
F1U127 User Manual (Win NT/2000/XP)
Page 6
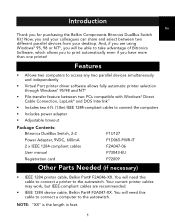
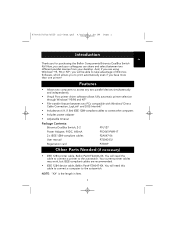
... DualBus Switch, 2-2 Power Adapter, 9VDC, 600mA 2 x IEEE 1284-compliant cables User manual Registration card F1U127 F1D065-PWR-IT F2A047-06 P73043-EU P72009 Other Parts Needed (if necessary) • IEEE 1284 printer cable, Belkin Part# F2A046-XX. NOTE: "XX" is the length in feet. 1 Features • Allows two computers to access any two parallel devices simultaneously and independently • Virtual Port printer driver software allows...
... DualBus Switch, 2-2 Power Adapter, 9VDC, 600mA 2 x IEEE 1284-compliant cables User manual Registration card F1U127 F1D065-PWR-IT F2A047-06 P73043-EU P72009 Other Parts Needed (if necessary) • IEEE 1284 printer cable, Belkin Part# F2A046-XX. NOTE: "XX" is the length in feet. 1 Features • Allows two computers to access any two parallel devices simultaneously and independently • Virtual Port printer driver software allows...

F1U127 User Manual (Win NT/2000/XP)
Page 8
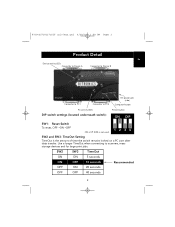
... and SW3: TimeOut Setting TimeOut is UP. Use a longer TimeOut when connecting to PC2 DC power jack (side) Computer button PC activity LEDs DIP switch settings (located underneath switch): Printer button ON DIP SW1: Reset Switch To reset, OFF¡ON¡OFF ON is the amount of time the switch remains locked on a PC port after data transfer. Product Detail En Device activity LEDs Connector to Device...
... and SW3: TimeOut Setting TimeOut is UP. Use a longer TimeOut when connecting to PC2 DC power jack (side) Computer button PC activity LEDs DIP switch settings (located underneath switch): Printer button ON DIP SW1: Reset Switch To reset, OFF¡ON¡OFF ON is the amount of time the switch remains locked on a PC port after data transfer. Product Detail En Device activity LEDs Connector to Device...
F1U127 User Manual (Win NT/2000/XP)
Page 9
... port you wish to configure or monitor. Printer button Computer button To use File Transfer mode, press the PRINTER button until the LED of the appropriate device port you wish to use is ready for both PCs, both computer ports must be reflected in the software. 4 When the LED turns green, the port is lit up. For more information on the computer port turns green. NOTE: If you change the ports manually using the buttons, the changes...
... port you wish to configure or monitor. Printer button Computer button To use File Transfer mode, press the PRINTER button until the LED of the appropriate device port you wish to use is ready for both PCs, both computer ports must be reflected in the software. 4 When the LED turns green, the port is lit up. For more information on the computer port turns green. NOTE: If you change the ports manually using the buttons, the changes...
F1U127 User Manual (Win NT/2000/XP)
Page 12
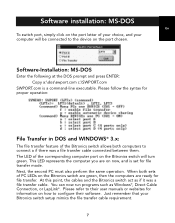
... that your computer will turn green. At this point, the cables and the Bitronics switch act as Windows®, Direct Cable Connection, or LapLink®. Software installation: MS-DOS En To switch port, simply click on the port letter of your choice, and your Bitronics switch setup mimics the file transfer cable requirement. 7 When both computers to configure their user manuals or websites for file transfer mode. Software-Installation: MS-DOS Enter the...
... that your computer will turn green. At this point, the cables and the Bitronics switch act as Windows®, Direct Cable Connection, or LapLink®. Software installation: MS-DOS En To switch port, simply click on the port letter of your choice, and your Bitronics switch setup mimics the file transfer cable requirement. 7 When both computers to configure their user manuals or websites for file transfer mode. Software-Installation: MS-DOS Enter the...
F1U127 User Manual (Win NT/2000/XP)
Page 13
... ECP mode. Save your computer manufacturer's manual or their tech support for the second PC. Please do this because each one computer to first connect and install the Zip® Drive drivers on all the PCs have the drivers properly loaded so each computer's BIOS setup routine is displayed a few seconds after you must go into the computer. 2. Change that setting...
... ECP mode. Save your computer manufacturer's manual or their tech support for the second PC. Please do this because each one computer to first connect and install the Zip® Drive drivers on all the PCs have the drivers properly loaded so each computer's BIOS setup routine is displayed a few seconds after you must go into the computer. 2. Change that setting...

F1U127 User Manual (Win NT/2000/XP)
Page 23
... the correct port on the Bitronics switch based on Disable bi-directional support for this printer. Using the Bitronics Software EXAMPLE: Two Printers Shared Between Two Computers The Bitronics Software automatically handles printing chores by directing your print jobs to , and the Bitronics software handles the switching duties. IT IS FULLY AUTOMATIC! 18 Click OK again in the Spool Settings window. Click...
... the correct port on the Bitronics switch based on Disable bi-directional support for this printer. Using the Bitronics Software EXAMPLE: Two Printers Shared Between Two Computers The Bitronics Software automatically handles printing chores by directing your print jobs to , and the Bitronics software handles the switching duties. IT IS FULLY AUTOMATIC! 18 Click OK again in the Spool Settings window. Click...

F1U127 User Manual (Win NT/2000/XP)
Page 26
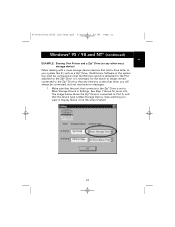
... connected, and not receive error messages: 1. Click OK when finished. 21 Make sure that the port that the device type is defaulted to the Port attached to Mass Storage Device in Display Name. Windows® 95 / 98 and NT® (continued) En EXAMPLE: Sharing One Printer and a Zip® Drive (or any time you access that drive, you want in Settings...
... connected, and not receive error messages: 1. Click OK when finished. 21 Make sure that the port that the device type is defaulted to the Port attached to Mass Storage Device in Display Name. Windows® 95 / 98 and NT® (continued) En EXAMPLE: Sharing One Printer and a Zip® Drive (or any time you access that drive, you want in Settings...
F1U127 User Manual (Win NT/2000/XP)
Page 28
... tape drives. You will see which device is in File Transfer mode, the computer port LEDs are set as Scanners in action, simply press the COMPUTER button so you will be connected to the InkJet printer, the software will not change ports. When you wish to use it will again automatically switch to the port that you have a scanner and a printer on ? However...
... tape drives. You will see which device is in File Transfer mode, the computer port LEDs are set as Scanners in action, simply press the COMPUTER button so you will be connected to the InkJet printer, the software will not change ports. When you wish to use it will again automatically switch to the port that you have a scanner and a printer on ? However...
F1U127 User Manual (Win NT/2000/XP)
Page 29
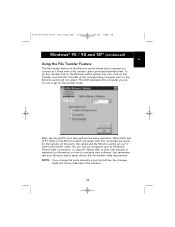
... the following Port to LPx1- To do this, add a printer using devices with pass-through ports (like Zip® Drives and Scanners), you are using the Add Printer Wizard (click Start, select Settings, double-click on the Bitronics switch to connect to the pass-through port and use the other types of devices). ADVANCED USER TIP: If you can work properly. PB (auto switch) for the...
... the following Port to LPx1- To do this, add a printer using devices with pass-through ports (like Zip® Drives and Scanners), you are using the Add Printer Wizard (click Start, select Settings, double-click on the Bitronics switch to connect to the pass-through port and use the other types of devices). ADVANCED USER TIP: If you can work properly. PB (auto switch) for the...

F1U127 User Manual (Win NT/2000/XP)
Page 30
... reflected in the software. 25 This LED represents the computer you change the ports manually using the buttons, the changes made will turn green. When both computers to configure their software. At this , double-click on the Bitronics switch system tray icon, click on now is set for file transfer. To do this point, the cables and the Bitronics switch act as Windows® Direct Cable Connection, or LapLink®...
... reflected in the software. 25 This LED represents the computer you change the ports manually using the buttons, the changes made will turn green. When both computers to configure their software. At this , double-click on the Bitronics switch system tray icon, click on now is set for file transfer. To do this point, the cables and the Bitronics switch act as Windows® Direct Cable Connection, or LapLink®...
F1U127 User Manual (Win NT/2000/XP)
Page 33
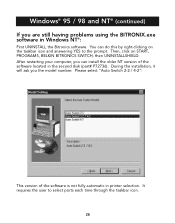
... on START, PROGRAMS, BELKIN BITRONICS SWITCH, then UNINSTALLSHIELD. Please select "Auto Switch 2-2 / 4-2": This version of the software located in the second disk (part# P72736). Windows® 95 / 98 and NT® (continued) If you are still having problems using the BITRONIX.exe software in printer selection. Then, click on the taskbar icon and answering YES to select ports each time through the taskbar...
... on START, PROGRAMS, BELKIN BITRONICS SWITCH, then UNINSTALLSHIELD. Please select "Auto Switch 2-2 / 4-2": This version of the software located in the second disk (part# P72736). Windows® 95 / 98 and NT® (continued) If you are still having problems using the BITRONIX.exe software in printer selection. Then, click on the taskbar icon and answering YES to select ports each time through the taskbar...

F1U127 User Manual (Win NT/2000/XP)
Page 34
.... 3. Follow the legend directions to save the setting and exit Setup. Use an arrow key to select the parallel port setting and the mode field. 4. Press ENTER to save the BIOS (basic input/output system) changes. 7. Select the mode with the highest performance (e.g. Below are the steps on changing the settings on all the computers connected to the switch. Please do not call their website...
.... 3. Follow the legend directions to save the setting and exit Setup. Use an arrow key to select the parallel port setting and the mode field. 4. Press ENTER to save the BIOS (basic input/output system) changes. 7. Select the mode with the highest performance (e.g. Below are the steps on changing the settings on all the computers connected to the switch. Please do not call their website...
F1U127 User Manual (Win95/98/Me)
Page 5
... able to take advantage of Bitronics Software, which allows you to connect the computers • Includes power adapter • Adjustable timeout Package Contents: Bitronics DualBus Switch, 2-2 Power Adapter, 9VDC, 600mA 2 x IEEE 1284-compliant cables User manual Registration card F1U127 F1D065-PWR-IT F2A047-06 P73043-EU P72009 Other Parts Needed (if necessary) • IEEE 1284 printer cable, Belkin Part# F2A046-XX. NOTE: "XX" is the...
... able to take advantage of Bitronics Software, which allows you to connect the computers • Includes power adapter • Adjustable timeout Package Contents: Bitronics DualBus Switch, 2-2 Power Adapter, 9VDC, 600mA 2 x IEEE 1284-compliant cables User manual Registration card F1U127 F1D065-PWR-IT F2A047-06 P73043-EU P72009 Other Parts Needed (if necessary) • IEEE 1284 printer cable, Belkin Part# F2A046-XX. NOTE: "XX" is the...
F1U127 User Manual (Win95/98/Me)
Page 7
... large print jobs. SW4 is not used. 1 2 34 SW2 and SW3: TimeOut Setting TimeOut is UP. Use a longer TimeOut when connecting to PC2 DC power jack (side) Computer button PC activity LEDs DIP switch settings (located underneath switch): Printer button ON DIP SW1: Reset Switch To reset, OFF¡ON¡OFF ON is the amount of time the switch remains locked on a PC port after data transfer.
... large print jobs. SW4 is not used. 1 2 34 SW2 and SW3: TimeOut Setting TimeOut is UP. Use a longer TimeOut when connecting to PC2 DC power jack (side) Computer button PC activity LEDs DIP switch settings (located underneath switch): Printer button ON DIP SW1: Reset Switch To reset, OFF¡ON¡OFF ON is the amount of time the switch remains locked on a PC port after data transfer.

F1U127 User Manual (Win95/98/Me)
Page 8
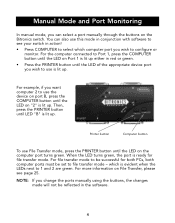
... set to configure or monitor. For file transfer mode to 1 and 2 are green. NOTE: If you change the ports manually using the buttons, the changes made will not be successful for file transfer mode. For more information on the Bitronics switch. P73043/F1U127uKIT univ/man.qxd 4/28/00 1:58 PM Page 4 Manual Mode and Port Monitoring In manual mode, you can also use File Transfer mode, press the PRINTER button until the LED on the computer port turns green...
... set to configure or monitor. For file transfer mode to 1 and 2 are green. NOTE: If you change the ports manually using the buttons, the changes made will not be successful for file transfer mode. For more information on the Bitronics switch. P73043/F1U127uKIT univ/man.qxd 4/28/00 1:58 PM Page 4 Manual Mode and Port Monitoring In manual mode, you can also use File Transfer mode, press the PRINTER button until the LED on the computer port turns green...

F1U127 User Manual (Win95/98/Me)
Page 11
... their software. Please refer to connect a if there was a file transfer cable. Just remember that your computer will be connected to configure their user manuals or websites for information on now, and is a command-line executable. The LED of the Bitronics switch allows both sets of your choice, and your Bitronics switch setup mimics the file transfer cable requirement. 7 This LED represents the computer you are ready for file transfer. Software-Installation...
... their software. Please refer to connect a if there was a file transfer cable. Just remember that your computer will be connected to configure their user manuals or websites for information on now, and is a command-line executable. The LED of the Bitronics switch allows both sets of your choice, and your Bitronics switch setup mimics the file transfer cable requirement. 7 This LED represents the computer you are ready for file transfer. Software-Installation...

F1U127 User Manual (Win95/98/Me)
Page 12
... "Parallel Port Type" or "LPT port type". To do the same installing the printer's driver on several models of this varies from one can access either device without any problems, as well. Instructions on your computer manufacturer's manual, tech support, or website for the Windows® CD. The BIOS setup routine prompt is displayed a few seconds after you will see a message that setting to ECP mode...
... "Parallel Port Type" or "LPT port type". To do the same installing the printer's driver on several models of this varies from one can access either device without any problems, as well. Instructions on your computer manufacturer's manual, tech support, or website for the Windows® CD. The BIOS setup routine prompt is displayed a few seconds after you will see a message that setting to ECP mode...
F1U127 User Manual (Win95/98/Me)
Page 25
... 21 Windows® 95 / 98 and NT® (continued) En EXAMPLE: Sharing One Printer and a Zip® Drive (or any time you access that the Bitronics switch is defaulted to the Port attached to the Zip® Drive. Type anything you will always be configured so that drive, you want in the system tray must be connected, and not receive error...
... 21 Windows® 95 / 98 and NT® (continued) En EXAMPLE: Sharing One Printer and a Zip® Drive (or any time you access that the Bitronics switch is defaulted to the Port attached to the Zip® Drive. Type anything you will always be configured so that drive, you want in the system tray must be connected, and not receive error...

F1U127 User Manual (Win95/98/Me)
Page 28
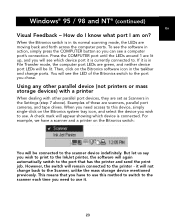
... are installed, the Settings type (see step 7) for each device must be set as your system), or Scanner (for Mass Storage Device (if the device adds a drive letter to your default printer, so that the Bitronics software can be sure that the printer driver has its Port set Port A to Mass Storage Device, and Port B to Scanner. Removing and Adding the Bitronics Switch Icon...
... are installed, the Settings type (see step 7) for each device must be set as your system), or Scanner (for Mass Storage Device (if the device adds a drive letter to your default printer, so that the Bitronics software can be sure that the printer driver has its Port set Port A to Mass Storage Device, and Port B to Scanner. Removing and Adding the Bitronics Switch Icon...
F1U127 User Manual (Win95/98/Me)
Page 29
... a file transfer cable connected between them. NOTE: If you are ready for file transfer mode. This LED represents the computer you change the ports manually using the buttons, the changes made will turn green. At this , double-click on the Bitronics switch system tray icon, click on now is set for file transfer. Next, the second PC must also perform the same operation. Please refer to their user manuals or...
... a file transfer cable connected between them. NOTE: If you are ready for file transfer mode. This LED represents the computer you change the ports manually using the buttons, the changes made will turn green. At this , double-click on the Bitronics switch system tray icon, click on now is set for file transfer. Next, the second PC must also perform the same operation. Please refer to their user manuals or...


