Owner's Manual
Page 6
Table of Contents Quick Overview Installation • Power Connection • Mounting Location • Windshield /Visor Mounting Controls and Features • Power up Test Sequence/ Operating Mode 4-5 6-7 6 6 7 8-11 8 Programming • Which Selectable Features Can I Program? • How to Program • Selectable Features ...
Table of Contents Quick Overview Installation • Power Connection • Mounting Location • Windshield /Visor Mounting Controls and Features • Power up Test Sequence/ Operating Mode 4-5 6-7 6 6 7 8-11 8 Programming • Which Selectable Features Can I Program? • How to Program • Selectable Features ...

Owner's Manual
Page 7
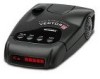
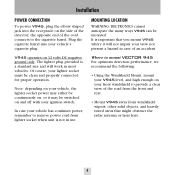
... cover on top of the detector to i POWER JACK Plug the Cord into this portion into your vehicles lighter socket. 2 Mount V945 on the windshield using your VECTOR 945, just follow these simple steps 1 Plug the angled end of the detector. Press and hold the PWR button to adjust the volume. ...Quick Overview To begin using the supplied windshield mount. 3 Press the PWR button, located top left, to turn V945 on or off. plug ...
... cover on top of the detector to i POWER JACK Plug the Cord into this portion into your vehicles lighter socket. 2 Mount V945 on the windshield using your VECTOR 945, just follow these simple steps 1 Plug the angled end of the detector. Press and hold the PWR button to adjust the volume. ...Quick Overview To begin using the supplied windshield mount. 3 Press the PWR button, located top left, to turn V945 on or off. plug ...

Owner's Manual
Page 8
.../VOLUME CONTROL Press and hold to silence the audio for a specific alert. For best performance, do not mount the V945 directly behind the vehicle. WINDSHIELD/VISOR MOUNT Remove cover on indication. Page 24 Note: In the Dark Mode the display will show Safety Radar Category messages. ...Page 9 The display will indicate radar band, and a precise bar graph of the detector to insert windshield or visor mount into this button (above the display) to adjust the volume level. Briefly press this slot. Page 6 ALPHANUMERIC TEXT DISPLAY...
.../VOLUME CONTROL Press and hold to silence the audio for a specific alert. For best performance, do not mount the V945 directly behind the vehicle. WINDSHIELD/VISOR MOUNT Remove cover on indication. Page 24 Note: In the Dark Mode the display will show Safety Radar Category messages. ...Page 9 The display will indicate radar band, and a precise bar graph of the detector to insert windshield or visor mount into this button (above the display) to adjust the volume level. Briefly press this slot. Page 6 ALPHANUMERIC TEXT DISPLAY...
Owner's Manual
Page 9
... an accident. Plug the cigarette barrel into the receptacle on 12 volts DC negative ground only. Where to mount VECTOR 945 For optimum detection performance, we recommend the following: • Using the Windshield Mount, mount your V945 level, and high enough on and off with your lighter socket must be...jack into your front windshield to provide a clear view of the road from the front and rear. • Mount V945 away from lighter socket when unit is not in use. In case your view nor present a hazard in most vehicles. MOUNTING LOCATION WARNING: BELTRONICS cannot anticipate the ...
... an accident. Plug the cigarette barrel into the receptacle on 12 volts DC negative ground only. Where to mount VECTOR 945 For optimum detection performance, we recommend the following: • Using the Windshield Mount, mount your V945 level, and high enough on and off with your lighter socket must be...jack into your front windshield to provide a clear view of the road from the front and rear. • Mount V945 away from lighter socket when unit is not in use. In case your view nor present a hazard in most vehicles. MOUNTING LOCATION WARNING: BELTRONICS cannot anticipate the ...

Owner's Manual
Page 10
... detector onto base plate unit, it in place. 3 Use a screw driver or a small coin to adjust the angle of the suction-cup mount until is equipped with this type of windshield can permanently mark the surface. Installation WINDSHIELD MOUNTING 1 Remove the mounting bracket cover on top of the unit by pressing on this type of...
... detector onto base plate unit, it in place. 3 Use a screw driver or a small coin to adjust the angle of the suction-cup mount until is equipped with this type of windshield can permanently mark the surface. Installation WINDSHIELD MOUNTING 1 Remove the mounting bracket cover on top of the unit by pressing on this type of...


