
User Manual
Page 2
... product supports PRINT Image Matching. BenQ makes no warranty of merchantability and fitness for any error that is directly under the sun. Combination of using PRINT Image Matching and PRINT Image Matching II enabled digital still cameras, printers and software help photographers to , the implied warranties of any kind with your fingers. • To prevent electrical shock, do not attempt to avoid losing your camera, please tum the power...
... product supports PRINT Image Matching. BenQ makes no warranty of merchantability and fitness for any error that is directly under the sun. Combination of using PRINT Image Matching and PRINT Image Matching II enabled digital still cameras, printers and software help photographers to , the implied warranties of any kind with your fingers. • To prevent electrical shock, do not attempt to avoid losing your camera, please tum the power...

User Manual
Page 3
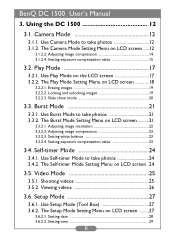
...Selecting flash mode 10 2.7.3. Setting the macro mode 10 I Front View 1 1.2.2. To take photos using the viewfinder 6 2.6.2. Turning off the power 5 2.5.1. To set the LCD monitor icon display mode off 9 2.7.1.4. Power Save Mode 5 2.5.3. Preparing your DC 1500 1 1.1. Forced Shut Down Mode 6 2.6. Function Keys for using 3 2.1. Turning on 8 2.7.1.3. Turning off the power 5 2.5.2. Charging built-in lithium batteries 3 2.2. Installing memory card 4 2.4. Setting LCD monitor icon display mode 8 2.7.1.1. To set the LCD monitor icon display mode...
...Selecting flash mode 10 2.7.3. Setting the macro mode 10 I Front View 1 1.2.2. To take photos using the viewfinder 6 2.6.2. Turning off the power 5 2.5.1. To set the LCD monitor icon display mode off 9 2.7.1.4. Power Save Mode 5 2.5.3. Preparing your DC 1500 1 1.1. Forced Shut Down Mode 6 2.6. Function Keys for using 3 2.1. Turning on 8 2.7.1.3. Turning off the power 5 2.5.2. Charging built-in lithium batteries 3 2.2. Installing memory card 4 2.4. Setting LCD monitor icon display mode 8 2.7.1.1. To set the LCD monitor icon display mode...
User Manual
Page 4
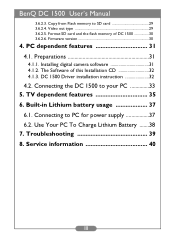
... Adjusting image compression 23 3.3.2.3. Shooting videos 25 3.5.2. The Setup Mode Setting Menu on the LCD screen 17 3.2.2. BenQ DC 1500 User's Manual 3. Use Camera Mode to take photos 24 3.4.2. Use Play Mode on LCD screen ........27 3.6.2.1. Setting white balance 23 3.3.2.4. Setup Mode 27 3.6.1. The Burst Mode Setting Menu on LCD screen .24 3.5. Setting date 28 3.6.2.2. Setting exposure compensation value 15 3.2. Setting exposure compensation value 23 3.4. The Self-timer Mode Setting Menu on LCD screen .........21 3.3.2.1. Video Mode 25 3.5.1. Use Setup...
... Adjusting image compression 23 3.3.2.3. Shooting videos 25 3.5.2. The Setup Mode Setting Menu on the LCD screen 17 3.2.2. BenQ DC 1500 User's Manual 3. Use Camera Mode to take photos 24 3.4.2. Use Play Mode on LCD screen ........27 3.6.2.1. Setting white balance 23 3.3.2.4. Setup Mode 27 3.6.1. The Burst Mode Setting Menu on LCD screen .24 3.5. Setting date 28 3.6.2.2. Setting exposure compensation value 15 3.2. Setting exposure compensation value 23 3.4. The Self-timer Mode Setting Menu on LCD screen .........21 3.3.2.1. Video Mode 25 3.5.1. Use Setup...
User Manual
Page 5
... Lithium battery usage 37 6.1. Firmware version 30 4. Connecting to SD card 29 3.6.2.4. Use Your PC To Charge Lithium Battery .......38 7. DC 1500 Driver installation instruction 32 4.2. TV dependent features 35 6. Video out type 29 3.6.2.5. PC dependent features 31 4.1. The Software of DC 1500 30 3.6.2.6. Format SD card and the flash memory of this Installation CD 32 4.1.3. Installing digital camera software 31 4.1.2. Connecting the DC 1500 to your PC 33 5. BenQ DC 1500 User's Manual 3.6.2.3. Troubleshooting 39...
... Lithium battery usage 37 6.1. Firmware version 30 4. Connecting to SD card 29 3.6.2.4. Use Your PC To Charge Lithium Battery .......38 7. DC 1500 Driver installation instruction 32 4.2. TV dependent features 35 6. Video out type 29 3.6.2.5. PC dependent features 31 4.1. The Software of DC 1500 30 3.6.2.6. Format SD card and the flash memory of this Installation CD 32 4.1.3. Installing digital camera software 31 4.1.2. Connecting the DC 1500 to your PC 33 5. BenQ DC 1500 User's Manual 3.6.2.3. Troubleshooting 39...
User Manual
Page 7
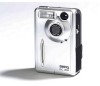
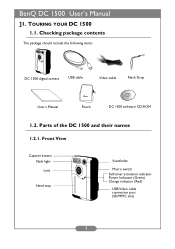
BenQ DC 1500 User's Manual ]1. Checking package contents The package should include the following items: DC 1500 digital camera USB cable Video cable Neck Strap User's Manual Pouch DC 1500 software CD-ROM 1.2. Front View Capture button Flash light Lens Hand stop Viewfinder Macro switch Self-timer activation indicator Power Indicator (Green) Charge indicator (Red) USB/Video cable connection port (SD/MMC slot) 1 TOURING YOUR DC 1500 1.1. Parts of the DC 1500 and their names 1.2.1.
BenQ DC 1500 User's Manual ]1. Checking package contents The package should include the following items: DC 1500 digital camera USB cable Video cable Neck Strap User's Manual Pouch DC 1500 software CD-ROM 1.2. Front View Capture button Flash light Lens Hand stop Viewfinder Macro switch Self-timer activation indicator Power Indicator (Green) Charge indicator (Red) USB/Video cable connection port (SD/MMC slot) 1 TOURING YOUR DC 1500 1.1. Parts of the DC 1500 and their names 1.2.1.
User Manual
Page 9
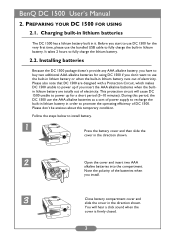
...-in the direction shown. Before you don't want to use the bundled USB cable to use DC 1500 for a short period (5~10 minutes). Please also note that DC 1500 are designed with a Protection Circuit, which makes DC 1500 unable to power up if you install. Follow the steps below to fully charge the lithium battery. 2.2. This protection circuit will hear a click sound when...
...-in the direction shown. Before you don't want to use the bundled USB cable to use DC 1500 for a short period (5~10 minutes). Please also note that DC 1500 are designed with a Protection Circuit, which makes DC 1500 unable to power up if you install. Follow the steps below to fully charge the lithium battery. 2.2. This protection circuit will hear a click sound when...
User Manual
Page 11
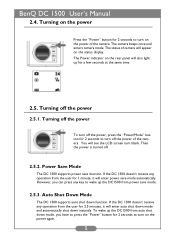
... camera. Power Save Mode The DC 1500 supports power save mode. 2.5.3. The Power indicator on the rear panel will enter power save mode automatically. Auto Shut Down Mode The DC 1500 supports auto shut down mode, you can press any operation from the user for 2 seconds to turn on the power Press the "Power" button for 2.5 minutes, it will also light up the DC1500 from the user for a few seconds at the same time. 2.5. You will see the LCD screen turn...
... camera. Power Save Mode The DC 1500 supports power save mode. 2.5.3. The Power indicator on the rear panel will enter power save mode automatically. Auto Shut Down Mode The DC 1500 supports auto shut down mode, you can press any operation from the user for 2 seconds to turn on the power Press the "Power" button for 2.5 minutes, it will also light up the DC1500 from the user for a few seconds at the same time. 2.5. You will see the LCD screen turn...
User Manual
Page 12
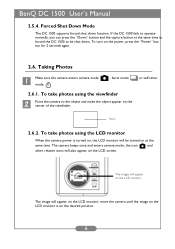
... User's Manual 2.5.4. Forced Shut Down Mode The DC 1500 supports forced shut down . focus 2.6.2. The images will be shut down function. To take photos using the viewfinder Point the camera to be turned on the power, press the "Power" button for 2 seconds again. 2.6. To turn on at the same time to forced the DC 1500 to the object and make the object appear on the LCD monitor. To take photos using the LCD...
... User's Manual 2.5.4. Forced Shut Down Mode The DC 1500 supports forced shut down . focus 2.6.2. The images will be shut down function. To take photos using the viewfinder Point the camera to be turned on the power, press the "Power" button for 2 seconds again. 2.6. To turn on at the same time to forced the DC 1500 to the object and make the object appear on the LCD monitor. To take photos using the LCD...
User Manual
Page 16
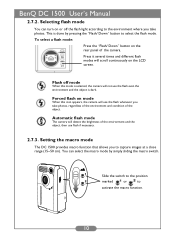
... of the environment and the object, then use the flash whenever you take photos, regardless of the environment and condition of the object. Press it several times and different flash modes will scroll continuously on mode When this mode is selected, the camera will detect the brightness of the camera. Forced flash on the LCD screen. BenQ DC 1500 User's Manual 2.7.2. Flash off the flash light according to activate the macro function. 10
... of the environment and the object, then use the flash whenever you take photos, regardless of the environment and condition of the object. Press it several times and different flash modes will scroll continuously on mode When this mode is selected, the camera will detect the brightness of the camera. Forced flash on the LCD screen. BenQ DC 1500 User's Manual 2.7.2. Flash off the flash light according to activate the macro function. 10
User Manual
Page 18
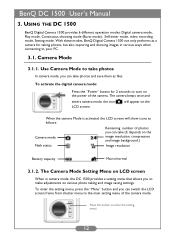
... mode), Self-timer mode, video recording mode, Setting mode. Use Camera Mode to take photos In camera mode, you can take (It depends on the When the camera Mode is activated, the LCD screen will appear on the image resolution, compression and image background.) Flash status Image resolution Battery capacity Macro/normal 3.1.2. will show icons as follows: Camera mode Remaining number of the camera. With these modes, BenQ Digital Camera 1500 not only performs as files. To activate the digital camera mode: Press the "Power" button for taking and image saving settings. BenQ...
... mode), Self-timer mode, video recording mode, Setting mode. Use Camera Mode to take photos In camera mode, you can take (It depends on the When the camera Mode is activated, the LCD screen will appear on the image resolution, compression and image background.) Flash status Image resolution Battery capacity Macro/normal 3.1.2. will show icons as follows: Camera mode Remaining number of the camera. With these modes, BenQ Digital Camera 1500 not only performs as files. To activate the digital camera mode: Press the "Power" button for taking and image saving settings. BenQ...
User Manual
Page 19
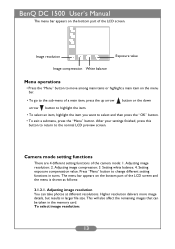
... take photos at different resolutions. To select image resolution: 13 Press "Menu" button to the normal LCD preview screen. Adjusting image resolution You can be taken in the memory card. Adjusting image resolution; 2. Adjusting image compression; 3. Image resolution Exposure value Image compresstion White balance Menu operations • Press the "Menu" button to move among main items or highlight a main item on the bottom part of the LCD screen. After your settings finished, press this button to return to change different setting functions...
... take photos at different resolutions. To select image resolution: 13 Press "Menu" button to the normal LCD preview screen. Adjusting image resolution You can be taken in the memory card. Adjusting image resolution; 2. Adjusting image compression; 3. Image resolution Exposure value Image compresstion White balance Menu operations • Press the "Menu" button to move among main items or highlight a main item on the bottom part of the LCD screen. After your settings finished, press this button to return to change different setting functions...
User Manual
Page 21
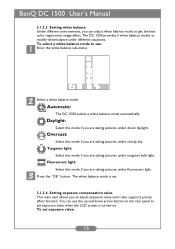
... adjust white balance mode to set exposure value when the LCD screen is set exposure value: 15 To set . 3.1.2.4. Fluorescent light: Select this mode if you can use : Enter the white balance sub-menu. Press the "OK" button. BenQ DC 1500 User's Manual 3.1.2.3. Setting white balance Under different environments, you are taking pictures under fluorescent light. The DC 1500 provides 5 white balance modes to adjust exposure value and it also supports promp effect function. To select a white balance mode to use the up and down arrow button on . Select a white balance mode...
... adjust white balance mode to set exposure value when the LCD screen is set exposure value: 15 To set . 3.1.2.4. Fluorescent light: Select this mode if you can use : Enter the white balance sub-menu. Press the "OK" button. BenQ DC 1500 User's Manual 3.1.2.3. Setting white balance Under different environments, you are taking pictures under fluorescent light. The DC 1500 provides 5 white balance modes to adjust exposure value and it also supports promp effect function. To select a white balance mode to use the up and down arrow button on . Select a white balance mode...
User Manual
Page 23
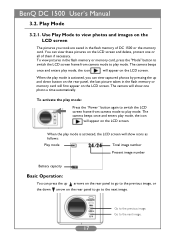
... the memory card. When the play mode is activated, you took are saved in the flash memory or memory card will show icons as follows: Play mode Total image number Present image number Battery capacity Basic Operation: You can view these pictures on the LCD screen. The camera will first appear on the LCD screen and delete, protect one photo a time automatically. Go to the next image. 17 To activate the play mode: Press the "Power" button again to switch the LCD screen frame from camera mode to play mode, the icon...
... the memory card. When the play mode is activated, you took are saved in the flash memory or memory card will show icons as follows: Play mode Total image number Present image number Battery capacity Basic Operation: You can view these pictures on the LCD screen. The camera will first appear on the LCD screen and delete, protect one photo a time automatically. Go to the next image. 17 To activate the play mode: Press the "Power" button again to switch the LCD screen frame from camera mode to play mode, the icon...

User Manual
Page 25
... LCD screen and the menu is locked. 19 in the submenu and After entering the image lock submenu, highlight the icon press "OK" button. Lock image; 3. Erasing images To erase image(s) in the memory card: Select item and the image erase modes will appear. Then press the "OK" button to set the image erase mode. The current image is shown as below: : erase current image. :erase all images in the memory card. 3.2.2.2. To lock images: Select item and the image lock modes will appear. Erase image; 2. I. BenQ DC 1500 User's Manual Play mode setting functions...
... LCD screen and the menu is locked. 19 in the submenu and After entering the image lock submenu, highlight the icon press "OK" button. Lock image; 3. Erasing images To erase image(s) in the memory card: Select item and the image erase modes will appear. Then press the "OK" button to set the image erase mode. The current image is shown as below: : erase current image. :erase all images in the memory card. 3.2.2.2. To lock images: Select item and the image lock modes will appear. Erase image; 2. I. BenQ DC 1500 User's Manual Play mode setting functions...

User Manual
Page 28
... 1500 User's Manual The menu bar appears on the bottom part of the LCD screen and the menu is shown as follows: 3.3.2.1. Setting exposure compensation value. Press "Menu" button to change different setting functions in larger file size. The menu bar appears on the menu bar. • To go to select and then press the "Mode/OK" button. • To exit a submenu, press the "Menu" button. This will also affect the remaining images...
... 1500 User's Manual The menu bar appears on the bottom part of the LCD screen and the menu is shown as follows: 3.3.2.1. Setting exposure compensation value. Press "Menu" button to change different setting functions in larger file size. The menu bar appears on the menu bar. • To go to select and then press the "Mode/OK" button. • To exit a submenu, press the "Menu" button. This will also affect the remaining images...

User Manual
Page 30
... "Mode" button again to switch the LCD screen frame from burst mode to "3.1.2. After10 seconds, the camera will take photos If the self-timer mode is the same as follows: Self-timer mode Remaining number of this menu. 24 The self-timer activation indicator on the image resolution, compression and image background.) Flash status Image resolution Battery capacity Macro/normal Press the capture button and the camera will blinks simultaneously. When the self-timer mode is activated, the LCD screen will show icons as the camera mode setting menu...
... "Mode" button again to switch the LCD screen frame from burst mode to "3.1.2. After10 seconds, the camera will take photos If the self-timer mode is the same as follows: Self-timer mode Remaining number of this menu. 24 The self-timer activation indicator on the image resolution, compression and image background.) Flash status Image resolution Battery capacity Macro/normal Press the capture button and the camera will blinks simultaneously. When the self-timer mode is activated, the LCD screen will show icons as the camera mode setting menu...

User Manual
Page 31
... displayed on flashing while the video is being shot and the recording time will keep on the LCD screen. The image resolution of the viewfinder or the LCD screen. Shooting videos Point the camera to shoot and make the object appear on the LCD screen. It is activated, the LCD screen will appear on the center of Video mode is activated, you want to the object you can shoot Battery capacity Macro/normal 3.5.1. The icon flashes while shooting videos...
... displayed on flashing while the video is being shot and the recording time will keep on the LCD screen. The image resolution of the viewfinder or the LCD screen. Shooting videos Point the camera to shoot and make the object appear on the LCD screen. It is activated, the LCD screen will appear on the center of Video mode is activated, you want to the object you can shoot Battery capacity Macro/normal 3.5.1. The icon flashes while shooting videos...

User Manual
Page 32
... view these videos, press the "Mode" button to switch the LCD screen frame from video mode to the next image (video). Go to play mode. Go to play mode. Select the video which you stop playing videos. While playing the video, the icon on the LCD screen will keep on flashing and the recording time will also be saved in the flash memory of DC 1500 or your videos, press the capture button again. The camera beeps and enters play mode, the icon and the icon...
... view these videos, press the "Mode" button to switch the LCD screen frame from video mode to the next image (video). Go to play mode. Go to play mode. Select the video which you stop playing videos. While playing the video, the icon on the LCD screen will keep on flashing and the recording time will also be saved in the flash memory of DC 1500 or your videos, press the capture button again. The camera beeps and enters play mode, the icon and the icon...

User Manual
Page 34
... panel to select the right number and press the "OK" button to select and then press the "OK" button. • To exit a submenu, press the "Menu" button. Time setting; 3. Video out type; 5. The menu bar appears on the bottom part of the setup mode: 1. BenQ DC 1500 User's Manual The menu bar appears on the bottom part of the LCD screen. 2002/08/22 Date setting Time setting Save from Flash memory to the normal LCD preview screen.
... panel to select the right number and press the "OK" button to select and then press the "OK" button. • To exit a submenu, press the "Menu" button. Time setting; 3. Video out type; 5. The menu bar appears on the bottom part of the setup mode: 1. BenQ DC 1500 User's Manual The menu bar appears on the bottom part of the LCD screen. 2002/08/22 Date setting Time setting Save from Flash memory to the normal LCD preview screen.
User Manual
Page 38
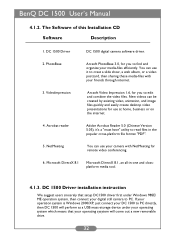
... under Windows 98SE/ ME operation system, then connect your digital still camara to find and organize your operating sysytem will come out a new removable drive. 32 VideoImpression Arcsoft Video Impression 1.6, for you to PC. Microsoft DirectX 8.1 Microsoft DirectX 8.1, an all-in the popular cross-platform file format "PDF". 5. DC 1500 Driver DC 1500 digital camera software driver. 2. NetMeeting You can be created by existing video, animation, and image files,quickly...
... under Windows 98SE/ ME operation system, then connect your digital still camara to find and organize your operating sysytem will come out a new removable drive. 32 VideoImpression Arcsoft Video Impression 1.6, for you to PC. Microsoft DirectX 8.1 Microsoft DirectX 8.1, an all-in the popular cross-platform file format "PDF". 5. DC 1500 Driver DC 1500 digital camera software driver. 2. NetMeeting You can be created by existing video, animation, and image files,quickly...


