
EP5920 User Manual
Page 6
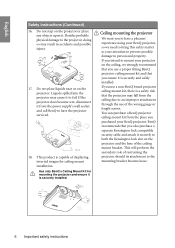
... of displaying inverted images for mounting the projector and ensure it . BenQ recommends that you purchased your attention to prevent possible damage to the mounting bracket become wet, disconnect it from the power supply's wall socket and call BenQ to an improper attachment through the use a non-BenQ brand projector ceiling mount kit, there is a safety risk that you use of the ceiling mount bracket. English Safety Instructions (Continued...
... of displaying inverted images for mounting the projector and ensure it . BenQ recommends that you purchased your attention to prevent possible damage to the mounting bracket become wet, disconnect it from the power supply's wall socket and call BenQ to an improper attachment through the use a non-BenQ brand projector ceiling mount kit, there is a safety risk that you use of the ceiling mount bracket. English Safety Instructions (Continued...
EP5920 User Manual
Page 7
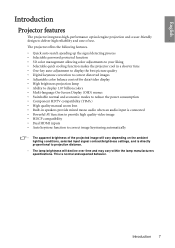
... the signal detecting process • Selectable password protected function • 3D color management allowing color adjustments to your liking • Selectable quick cooling function makes the projector cool in a shorter time • One-key auto-adjustment to display the best picture quality • Digital keystone correction to correct distorted images • Adjustable color balance control for data/video display • High brightness projection lamp • Ability to display 1.07 billion colors • Multi-language On-Screen Display...
... the signal detecting process • Selectable password protected function • 3D color management allowing color adjustments to your liking • Selectable quick cooling function makes the projector cool in a shorter time • One-key auto-adjustment to display the best picture quality • Digital keystone correction to correct distorted images • Adjustable color balance control for data/video display • High brightness projection lamp • Ability to display 1.07 billion colors • Multi-language On-Screen Display...

EP5920 User Manual
Page 10
... flashes when the projector is activated, the #4, #8 and #11 keys See "Using the menus" on page 30 for are used as directional arrows to select the details. Used to hide the screen picture. timings for 12 details. 13 9. POWER indicator light "Auto-adjusting the image" on page 26 for Lights up 6 8 or flashes when the lamp has developed a problem. MENU/EXIT Increases volume. See "Adjusting the Turns on the On-Screen Display (OSD) sound...
... flashes when the projector is activated, the #4, #8 and #11 keys See "Using the menus" on page 30 for are used as directional arrows to select the details. Used to hide the screen picture. timings for 12 details. 13 9. POWER indicator light "Auto-adjusting the image" on page 26 for Lights up 6 8 or flashes when the lamp has developed a problem. MENU/EXIT Increases volume. See "Adjusting the Turns on the On-Screen Display (OSD) sound...
EP5920 User Manual
Page 11
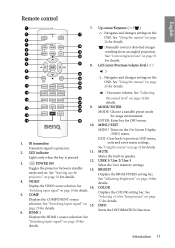
... level ( / ) : Navigates and changes settings in speaker. LED indicator 11. POWER ON Toggles the projector between standby 13. See "Switching input signal" on page 31 for details. See "Correcting keystone" on page 29 for details. See "Adjusting the sound level" on page 29 for details. MUTE Mutes the built-in the OSD. "Switching input signal" on page 42 for details. 5. HDMI 1 Displays the HDMI 1 source selection. See "Using the menus" on...
... level ( / ) : Navigates and changes settings in speaker. LED indicator 11. POWER ON Toggles the projector between standby 13. See "Switching input signal" on page 31 for details. See "Correcting keystone" on page 29 for details. See "Adjusting the sound level" on page 29 for details. MUTE Mutes the built-in the OSD. "Switching input signal" on page 42 for details. 5. HDMI 1 Displays the HDMI 1 source selection. See "Using the menus" on...
EP5920 User Manual
Page 12
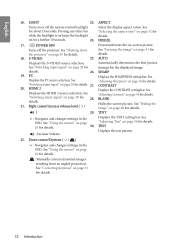
... the remote control backlight for details. : Manually corrects distorted images resulting from an angled projection. AUTO Displays the S-VIDEO source selection. Automatically determines the best picture See "Switching input signal" on page 29 for timings for details. Right cursor/Increase volume level ( / Hides the screen picture. TINT : Navigates and changes settings in the OSD. LIGHT 23. See "Selecting the aspect ratio" on page 26 for details. ) 29. S-VIDEO 25. PC Displays...
... the remote control backlight for details. : Manually corrects distorted images resulting from an angled projection. AUTO Displays the S-VIDEO source selection. Automatically determines the best picture See "Switching input signal" on page 29 for timings for details. Right cursor/Increase volume level ( / Hides the screen picture. TINT : Navigates and changes settings in the OSD. LIGHT 23. See "Selecting the aspect ratio" on page 26 for details. ) 29. S-VIDEO 25. PC Displays...

EP5920 User Manual
Page 15
... preference will dictate which installation location you turn the projector on. *To set the projector position: 1. Press MENU/EXIT on the projector or remote control and then press / until the correct position is highlighted. 2. Rear Table Select this location with the projector placed on the ceiling. SYSTEM SETUP: Basic Language Projector Position Menu Settings Operation Settings Remote Receiver Background Color Splash Screen English Front Table Front+Top Blue BenQ PC Menu/Back Exit Positioning your...
... preference will dictate which installation location you turn the projector on. *To set the projector position: 1. Press MENU/EXIT on the projector or remote control and then press / until the correct position is highlighted. 2. Rear Table Select this location with the projector placed on the ceiling. SYSTEM SETUP: Basic Language Projector Position Menu Settings Operation Settings Remote Receiver Background Color Splash Screen English Front Table Front+Top Blue BenQ PC Menu/Back Exit Positioning your...
EP5920 User Manual
Page 19
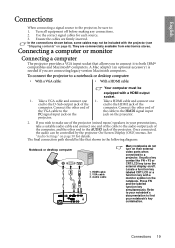
... "Audio Settings" on page 8). English Connections When connecting a signal source to the projector, be controlled by the projector On-Screen Display (OSD) menus. Turn all equipment off . Use the correct signal cables for details. HDMI cable 2. In the connections shown below, some cables may not be equipped with a HDMI output socket. 1. Connections 19 Connect the other end of the computer. To connect the projector to a notebook or desktop computer: • With a VGA cable: • With a HDMI cable: Your...
... "Audio Settings" on page 8). English Connections When connecting a signal source to the projector, be controlled by the projector On-Screen Display (OSD) menus. Turn all equipment off . Use the correct signal cables for details. HDMI cable 2. In the connections shown below, some cables may not be equipped with a HDMI output socket. 1. Connections 19 Connect the other end of the computer. To connect the projector to a notebook or desktop computer: • With a VGA cable: • With a HDMI cable: Your...
EP5920 User Manual
Page 24
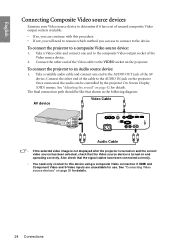
... be controlled by the projector On-Screen Display (OSD) menus. Connect the other end of the cable to the AUDIO IN jack on the projector. To connect the projector to a composite Video source device: 1. See "Adjusting the sound" on and operating correctly. Take a suitable audio cable and connect one end to the composite Video output socket of the Video source device. 2. Also check that the Video source device is turned on and the correct video source has...
... be controlled by the projector On-Screen Display (OSD) menus. Connect the other end of the cable to the AUDIO IN jack on the projector. To connect the projector to a composite Video source device: 1. See "Adjusting the sound" on and operating correctly. Take a suitable audio cable and connect one end to the composite Video output socket of the Video source device. 2. Also check that the Video source device is turned on and the correct video source has...
EP5920 User Manual
Page 25
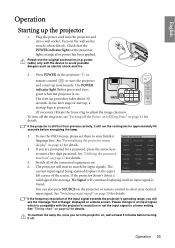
... to adjust the image clearness. If the frequency/resolution of the input signal exceeds the projector's operating range, you turn off the ring tone, see the message 'Out of start to enter a five digit password. The POWER indicator light flashes green and stays green when the projector is on page 43 for details. The start up the projector 1. If the projector is projected. (If necessary) Rotate the focus ring to leave left corner of the connected...
... to adjust the image clearness. If the frequency/resolution of the input signal exceeds the projector's operating range, you turn off the ring tone, see the message 'Out of start to enter a five digit password. The POWER indicator light flashes green and stays green when the projector is on page 43 for details. The start up the projector 1. If the projector is projected. (If necessary) Rotate the focus ring to leave left corner of the connected...

EP5920 User Manual
Page 26
...-Screen Display (OSD) menus for details. Press to highlight Language and remote control to select a preferred language. press MODE/ENTER to turn the OSD menu on the left side of key(s) and a lock. PTCTURE : Basic Picture Mode Reference Mode Brightness 50 Contrast 0 Color 0 Tint 0 Sharpness 0 Flesh Tone 0 Save Settings Reset Picture Settings User 1 Living Room SYSTEM SETUP: Basic Language Projector Position Menu Settings Operation Settings Remote Receiver Background Color Splash Screen English Front Table Front+Top Blue BenQ...
...-Screen Display (OSD) menus for details. Press to highlight Language and remote control to select a preferred language. press MODE/ENTER to turn the OSD menu on the left side of key(s) and a lock. PTCTURE : Basic Picture Mode Reference Mode Brightness 50 Contrast 0 Color 0 Tint 0 Sharpness 0 Flesh Tone 0 Save Settings Reset Picture Settings User 1 Living Room SYSTEM SETUP: Basic Language Projector Position Menu Settings Operation Settings Remote Receiver Background Color Splash Screen English Front Table Front+Top Blue BenQ...
EP5920 User Manual
Page 27
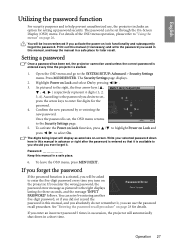
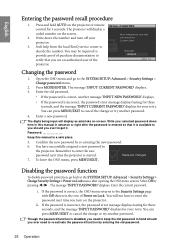
... highlight Power on Lock and press / to "Using the menus" on the projector. The digits being input will automatically shut down here in a safe place. 6. The password can use , the projector includes an option for details. You can retry by re-entering the new password. Operation 27 Password Keep this manual, and keep the manual in advance or right after the password is started. 1. To leave the OSD menu, press MENU/EXIT...
... highlight Power on Lock and press / to "Using the menus" on the projector. The digits being input will automatically shut down here in a safe place. 6. The password can use , the projector includes an option for details. You can retry by re-entering the new password. Operation 27 Password Keep this manual, and keep the manual in advance or right after the password is started. 1. To leave the OSD menu, press MENU/EXIT...
EP5920 User Manual
Page 28
Seek help from the local BenQ service center to enter the new password next time the projector is incorrect, the password error message displays lasting for three seconds, and the message 'INPUT CURRENT PASSWORD' displays for your projector. Press MODE/ENTER. Enter the old password. • If the password is correct, another message 'INPUT NEW PASSWORD' displays. • If the password is started. You can press MENU/EXIT to cancel the change or try another password. 4. The digits being input will not...
Seek help from the local BenQ service center to enter the new password next time the projector is incorrect, the password error message displays lasting for three seconds, and the message 'INPUT CURRENT PASSWORD' displays for your projector. Press MODE/ENTER. Enter the old password. • If the password is correct, another message 'INPUT NEW PASSWORD' displays. • If the password is started. You can press MENU/EXIT to cancel the change or try another password. 4. The digits being input will not...
EP5920 User Manual
Page 29
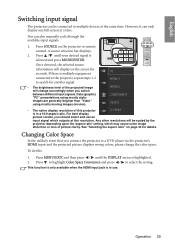
... images are generally brighter than "Video" using mostly moving images (movies). See "Selecting the aspect ratio" on page 32 for seconds. A source selection bar displays. 2. Operation 29 Press / until the DISPLAY menu is multiple equipment connected to the projector, repeat steps 1-2 to a DVD player via the projector's HDMI input and the projected picture displays wrong colors, please change accordingly when you switch between different input signals. Any other resolutions will display on the projector or remote control...
... images are generally brighter than "Video" using mostly moving images (movies). See "Selecting the aspect ratio" on page 32 for seconds. A source selection bar displays. 2. Operation 29 Press / until the DISPLAY menu is multiple equipment connected to the projector, repeat steps 1-2 to a DVD player via the projector's HDMI input and the projected picture displays wrong colors, please change accordingly when you switch between different input signals. Any other resolutions will display on the projector or remote control...
EP5920 User Manual
Page 38
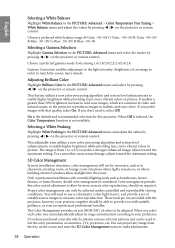
... the PICTURE: Advanced > Color Temperature Fine Tuning > White Balance menu and adjust the values by pressing / on the projector or remote control. This feature utilizes a new color-processing algorithm and system level enhancements to allow daylight into the room. Only in the PICTURE: Advanced menu and adjust the values by pressing / on , or where building external windows allow for this projector. If you can project any image from...
... the PICTURE: Advanced > Color Temperature Fine Tuning > White Balance menu and adjust the values by pressing / on the projector or remote control. This feature utilizes a new color-processing algorithm and system level enhancements to allow daylight into the room. Only in the PICTURE: Advanced menu and adjust the values by pressing / on , or where building external windows allow for this projector. If you can project any image from...
EP5920 User Manual
Page 43
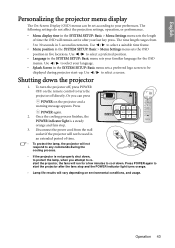
... POWER again to start -up. Use / to select a screen. Or you attempt to restart the projector, the fans will not respond to cool down the projector 1. Operation 43 Shutting down . The following settings do not affect the projection settings, operation, or performance. • Menu display time in an extended period of time the OSD will remain active after the fans stop and the POWER indicator light turns orange. • Lamp life results will not be displayed...
... POWER again to start -up. Use / to select a screen. Or you attempt to restart the projector, the fans will not respond to cool down the projector 1. Operation 43 Shutting down . The following settings do not affect the projection settings, operation, or performance. • Menu display time in an extended period of time the OSD will remain active after the fans stop and the POWER indicator light turns orange. • Lamp life results will not be displayed...
EP5920 User Manual
Page 49
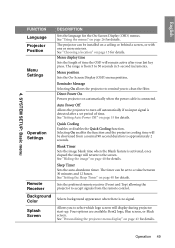
.... Menu position Sets the On-Screen Display (OSD) menu position. Auto Power Off Allows the projector to clean the filter. Sleep Timer Sets the auto-shutdown timer. Four options are available: BenQ logo, Blue screen, or Black screen. See "Personalizing the projector menu display" on page 15 for details. See "Setting the Sleep Timer" on a ceiling or behind a screen, or with one or more mirrors. SYSTEM SETUP: Basic menu FUNCTION Language Projector Position Menu Settings Operation Settings Remote Receiver Background Color Splash Screen DESCRIPTION Sets the...
.... Menu position Sets the On-Screen Display (OSD) menu position. Auto Power Off Allows the projector to clean the filter. Sleep Timer Sets the auto-shutdown timer. Four options are available: BenQ logo, Blue screen, or Black screen. See "Personalizing the projector menu display" on page 15 for details. See "Setting the Sleep Timer" on a ceiling or behind a screen, or with one or more mirrors. SYSTEM SETUP: Basic menu FUNCTION Language Projector Position Menu Settings Operation Settings Remote Receiver Background Color Splash Screen DESCRIPTION Sets the...
EP5920 User Manual
Page 50
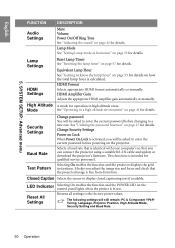
... screen to the factory preset values. HDMI Format Selects appropriate HDMI format automatically or manually. See "Operating in a high altitude environment" on how the total lamp hour is activated, you can connect the projector using a suitable RS-232 cable and update or download the projector's firmware. Baud Rate Selects a baud rate that you will be asked to a new one. Lamp Mode See "Setting Lamp mode as Economic" on the projector. Change Security Settings Power on Lock When Power On Lock...
... screen to the factory preset values. HDMI Format Selects appropriate HDMI format automatically or manually. See "Operating in a high altitude environment" on how the total lamp hour is activated, you can connect the projector using a suitable RS-232 cable and update or download the projector's firmware. Baud Rate Selects a baud rate that you will be asked to a new one. Lamp Mode See "Setting Lamp mode as Economic" on the projector. Change Security Settings Power on Lock When Power On Lock...
EP5920 User Manual
Page 53
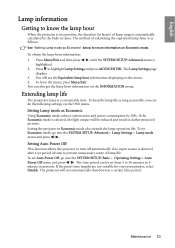
... lamp operation life. If the Economic mode is a consumable item . Press Menu/Exit and then press / until the SYSTEM SETUP: Advanced menu is detected after a set Economic mode, go into the SYSTEM SETUP: Advanced > Lamp Settings > Lamp mode menu and press / . The Lamp Settings page displays. 3. To obtain the lamp hour information: 1. To leave the menu, press Menu/Exit. Setting Auto Power Off This function allows the projector to turn off automatically if no input source is highlighted. 2. Setting the projector...
... lamp operation life. If the Economic mode is a consumable item . Press Menu/Exit and then press / until the SYSTEM SETUP: Advanced menu is detected after a set Economic mode, go into the SYSTEM SETUP: Advanced > Lamp Settings > Lamp mode menu and press / . The Lamp Settings page displays. 3. To obtain the lamp hour information: 1. To leave the menu, press Menu/Exit. Setting Auto Power Off This function allows the projector to turn off automatically if no input source is highlighted. 2. Setting the projector...

EP5920 User Manual
Page 55
... between the lamp and the projector. Loosen the captive screw from the wall socket. The sharp edges inside the projector may cause injuries. Remove the lamp compartment cover as shown. 4. Maintenance 55 Turn the power off and disconnect the power cord before replacing the lamp. • To reduce the risk of injuries to fingers and damage to internal components, use caution when removing lamp glass that...
... between the lamp and the projector. Loosen the captive screw from the wall socket. The sharp edges inside the projector may cause injuries. Remove the lamp compartment cover as shown. 4. Maintenance 55 Turn the power off and disconnect the power cord before replacing the lamp. • To reduce the risk of injuries to fingers and damage to internal components, use caution when removing lamp glass that...

EP5920 User Manual
Page 59
... Replace the battery with the SOURCE key on the projector or remote control. The password is not correctly focused. Remedy Plug the power cord into the AC inlet on page 28 for details. Remove the obstacle. The projector and the screen are too far away from the power cable. Check the connection. If the power outlet has a switch, make sure that the signal cable is switched on. Troubleshooting 59 Blurred image Cause The projection lens...
... Replace the battery with the SOURCE key on the projector or remote control. The password is not correctly focused. Remedy Plug the power cord into the AC inlet on page 28 for details. Remove the obstacle. The projector and the screen are too far away from the power cable. Check the connection. If the power outlet has a switch, make sure that the signal cable is switched on. Troubleshooting 59 Blurred image Cause The projection lens...


