

User Manual
Page 2
... written permission of power available, consult your monitor Power Safety • The AC plug isolates this publication and to dangerous voltages or other accident such as opening or removing covers may be operated from the wall outlet before cleaning. All rights reserved. They must be blocked or covered. If you to make changes from the AC supply. • The power supply cord serves as a power disconnect device...
... written permission of power available, consult your monitor Power Safety • The AC plug isolates this publication and to dangerous voltages or other accident such as opening or removing covers may be operated from the wall outlet before cleaning. All rights reserved. They must be blocked or covered. If you to make changes from the AC supply. • The power supply cord serves as a power disconnect device...

User Manual
Page 3
... to install the monitor on a new computer 12 How to upgrade the monitor on an existing computer 13 How to install on Windows 7 system 14 How to install on Windows Vista systems 15 How to install on Windows XP system 16 Picture optimization ...17 How to adjust your monitor 18 The control panel ...18 Hot key mode ...19 Main menu mode ...20 Troubleshooting ...32 Frequently asked questions (FAQ 32 Need more help...
... to install the monitor on a new computer 12 How to upgrade the monitor on an existing computer 13 How to install on Windows 7 system 14 How to install on Windows Vista systems 15 How to install on Windows XP system 16 Picture optimization ...17 How to adjust your monitor 18 The control panel ...18 Hot key mode ...19 Main menu mode ...20 Troubleshooting ...32 Frequently asked questions (FAQ 32 Need more help...

User Manual
Page 7
... damage the LCD substrate voiding your monitor hardware 7 You should position the monitor and angle the screen to minimize unwanted reflections from other light sources. -5O~ +20O How to check that they click and lock into place. Sliding or scraping the monitor around on a flat clean padded surface. Please be careful to prevent damage to the monitor. Attach the monitor base. Placing the screen surface on...
... damage the LCD substrate voiding your monitor hardware 7 You should position the monitor and angle the screen to minimize unwanted reflections from other light sources. -5O~ +20O How to check that they click and lock into place. Sliding or scraping the monitor around on a flat clean padded surface. Please be careful to prevent damage to the monitor. Attach the monitor base. Placing the screen surface on...

User Manual
Page 9
Plug the other end of the power cord into a power outlet and turn -on the right of the monitor. Picture may differ from your BenQ monitor on . Turn on the computer too, and follow the instructions in Section 4: Getting the most from product supplied for your monitor hardware 9 How to install the monitor software. 4. Turn on the monitor by pressing the power button on the power. Connect-to and turn it on page 11 to assemble your region.
Plug the other end of the power cord into a power outlet and turn -on the right of the monitor. Picture may differ from your BenQ monitor on . Turn on the computer too, and follow the instructions in Section 4: Getting the most from product supplied for your monitor hardware 9 How to install the monitor software. 4. Turn on the monitor by pressing the power button on the power. Connect-to and turn it on page 11 to assemble your region.

User Manual
Page 11
...-step instructions for either case however, the very next time you are upgrading an existing installation (which version of the Administrators group in order to select a monitor model. At that point, click the Have Disk button, insert the BenQ LCD Monitor CD-ROM and select the appropriate monitor model. The circumstances under which you connect and install your new BenQ color LCD flat screen monitor, you should install the custom BenQ LCD Monitor driver software...
...-step instructions for either case however, the very next time you are upgrading an existing installation (which version of the Administrators group in order to select a monitor model. At that point, click the Have Disk button, insert the BenQ LCD Monitor CD-ROM and select the appropriate monitor model. The circumstances under which you connect and install your new BenQ color LCD flat screen monitor, you should install the custom BenQ LCD Monitor driver software...

User Manual
Page 12
... model, refer to the following these instructions. If you should instead be following table. How to install the monitor on a new computer This instruction details the procedure for selecting and installing the BenQ LCD Monitor driver software on a new computer which the BenQ LCD Monitor is only suitable for a computer which has never been used before, and for which has never had another monitor connected to it displays...
... model, refer to the following these instructions. If you should instead be following table. How to install the monitor on a new computer This instruction details the procedure for selecting and installing the BenQ LCD Monitor driver software on a new computer which the BenQ LCD Monitor is only suitable for a computer which has never been used before, and for which has never had another monitor connected to it displays...

User Manual
Page 13
Getting the most from your model may well function perfectly with other versions of Windows, however, as compatible for your BenQ monitor 13 How to upgrade the monitor on an existing computer This instruction details the procedure for manually updating the existing monitor driver software on page 16. You need only steer it in the right direction. It is currently tested as at the time...
Getting the most from your model may well function perfectly with other versions of Windows, however, as compatible for your BenQ monitor 13 How to upgrade the monitor on an existing computer This instruction details the procedure for manually updating the existing monitor driver software on page 16. You need only steer it in the right direction. It is currently tested as at the time...

User Manual
Page 14
Go to Start, Control Panel, Hardware and Sound, Devices and Printers and right-click the name of your system - In the Update Driver Software window, select the option Browse my computer for the CD-ROM drive). The drive letter for your CD drive may differ from the example above depending upon your monitor from provided driver list, and click Next. Select...
Go to Start, Control Panel, Hardware and Sound, Devices and Printers and right-click the name of your system - In the Update Driver Software window, select the option Browse my computer for the CD-ROM drive). The drive letter for your CD drive may differ from the example above depending upon your monitor from provided driver list, and click Next. Select...

User Manual
Page 15
... appearance and sounds window. Select Display Settings from the popup menu. Click Browse and navigate to restart your computer after the driver update is the drive letter designator for driver software. 8. The Display Settings window will display. 3. This will copy and install the appropriate monitor driver files to install on the computer. 7. You may be 'D:' or 'E:' or 'F:' etc. 9. Click the Driver tab and the Update Driver button. 6. Click the Monitor tab and...
... appearance and sounds window. Select Display Settings from the popup menu. Click Browse and navigate to restart your computer after the driver update is the drive letter designator for driver software. 8. The Display Settings window will display. 3. This will copy and install the appropriate monitor driver files to install on the computer. 7. You may be 'D:' or 'E:' or 'F:' etc. 9. Click the Driver tab and the Update Driver button. 6. Click the Monitor tab and...

User Manual
Page 16
... the Classic view, click Start | Control Panel | Display. • Under the Category view, click Start | Control Panel | Appearance and Themes | Change the screen resolution. Follow the wizard instructions noting the steps below: 6. When completes, the wizard should have found and selected the BenQ driver on the computer you to continue with these instructions. 5. If there is located in step 6. You may be selected for the best driver in...
... the Classic view, click Start | Control Panel | Display. • Under the Category view, click Start | Control Panel | Appearance and Themes | Change the screen resolution. Follow the wizard instructions noting the steps below: 6. When completes, the wizard should have found and selected the BenQ driver on the computer you to continue with these instructions. 5. If there is located in step 6. You may be selected for the best driver in...

User Manual
Page 17
... an optimal display from CD-ROM. Press the AUTO key to optimize the currently displayed image to enter the menu. 5. As you connect a digital video output using geometry menu items. To assist you in this endeavour, BenQ has provided a screen test image utility which you notice a vertical noise (like a curtain effect-shimmering of your monitor, the AUTO key and the Auto Adjustment function will be disabled, because the monitor will automatically display the best image. Use...
... an optimal display from CD-ROM. Press the AUTO key to optimize the currently displayed image to enter the menu. 5. As you connect a digital video output using geometry menu items. To assist you in this endeavour, BenQ has provided a screen test image utility which you notice a vertical noise (like a curtain effect-shimmering of your monitor, the AUTO key and the Auto Adjustment function will be disabled, because the monitor will automatically display the best image. Use...

User Manual
Page 18
MENU key: Activates OSD main menu and return to adjust your monitor The key is not currently displaying. Power: Turns the power on page 19. 18 How to adjust your monitor The control panel 1 2 3 4 5 6 1. See Hot key mode on or off. AUTO: Adjusts vertical position, phase, horizontal position and pixel clock automatically. 2. How to the previous menu or exit OSD. 3. /Display Mode key: For Up/Increase adjustment. OSD = On Screen Display. Hot key displays will only operate while the OSD menu is the...
MENU key: Activates OSD main menu and return to adjust your monitor The key is not currently displaying. Power: Turns the power on page 19. 18 How to adjust your monitor The control panel 1 2 3 4 5 6 1. See Hot key mode on or off. AUTO: Adjusts vertical position, phase, horizontal position and pixel clock automatically. 2. How to the previous menu or exit OSD. 3. /Display Mode key: For Up/Increase adjustment. OSD = On Screen Display. Hot key displays will only operate while the OSD menu is the...
User Manual
Page 20
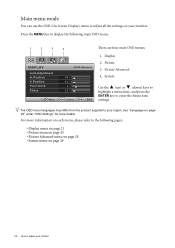
... the Menu item settings. Position V. Position Pixel Clock Phase MODE: Standard 10 12 1 12 Move ENTER Select MENU Exit There are four main OSD menus: 1. The OSD menu languages may differ from the product supplied to your region, see "Language on page 30" under "OSD Settings" for more information on each menu, please refer to the following main OSD menu. 1 2 3 4 DISPLAY Auto Adjustment H. Display 2. Picture 3. Main menu mode You can use the OSD (On Screen Display) menu to adjust all the settings...
... the Menu item settings. Position V. Position Pixel Clock Phase MODE: Standard 10 12 1 12 Move ENTER Select MENU Exit There are four main OSD menus: 1. The OSD menu languages may differ from the product supplied to your region, see "Language on page 30" under "OSD Settings" for more information on each menu, please refer to the following main OSD menu. 1 2 3 4 DISPLAY Auto Adjustment H. Display 2. Picture 3. Main menu mode You can use the OSD (On Screen Display) menu to adjust all the settings...

User Manual
Page 21
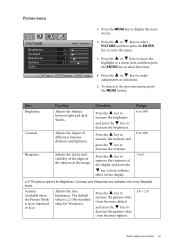
... key to the previous menu, press the MENU button. To return to enter the menu. 3. The AUTO key is a 'hot key' for you connect a digital video output using a digital (DVI) cable to display the main menu. Display menu 1. Position V. Item Auto Adjustment Function Optimizes and adjusts the screen settings automatically for this option and make adjustments or selections. 5. Operation Press the ENTER key to adjust your monitor, the AUTO key and the Auto Adjustment function will be disabled. How to select...
... key to the previous menu, press the MENU button. To return to enter the menu. 3. The AUTO key is a 'hot key' for you connect a digital video output using a digital (DVI) cable to display the main menu. Display menu 1. Position V. Item Auto Adjustment Function Optimizes and adjusts the screen settings automatically for this option and make adjustments or selections. 5. Operation Press the ENTER key to adjust your monitor, the AUTO key and the Auto Adjustment function will be disabled. How to select...
User Manual
Page 23
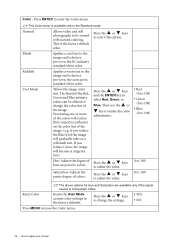
... Brightness Contrast Sharpness Function Adjusts the balance between darkness and lightness. Adjusts the clarity and visibility of the edges of the subjects in the Standard mode. Range 0 to 100 0 to 100 1 to Standard or Eco) Adjusts the tone luminance. PICTURE Brightness Contrast Sharpness Gamma Color MODE: Standard 12 10 1 2.2 2. To return to enter the menu. 3. The default value is set to 5 The above options for Windows). Press...
... Brightness Contrast Sharpness Function Adjusts the balance between darkness and lightness. Adjusts the clarity and visibility of the edges of the subjects in the Standard mode. Range 0 to 100 0 to 100 1 to Standard or Eco) Adjusts the tone luminance. PICTURE Brightness Contrast Sharpness Gamma Color MODE: Standard 12 10 1 2.2 2. To return to enter the menu. 3. The default value is set to 5 The above options for Windows). Press...
User Manual
Page 24
... the Color menu. 24 How to 100 Reset Color The above options for Hue and Saturation are available only if the signal source is available only in the Standard mode. Press the or keys to adjust the value. • Red (0 to 100) • Green (0 to 100) • Blue (0 to 100) 0 to 100 0 to adjust your monitor If you reduce the Blue level the image will...
... the Color menu. 24 How to 100 Reset Color The above options for Hue and Saturation are available only if the signal source is available only in the Standard mode. Press the or keys to adjust the value. • Red (0 to 100) • Green (0 to 100) • Blue (0 to 100) 0 to 100 0 to adjust your monitor If you reduce the Blue level the image will...

User Manual
Page 29
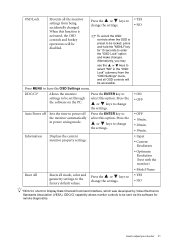
... main menu. SYSTEM Input OSD Settings DDC/CI Auto Power off Information Reset All Move MODE: Standard DVI 2. Item Input Function Use this to change the settings. • D-sub (VGA) Analog-only models do not have the Input function. Press the MENU key to select that appropriate to adjust your video cable connection type. 5. Press the or keys to select SYSTEM and then press the ENTER key to the previous menu, press the MENU button. MENU...
... main menu. SYSTEM Input OSD Settings DDC/CI Auto Power off Information Reset All Move MODE: Standard DVI 2. Item Input Function Use this to change the settings. • D-sub (VGA) Analog-only models do not have the Input function. Press the MENU key to select that appropriate to adjust your video cable connection type. 5. Press the or keys to select SYSTEM and then press the ENTER key to the previous menu, press the MENU button. MENU...
User Manual
Page 31
.... • Input • Current Resolution • Optimum Resolution (best with the monitor) • Model Name • YES • NO *DDC/CI, short for remote diagnostics. Press the ENTER key to select "NO" in power saving mode. Press the or keys to enter the "OSD Lock" option and make changes. OSD Lock Prevents all the monitor settings from the "OSD Settings" menu, and all mode, color and geometry settings to be set through the software on the...
.... • Input • Current Resolution • Optimum Resolution (best with the monitor) • Model Name • YES • NO *DDC/CI, short for remote diagnostics. Press the ENTER key to select "NO" in power saving mode. Press the or keys to enter the "OSD Lock" option and make changes. OSD Lock Prevents all the monitor settings from the "OSD Settings" menu, and all mode, color and geometry settings to be set through the software on the...

User Manual
Page 32
... these losses by working through the instructions in the signal input. Remove the extension cable for blurring to occur due to the factory defaults. No image can minimize these instructions. Does the blurring only occur at resolutions lower than the native (maximum) resolution? 7. Troubleshooting Frequently asked questions (FAQ) The image is permanently black, one or more pixels are permanently red, green, blue or another color. • Clean the LCD screen. • Cycle power on-off...
... these losses by working through the instructions in the signal input. Remove the extension cable for blurring to occur due to the factory defaults. No image can minimize these instructions. Does the blurring only occur at resolutions lower than the native (maximum) resolution? 7. Troubleshooting Frequently asked questions (FAQ) The image is permanently black, one or more pixels are permanently red, green, blue or another color. • Clean the LCD screen. • Cycle power on-off...

User Manual
Page 33
... the "OSD Lock" option and make adjustments based on these instructions. The OSD controls are running at : Support@BenQ.com. Need more help , check the signal cable connectors. Is the prompt on the display not illuminated at its native resolution. See Display Mode on page 27 for the input sources. Check the power supply mains socket, the external power supply and the mains switch. Troubleshooting 33 If the LED is illuminated in orange, the power management mode is distorted, flashes or flickers: Read the instructions on...
... the "OSD Lock" option and make adjustments based on these instructions. The OSD controls are running at : Support@BenQ.com. Need more help , check the signal cable connectors. Is the prompt on the display not illuminated at its native resolution. See Display Mode on page 27 for the input sources. Check the power supply mains socket, the external power supply and the mains switch. Troubleshooting 33 If the LED is illuminated in orange, the power management mode is distorted, flashes or flickers: Read the instructions on...


