

User Manual
Page 1
LCD Monitor User Manual GL930/GL930A GL931/GL931A GL2030/GL2030A GL2230/GL2230A GL2231/GL2231A Welcome
LCD Monitor User Manual GL930/GL930A GL931/GL931A GL2030/GL2030A GL2230/GL2230A GL2231/GL2231A Welcome

User Manual
Page 2
... • Slots and openings on the marked label. If any of the above mentioned misuse or other risks. Clean the LCD monitor surface with respect to the contents hereof and specifically disclaims any warranties, merchantability or fitness for servicing. Servicing • Do not ...© 2010 by any means, electronic, mechanical, magnetic, optical, chemical, manual or otherwise, without obligation of BenQ Corporation to notify any person of such revision or changes. No part of this publication may expose you are for pluggable equipment. Your monitor should be blocked or covered.
... • Slots and openings on the marked label. If any of the above mentioned misuse or other risks. Clean the LCD monitor surface with respect to the contents hereof and specifically disclaims any warranties, merchantability or fitness for servicing. Servicing • Do not ...© 2010 by any means, electronic, mechanical, magnetic, optical, chemical, manual or otherwise, without obligation of BenQ Corporation to notify any person of such revision or changes. No part of this publication may expose you are for pluggable equipment. Your monitor should be blocked or covered.

User Manual
Page 3
... Copyright ...2 Disclaimer ...2 Getting started ...4 Getting to know your monitor 6 Front view ...6 Back view ...6 How to assemble your monitor hardware 7 How to detach the stand base ...10 Getting the most from your BenQ monitor 11 How to install the monitor on a new computer 12 How to upgrade the monitor on an existing computer 13 How to install...
... Copyright ...2 Disclaimer ...2 Getting started ...4 Getting to know your monitor 6 Front view ...6 Back view ...6 How to assemble your monitor hardware 7 How to detach the stand base ...10 Getting the most from your BenQ monitor 11 How to install the monitor on a new computer 12 How to upgrade the monitor on an existing computer 13 How to install...

User Manual
Page 4
1. BenQ LCD Monitor Monitor Base Quick Start Guide CD-ROM Power Cord (Picture may differ from product supplied for a replacement. Getting started When unpacking please check you have the following items. If any are missing or damaged, please contact the place of purchase for your region.) Video Cable: D-Sub 4 Getting started
1. BenQ LCD Monitor Monitor Base Quick Start Guide CD-ROM Power Cord (Picture may differ from product supplied for a replacement. Getting started When unpacking please check you have the following items. If any are missing or damaged, please contact the place of purchase for your region.) Video Cable: D-Sub 4 Getting started

User Manual
Page 5
Getting started 5 The fitted foam packing is ideal for use in storage for protecting the monitor during transport. Video Cable: DVI-D (Optional accessory for models with DVI inputs, sold separately) Consider keeping the box and packaging in the future when you may need to transport the monitor.
Getting started 5 The fitted foam packing is ideal for use in storage for protecting the monitor during transport. Video Cable: DVI-D (Optional accessory for models with DVI inputs, sold separately) Consider keeping the box and packaging in the future when you may need to transport the monitor.

User Manual
Page 6
Control buttons 2. D-Sub socket 6. Lock switch 3 45 6 • Above diagram may vary depending on the model. • Picture may differ from product supplied for your region. 6 Getting to know your monitor Front view 1. 2. AC Power Input jack 4. Power button Back view 1 2 3. DVI-D socket (Analog-only models do not have the DVI-D input socket) 5. Getting to know your monitor
Control buttons 2. D-Sub socket 6. Lock switch 3 45 6 • Above diagram may vary depending on the model. • Picture may differ from product supplied for your region. 6 Getting to know your monitor Front view 1. 2. AC Power Input jack 4. Power button Back view 1 2 3. DVI-D socket (Analog-only models do not have the DVI-D input socket) 5. Getting to know your monitor

User Manual
Page 7
... you must turn it over and place it off before continuing. 3. Do not plug-in or turn-on the power to assemble your monitor hardware If the computer is turned on your desk will crack the glass or damage the LCD substrate voiding your warranty. Placing the screen ...surface on a flat even surface. Protect the monitor and screen by clearing a flat open area on your monitor hardware 7 While holding the monitor firmly against the desk, pull the monitor stand arm upwards clear of the stand arm, then push them back apart to do...
... you must turn it over and place it off before continuing. 3. Do not plug-in or turn-on the power to assemble your monitor hardware If the computer is turned on your desk will crack the glass or damage the LCD substrate voiding your warranty. Placing the screen ...surface on a flat even surface. Protect the monitor and screen by clearing a flat open area on your monitor hardware 7 While holding the monitor firmly against the desk, pull the monitor stand arm upwards clear of the stand arm, then push them back apart to do...

User Manual
Page 8
...ferrite filter) to the computer video socket. Connect the other end of the D-Sub cable (at the end with the ferrite filter) to the monitor. Connect the power cable to the computer video socket. Plug one end of the DVI-D cable (at the end with appropriate video systems. ...(Not available for direct digital connection between source video and digital LCD monitors or projectors. Connect the other end to prevent the plugs from accidently falling out during use . To Connect the DVI-D Cable Connect the ...
...ferrite filter) to the computer video socket. Connect the other end of the D-Sub cable (at the end with the ferrite filter) to the monitor. Connect the power cable to the computer video socket. Plug one end of the DVI-D cable (at the end with appropriate video systems. ...(Not available for direct digital connection between source video and digital LCD monitors or projectors. Connect the other end to prevent the plugs from accidently falling out during use . To Connect the DVI-D Cable Connect the ...

User Manual
Page 9
Plug the other end of the monitor. Turn on the monitor by pressing the power button on . Picture may differ from your monitor hardware 9 4. How to and turn it on the right of the power cord into a power outlet and turn -on the computer too, and follow the instructions in Section 4: Getting the most from product supplied for your region. Connect-to assemble your BenQ monitor on page 11 to install the monitor software. Turn on the power.
Plug the other end of the monitor. Turn on the monitor by pressing the power button on . Picture may differ from your monitor hardware 9 4. How to and turn it on the right of the power cord into a power outlet and turn -on the computer too, and follow the instructions in Section 4: Getting the most from product supplied for your region. Connect-to assemble your BenQ monitor on page 11 to install the monitor software. Turn on the power.

User Manual
Page 10
... padded surface. Press the locking clips to detach the monitor base from the monitor stand arm. 10 How to assemble your desk and placing a soft item like a stapler or a mouse will scratch or damage the monitor surround and controls. 2. How to the monitor. Protect the monitor and screen by clearing a flat open area on an... object like a towel on the desk for padding, before unplugging the monitor signal cable. Turn off the computer before laying the screen face down on your desk will crack the glass or damage the LCD substrate voiding ...
... padded surface. Press the locking clips to detach the monitor base from the monitor stand arm. 10 How to assemble your desk and placing a soft item like a stapler or a mouse will scratch or damage the monitor surround and controls. 2. How to the monitor. Protect the monitor and screen by clearing a flat open area on an... object like a towel on the desk for padding, before unplugging the monitor signal cable. Turn off the computer before laying the screen face down on your desk will crack the glass or damage the LCD substrate voiding ...

User Manual
Page 11
... click the Have Disk button, insert the BenQ LCD Monitor CD-ROM and select the appropriate monitor model. Getting the most benefit from your new BenQ color LCD flat screen monitor, you turn on the BenQ LCD Monitor CD-ROM. Furthermore, if your BenQ monitor 11 In either an automatic (new) or... on the back of the Administrators group in order to successfully install the BenQ LCD Monitor driver software. These circumstances relate to which already has existing monitor driver software) with a newer monitor. The circumstances under which you connect and install your computer. • ...
... click the Have Disk button, insert the BenQ LCD Monitor CD-ROM and select the appropriate monitor model. Getting the most benefit from your new BenQ color LCD flat screen monitor, you turn on the BenQ LCD Monitor CD-ROM. Furthermore, if your BenQ monitor 11 In either an automatic (new) or... on the back of the Administrators group in order to successfully install the BenQ LCD Monitor driver software. These circumstances relate to which already has existing monitor driver software) with a newer monitor. The circumstances under which you connect and install your computer. • ...

User Manual
Page 12
... the prompts until it (and has monitor driver software installed), you are adding the BenQ LCD Monitor to an existing computer that the wizard has selected the correct name of your BenQ monitor Click Finish. 7. How to install the monitor on a new computer This instruction details... suitable driver files for my device option, and click Next. 4. Driver files GL930 GL930A GL931 GL931A GL2030 GL2030A GL2230 GL2230A GL2231 GL2231A Suitable models GL930, GL930M GL930A, GL930AM GL931, GL931M GL931A, GL931AM GL2030, GL2030M GL2030A, GL2030AM GL2230, GL2230M GL2230A, GL2230AM GL2231, GL2231M...
... the prompts until it (and has monitor driver software installed), you are adding the BenQ LCD Monitor to an existing computer that the wizard has selected the correct name of your BenQ monitor Click Finish. 7. How to install the monitor on a new computer This instruction details... suitable driver files for my device option, and click Next. 4. Driver files GL930 GL930A GL931 GL931A GL2030 GL2030A GL2230 GL2230A GL2231 GL2231A Suitable models GL930, GL930M GL930A, GL930AM GL931, GL931M GL931A, GL931AM GL2030, GL2030M GL2030A, GL2030AM GL2230, GL2230M GL2230A, GL2230AM GL2231, GL2231M...

User Manual
Page 13
...have connected, and letting Windows install the corresponding driver files from your BenQ monitor 13 You need only steer it in the right direction. Windows has an Upgrade Device Driver Wizard to upgrade the monitor on an existing computer This instruction details the procedure for manually updating ... System (OS). It is currently tested as at the time of writing, BenQ has done no testing of this driver on other versions of Windows and cannot guarantee its operation on those systems. Installing monitor driver software involves selecting an appropriate information file (.inf) on page 16....
...have connected, and letting Windows install the corresponding driver files from your BenQ monitor 13 You need only steer it in the right direction. Windows has an Upgrade Device Driver Wizard to upgrade the monitor on an existing computer This instruction details the procedure for manually updating ... System (OS). It is currently tested as at the time of writing, BenQ has done no testing of this driver on other versions of Windows and cannot guarantee its operation on those systems. Installing monitor driver software involves selecting an appropriate information file (.inf) on page 16....

User Manual
Page 14
...for your CD drive may differ from your system - Click the Hardware tab. 3. Click the Driver tab and the Update Driver button. 5. Insert the BenQ LCD Monitor CD-ROM into a CD drive on Windows 7 system 1. Click Close. You may be prompted to Start, Control Panel, Hardware and Sound, Devices and... Printers and right-click the name of your monitor from the menu. Alternatively, right-click the desktop and select Personalize, Display, Devices and Printers, and right-click the name of your...
...for your CD drive may differ from your system - Click the Hardware tab. 3. Click the Driver tab and the Update Driver button. 5. Insert the BenQ LCD Monitor CD-ROM into a CD drive on Windows 7 system 1. Click Close. You may be prompted to Start, Control Panel, Hardware and Sound, Devices and... Printers and right-click the name of your monitor from the menu. Alternatively, right-click the desktop and select Personalize, Display, Devices and Printers, and right-click the name of your...

User Manual
Page 15
...You may differ from the Personalize appearance and sounds window. The Display Settings window will copy and install the appropriate monitor driver files to your BenQ monitor 15 Click Continue in the prompted User Account Control window. 5. Select the correct folder name of your... monitor from your computer. 10. Click Close. Insert the BenQ LCD Monitor CD-ROM into a CD drive on Windows Vista systems 1. Click the Monitor tab and the Properties button. 4. Getting the most from provided driver list...
...You may differ from the Personalize appearance and sounds window. The Display Settings window will copy and install the appropriate monitor driver files to your BenQ monitor 15 Click Continue in the prompted User Account Control window. 5. Select the correct folder name of your... monitor from your computer. 10. Click Close. Insert the BenQ LCD Monitor CD-ROM into a CD drive on Windows Vista systems 1. Click the Monitor tab and the Properties button. 4. Getting the most from provided driver list...

User Manual
Page 16
... computer after the driver update is complete. 16 Getting the most from provided driver list on the computer you attached the monitor to your computer. 10. Insert the BenQ LCD Monitor CD-ROM into a CD drive on the CD, and click the Next button. When completes, the wizard should have... the option Install from the popup menu. Please wait while the wizard searches for you to your monitor model. 9. This will display. You may be selected for drives and the BenQ LCD Monitor CD inserted in these locations and also check Search removable media, then click Next. The quickest shortcut...
... computer after the driver update is complete. 16 Getting the most from provided driver list on the computer you attached the monitor to your computer. 10. Insert the BenQ LCD Monitor CD-ROM into a CD drive on the CD, and click the Next button. When completes, the wizard should have... the option Install from the popup menu. Please wait while the wizard searches for you to your monitor model. 9. This will display. You may be selected for drives and the BenQ LCD Monitor CD inserted in these locations and also check Search removable media, then click Next. The quickest shortcut...

User Manual
Page 17
...AUTO key on your computer is to use any other image, such as the desktop of your monitor, the AUTO key and the Auto Adjustment function will be disabled, because the monitor will automatically display the best image. Picture optimization 17 As you notice a horizontal noise, press ...your operating system. 5. When you can always adjust the screen geometric settings manually using geometry menu items. To assist you in this endeavour, BenQ has provided a screen test image utility which you connect a digital video output using a digital (DVI) cable to select Pixel Clock and press...
...AUTO key on your computer is to use any other image, such as the desktop of your monitor, the AUTO key and the Auto Adjustment function will be disabled, because the monitor will automatically display the best image. Picture optimization 17 As you notice a horizontal noise, press ...your operating system. 5. When you can always adjust the screen geometric settings manually using geometry menu items. To assist you in this endeavour, BenQ has provided a screen test image utility which you connect a digital video output using a digital (DVI) cable to select Pixel Clock and press...

User Manual
Page 18
... position, phase, horizontal position and pixel clock automatically. 2. MENU key: Activates OSD main menu and return to adjust your monitor Power: Turns the power on page 19. 18 How to adjust your monitor The control panel 1 2 3 4 5 6 1. OSD = On Screen Display. The key is not currently displaying. See Hot key mode on or...
... position, phase, horizontal position and pixel clock automatically. 2. MENU key: Activates OSD main menu and return to adjust your monitor Power: Turns the power on page 19. 18 How to adjust your monitor The control panel 1 2 3 4 5 6 1. OSD = On Screen Display. The key is not currently displaying. See Hot key mode on or...

User Manual
Page 19
... on page 27. Mode hot key Press the key continually to switch between the 6 modes for analog-only models) Press the ENTER key to your monitor 19 The setting will take effect immediately. See also Display Mode on page 29. Display Mode hot key Press the key continually to switch between... key (not available for the main window, including Standard, Movie, Game, Photo, sRGB, and Eco. The setting will take effect immediately. Hot key mode The monitor keys perform as hot keys to provide direct access to adjust your...
... on page 27. Mode hot key Press the key continually to switch between the 6 modes for analog-only models) Press the ENTER key to your monitor 19 The setting will take effect immediately. See also Display Mode on page 29. Display Mode hot key Press the key continually to switch between... key (not available for the main window, including Standard, Movie, Game, Photo, sRGB, and Eco. The setting will take effect immediately. Hot key mode The monitor keys perform as hot keys to provide direct access to adjust your...
User Manual
Page 20
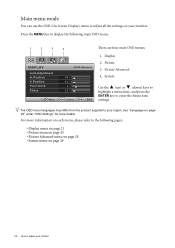
...pages: • Display menu on page 21 • Picture menu on page 23 • Picture Advanced menu on page 25 • System menu on your monitor For more details. Display 2. Picture Advanced 4. Position Pixel Clock Phase MODE: Standard 10 12 1 12 Move ENTER Select MENU Exit There are four main OSD... menus: 1. Press the MENU key to adjust your monitor. Position V. System Use the (up) or (down) keys to highlight a menu item, and press the ENTER key to enter the Menu item settings...
...pages: • Display menu on page 21 • Picture menu on page 23 • Picture Advanced menu on page 25 • System menu on your monitor For more details. Display 2. Picture Advanced 4. Position Pixel Clock Phase MODE: Standard 10 12 1 12 Move ENTER Select MENU Exit There are four main OSD... menus: 1. Press the MENU key to adjust your monitor. Position V. System Use the (up) or (down) keys to highlight a menu item, and press the ENTER key to enter the Menu item settings...

