
User Manual
Page 3
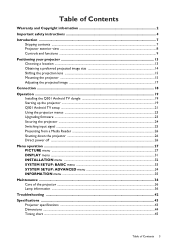
... 19 Starting up the projector ...19 QS01 Android TV setup ...21 Using the projector menus ...23 Upgrading firmware ...23 Securing the projector ...24 Switching input signal ...25 Presenting from a Media Reader ...26 Shutting down the projector ...26 Direct power off ...26 Menu operation ...27 PICTURE menu ...27 DISPLAY menu ...31 INSTALLATION menu ...32 SYSTEM SETUP: BASIC menu ...33 SYSTEM SETUP: ADVANCED menu 34 INFORMATION menu ...35 Maintenance ...36 Care of the projector ...36 Lamp information ...36 Troubleshooting ...42 Specifications ...43 Projector specifications ...43...
... 19 Starting up the projector ...19 QS01 Android TV setup ...21 Using the projector menus ...23 Upgrading firmware ...23 Securing the projector ...24 Switching input signal ...25 Presenting from a Media Reader ...26 Shutting down the projector ...26 Direct power off ...26 Menu operation ...27 PICTURE menu ...27 DISPLAY menu ...31 INSTALLATION menu ...32 SYSTEM SETUP: BASIC menu ...33 SYSTEM SETUP: ADVANCED menu 34 INFORMATION menu ...35 Maintenance ...36 Care of the projector ...36 Lamp information ...36 Troubleshooting ...42 Specifications ...43 Projector specifications ...43...
User Manual
Page 4
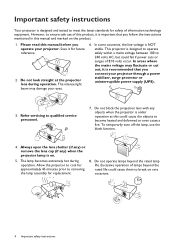
... projector through a power stabilizer, surge protector or uninterruptible power supply (UPS). 3. The lamp becomes extremely hot during operation. However, to ensure safe use the blank function. 4. Refer servicing to break on rare occasions. 4 Important safety instructions To temporarily turn off the lamp, use of this manual and marked on . 5. Excessive operation of lamps beyond the rated lamp life. Do not look straight at the projector lens during operation. Always open the lens...
... projector through a power stabilizer, surge protector or uninterruptible power supply (UPS). 3. The lamp becomes extremely hot during operation. However, to ensure safe use the blank function. 4. Refer servicing to break on rare occasions. 4 Important safety instructions To temporarily turn off the lamp, use of this manual and marked on . 5. Excessive operation of lamps beyond the rated lamp life. Do not look straight at the projector lens during operation. Always open the lens...
User Manual
Page 8
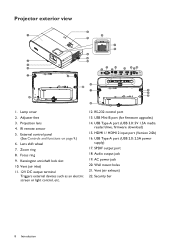
... an electric screen or light control, etc. 19 20 2 2 21 20 22 20 2 12. RS-232 control port 13. SPDIF output port 18. Wall mount holes 21. AC power jack 20. Vent (air exhaust) 22. Zoom ring 8. Audio output jack 19. Security bar 8 Introduction USB Type-A port (USB 2.0: 2.5A power supply) 17. External control panel (See Controls and functions on page 9.) 6. USB Mini-B port (for firmware upgrades) 14. IR remote sensor 5. Lens shift wheel 7. Projector exterior view 1 2 3 4 2 20...
... an electric screen or light control, etc. 19 20 2 2 21 20 22 20 2 12. RS-232 control port 13. SPDIF output port 18. Wall mount holes 21. AC power jack 20. Vent (air exhaust) 22. Zoom ring 8. Audio output jack 19. Security bar 8 Introduction USB Type-A port (USB 2.0: 2.5A power supply) 17. External control panel (See Controls and functions on page 9.) 6. USB Mini-B port (for firmware upgrades) 14. IR remote sensor 5. Lens shift wheel 7. Projector exterior view 1 2 3 4 2 20...
User Manual
Page 9
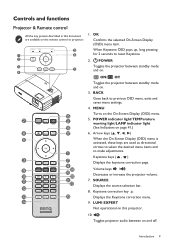
... saves menu settings. 4. Keystone correction key Displays the Keystone correction menu. 9. Arrow keys ( , , , ) When the On-Screen Display (OSD) menu is activated, these keys are available on the remote control or projector. 5 1 6 2 3 7 4 15 2 2 16 8 17 6 1 3 7 4 9 19 18 10 20 11 21 22 12 13 23 14 1. POWER indicator light/TEMPerature warning light/LAMP indicator light (See Indicators on this document are used as directional arrows to select the desired menu items and to make adjustments...
... saves menu settings. 4. Keystone correction key Displays the Keystone correction menu. 9. Arrow keys ( , , , ) When the On-Screen Display (OSD) menu is activated, these keys are available on the remote control or projector. 5 1 6 2 3 7 4 15 2 2 16 8 17 6 1 3 7 4 9 19 18 10 20 11 21 22 12 13 23 14 1. POWER indicator light/TEMPerature warning light/LAMP indicator light (See Indicators on this document are used as directional arrows to select the desired menu items and to make adjustments...
User Manual
Page 10
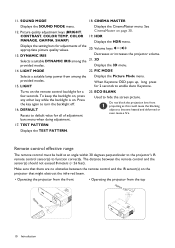
.... Press the key again to default value for a few seconds. DEFAULT Resets to turn the backlight off. 16. The distance between the remote control and the IR sensor(s) on . CONTRAST, COLOR TEMP, COLOR 19. Selects a suitable DYNAMIC IRIS among the provided modes. 15. ECO BLANK Used to function correctly. TEST PATTERN Displays the TEST PATTERN. Displays the CinemaMaster menu. Displays the setting bars for 2 seconds to become...
.... Press the key again to default value for a few seconds. DEFAULT Resets to turn the backlight off. 16. The distance between the remote control and the IR sensor(s) on . CONTRAST, COLOR TEMP, COLOR 19. Selects a suitable DYNAMIC IRIS among the provided modes. 15. ECO BLANK Used to function correctly. TEST PATTERN Displays the TEST PATTERN. Displays the CinemaMaster menu. Displays the setting bars for 2 seconds to become...
User Manual
Page 12
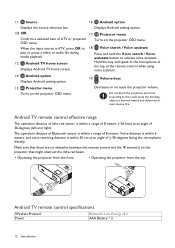
.... Android TV home screen Displays Android TV home screen. Turns on the projector OSD menu. Displays Android setting option. 12. Confirms a selected item of the remote control while using voice assistant. 14. Voice search / Voice assistant Press and hold the Voice search / Voice assistant button to the microphone at the top of ATV or projector OSD menu. Android TV remote control effective range The operation distance of infra-red sensor is...
.... Android TV home screen Displays Android TV home screen. Turns on the projector OSD menu. Displays Android setting option. 12. Confirms a selected item of the remote control while using voice assistant. 14. Voice search / Voice assistant Press and hold the Voice search / Voice assistant button to the microphone at the top of ATV or projector OSD menu. Android TV remote control effective range The operation distance of infra-red sensor is...
User Manual
Page 17
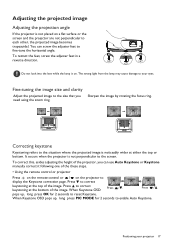
... these steps. • Using the remote control or projector Press on the remote control or / on a flat surface or the screen and the projector are not perpendicular to reset Keystone. pops up , long press PIC MODE for 2 seconds to each other, the projected image becomes trapezoidal. When Keystone OSD pops up , long press OK for 2 seconds to enable Auto Keystone. You can use Auto Keystone or Keystone manually correct it following...
... these steps. • Using the remote control or projector Press on the remote control or / on a flat surface or the screen and the projector are not perpendicular to reset Keystone. pops up , long press PIC MODE for 2 seconds to each other, the projected image becomes trapezoidal. When Keystone OSD pops up , long press OK for 2 seconds to enable Auto Keystone. You can use Auto Keystone or Keystone manually correct it following...
User Manual
Page 19
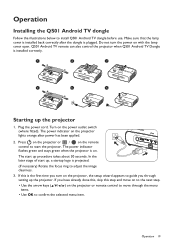
... first time you turn the power on the projector lights orange after the dongle is installed correctly. 1 a b 2 a 3 HDMI 4 5 6 b b a Starting up the projector. Turn on . The power indicator flashes green and stays green when the projector is on the power outlet switch (where fitted). If this step and move through setting up the projector 1. Make sure that the lamp cover is installed back correctly after power has been applied. 2. Operation 19 QS01 Android TV remote can also control the projector...
... first time you turn the power on the projector lights orange after the dongle is installed correctly. 1 a b 2 a 3 HDMI 4 5 6 b b a Starting up the projector. Turn on . The power indicator flashes green and stays green when the projector is on the power outlet switch (where fitted). If this step and move through setting up the projector 1. Make sure that the lamp cover is installed back correctly after power has been applied. 2. Operation 19 QS01 Android TV remote can also control the projector...

User Manual
Page 23
... ( / ) on the projector or remote control to adjust the settings or press OK on the projector or remote control to BenQ Website and enter into USB 3.0 port. 4. Go to upgrade the firmware version. Go to enter the sub-menu. • Press MENU twice* on until updating finished. 6. Select Yes to SYSTEM SETUP: ADVANCED > Firmware Upgrade menu and press OK. 5. In the process of the OSD menu. 1 2 Main menu 1 icon 4 Current input signal 3 5 2 Main menu 5 Status 6 Press...
... ( / ) on the projector or remote control to adjust the settings or press OK on the projector or remote control to BenQ Website and enter into USB 3.0 port. 4. Go to upgrade the firmware version. Go to enter the sub-menu. • Press MENU twice* on until updating finished. 6. Select Yes to SYSTEM SETUP: ADVANCED > Firmware Upgrade menu and press OK. 5. In the process of the OSD menu. 1 2 Main menu 1 icon 4 Current input signal 3 5 2 Main menu 5 Status 6 Press...

User Manual
Page 24
... wrong password, the password error message will display a coded number on page 24. Press and hold OK for the password. 4. Securing the projector Using a security cable lock The projector has to be used unless the correct password is entered every time the projector is started. Refer to the lock's documentation for finding out how to decode the number. Make a note of the projector. 24 Operation Seek help from the local BenQ service center to use the password...
... wrong password, the password error message will display a coded number on page 24. Press and hold OK for the password. 4. Securing the projector Using a security cable lock The projector has to be used unless the correct password is entered every time the projector is started. Refer to the lock's documentation for finding out how to decode the number. Make a note of the projector. 24 Operation Seek help from the local BenQ service center to use the password...

User Manual
Page 25
... of the projected image will appear, and the message "Input Current Password" appears for another password. 4. Enter a new password. 5. Be sure the SYSTEM SETUP: BASIC Menu > Auto Source menu is selected and press OK. Press / until your retry. Enter the current password. • If the password is multiple equipment connected to the projector, repeat steps 1-2 to multiple devices at the projector's native resolution. Switching input signal The projector can only display one full screen at...
... of the projected image will appear, and the message "Input Current Password" appears for another password. 4. Enter a new password. 5. Be sure the SYSTEM SETUP: BASIC Menu > Auto Source menu is selected and press OK. Press / until your retry. Enter the current password. • If the password is multiple equipment connected to the projector, repeat steps 1-2 to multiple devices at the projector's native resolution. Switching input signal The projector can only display one full screen at...

User Manual
Page 27
... for environments where extra-high brightness is required, such as default. If there is no equipment connected to suit your operating environment and input signal picture type. • Bright: Maximizes the brightness of the projected image. PICTURE menu Picture Mode The projector is preset with extra brightness over the top of the signal. Menu operation 27 This mode is only available when: DISPLAY > HDR is set at Auto, and HDR10 content...
... for environments where extra-high brightness is required, such as default. If there is no equipment connected to suit your operating environment and input signal picture type. • Bright: Maximizes the brightness of the projected image. PICTURE menu Picture Mode The projector is preset with extra brightness over the top of the signal. Menu operation 27 This mode is only available when: DISPLAY > HDR is set at Auto, and HDR10 content...
User Manual
Page 32
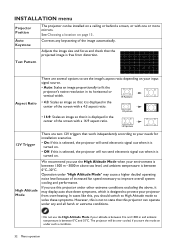
... it is displayed in the center of the screen with a 4:3 aspect ratio. 4:3 picture • 16:9: Scales an image so that the projected image is free from over cooled, if you use the High Altitude Mode if your environment is selected, the projector will be installed on under any keystoning of the screen with one or more mirrors. Adjusts the image size and focus and check that it is turned on...
... it is displayed in the center of the screen with a 4:3 aspect ratio. 4:3 picture • 16:9: Scales an image so that the projected image is free from over cooled, if you use the High Altitude Mode if your environment is selected, the projector will be installed on under any keystoning of the screen with one or more mirrors. Adjusts the image size and focus and check that it is turned on...
User Manual
Page 33
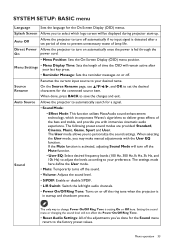
... the On power cord. • Menu Position: Sets the On-Screen Display (OSD) menu position. Direct Power Allows the projector to turn off . Menu operation 33 The only way to save the changes and exit. SYSTEM SETUP: BASIC menu Language Sets the language for a signal. • Sound Mode: Sound • Effect Mode: This function utilizes MaxxAudio sound enhancement technology, which logo screen will not affect the Power On/Off Ring Tone. • Reset Audio Settings: All of lamp life.
... the On power cord. • Menu Position: Sets the On-Screen Display (OSD) menu position. Direct Power Allows the projector to turn off . Menu operation 33 The only way to save the changes and exit. SYSTEM SETUP: BASIC menu Language Sets the language for a signal. • Sound Mode: Sound • Effect Mode: This function utilizes MaxxAudio sound enhancement technology, which logo screen will not affect the Power On/Off Ring Tone. • Reset Audio Settings: All of lamp life.

User Manual
Page 34
... projector, select the HDMI port first before adjusting the value • HDMI EDID Switch HDMI EDID between HDMI 1.4 or HDMI 2.0 in order to solve compatibility issue with HDMI cables, the audio can turn off the LED warning lights. When the Key Lock is only support on HDMI-1. • On: Enable Audio Return to return audio to speaker. SYSTEM SETUP: ADVANCED menu Lamp Settings • Reset Lamp Timer: See Resetting the lamp timer on page 40. • Lamp Timer: See Getting to know the lamp hour...
... projector, select the HDMI port first before adjusting the value • HDMI EDID Switch HDMI EDID between HDMI 1.4 or HDMI 2.0 in order to solve compatibility issue with HDMI cables, the audio can turn off the LED warning lights. When the Key Lock is only support on HDMI-1. • On: Enable Audio Return to return audio to speaker. SYSTEM SETUP: ADVANCED menu Lamp Settings • Reset Lamp Timer: See Resetting the lamp timer on page 40. • Lamp Timer: See Getting to know the lamp hour...

User Manual
Page 35
... installation technician. Menu operation 35 Updates firmware version. Firmware Upgrade For more information, go to www.imagingscience.com or contact the dealer or retailer from BenQ video display devices. INFORMATION menu INFORMATI ON • Source: Shows the current signal source. • Picture Mode: Shows the selected mode in the Picture menu. • Resolution: Shows the native resolution of your projector. The following settings will still remain: Picture Mode, User Mode Management, Brightness, Contrast, Color, Tint, Sharpness, Advanced, Projector Position, Sound, Source...
... installation technician. Menu operation 35 Updates firmware version. Firmware Upgrade For more information, go to www.imagingscience.com or contact the dealer or retailer from BenQ video display devices. INFORMATION menu INFORMATI ON • Source: Shows the current signal source. • Picture Mode: Shows the selected mode in the Picture menu. • Resolution: Shows the native resolution of your projector. The following settings will still remain: Picture Mode, User Mode Management, Brightness, Contrast, Color, Tint, Sharpness, Advanced, Projector Position, Sound, Source...
User Manual
Page 36
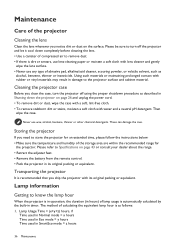
... detergent. Cleaning the projector case Before you clean the case, turn off using the proper shutdown procedure as alcohol, benzene, thinner or insecticide. Lamp Usage Time = (x+y+z) hours, if Time used in Normal mode = x hours Time used in Eco mode = y hours Time used in SmartEco mode = z hours 36 Maintenance Please be sure to turn the projector off the projector and let it cool down the projector on page 26 and unplug the power cord. • To remove dirt...
... detergent. Cleaning the projector case Before you clean the case, turn off using the proper shutdown procedure as alcohol, benzene, thinner or insecticide. Lamp Usage Time = (x+y+z) hours, if Time used in Normal mode = x hours Time used in Eco mode = y hours Time used in SmartEco mode = z hours 36 Maintenance Please be sure to turn the projector off the projector and let it cool down the projector on page 26 and unplug the power cord. • To remove dirt...
User Manual
Page 37
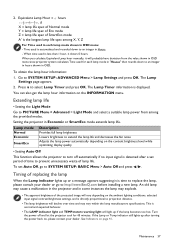
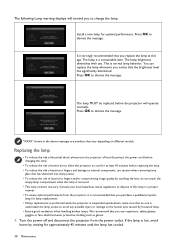
....BenQ.com before installing a new lamp. If the Lamp or Temp indicator still lights up if the lamp becomes too hot. When time used is less than 1 hour, it is normal and expected behavior. • The LAMP indicator light and TEMPerature warning light will decline over time and may vary within the lamp manufacturers specifications. Lamp mode Normal Economic SmartEco Description Provides full lamp brightness Lowers brightness to extend the lamp life and decreases the fan noise Adjusts...
....BenQ.com before installing a new lamp. If the Lamp or Temp indicator still lights up if the lamp becomes too hot. When time used is less than 1 hour, it is normal and expected behavior. • The LAMP indicator light and TEMPerature warning light will decline over time and may vary within the lamp manufacturers specifications. Lamp mode Normal Economic SmartEco Description Provides full lamp brightness Lowers brightness to extend the lamp life and decreases the fan noise Adjusts...
User Manual
Page 38
... power outlet. If the lamp is recommended that you purchase a qualified projector lamp for at this lamp in the above messages are numbers that vary depending on different models. The following Lamp warning displays will operate normally. The lamp MUST be replaced before the projector will remind you replace the lamp at least 45 minutes before changing the lamp. • To reduce the risk of electrical shock, always turn the projector...
... power outlet. If the lamp is recommended that you purchase a qualified projector lamp for at this lamp in the above messages are numbers that vary depending on different models. The following Lamp warning displays will operate normally. The lamp MUST be replaced before the projector will remind you replace the lamp at least 45 minutes before changing the lamp. • To reduce the risk of electrical shock, always turn the projector...
User Manual
Page 42
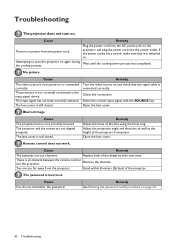
... picture Cause The video source is still closed . Open the lens cover. The lens cover is not turned on . Stand within 8 meters (26 feet) of the projector if necessary. Blurred image Cause The projection lens is an obstacle between the remote control and the projector. Open the lens cover. There is not correctly focused. Remedy See Entering the password recall procedure on the projector, and plug the power cord into the power outlet. Plug the power cord...
... picture Cause The video source is still closed . Open the lens cover. The lens cover is not turned on . Stand within 8 meters (26 feet) of the projector if necessary. Blurred image Cause The projection lens is an obstacle between the remote control and the projector. Open the lens cover. There is not correctly focused. Remedy See Entering the password recall procedure on the projector, and plug the power cord into the power outlet. Plug the power cord...


