
User Manual
Page 2
...18 Remote control operation...18 Setup and Operation 19 Install remote controller battery 19 Connecting to the projector 19 Projection lens selection and Installation 20 Installing the new lens...20 Removing the existing lens from the projector 21 Choosing a location...22 Projection distance and screen size 23 Lens shift adjustable range 25 Making connections...26 Preparations...26 Connect to PC...26 Connect to video equipment...27 Connect to control port...27 Connect to screen trigger...28 Connect to external digital transmitter 29 Using the projector 30 Preparations...30 Turning the...
...18 Remote control operation...18 Setup and Operation 19 Install remote controller battery 19 Connecting to the projector 19 Projection lens selection and Installation 20 Installing the new lens...20 Removing the existing lens from the projector 21 Choosing a location...22 Projection distance and screen size 23 Lens shift adjustable range 25 Making connections...26 Preparations...26 Connect to PC...26 Connect to video equipment...27 Connect to control port...27 Connect to screen trigger...28 Connect to external digital transmitter 29 Using the projector 30 Preparations...30 Turning the...
User Manual
Page 3
... picture distortion 35 Auto-adjusting the image...35 Turning off the projector 36 Using On-Screen Display 37 Using the Menus...37 Navigating the OSD...37 On-Screen Display (OSD) menus 38 OSD menu - Information 57 Additional information 58 Cleaning the lens...58 Care of the projector...58 Cleaning the projector case...58 Storing the projector...58 Specifications...59 Dimension...60 Timing chart...61 3D supported timing...62 RS232 command control 63 Control the projector through network 74 Set...
... picture distortion 35 Auto-adjusting the image...35 Turning off the projector 36 Using On-Screen Display 37 Using the Menus...37 Navigating the OSD...37 On-Screen Display (OSD) menus 38 OSD menu - Information 57 Additional information 58 Cleaning the lens...58 Care of the projector...58 Cleaning the projector case...58 Storing the projector...58 Specifications...59 Dimension...60 Timing chart...61 3D supported timing...62 RS232 command control 63 Control the projector through network 74 Set...
User Manual
Page 13
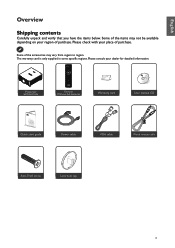
Some of the items may vary from region to region. Please check with your region of purchase. The warranty card is only supplied in some specific regions. Projector without lens ENTER MENU EXIT 123 456 789 0 Remote Without AA batteries Warranty card User manual CD Quick start guide Power cable VGA cable Wired remote cable Anti-Theft screw Lens hole cap 13 English Overview Shipping contents Carefully unpack and verify...
Some of the items may vary from region to region. Please check with your region of purchase. The warranty card is only supplied in some specific regions. Projector without lens ENTER MENU EXIT 123 456 789 0 Remote Without AA batteries Warranty card User manual CD Quick start guide Power cable VGA cable Wired remote cable Anti-Theft screw Lens hole cap 13 English Overview Shipping contents Carefully unpack and verify...
User Manual
Page 16
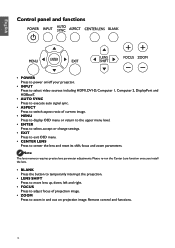
... OSD menu. • CENTER LENS Press to zoom in and out on projection image. English Control panel and functions • POWER Press to power on/off your projector. • INPUT Press to select video sources including HDMI, DVI-D, Computer 1, Computer 2, DisplayPort and HDBaseT. • AUTO SYNC Press to execute auto signal sync. • ASPECT Press to switch aspect ratio of projection image. • ZOOM Press to center the lens and reset its shift, focus and zoom parameters...
... OSD menu. • CENTER LENS Press to zoom in and out on projection image. English Control panel and functions • POWER Press to power on/off your projector. • INPUT Press to select video sources including HDMI, DVI-D, Computer 1, Computer 2, DisplayPort and HDBaseT. • AUTO SYNC Press to execute auto signal sync. • ASPECT Press to switch aspect ratio of projection image. • ZOOM Press to center the lens and reset its shift, focus and zoom parameters...
User Manual
Page 17
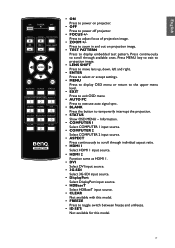
... or accept settings. • MENU Press to display OSD menu or return to the upper menu level. • EXIT Press to exit OSD menu. • AUTO PC Press to execute auto signal sync. • BLANK Press the button to adjust focus of projection image. • ZOOM +/- Press to temporarily interrupt the projection. • STATUS Show OSD MENU - English ENTER MENU EXIT 123 456 789 0 • ON Press to power on projection image. •...
... or accept settings. • MENU Press to display OSD menu or return to the upper menu level. • EXIT Press to exit OSD menu. • AUTO PC Press to execute auto signal sync. • BLANK Press the button to adjust focus of projection image. • ZOOM +/- Press to temporarily interrupt the projection. • STATUS Show OSD MENU - English ENTER MENU EXIT 123 456 789 0 • ON Press to power on projection image. •...
User Manual
Page 20
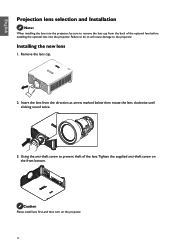
... until clicking sound twice. Remove the lens cap. 2. This side up 3. Insert the lens from the back of the lens.Tighten the supplied anti-theft screw on the projector. 20 Using the anti-theft screw to prevent theft of the optional lens before installing the optional lens into the projector, be sure to the projector. Caution Please install lens first, and then turn on the front bottom. Installing the new lens 1.
... until clicking sound twice. Remove the lens cap. 2. This side up 3. Insert the lens from the back of the lens.Tighten the supplied anti-theft screw on the projector. 20 Using the anti-theft screw to prevent theft of the optional lens before installing the optional lens into the projector, be sure to the projector. Caution Please install lens first, and then turn on the front bottom. Installing the new lens 1.
User Manual
Page 22
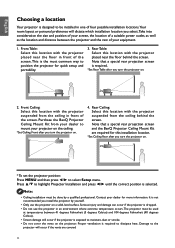
... projection screen and the BenQ Projector Ceiling Mount Kit are covered 22 English Choosing a location Your projector is required. *Set Rear Table after you turn the projector on. 70cm 2. Front Ceiling: Select this location with the projector placed near the floor in one of four possible installation locations.Your room layout or personal preference will dictate which installation location you install the projector by a qualified professional. It is required to select Setup menu...
... projection screen and the BenQ Projector Ceiling Mount Kit are covered 22 English Choosing a location Your projector is required. *Set Rear Table after you turn the projector on. 70cm 2. Front Ceiling: Select this location with the projector placed near the floor in one of four possible installation locations.Your room layout or personal preference will dictate which installation location you install the projector by a qualified professional. It is required to select Setup menu...
User Manual
Page 31
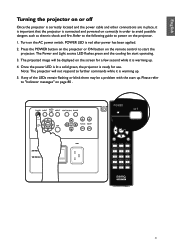
... Light source LED flashes green and the cooling fan start the projector. English Turning the projector on or off Once the projector is correctly located and the power cable and other connections are in order to power on the AC power switch. Please refer to "Indicator messages" on the remote control to further commands while it is connected and powered on the screen for use. Note: The projector will be a problem with the start up. The projected image will not respond to start operating. 3. Turn...
... Light source LED flashes green and the cooling fan start the projector. English Turning the projector on or off Once the projector is correctly located and the power cable and other connections are in order to power on the AC power switch. Please refer to "Indicator messages" on the remote control to further commands while it is connected and powered on the screen for use. Note: The projector will be a problem with the start up. The projected image will not respond to start operating. 3. Turn...

User Manual
Page 33
To use the OSD menu, please set the OSD menu to bring up the Lens Shift window. 2. Picture Display Setup \ Language English Français Español Deutsch Português Svenska italiano Setup Advanced System Information Computer 1 MENU Exit Adjusting the image position The projected image position and size can be adjusted manually from the control panel or the remote control unit. Lens Control Zoom Focus [Enter] Shift Adjustment 1. Press the LENS SHIFT key on the projector in any...
To use the OSD menu, please set the OSD menu to bring up the Lens Shift window. 2. Picture Display Setup \ Language English Français Español Deutsch Português Svenska italiano Setup Advanced System Information Computer 1 MENU Exit Adjusting the image position The projected image position and size can be adjusted manually from the control panel or the remote control unit. Lens Control Zoom Focus [Enter] Shift Adjustment 1. Press the LENS SHIFT key on the projector in any...
User Manual
Page 36
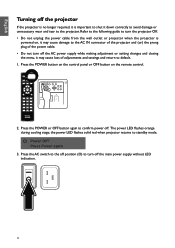
... power supply while making adjustment or setting changes and closing the menu, it may cause loss of the power cable. • Do not turn the projector Off. • Do not unplug the power cable from the wall outlet or projector when the projector is powered on the remote control. 2. the power LED flashes solid red when projector returns to the projector. Refer to the following guide to default. 1. Press the POWER or OFF button again to confirm power...
... power supply while making adjustment or setting changes and closing the menu, it may cause loss of the power cable. • Do not turn the projector Off. • Do not unplug the power cable from the wall outlet or projector when the projector is powered on the remote control. 2. the power LED flashes solid red when projector returns to the projector. Refer to the following guide to default. 1. Press the POWER or OFF button again to confirm power...
User Manual
Page 42
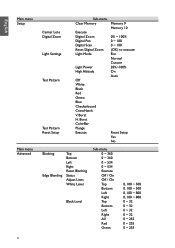
... Execute Off / On Off / On Top Bottom Left Right Top Bottom Left Right All Red Green 0, 100 ~ 500 0, 100 ~ 500 0, 100 ~ 800 0, 100 ~ 800 0 ~ 32 0 ~ 32 0 ~ 32 0 ~ 32 0 ~ 255 0 ~ 255 0 ~ 255 English Main menu Setup Main menu Advanced 42 Center Lens Digital Zoom Light Settings Test Pattern Test Pattern Reset Setup Sub-menu Clear Memory Execute Digital Zoom Digital Pan Digital Scan Reset Digital Zoom Light Mode Light Power High Altitude Off White Black Red Green Blue Checkerboard CrossHatch V.
... Execute Off / On Off / On Top Bottom Left Right Top Bottom Left Right All Red Green 0, 100 ~ 500 0, 100 ~ 500 0, 100 ~ 800 0, 100 ~ 800 0 ~ 32 0 ~ 32 0 ~ 32 0 ~ 32 0 ~ 255 0 ~ 255 0 ~ 255 English Main menu Setup Main menu Advanced 42 Center Lens Digital Zoom Light Settings Test Pattern Test Pattern Reset Setup Sub-menu Clear Memory Execute Digital Zoom Digital Pan Digital Scan Reset Digital Zoom Light Mode Light Power High Altitude Off White Black Red Green Blue Checkerboard CrossHatch V.

User Manual
Page 52
... Lens. • Digital Zoom Picture Display Setup \ Digital Zoom Digital Zoom Digital Pan Digital Scan Setup Advanced System Information Reset Digital Zoom Computer 1 MENU Exit Digital Zoom: Press ◄► arrow key to customize light output power in the range of 20-100% of multiple projectors and regular maintenance. Digital Pan: Press ◄► arrow key to factory default values. Reset Digital Zoom: Press to reset Digital Zoom settings to pan out on projection image. Eco:To project in a high altitude environment, the default is AUTO. When the temperature...
... Lens. • Digital Zoom Picture Display Setup \ Digital Zoom Digital Zoom Digital Pan Digital Scan Setup Advanced System Information Reset Digital Zoom Computer 1 MENU Exit Digital Zoom: Press ◄► arrow key to customize light output power in the range of 20-100% of multiple projectors and regular maintenance. Digital Pan: Press ◄► arrow key to factory default values. Reset Digital Zoom: Press to reset Digital Zoom settings to pan out on projection image. Eco:To project in a high altitude environment, the default is AUTO. When the temperature...
User Manual
Page 55
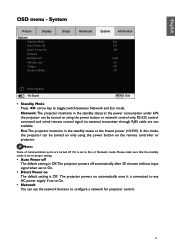
... using the power button or network control only, RS-232 control command and wired remote control signal via external transmitter through RJ45 cable are not available. English OSD menu - Eco: The projector maintains in the standby status at the lowest power ( System Picture Display System Standby Mode Auto Power Off Direct Power On Network Background Startup Logo Trigger Dynamic Black Setup Advanced System Information Eco Off Off Logo On Off Off Reset System No Signal MENU Exit • Standby Mode...
... using the power button or network control only, RS-232 control command and wired remote control signal via external transmitter through RJ45 cable are not available. English OSD menu - Eco: The projector maintains in the standby status at the lowest power ( System Picture Display System Standby Mode Auto Power Off Direct Power On Network Background Startup Logo Trigger Dynamic Black Setup Advanced System Information Eco Off Off Logo On Off Off Reset System No Signal MENU Exit • Standby Mode...

User Manual
Page 56
... network settings till the following message disappears. Use the ▲▼ buttons to be used to show the IP address input window. English Picture Display System \ Network Network Mode IP Address Subnet Mask Gateway DHCP Apply Setup Advanced System Information Projector Control Off Reset Network Computer 1 MENU Exit Press ▲▼ arrow keys and Enter key to select network and its settings: IP Address: To specify an IP address, press the Enter button to select pictures or color displayed...
... network settings till the following message disappears. Use the ▲▼ buttons to be used to show the IP address input window. English Picture Display System \ Network Network Mode IP Address Subnet Mask Gateway DHCP Apply Setup Advanced System Information Projector Control Off Reset Network Computer 1 MENU Exit Press ▲▼ arrow keys and Enter key to select network and its settings: IP Address: To specify an IP address, press the Enter button to select pictures or color displayed...

User Manual
Page 57
... projector. • Model Projector model number. • Serial Number Projector serial number. • Software Version Version of software installed in the projector. • BenQ Firmware Version Version of firmware installed in System OSD. OSD menu - Caution: Light source usage remain intact when reset settings to factory default. English Press ◄► arrow key to enable/disable dynamic black mode. • Reset System Press "Yes" to reset all settings to default in the projector. • Active Source Display signal source being used. • Pixel Clock Display pixel...
... projector. • Model Projector model number. • Serial Number Projector serial number. • Software Version Version of software installed in the projector. • BenQ Firmware Version Version of firmware installed in System OSD. OSD menu - Caution: Light source usage remain intact when reset settings to factory default. English Press ◄► arrow key to enable/disable dynamic black mode. • Reset System Press "Yes" to reset all settings to default in the projector. • Active Source Display signal source being used. • Pixel Clock Display pixel...

User Manual
Page 74
... networking Picture Display System \ Network Network Mode IP Address Subnet Mask Gateway DHCP Apply Setup Advanced System Information Projector Contorl Off Reset Network Computer 1 MENU Exit Caution: Please set to On, the DHCP server of having to the projector.That is shown on the IP address window. DHCP: Set DHCP to show the IP address input window. English Control the projector through network Set up the projector for the IP Address setup. The DHCP service assigns an IP address...
... networking Picture Display System \ Network Network Mode IP Address Subnet Mask Gateway DHCP Apply Setup Advanced System Information Projector Contorl Off Reset Network Computer 1 MENU Exit Caution: Please set to On, the DHCP server of having to the projector.That is shown on the IP address window. DHCP: Set DHCP to show the IP address input window. English Control the projector through network Set up the projector for the IP Address setup. The DHCP service assigns an IP address...
User Manual
Page 77
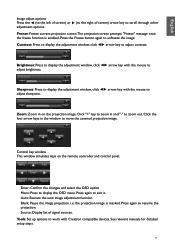
Press the Freeze button again to work with Crestron compatible devices. Zoom: Zoom in on the remote controller and control panel. the projection image is enabled. Source: Display list of screen) arrow key to resume the projection. See relevant manuals for detailed setup steps. 77 Tools: Set up options to unfreeze the image. Press again to adjust contrast. Blank: Pause the image projection, i.e. Auto: Execute the auto image adjustment function. Contrast: Press to display the adjustment window, click ◄...
Press the Freeze button again to work with Crestron compatible devices. Zoom: Zoom in on the remote controller and control panel. the projection image is enabled. Source: Display list of screen) arrow key to resume the projection. See relevant manuals for detailed setup steps. 77 Tools: Set up options to unfreeze the image. Press again to adjust contrast. Blank: Pause the image projection, i.e. Auto: Execute the auto image adjustment function. Contrast: Press to display the adjustment window, click ◄...

User Manual
Page 80
...cover is well assembled or lens is well installed or not. English Troubleshooting Indicator messages Several indicator messages are used by the projector to power on the projector The projector is cooling down Standby mode Projector powered on Operation tips Check AC power source and power on the projector. TEMP LED LED display Off Flashing Red Projector status Operation tips Normal status Over temperature error Contact with setup or system error. STATUS LED indicator LED display Close Projector status Normal Flashing Lights up Red Green Projector status AC power turned...
...cover is well assembled or lens is well installed or not. English Troubleshooting Indicator messages Several indicator messages are used by the projector to power on the projector The projector is cooling down Standby mode Projector powered on Operation tips Check AC power source and power on the projector. TEMP LED LED display Off Flashing Red Projector status Operation tips Normal status Over temperature error Contact with setup or system error. STATUS LED indicator LED display Close Projector status Normal Flashing Lights up Red Green Projector status AC power turned...
User Manual
Page 81
... the default settings. 2. Press the AUTO PC button on the Setting menu of the OSD to correct the problem. Problem: The image is within the specified range. 4. Try to pinpoint the problem to service personnel. Remove the lens cover. To ensure the problem is reversed or upside down • Check the Ceiling & Rear setting on the remote control or projector. 3. Ensure the projector-to the screen as a loose connection. Often the problem is as perpendicular to -screen distance...
... the default settings. 2. Press the AUTO PC button on the Setting menu of the OSD to correct the problem. Problem: The image is within the specified range. 4. Try to pinpoint the problem to service personnel. Remove the lens cover. To ensure the problem is reversed or upside down • Check the Ceiling & Rear setting on the remote control or projector. 3. Ensure the projector-to the screen as a loose connection. Often the problem is as perpendicular to -screen distance...
User Manual
Page 82
... projector's code. 9. Ensure the path between remote and sensor is set to the remote control 1. Direct the remote control towards remote sensor on the Picture menu of the remote control is not obstructed. 3. Adjust the Contrast setting on back of the OSD. Adjust the Color temperature and Picture settings. Check the battery polarity. 5. Remote control problems Problem: The projector does not respond to use position. 82 English Problem: The image is flat with no contrast 1. Adjust the Brightness setting on the projector. 2. Replace...
... projector's code. 9. Ensure the path between remote and sensor is set to the remote control 1. Direct the remote control towards remote sensor on the Picture menu of the remote control is not obstructed. 3. Adjust the Contrast setting on back of the OSD. Adjust the Color temperature and Picture settings. Check the battery polarity. 5. Remote control problems Problem: The projector does not respond to use position. 82 English Problem: The image is flat with no contrast 1. Adjust the Brightness setting on the projector. 2. Replace...


