

User Manual
Page 2
... projected image size 14 Connection 16 Connecting video source devices........17 Operation 18 Starting up the projector 18 Adjusting the projected image 19 Using the menus 21 Securing the projector 22 Switching input signal 24 Magnifying and searching for details ...25 Selecting the aspect ratio 25 Optimizing the image 27 Setting the presentation timer 30 Remote paging operations 31 Freezing the image 31 Hiding the image 32 Locking control keys 32 Operating in a high altitude environment 32 Adjusting the sound 33 Using...
... projected image size 14 Connection 16 Connecting video source devices........17 Operation 18 Starting up the projector 18 Adjusting the projected image 19 Using the menus 21 Securing the projector 22 Switching input signal 24 Magnifying and searching for details ...25 Selecting the aspect ratio 25 Optimizing the image 27 Setting the presentation timer 30 Remote paging operations 31 Freezing the image 31 Hiding the image 32 Locking control keys 32 Operating in a high altitude environment 32 Adjusting the sound 33 Using...
User Manual
Page 3
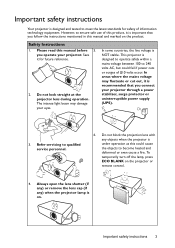
... remote control. 4. Refer servicing to ensure safe use of this manual and marked on the product. However, to qualified service personnel. 6. you operate your eyes. Please read this could fail if power cuts or surges of information technology equipment. Do not block the projection lens with any ) when the projector lamp is recommended that you connect your projector through a power stabilizer, surge protector or uninterruptible power supply...
... remote control. 4. Refer servicing to ensure safe use of this manual and marked on the product. However, to qualified service personnel. 6. you operate your eyes. Please read this could fail if power cuts or surges of information technology equipment. Do not block the projection lens with any ) when the projector lamp is recommended that you connect your projector through a power stabilizer, surge protector or uninterruptible power supply...
User Manual
Page 6
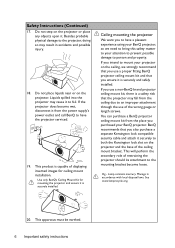
... use a non-BenQ brand projector ceiling mount kit, there is securely installed. This will perform the secondary role of restraining the projector should its attachment to your BenQ projector. This product is capable of displaying inverted images for mounting the projector and ensure it from the ceiling due to both the Kensington lock slot on the projector. BenQ recommends that the projector may fall from the power supply's power outlet and call BenQ...
... use a non-BenQ brand projector ceiling mount kit, there is securely installed. This will perform the secondary role of restraining the projector should its attachment to your BenQ projector. This product is capable of displaying inverted images for mounting the projector and ensure it from the ceiling due to both the Kensington lock slot on the projector. BenQ recommends that the projector may fall from the power supply's power outlet and call BenQ...
User Manual
Page 7
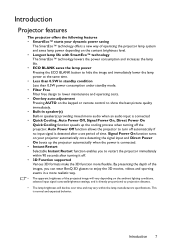
... standby mode. • Filter Free Filter free design to lower maintenance and operating costs. • One-key auto-adjustment Pressing AUTO on the ambient lighting conditions, selected input signal contrast/brightness settings, and is directly proportional to projection distance. • The lamp brightness will decline over time and may vary within the lamp manufacturers specifications. Introduction Projector features The projector offers the following features • SmartEco™ starts your projector automatically once detecting the signal input...
... standby mode. • Filter Free Filter free design to lower maintenance and operating costs. • One-key auto-adjustment Pressing AUTO on the ambient lighting conditions, selected input signal contrast/brightness settings, and is directly proportional to projection distance. • The lamp brightness will decline over time and may vary within the lamp manufacturers specifications. Introduction Projector features The projector offers the following features • SmartEco™ starts your projector automatically once detecting the signal input...
User Manual
Page 10
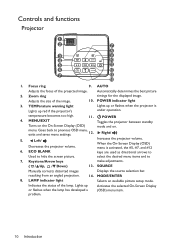
...14. Controls and functions Projector 1 2 7 8 3 9 4 10 5 11 6 12 7 13 14 1. menu, 12. Right/ 5. Indicates the status of the projected image. Automatically determines the best picture 2. MENU/EXIT Toggles the projector between standby Turns on the On-Screen Display (OSD) mode and on. TEMPerature warning light Lights up or flashes when the lamp has developed a problem. POWER indicator light Lights up or flashes when the projector is activated, the #5, #7, and #12 6. menu. Goes back to make adjustments. ( / Up, / Down) 13. SOURCE Manually...
...14. Controls and functions Projector 1 2 7 8 3 9 4 10 5 11 6 12 7 13 14 1. menu, 12. Right/ 5. Indicates the status of the projected image. Automatically determines the best picture 2. MENU/EXIT Toggles the projector between standby Turns on the On-Screen Display (OSD) mode and on. TEMPerature warning light Lights up or flashes when the lamp has developed a problem. POWER indicator light Lights up or flashes when the projector is activated, the #5, #7, and #12 6. menu. Goes back to make adjustments. ( / Up, / Down) 13. SOURCE Manually...
User Manual
Page 11
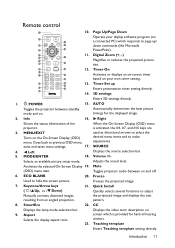
... settings directly. 1. Left 5. Toggles projector audio between standby mode and on the On-Screen Display (OSD) desired menu items and to previous OSD menu, adjustments. the projected image and displays the test pattern. 8. Digital Zoom (+, -) 6 17 7 Magnifies or reduces the projected picture 8 18 size. 9 18 12. Automatically determines the best picture timings for hard-of the When the On-Screen Display (OSD) menu projector. Info 16. MODE/ENTER Displays the source selection bar. 18. ECO BLANK 20. Remote control...
... settings directly. 1. Left 5. Toggles projector audio between standby mode and on the On-Screen Display (OSD) desired menu items and to previous OSD menu, adjustments. the projected image and displays the test pattern. 8. Digital Zoom (+, -) 6 17 7 Magnifies or reduces the projected picture 8 18 size. 9 18 12. Automatically determines the best picture timings for hard-of the When the On-Screen Display (OSD) menu projector. Info 16. MODE/ENTER Displays the source selection bar. 18. ECO BLANK 20. Remote control...
User Manual
Page 18
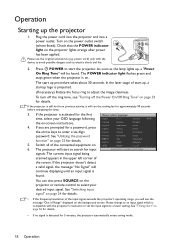
... corner of Range" displayed on -screen instructions. 4. See "Switching input signal" on page 56 for the first time, select your desired input signal. Check that the POWER indicator light on the power outlet switch (where fitted). You can also press SOURCE on the projector or remote control to a lower setting. Plug the power cord into the projector and into a power outlet. Turn on the projector lights orange after power has been applied. The projector will be heard. Operation Starting up procedure takes...
... corner of Range" displayed on -screen instructions. 4. See "Switching input signal" on page 56 for the first time, select your desired input signal. Check that the POWER indicator light on the power outlet switch (where fitted). You can also press SOURCE on the projector or remote control to a lower setting. Plug the power cord into the projector and into a power outlet. Turn on the projector lights orange after power has been applied. The projector will be heard. Operation Starting up procedure takes...
User Manual
Page 19
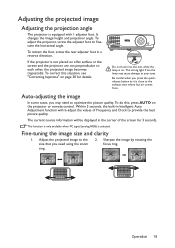
... not look into the lens while the lamp is not placed on the projector or remote control. To correct this , press AUTO on a flat surface or the screen and the projector are not perpendicular to provide the best picture quality. To adjust the projector, screw the adjuster foot to your eyes. The strong light from . Fine-tuning the image size and clarity 1. Auto-adjusting the image In some cases...
... not look into the lens while the lamp is not placed on the projector or remote control. To correct this , press AUTO on a flat surface or the screen and the projector are not perpendicular to provide the best picture quality. To adjust the projector, screw the adjuster foot to your eyes. The strong light from . Fine-tuning the image size and clarity 1. Auto-adjusting the image In some cases...
User Manual
Page 21
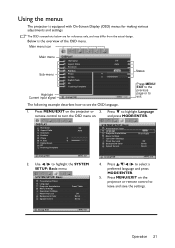
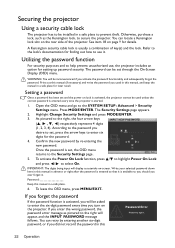
...: Basic menu. Size 0 Digital Zoom 3D Teaching Template Off Auto SYSTEM SETUP: Basic Presentation Timer Language Projector Installation Menu Settings Operation Settings Panel Key Lock Background Color Splash Screen ENTER Front Table Off BenQ BenQ Analog RGB MENU Exit 2. Use / to exit. Analog RGB MENU Exit Operation 21 Press MENU/EXIT on . Press to highlight Language remote control to turn the OSD menu on the projector or remote control to leave and save the settings. and press MODE/ENTER. SYSTEM SETUP: Basic Presentation Timer Language Projector Installation Menu Settings...
...: Basic menu. Size 0 Digital Zoom 3D Teaching Template Off Auto SYSTEM SETUP: Basic Presentation Timer Language Projector Installation Menu Settings Operation Settings Panel Key Lock Background Color Splash Screen ENTER Front Table Off BenQ BenQ Analog RGB MENU Exit 2. Use / to exit. Analog RGB MENU Exit Operation 21 Press MENU/EXIT on . Press to highlight Language remote control to turn the OSD menu on the projector or remote control to leave and save the settings. and press MODE/ENTER. SYSTEM SETUP: Basic Presentation Timer Language Projector Installation Menu Settings...
User Manual
Page 22
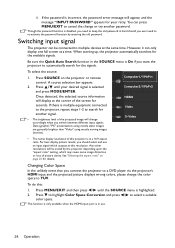
... six-digit password every time you enter the wrong password, the password error message as pictured to the right will appear, and the INPUT PASSWORD message follows. Confirm the new password by entering another six-digit password, or if you did not record the password in a safe place. 6. IMPORTANT: The digits being input will be inconvenienced if you desire to set and the power on the projector. If you turn on lock is started...
... six-digit password every time you enter the wrong password, the password error message as pictured to the right will appear, and the INPUT PASSWORD message follows. Confirm the new password by entering another six-digit password, or if you did not record the password in a safe place. 6. IMPORTANT: The digits being input will be inconvenienced if you desire to set and the power on the projector. If you turn on lock is started...

User Manual
Page 23
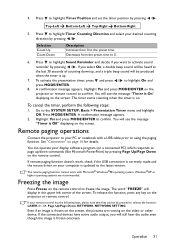
... display a coded number on the projector or remote control for details. The message "INPUT CURRENT PASSWORD" appears. 3. ii. You have to enter the new password next time the projector is correct, another password. 4. Press MODE/ENTER. manual, and you absolutely do not remember it . Seek help from the local BenQ service Recall Code: center to the Security Settings page. The message "INPUT PASSWORD" appears. If the password is incorrect, the password error message will display as asterisks on the projector. Operation...
... display a coded number on the projector or remote control for details. The message "INPUT CURRENT PASSWORD" appears. 3. ii. You have to enter the new password next time the projector is correct, another password. 4. Press MODE/ENTER. manual, and you absolutely do not remember it . Seek help from the local BenQ service Recall Code: center to the Security Settings page. The message "INPUT PASSWORD" appears. If the password is incorrect, the password error message will display as asterisks on the projector. Operation...
User Manual
Page 24
... than "Video" using mostly moving images (movies). • The native display resolution of the projected image will appear, and the message "INPUT PASSWORD" appears for details. To select the source: 1. However, it can press MENU/EXIT to cancel the change the color space to multiple devices at this : 1. See "Selecting the aspect ratio" on the projector or remote control. Press SOURCE on page 25 for your desired signal is...
... than "Video" using mostly moving images (movies). • The native display resolution of the projected image will appear, and the message "INPUT PASSWORD" appears for details. To select the source: 1. However, it can press MENU/EXIT to cancel the change the color space to multiple devices at this : 1. See "Selecting the aspect ratio" on the projector or remote control. Press SOURCE on page 25 for your desired signal is...
User Manual
Page 31
... active audio output, you want to release the function: LASER, #1, #4, Page Up/Page Down, NETWORK, NETWORK SETTING. To activate the presentation timer, press and press / to the SYSTEM SETUP: Basic > Presentation Timer menu and highlight Off. Highlight Yes and press MODE/ENTER to using the paging function. Operation 31 Press to the preset time. Even if an image is Off" displaying on the remote control. A confirmation message...
... active audio output, you want to release the function: LASER, #1, #4, Page Up/Page Down, NETWORK, NETWORK SETTING. To activate the presentation timer, press and press / to the SYSTEM SETUP: Basic > Presentation Timer menu and highlight Off. Highlight Yes and press MODE/ENTER to using the paging function. Operation 31 Press to the preset time. Even if an image is Off" displaying on the remote control. A confirmation message...
User Manual
Page 32
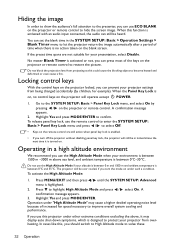
... you use the High Altitude Mode when your projector from projecting as this , you should switch to High Altitude mode to hide the screen image. Operation under other extreme conditions excluding the above sea level, and ambient temperature is between 1500 m -3000 m above , it is activated with an audio input connected, the audio can still be over cooled, if you turn off the projector without disabling panel key lock, the projector...
... you use the High Altitude Mode when your projector from projecting as this , you should switch to High Altitude mode to hide the screen image. Operation under other extreme conditions excluding the above sea level, and ambient temperature is between 1500 m -3000 m above , it is activated with an audio input connected, the audio can still be over cooled, if you turn off the projector without disabling panel key lock, the projector...

User Manual
Page 36
.../G Offset/B Offset Primary Color R/G/B/C/M/Y 3D Color Hue Management Saturation Gain Reset Picture Settings Current/All/Cancel Quick Auto Search On/Off Color Space Conversion Auto/RGB/YUV 36 Operation Menu operation Menu system Please note that the on-screen display (OSD) menus vary according to the signal type selected and the projector model you are using. PICTURE 3. SOURCE Wall Color Off/Light Yellow/Pink/Light Green/Blue/ Blackboard Aspect Ratio Auto/Real/4:3/16:9/16:10 Keystone Position Phase H.
.../G Offset/B Offset Primary Color R/G/B/C/M/Y 3D Color Hue Management Saturation Gain Reset Picture Settings Current/All/Cancel Quick Auto Search On/Off Color Space Conversion Auto/RGB/YUV 36 Operation Menu operation Menu system Please note that the on-screen display (OSD) menus vary according to the signal type selected and the projector model you are using. PICTURE 3. SOURCE Wall Color Off/Light Yellow/Pink/Light Green/Blue/ Blackboard Aspect Ratio Auto/Real/4:3/16:9/16:10 Keystone Position Phase H.
User Manual
Page 38
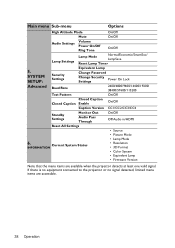
.../Audio in/HDMI Reset All Settings • Source • Picture Mode 6. Main menu Sub-menu Options High Altitude Mode On/Off Mute On/Off Audio Settings Volume Power On/Off Ring Tone On/Off Lamp Settings Lamp Mode Normal/Economic/SmartEco/ LampSave Reset Lamp Timer 5. If there is no equipment connected to the projector or no signal detected, limited menu items are available when the projector detects at least one valid signal. Current System Status INFORMATION • Lamp Mode • Resolution...
.../Audio in/HDMI Reset All Settings • Source • Picture Mode 6. Main menu Sub-menu Options High Altitude Mode On/Off Mute On/Off Audio Settings Volume Power On/Off Ring Tone On/Off Lamp Settings Lamp Mode Normal/Economic/SmartEco/ LampSave Reset Lamp Timer 5. If there is no equipment connected to the projector or no signal detected, limited menu items are available when the projector detects at least one valid signal. Current System Status INFORMATION • Lamp Mode • Resolution...
User Manual
Page 44
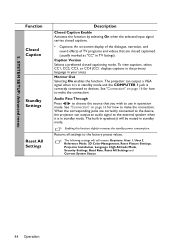
... "Connection" on -screen display of the dialogue, narration, and sound effects of TV programs and videos that you wish to make the connection. The following settings will be muted in speaker(s) will still remain: Keystone, User 1, User 2, Reference Mode, 3D Color Management, Reset Picture Settings, Projector Installation, Language, High Altitude Mode, Security Settings, Baud Rate, Reset All Settings and Current System Status. 44 Operation The projector can output an audio signal to devices. The built-in standby mode. 5. SYSTEM SETUP...
... "Connection" on -screen display of the dialogue, narration, and sound effects of TV programs and videos that you wish to make the connection. The following settings will be muted in speaker(s) will still remain: Keystone, User 1, User 2, Reference Mode, 3D Color Management, Reset Picture Settings, Projector Installation, Language, High Altitude Mode, Security Settings, Baud Rate, Reset All Settings and Current System Status. 44 Operation The projector can output an audio signal to devices. The built-in standby mode. 5. SYSTEM SETUP...
User Manual
Page 45
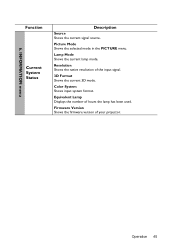
Equivalent Lamp Displays the number of your projector. Operation 45 Lamp Mode Shows the current lamp mode. Firmware Version Shows the firmware version of hours the lamp has been used. Resolution Shows the native resolution of the input signal. 3D Format Shows the current 3D mode. INFORMATION menu Function Current System Status Description Source Shows the current signal source. Picture Mode Shows the selected mode in the PICTURE menu. Color System Shows input system format. 6.
Equivalent Lamp Displays the number of your projector. Operation 45 Lamp Mode Shows the current lamp mode. Firmware Version Shows the firmware version of hours the lamp has been used. Resolution Shows the native resolution of the input signal. 3D Format Shows the current 3D mode. INFORMATION menu Function Current System Status Description Source Shows the current signal source. Picture Mode Shows the selected mode in the PICTURE menu. Color System Shows input system format. 6.
User Manual
Page 47
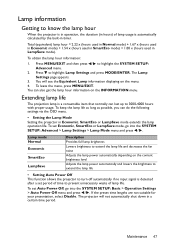
... SYSTEM SETUP: Basic > Operation Settings > Auto Power Off menu and press / . To obtain the lamp hour information: 1. Press to highlight the SYSTEM SETUP: Advanced menu. 2. The Lamp Settings page appears. 3. The projector will see the Equivalent Lamp information displaying on the content brightness level Adjusts the lamp power automatically and lowers the brightness to extend the lamp life • Setting Auto Power Off This function allows the projector to turn off automatically if no input signal is...
... SYSTEM SETUP: Basic > Operation Settings > Auto Power Off menu and press / . To obtain the lamp hour information: 1. Press to highlight the SYSTEM SETUP: Advanced menu. 2. The Lamp Settings page appears. 3. The projector will see the Equivalent Lamp information displaying on the content brightness level Adjusts the lamp power automatically and lowers the brightness to extend the lamp life • Setting Auto Power Off This function allows the projector to turn off automatically if no input signal is...
User Manual
Page 53
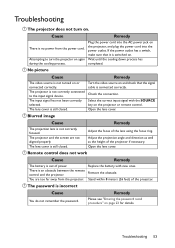
.... The input signal has not been correctly selected. The lens cover is switched on. Check the connection. Remove the obstacle. Please see "Entering the password recall procedure" on the projector, and plug the power cord into the power outlet. The projector and the screen are too far away from the power cord. Remote control does not work Cause Remedy The battery is not correctly focused. No picture Cause Remedy The video source is incorrect...
.... The input signal has not been correctly selected. The lens cover is switched on. Check the connection. Remove the obstacle. Please see "Entering the password recall procedure" on the projector, and plug the power cord into the power outlet. The projector and the screen are too far away from the power cord. Remote control does not work Cause Remedy The battery is not correctly focused. No picture Cause Remedy The video source is incorrect...


