User Manual
Page 2
... contents 8 Projector exterior view 9 Controls and functions 10 Positioning your projector 14 Choosing a location 14 Obtaining a preferred projected image size 15 Connection 18 Connecting a computer or monitor... 19 Connecting Video source devices....... 20 Operation 23 Starting up the projector 23 Adjusting the projected image 24 Using the menus 26 Securing the projector 27 Switching input signal 30 Magnifying and searching for details . 31 Selecting the aspect ratio 31 Optimizing the image 33 Setting the presentation timer 37...
... contents 8 Projector exterior view 9 Controls and functions 10 Positioning your projector 14 Choosing a location 14 Obtaining a preferred projected image size 15 Connection 18 Connecting a computer or monitor... 19 Connecting Video source devices....... 20 Operation 23 Starting up the projector 23 Adjusting the projected image 24 Using the menus 26 Securing the projector 27 Switching input signal 30 Magnifying and searching for details . 31 Selecting the aspect ratio 31 Optimizing the image 33 Setting the presentation timer 37...

User Manual
Page 3
... . 5. In some heated air and odor from its ventilation grill. Always open the lens shutter or operate your projector through a power stabilizer, surge protector or uninterruptible power supply (UPS). 3. mains voltage between 100 to operate safely within a light beam may fluctuate or cut out, it is important that you 4. Refer servicing to meet the latest standards for remove the lens cap when the...
... . 5. In some heated air and odor from its ventilation grill. Always open the lens shutter or operate your projector through a power stabilizer, surge protector or uninterruptible power supply (UPS). 3. mains voltage between 100 to operate safely within a light beam may fluctuate or cut out, it is important that you 4. Refer servicing to meet the latest standards for remove the lens cap when the...
User Manual
Page 7
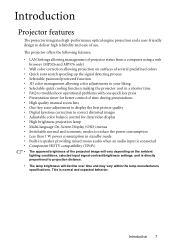
... a shorter time • FAQ to troubleshoot operational problems with one quick key press • Presentation timer for better control of time during presentations • High quality manual zoom lens • One-key auto-adjustment to display the best picture quality • Digital keystone correction to correct distorted images • Adjustable color balance control for data/video display • High brightness projection lamp • Multi-language On-Screen Display (OSD) menus • Switchable normal and economic modes to reduce the power consumption...
... a shorter time • FAQ to troubleshoot operational problems with one quick key press • Presentation timer for better control of time during presentations • High quality manual zoom lens • One-key auto-adjustment to display the best picture quality • Digital keystone correction to correct distorted images • Adjustable color balance control for data/video display • High brightness projection lamp • Multi-language On-Screen Display (OSD) menus • Switchable normal and economic modes to reduce the power consumption...
User Manual
Page 10
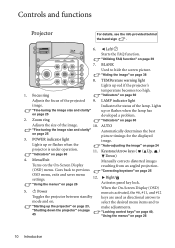
... saves menu settings. Focus ring "Indicators" on page 38 6 13 8. Lights up the projector" on page 23, "Shutting down the projector" on page 25 Automatically determines the best picture timings for the displayed 3. Goes back to hide the screen picture. 5 12 "Hiding the image" on page 60 Adjusts the focus of the projected 9. Right/ Activates panel key lock. 5. TEMPerature warning light 14 7 Lights up or flashes when the lamp has developed a problem. Lights "Fine-tuning the image size and...
... saves menu settings. Focus ring "Indicators" on page 38 6 13 8. Lights up the projector" on page 23, "Shutting down the projector" on page 25 Automatically determines the best picture timings for the displayed 3. Goes back to hide the screen picture. 5 12 "Hiding the image" on page 60 Adjusts the focus of the projected 9. Right/ Activates panel key lock. 5. TEMPerature warning light 14 7 Lights up or flashes when the lamp has developed a problem. Lights "Fine-tuning the image size and...

User Manual
Page 11
... Kensington lock slot on the projector and the base of the ceiling mount bracket. 13. Introduction 11 If you intend to mount your attention to prevent possible damage to have a pleasant experience using your BenQ projector, so we strongly recommend that you use a non-BenQ brand projector ceiling mount kit, there is securely and safely installed. Mode/Enter Selects an available picture setup mode. SOURCE Displays the source selection bar. "Switching input signal" on...
... Kensington lock slot on the projector and the base of the ceiling mount bracket. 13. Introduction 11 If you intend to mount your attention to prevent possible damage to have a pleasant experience using your BenQ projector, so we strongly recommend that you use a non-BenQ brand projector ceiling mount kit, there is securely and safely installed. Mode/Enter Selects an available picture setup mode. SOURCE Displays the source selection bar. "Switching input signal" on...

User Manual
Page 12
... On-Screen Display (OSD) menu item. Freeze Freezes the projected image. Left/ Starts the FAQ function. "Switching input signal" on page 33 Adjusts the sound level. Digital Zoom (+, -) 12. "Selecting a picture mode" on page 30 5. mode and on page 41 12 Introduction "Utilizing FAQ function" on the On-Screen Display 2 9 (OSD) menu. SOURCE Used to make adjustments. Volume +/- Right/ 45 Activates panel key lock. 2. "Magnifying and searching for the displayed Toggles the projector between standby image. "Adjusting the sound" on...
... On-Screen Display (OSD) menu item. Freeze Freezes the projected image. Left/ Starts the FAQ function. "Switching input signal" on page 33 Adjusts the sound level. Digital Zoom (+, -) 12. "Selecting a picture mode" on page 30 5. mode and on page 41 12 Introduction "Utilizing FAQ function" on the On-Screen Display 2 9 (OSD) menu. SOURCE Used to make adjustments. Volume +/- Right/ 45 Activates panel key lock. 2. "Magnifying and searching for the displayed Toggles the projector between standby image. "Adjusting the sound" on...

User Manual
Page 14
... BenQ Projector Ceiling Mount Kit from your dealer to be installed in the SYSTEM SETUP: Basic > Projector Position menu after you is required. Your room layout or personal preference will dictate which installation location you turn the projector on. 2. Front Table 3. turn the projector on. Note that a special rear projection screen Basic > Projector Position menu after you turn the projector on. Set Rear Ceiling in one of the screen. Take into consideration the size...
... BenQ Projector Ceiling Mount Kit from your dealer to be installed in the SYSTEM SETUP: Basic > Projector Position menu after you is required. Your room layout or personal preference will dictate which installation location you turn the projector on. 2. Front Table 3. turn the projector on. Note that a special rear projection screen Basic > Projector Position menu after you turn the projector on. Set Rear Ceiling in one of the screen. Take into consideration the size...

User Manual
Page 19
... labeled CRT/LCD or a function key with a DVI input jack, take a suitable audio cable and connect one end of the cable to the AUDIO OUT jack of the projector, and the other end of the VGA cable to a projector. Once connected, the audio can connect the MONITOR OUT signal output jack on a monitor as well as described in speaker will be controlled by the projector On-Screen Display (OSD...
... labeled CRT/LCD or a function key with a DVI input jack, take a suitable audio cable and connect one end of the cable to the AUDIO OUT jack of the projector, and the other end of the VGA cable to a projector. Once connected, the audio can connect the MONITOR OUT signal output jack on a monitor as well as described in speaker will be controlled by the projector On-Screen Display (OSD...

User Manual
Page 21
... audio input is turned on and the correct video source has been selected, check that the signal cables have been connected correctly. See "Audio Settings" on page 52 for details. • If the selected video image is not displayed after the projector is turned on and operating correctly. Also check that the Video source device is connected. Match the color of the plugs to the color of the Video source device. Take a Component Video to VGA (D-Sub) adapter cable...
... audio input is turned on and the correct video source has been selected, check that the signal cables have been connected correctly. See "Audio Settings" on page 52 for details. • If the selected video image is not displayed after the projector is turned on and operating correctly. Also check that the Video source device is connected. Match the color of the plugs to the color of the Video source device. Take a Component Video to VGA (D-Sub) adapter cable...
User Manual
Page 23
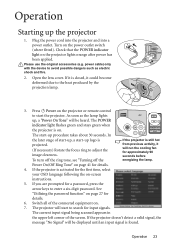
... projector or remote control to start -up logo is projected. (If necessary) Rotate the focus ring to adjust the image clearness. Plug the power cord into the projector and into a power outlet. Please use the original accessories (e.g. Open the lens cover. The start to enter a six-digit password. Operation 23 Operation Starting up , a "Power On Tone" will run the cooling fan for approximately 90 seconds before energizing the lamp. Check that the POWER indicator light on the power outlet switch (where fitted). power cable...
... projector or remote control to start -up logo is projected. (If necessary) Rotate the focus ring to adjust the image clearness. Plug the power cord into the projector and into a power outlet. Please use the original accessories (e.g. Open the lens cover. The start to enter a six-digit password. Operation 23 Operation Starting up , a "Power On Tone" will run the cooling fan for approximately 90 seconds before energizing the lamp. Check that the POWER indicator light on the power outlet switch (where fitted). power cable...

User Manual
Page 24
..., the projected image becomes trapezoidal. Screw the rear adjuster foot in a reverse direction. • Do not look into the lens while the lamp is equipped with the projector's resolution or set the input signal to a lower setting. The current source information will be displayed in the corner of Frequency and Clock to provide the best picture quality. Please change the image height and projection angle. See "Timing chart" on...
..., the projected image becomes trapezoidal. Screw the rear adjuster foot in a reverse direction. • Do not look into the lens while the lamp is equipped with the projector's resolution or set the input signal to a lower setting. The current source information will be displayed in the corner of Frequency and Clock to provide the best picture quality. Please change the image height and projection angle. See "Timing chart" on...

User Manual
Page 28
... 1. Open the OSD menu and go to decode the number. Seek help from the local BenQ service center to the SYSTEM SETUP: Advanced> Security Settings > Change Password menu. 2. displayed lasting for three seconds, and the message "INPUT CURRENT PASSWORD" is displayed. 3. You can retry by re-entering the new password. 28 Operation Password Keep this manual in this manual in a short time. Enter a new password. Confirm the new password by entering another password. 4. You can use the password recall procedure. The projector...
... 1. Open the OSD menu and go to decode the number. Seek help from the local BenQ service center to the SYSTEM SETUP: Advanced> Security Settings > Change Password menu. 2. displayed lasting for three seconds, and the message "INPUT CURRENT PASSWORD" is displayed. 3. You can retry by re-entering the new password. 28 Operation Password Keep this manual in this manual in a short time. Enter a new password. Confirm the new password by entering another password. 4. You can use the password recall procedure. The projector...

User Manual
Page 29
... SETUP: Advanced > Security Settings > Power On Lock menu after opening the OSD menu system. 6. Disabling the password function To disable password protection, go back to cancel the change or try another password. If the password is incorrect, the password error message is displayed lasting for three seconds, and the message "INPUT PASSWORD" is displayed. You will not have successfully assigned a new password to re-activate the password function by pressing / . Operation 29 i. If the password...
... SETUP: Advanced > Security Settings > Power On Lock menu after opening the OSD menu system. 6. Disabling the password function To disable password protection, go back to cancel the change or try another password. If the password is incorrect, the password error message is displayed lasting for three seconds, and the message "INPUT PASSWORD" is displayed. You will not have successfully assigned a new password to re-activate the password function by pressing / . Operation 29 i. If the password...
User Manual
Page 44
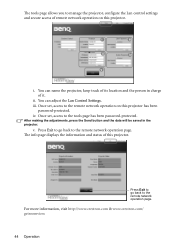
You can adjust the Lan Control Settings. Once set , access to the tools page has been password-protected. iv. After making the adjustments, press the Send button and the data will be saved in charge of it. The info page displays the information and status of this projector. ii. Once set , access to the remote network operation on this projector. Press Exit to go back to the remote network operation page...
You can adjust the Lan Control Settings. Once set , access to the tools page has been password-protected. iv. After making the adjustments, press the Send button and the data will be saved in charge of it. The info page displays the information and status of this projector. ii. Once set , access to the remote network operation on this projector. Press Exit to go back to the remote network operation page...

User Manual
Page 46
DISPLAY Wall Color Aspect Ratio Keystone Position Phase H. PICTURE Brightness Contrast Color Tint Sharpness Brilliant Color Color Temperature Primary Color 3D Color Hue Management Saturation Gain Save Settings 3. SOURCE Quick Auto Search 4. SYSTEM SETUP: Basic Presentation Timer Timer Period Timer Display Timer Position Timer Counting Direction Sound Reminder On/Off Options Off/Light Yellow/Pink/Light Green/Blue/Blackboard Auto/Real/4:3/16:9 Dynamic/Presentation/sRGB/ Cinema/User 1/User 2 Dynamic/Presentation/sRGB/ Cinema On/Off T1/T2/T3/T4 R/G/B/C/M/Y On/Off...
DISPLAY Wall Color Aspect Ratio Keystone Position Phase H. PICTURE Brightness Contrast Color Tint Sharpness Brilliant Color Color Temperature Primary Color 3D Color Hue Management Saturation Gain Save Settings 3. SOURCE Quick Auto Search 4. SYSTEM SETUP: Basic Presentation Timer Timer Period Timer Display Timer Position Timer Counting Direction Sound Reminder On/Off Options Off/Light Yellow/Pink/Light Green/Blue/Blackboard Auto/Real/4:3/16:9 Dynamic/Presentation/sRGB/ Cinema/User 1/User 2 Dynamic/Presentation/sRGB/ Cinema On/Off T1/T2/T3/T4 R/G/B/C/M/Y On/Off...
User Manual
Page 52
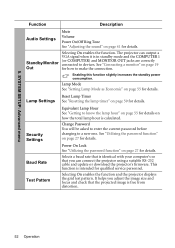
... a baud rate that you adjust the image size and focus and check that the projected image is intended for details. The projector can connect the projector using a suitable RS-232 cable and update or download the projector's firmware. Power On Lock See "Utilizing the password function" on page 55 for qualified service personnel. Selecting On enables the function and the projector displays the grid test pattern. Lamp Mode See "Setting Lamp Mode as Economic" on page 27...
... a baud rate that you adjust the image size and focus and check that the projected image is intended for details. The projector can connect the projector using a suitable RS-232 cable and update or download the projector's firmware. Power On Lock See "Utilizing the password function" on page 55 for qualified service personnel. Selecting On enables the function and the projector displays the grid test pattern. Lamp Mode See "Setting Lamp Mode as Economic" on page 27...
User Manual
Page 53
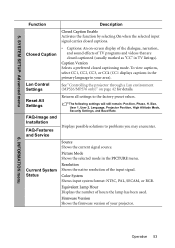
... factory preset values. Lan Control Settings See "Controlling the projector through a Lan environment (MP526/MP576 only)" on -screen display of the dialogue, narration, and sound effects of your area). Current System Status Picture Mode Shows the selected mode in your projector. 6. Firmware Version Shows the firmware version of TV programs and videos that are closed captioned (usually marked as "CC" in TV listings). INFORMATION menu Operation 53 Reset All Settings FAQ-Image and Installation...
... factory preset values. Lan Control Settings See "Controlling the projector through a Lan environment (MP526/MP576 only)" on -screen display of the dialogue, narration, and sound effects of your area). Current System Status Picture Mode Shows the selected mode in your projector. 6. Firmware Version Shows the firmware version of TV programs and videos that are closed captioned (usually marked as "CC" in TV listings). INFORMATION menu Operation 53 Reset All Settings FAQ-Image and Installation...

User Manual
Page 55
... the menu. 4. To set period of time to prevent unnecessary waste of lamp usage is automatically calculated by 20%. Setting Auto Power Off This function allows the projector to turn off automatically if no input signal is detected after a set Economic mode, go into the SYSTEM SETUP: Advanced > Lamp Settings > Lamp Mode menu and press / . Lamp information Getting to know the lamp hour When the projector is in operation, the duration (in hours) of lamp life. Press...
... the menu. 4. To set period of time to prevent unnecessary waste of lamp usage is automatically calculated by 20%. Setting Auto Power Off This function allows the projector to turn off automatically if no input signal is detected after a set Economic mode, go into the SYSTEM SETUP: Advanced > Lamp Settings > Lamp Mode menu and press / . Lamp information Getting to know the lamp hour When the projector is in operation, the duration (in hours) of lamp life. Press...
User Manual
Page 61
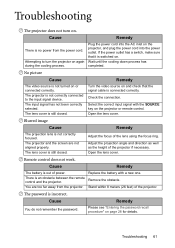
... remote control and the projector. Select the correct input signal with a new one. The lens cover is incorrect. The password is still closed . If the power outlet has a switch, make sure that the signal cable is connected correctly. You are not aligned properly. Remedy Turn the video source on . Remote control does not work. Remove the obstacle. The input signal has not been correctly selected. Check the connection. Cause Remedy The battery is not correctly focused. Troubleshooting...
... remote control and the projector. Select the correct input signal with a new one. The lens cover is incorrect. The password is still closed . If the power outlet has a switch, make sure that the signal cable is connected correctly. You are not aligned properly. Remedy Turn the video source on . Remote control does not work. Remove the obstacle. The input signal has not been correctly selected. Check the connection. Cause Remedy The battery is not correctly focused. Troubleshooting...
User Manual
Page 68
... using less than 2 watts of 1973, Section 508 BenQ's commitment to accessible products allows us to support government in suspend or sleep mode and is in making accessible technology choices BenQ's LCD monitors and projectors are color-coded to help users easily connecting products to computer systems correctly. • Some models of BenQ's monitors and projectors contain additional USB and DVI ports for brightness and contrast adjustments that helps...
... using less than 2 watts of 1973, Section 508 BenQ's commitment to accessible products allows us to support government in suspend or sleep mode and is in making accessible technology choices BenQ's LCD monitors and projectors are color-coded to help users easily connecting products to computer systems correctly. • Some models of BenQ's monitors and projectors contain additional USB and DVI ports for brightness and contrast adjustments that helps...


