User Manual
Page 2
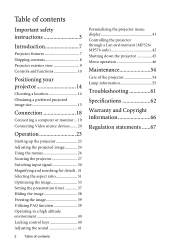
... instructions 3 Introduction 7 Projector features 7 Shipping contents 8 Projector exterior view 9 Controls and functions 10 Positioning your projector 14 Choosing a location 14 Obtaining a preferred projected image size 15 Connection 18 Connecting a computer or monitor... 19 Connecting Video source devices....... 20 Operation 23 Starting up the projector 23 Adjusting the projected image 24 Using the menus 26 Securing the projector 27 Switching input signal 30 Magnifying and searching for details . 31 Selecting the aspect ratio 31 Optimizing the image 33 Setting...
... instructions 3 Introduction 7 Projector features 7 Shipping contents 8 Projector exterior view 9 Controls and functions 10 Positioning your projector 14 Choosing a location 14 Obtaining a preferred projected image size 15 Connection 18 Connecting a computer or monitor... 19 Connecting Video source devices....... 20 Operation 23 Starting up the projector 23 Adjusting the projected image 24 Using the menus 26 Securing the projector 27 Switching input signal 30 Magnifying and searching for details . 31 Selecting the aspect ratio 31 Optimizing the image 33 Setting...

User Manual
Page 3
... instructions mentioned in this manual and marked on . 5. It is under operation, you connect your projector through a power stabilizer, surge protector or uninterruptible power supply (UPS). 3. Important safety instructions Your projector is designed and tested to operate safely within a light beam may damage your eyes. The intense designed to meet the latest standards for remove the lens cap when the future reference. Important safety instructions 3 projector lamp...
... instructions mentioned in this manual and marked on . 5. It is under operation, you connect your projector through a power stabilizer, surge protector or uninterruptible power supply (UPS). 3. Important safety instructions Your projector is designed and tested to operate safely within a light beam may damage your eyes. The intense designed to meet the latest standards for remove the lens cap when the future reference. Important safety instructions 3 projector lamp...
User Manual
Page 7
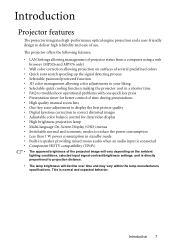
... • High quality manual zoom lens • One-key auto-adjustment to display the best picture quality • Digital keystone correction to correct distorted images • Adjustable color balance control for data/video display • High brightness projection lamp • Multi-language On-Screen Display (OSD) menus • Switchable normal and economic modes to reduce the power consumption • Less than 1 W power consumption in standby mode • Built-in speaker providing mixed mono audio when an audio input is connected •...
... • High quality manual zoom lens • One-key auto-adjustment to display the best picture quality • Digital keystone correction to correct distorted images • Adjustable color balance control for data/video display • High brightness projection lamp • Multi-language On-Screen Display (OSD) menus • Switchable normal and economic modes to reduce the power consumption • Less than 1 W power consumption in standby mode • Built-in speaker providing mixed mono audio when an audio input is connected •...
User Manual
Page 10
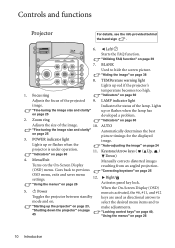
... a problem. Indicates the status of the lamp. Lights up red if the projector's 11 temperature becomes too high. 1. "Locking control keys" on page 40, "Using the menus" on page 60 11. "Indicators" on page 26 10 Introduction Menu/Exit Manually corrects distorted images Turns on page 25 Automatically determines the best picture timings for the displayed 3. POWER indicator light image. TEMPerature warning light 14 7 Lights up or flashes when the "Auto-adjusting the image" on page 25 OSD menu, exits and saves menu settings. AUTO "Fine...
... a problem. Indicates the status of the lamp. Lights up red if the projector's 11 temperature becomes too high. 1. "Locking control keys" on page 40, "Using the menus" on page 60 11. "Indicators" on page 26 10 Introduction Menu/Exit Manually corrects distorted images Turns on page 25 Automatically determines the best picture timings for the displayed 3. POWER indicator light image. TEMPerature warning light 14 7 Lights up or flashes when the "Auto-adjusting the image" on page 25 OSD menu, exits and saves menu settings. AUTO "Fine...

User Manual
Page 11
... lock compatible security cable and attach it is securely and safely installed. Activates the selected On-Screen Display (OSD) menu item. If you purchased your projector on the ceiling, we need to bring this safety matter to your attention to prevent possible damage to the mounting bracket become loose. Introduction 11 "Switching input signal" on page 33 14. Mode/Enter Selects an available picture setup mode...
... lock compatible security cable and attach it is securely and safely installed. Activates the selected On-Screen Display (OSD) menu item. If you purchased your projector on the ceiling, we need to bring this safety matter to your attention to prevent possible damage to the mounting bracket become loose. Introduction 11 "Switching input signal" on page 33 14. Mode/Enter Selects an available picture setup mode...

User Manual
Page 12
... the displayed Toggles the projector between standby image. Activates the selected On-Screen Display (OSD) menu item. "Freezing the image" on page 33 Adjusts the sound level. BLANK 11. Digital Zoom (+, -) 12. Remote control For details, see the info provided behind the hand sign . 7 7. Selects an available picture setup mode. "Selecting a picture mode" on page 39 3. "Correcting keystone" on the On-Screen Display 2 9 (OSD) menu. Freeze Freezes the projected image. Right/ 45 Activates panel key lock. 2. Menu/Exit 1 8 Turns...
... the displayed Toggles the projector between standby image. Activates the selected On-Screen Display (OSD) menu item. "Freezing the image" on page 33 Adjusts the sound level. BLANK 11. Digital Zoom (+, -) 12. Remote control For details, see the info provided behind the hand sign . 7 7. Selects an available picture setup mode. "Selecting a picture mode" on page 39 3. "Correcting keystone" on the On-Screen Display 2 9 (OSD) menu. Freeze Freezes the projected image. Right/ 45 Activates panel key lock. 2. Menu/Exit 1 8 Turns...

User Manual
Page 14
... dictate which installation location you turn the projector on . 2. Front Table 3. suspended upside-down from your dealer to mount your screen, the location of a suitable power outlet, as well as the location and distance between the projector and the rest of four possible installation locations: 1. Purchase the BenQ Projector Ceiling Mount Kit from the ceiling in the SYSTEM SETUP: Basic > Projector Position menu after you turn the projector on . Take into consideration the size and...
... dictate which installation location you turn the projector on . 2. Front Table 3. suspended upside-down from your dealer to mount your screen, the location of a suitable power outlet, as well as the location and distance between the projector and the rest of four possible installation locations: 1. Purchase the BenQ Projector Ceiling Mount Kit from the ceiling in the SYSTEM SETUP: Basic > Projector Position menu after you turn the projector on . Take into consideration the size and...

User Manual
Page 19
... 2 signal input jack on their external video ports when connected to find your external speakers (not supplied). Usually a key combo like FN + F3 or CRT/LCD key turns the external display on page 52 for details. Locate a function key labeled CRT/LCD or a function key with a DVI input jack, take a suitable audio cable and connect one end of the cable to the AUDIO OUT jack of the projector...
... 2 signal input jack on their external video ports when connected to find your external speakers (not supplied). Usually a key combo like FN + F3 or CRT/LCD key turns the external display on page 52 for details. Locate a function key labeled CRT/LCD or a function key with a DVI input jack, take a suitable audio cable and connect one end of the cable to the AUDIO OUT jack of the projector...

User Manual
Page 21
... video image is not displayed after the projector is turned on and operating correctly. If you can be muted when the AUDIO OUT jack is connected. • The projector is turned on and the correct video source has been selected, check that the signal cables have been connected correctly. Once connected, the audio can use of the projector (mixed mono) speaker(s) in your external speakers (not supplied). Connection 21 green to green, blue to blue, and red...
... video image is not displayed after the projector is turned on and operating correctly. If you can be muted when the AUDIO OUT jack is connected. • The projector is turned on and the correct video source has been selected, check that the signal cables have been connected correctly. Once connected, the audio can use of the projector (mixed mono) speaker(s) in your external speakers (not supplied). Connection 21 green to green, blue to blue, and red...
User Manual
Page 23
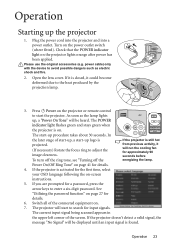
... details. 6. Check that the POWER indicator light on the power outlet switch (where fitted). Press II Power on page 27 for a password, press the arrow keys to the heat produced by the projection lamp. 3. In the later stage of the screen. Please use the original accessories (e.g. Open the lens cover. See "Utilizing the password function" on the projector or remote control to avoid possible dangers such as the lamp lights up...
... details. 6. Check that the POWER indicator light on the power outlet switch (where fitted). Press II Power on page 27 for a password, press the arrow keys to the heat produced by the projection lamp. 3. In the later stage of the screen. Please use the original accessories (e.g. Open the lens cover. See "Utilizing the password function" on the projector or remote control to avoid possible dangers such as the lamp lights up...

User Manual
Page 24
... lamp is equipped with the projector's resolution or set the input signal to provide the best picture quality. These adjusters change to an input signal which is compatible with 1 quick-release adjuster foot and 1 rear adjuster foot. To adjust the projector: 1. Please change the image height and projection angle. Screw the rear adjuster foot to each other, the projected image becomes trapezoidal. The strong light from . To correct this , press AUTO on the projector or remote control...
... lamp is equipped with the projector's resolution or set the input signal to provide the best picture quality. These adjusters change to an input signal which is compatible with 1 quick-release adjuster foot and 1 rear adjuster foot. To adjust the projector: 1. Please change the image height and projection angle. Screw the rear adjuster foot to each other, the projected image becomes trapezoidal. The strong light from . To correct this , press AUTO on the projector or remote control...

User Manual
Page 28
... on-screen. displayed lasting for 3 seconds. Press and hold AUTO on page 28 for your retry. Open the OSD menu and go to decode the number. Recall Code: 0 2 1 2 Exit Changing the password 1. You can retry by re-entering the new password. 28 Operation Seek help from the local BenQ service center to the SYSTEM SETUP: Advanced> Security Settings > Change Password menu. 2. See "Entering the password recall procedure" on the projector or remote control for...
... on-screen. displayed lasting for 3 seconds. Press and hold AUTO on page 28 for your retry. Open the OSD menu and go to decode the number. Recall Code: 0 2 1 2 Exit Changing the password 1. You can retry by re-entering the new password. 28 Operation Seek help from the local BenQ service center to the SYSTEM SETUP: Advanced> Security Settings > Change Password menu. 2. See "Entering the password recall procedure" on the projector or remote control for...

User Manual
Page 29
... Settings > Power On Lock menu after opening the OSD menu system. Disabling the password function To disable password protection, go back to cancel the change or try another password. To leave the OSD menu, press Menu/Exit. Select Off by entering the old password. The message "INPUT PASSWORD" is displayed for your retry. 6. If the password is incorrect, the password error message is displayed lasting for three seconds, and the message "INPUT PASSWORD" is displayed. Remember...
... Settings > Power On Lock menu after opening the OSD menu system. Disabling the password function To disable password protection, go back to cancel the change or try another password. To leave the OSD menu, press Menu/Exit. Select Off by entering the old password. The message "INPUT PASSWORD" is displayed for your retry. 6. If the password is incorrect, the password error message is displayed lasting for three seconds, and the message "INPUT PASSWORD" is displayed. Remember...
User Manual
Page 44
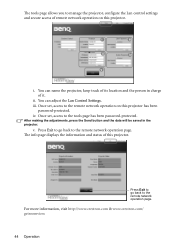
... the projector, keep track of its location and the person in the projector. Once set , access to the tools page has been password-protected. v. The info page displays the information and status of this projector. For more information, visit http://www.crestron.com & www.crestron.com/ getroomview. 44 Operation You can adjust the Lan Control Settings. After making the adjustments, press the Send button and the data...
... the projector, keep track of its location and the person in the projector. Once set , access to the tools page has been password-protected. v. The info page displays the information and status of this projector. For more information, visit http://www.crestron.com & www.crestron.com/ getroomview. 44 Operation You can adjust the Lan Control Settings. After making the adjustments, press the Send button and the data...

User Manual
Page 46
.../Bottom-Left/Top-Right/ Bottom-Right Count Down/Count Up On/Off 46 Operation PICTURE Brightness Contrast Color Tint Sharpness Brilliant Color Color Temperature Primary Color 3D Color Hue Management Saturation Gain Save Settings 3. DISPLAY Wall Color Aspect Ratio Keystone Position Phase H. Menu operation Menu system Please note that the on-screen display (OSD) menus vary according to the signal type selected and the projector model you are using. SOURCE Quick Auto Search 4.
.../Bottom-Left/Top-Right/ Bottom-Right Count Down/Count Up On/Off 46 Operation PICTURE Brightness Contrast Color Tint Sharpness Brilliant Color Color Temperature Primary Color 3D Color Hue Management Saturation Gain Save Settings 3. DISPLAY Wall Color Aspect Ratio Keystone Position Phase H. Menu operation Menu system Please note that the on-screen display (OSD) menus vary according to the signal type selected and the projector model you are using. SOURCE Quick Auto Search 4.
User Manual
Page 52
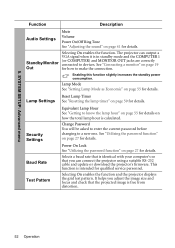
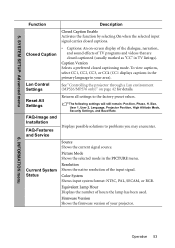
.... Power On Lock See "Utilizing the password function" on page 27 for details. This function is identical with your computer's so that you adjust the image size and focus and check that is intended for details. The projector can connect the projector using a suitable RS-232 cable and update or download the projector's firmware. Change Password You will be asked to enter the current password before changing to make the connection. Reset Lamp Timer Lamp Settings See "Resetting...
.... Power On Lock See "Utilizing the password function" on page 27 for details. This function is identical with your computer's so that you adjust the image size and focus and check that is intended for details. The projector can connect the projector using a suitable RS-232 cable and update or download the projector's firmware. Change Password You will be asked to enter the current password before changing to make the connection. Reset Lamp Timer Lamp Settings See "Resetting...
User Manual
Page 53
... projector through a Lan environment (MP526/MP576 only)" on -screen display of the dialogue, narration, and sound effects of your area). Firmware Version Shows the firmware version of TV programs and videos that are closed captions. Reset All Settings FAQ-Image and Installation FAQ-Features and Service Returns all settings to problems you may encounter. Current System Status Picture Mode Shows the selected mode in your projector. 6. Equivalent Lamp Hour Displays the number of the input signal...
... projector through a Lan environment (MP526/MP576 only)" on -screen display of the dialogue, narration, and sound effects of your area). Firmware Version Shows the firmware version of TV programs and videos that are closed captions. Reset All Settings FAQ-Image and Installation FAQ-Features and Service Returns all settings to problems you may encounter. Current System Status Picture Mode Shows the selected mode in your projector. 6. Equivalent Lamp Hour Displays the number of the input signal...

User Manual
Page 55
... the preset time lengths are not suitable for the MP515/MP525/MP526) hours with proper usage. The Lamp Settings page is detected after a set from 5 to 30 minutes in 5-minute increments. Setting Auto Power Off This function allows the projector to turn off automatically if no input signal is displayed. 3. You will see the Equivalent Lamp Hour information appearing on the INFORMATION menu. Extending lamp life The projection lamp is...
... the preset time lengths are not suitable for the MP515/MP525/MP526) hours with proper usage. The Lamp Settings page is detected after a set from 5 to 30 minutes in 5-minute increments. Setting Auto Power Off This function allows the projector to turn off automatically if no input signal is displayed. 3. You will see the Equivalent Lamp Hour information appearing on the INFORMATION menu. Extending lamp life The projection lamp is...
User Manual
Page 61
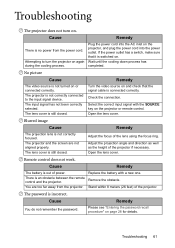
... projector, and plug the power cord into the AC inlet on page 28 for details. The projector and the screen are too far away from the power cord. Open the lens cover. Remove the obstacle. Troubleshooting 61 Blurred image Cause The projection lens is connected correctly. Troubleshooting The projector does not turn the projector on and check that it is an obstacle between the remote control and the projector. No picture Cause The video source is not turned...
... projector, and plug the power cord into the AC inlet on page 28 for details. The projector and the screen are too far away from the power cord. Open the lens cover. Remove the obstacle. Troubleshooting 61 Blurred image Cause The projection lens is connected correctly. Troubleshooting The projector does not turn the projector on and check that it is an obstacle between the remote control and the projector. No picture Cause The video source is not turned...
User Manual
Page 68
... the indicator shows yellow or amber, it means that helps computer systems to support government in making accessible technology choices BenQ's LCD monitors and projectors are color-coded to help users easily connecting products to computer systems correctly. • Some models of pre-programmed flicker-free timing to make the screen shown on the BenQ's web site (www.BenQ.com). Speaker controls are typically located on the frontpanel. • Firmware of 1973...
... the indicator shows yellow or amber, it means that helps computer systems to support government in making accessible technology choices BenQ's LCD monitors and projectors are color-coded to help users easily connecting products to computer systems correctly. • Some models of pre-programmed flicker-free timing to make the screen shown on the BenQ's web site (www.BenQ.com). Speaker controls are typically located on the frontpanel. • Firmware of 1973...


