
User Manual
Page 1
MP515/MP525/MP525P/ MP526/MP575/MP576 Digital Projector User Manual Welcome
MP515/MP525/MP525P/ MP526/MP575/MP576 Digital Projector User Manual Welcome
User Manual
Page 7
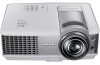
... on the ambient lighting conditions, selected input signal contrast/brightness settings, and is normal and expected behavior. Introduction Projector features The projector integrates high-performance optical engine projection and a user-friendly design to deliver high reliability and ease of the projected... presentations • High quality manual zoom lens • One-key auto-adjustment to display the best picture quality • Digital keystone correction to correct distorted images • Adjustable color balance control for data/video display • High brightness projection lamp ...
... on the ambient lighting conditions, selected input signal contrast/brightness settings, and is normal and expected behavior. Introduction Projector features The projector integrates high-performance optical engine projection and a user-friendly design to deliver high reliability and ease of the projected... presentations • High quality manual zoom lens • One-key auto-adjustment to display the best picture quality • Digital keystone correction to correct distorted images • Adjustable color balance control for data/video display • High brightness projection lamp ...

User Manual
Page 12
... standby image. Volume +/- Selects an available picture setup mode. "Auto-adjusting the image" on page 24 "Starting up the projector" on page 23, "Shutting down the projector" on page 41 12 Introduction Right/ 45 Activates panel key lock. 2. "Utilizing FAQ function" on page 39 When the ...the desired menu items and to previous OSD menu, exits and saves menu 3 10 settings. 4 11 "Using the menus" on page 31 6. Digital Zoom (+, -) 12. "Adjusting the sound" on page 10. Goes back to make adjustments. II Power Automatically determines the best picture timings for ...
... standby image. Volume +/- Selects an available picture setup mode. "Auto-adjusting the image" on page 24 "Starting up the projector" on page 23, "Shutting down the projector" on page 41 12 Introduction Right/ 45 Activates panel key lock. 2. "Utilizing FAQ function" on page 39 When the ...the desired menu items and to previous OSD menu, exits and saves menu 3 10 settings. 4 11 "Using the menus" on page 31 6. Digital Zoom (+, -) 12. "Adjusting the sound" on page 10. Goes back to make adjustments. II Power Automatically determines the best picture timings for ...
User Manual
Page 23
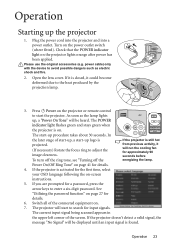
...on the power outlet switch (where fitted). The start -up procedure takes about 30 seconds. If the projector is projected. (If necessary) Rotate the focus ring to enter a six-digit password. power cable) only with the device to start to the heat produced by the projection lamp.... 3. Press II Power on -screen instructions. 5. Plug the power cord into the projector and into a power outlet. See "Utilizing the password...
...on the power outlet switch (where fitted). The start -up procedure takes about 30 seconds. If the projector is projected. (If necessary) Rotate the focus ring to enter a six-digit password. power cable) only with the device to start to the heat produced by the projection lamp.... 3. Press II Power on -screen instructions. 5. Plug the power cord into the projector and into a power outlet. See "Utilizing the password...

User Manual
Page 26
... Splash Screen English Front Table Disable Disable Off Disable BenQ SYSTEM SETUP: Basic Presentation Timer Language Projector Position Menu Settings Auto Power Off Blank Timer Panel Key Lock Sleep Timer Splash Screen English Front Table Disable Disable Off Disable BenQ Analog RGB Exit 4. Size Digital Zoom Current input signal Analog RGB Off Auto ENTER...
... Splash Screen English Front Table Disable Disable Off Disable BenQ SYSTEM SETUP: Basic Presentation Timer Language Projector Position Menu Settings Auto Power Off Blank Timer Panel Key Lock Sleep Timer Splash Screen English Front Table Disable Disable Off Disable BenQ Analog RGB Exit 4. Size Digital Zoom Current input signal Analog RGB Off Auto ENTER...

User Manual
Page 27
...the power on -screen. Confirm the new password by pressing / . 3. The Security Settings page is usually a combination of the projector. IMPORTANT: The digits being input will be used in this manual in a safe place. 5. Highlight Power On Lock and select On by re-entering... and go to the right, the four arrow keys ( , INPUT NEW PASSWORD , , ) respectively represent 4 digits (1, 2, 3, 4). You can be displayed as the Kensington lock, to use , the projector includes an option for the password. 4. Operation 27 A Kensington security cable lock is displayed. 2. As pictured to...
...the power on -screen. Confirm the new password by pressing / . 3. The Security Settings page is usually a combination of the projector. IMPORTANT: The digits being input will be used in this manual in a safe place. 5. Highlight Power On Lock and select On by re-entering... and go to the right, the four arrow keys ( , INPUT NEW PASSWORD , , ) respectively represent 4 digits (1, 2, 3, 4). You can be displayed as the Kensington lock, to use , the projector includes an option for the password. 4. Operation 27 A Kensington security cable lock is displayed. 2. As pictured to...

User Manual
Page 28
...seconds, and the message "INPUT CURRENT PASSWORD" is displayed for details. Press and hold AUTO on the screen. 2. Seek help from the local BenQ service center to verify that it is available to you should you ever forget it , you can retry by re-entering the new password. ...forget the password If the password function is activated, you will be asked to enter the six-digit password every time you turn off your projector. 3. The projector will display a coded number on the projector or remote control for three seconds, and the INPUT PASSWORD message follows. You can use the ...
...seconds, and the message "INPUT CURRENT PASSWORD" is displayed for details. Press and hold AUTO on the screen. 2. Seek help from the local BenQ service center to verify that it is available to you should you ever forget it , you can retry by re-entering the new password. ...forget the password If the password function is activated, you will be asked to enter the six-digit password every time you turn off your projector. 3. The projector will display a coded number on the projector or remote control for three seconds, and the INPUT PASSWORD message follows. You can use the ...
User Manual
Page 31
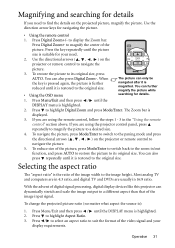
... Ratio. 3. You can dynamically stretch and scale the image output to a different aspect than that of digital signal processing, digital display devices like this projector can also press Digital Zoom-. You can further magnify the picture while • Using the OSD menu searching for your display requirements... original size. Most analog TV and computers are in 4:3 ratio, and digital TV and DVDs are using the projector control panel, press repeatedly to magnify the picture to navigate the picture. 3. Press Digital Zoom+ to magnify the center of the picture, press Mode/Enter to ...
... Ratio. 3. You can dynamically stretch and scale the image output to a different aspect than that of digital signal processing, digital display devices like this projector can also press Digital Zoom-. You can further magnify the picture while • Using the OSD menu searching for your display requirements... original size. Most analog TV and computers are in 4:3 ratio, and digital TV and DVDs are using the projector control panel, press repeatedly to magnify the picture to navigate the picture. 3. Press Digital Zoom+ to magnify the center of the picture, press Mode/Enter to ...

User Manual
Page 33
...press / to select a desired mode. Selecting a picture mode The projector is preset with an sRGB compatible and properly calibrated camera, and for viewing photos taken with several precalibrated colors to choose from digital cameras or DVs for presentations. To select an operation mode that ...for details. See "Setting the User 1/User 2 mode" on page 34 for environments where extra-high brightness is required such as using the projector in a blackened (little light) environment. 5. Cinema mode: Is appropriate for playing colorful movies, video clips from : Light Yellow, Pink, ...
...press / to select a desired mode. Selecting a picture mode The projector is preset with an sRGB compatible and properly calibrated camera, and for viewing photos taken with several precalibrated colors to choose from digital cameras or DVs for presentations. To select an operation mode that ...for details. See "Setting the User 1/User 2 mode" on page 34 for environments where extra-high brightness is required such as using the projector in a blackened (little light) environment. 5. Cinema mode: Is appropriate for playing colorful movies, video clips from : Light Yellow, Pink, ...

User Manual
Page 46
Size Digital Zoom Picture Mode Reference Mode 2. DISPLAY Wall Color Aspect Ratio Keystone Position Phase H. PICTURE Brightness Contrast Color Tint Sharpness Brilliant Color Color Temperature Primary Color ... Quick Auto Search 4. Menu operation Menu system Please note that the on-screen display (OSD) menus vary according to the signal type selected and the projector model you are using. SYSTEM SETUP: Basic Presentation Timer Timer Period Timer Display Timer Position Timer Counting Direction Sound Reminder On/Off Options Off/Light...
Size Digital Zoom Picture Mode Reference Mode 2. DISPLAY Wall Color Aspect Ratio Keystone Position Phase H. PICTURE Brightness Contrast Color Tint Sharpness Brilliant Color Color Temperature Primary Color ... Quick Auto Search 4. Menu operation Menu system Please note that the on-screen display (OSD) menus vary according to the signal type selected and the projector model you are using. SYSTEM SETUP: Basic Presentation Timer Timer Period Timer Display Timer Position Timer Counting Direction Sound Reminder On/Off Options Off/Light...
User Manual
Page 49
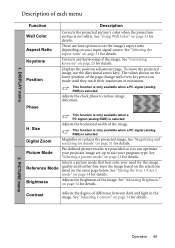
...brightness of the image. See "Using Wall Color" on the same page below. Adjusts the clock phase to suit your input signal source. Digital Zoom Magnifies or reduces the projected image. See "Selecting a picture mode" on the lower position of each menu Function Wall Color Aspect Ratio...image. Contrast Adjusts the degree of the image. 1. DISPLAY menu Description of the page change with every key press you can optimize your projector image set the image's aspect ratio depending on page 34 for details. There are provided so you made until they reach their maximum ...
...brightness of the image. See "Using Wall Color" on the same page below. Adjusts the clock phase to suit your input signal source. Digital Zoom Magnifies or reduces the projected image. See "Selecting a picture mode" on the lower position of each menu Function Wall Color Aspect Ratio...image. Contrast Adjusts the degree of the image. 1. DISPLAY menu Description of the page change with every key press you can optimize your projector image set the image's aspect ratio depending on page 34 for details. There are provided so you made until they reach their maximum ...

User Manual
Page 66
...replacement of any person of such revision or changes. *DLP, Digital Micromirror Device and DMD are copyrights of their respective companies or organizations... 0°C and 35°C, altitude lower than 4920 feet, and avoiding to operate the projector in any defects in material and workmanship, under normal usage and storage. All rights reserved.... computer language, in a dusty environment. Others are trademarks of purchase date will be required with BenQ's written instructions, especially the ambient humidity must be reproduced, transmitted, transcribed, stored in a retrieval...
...replacement of any person of such revision or changes. *DLP, Digital Micromirror Device and DMD are copyrights of their respective companies or organizations... 0°C and 35°C, altitude lower than 4920 feet, and avoiding to operate the projector in any defects in material and workmanship, under normal usage and storage. All rights reserved.... computer language, in a dusty environment. Others are trademarks of purchase date will be required with BenQ's written instructions, especially the ambient humidity must be reproduced, transmitted, transcribed, stored in a retrieval...


