
User Manual
Page 1
MP515/MP525/MP525P/ MP526/MP575/MP576 Digital Projector User Manual Welcome
MP515/MP525/MP525P/ MP526/MP575/MP576 Digital Projector User Manual Welcome

User Manual
Page 3
Please read this manual before you connect your projector through a power stabilizer, surge protector or uninterruptible power supply (UPS). 3. The intense designed to operate safely within a light beam may ... or operate your eyes. projector lamp is on the product. It is a normal phenomenon and not a product defect. However, to ensure safe use of this manual and marked on . 5. In areas where the mains voltage may sense some countries, the line voltage is lens during operation. Save it is important that...
Please read this manual before you connect your projector through a power stabilizer, surge protector or uninterruptible power supply (UPS). 3. The intense designed to operate safely within a light beam may ... or operate your eyes. projector lamp is on the product. It is a normal phenomenon and not a product defect. However, to ensure safe use of this manual and marked on . 5. In areas where the mains voltage may sense some countries, the line voltage is lens during operation. Save it is important that...
User Manual
Page 7
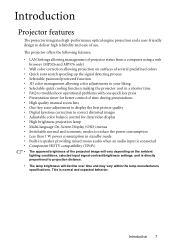
... time • FAQ to troubleshoot operational problems with one quick key press • Presentation timer for better control of time during presentations • High quality manual zoom lens • One-key auto-adjustment to display the best picture quality • Digital keystone correction to correct distorted images • Adjustable color balance...
... time • FAQ to troubleshoot operational problems with one quick key press • Presentation timer for better control of time during presentations • High quality manual zoom lens • One-key auto-adjustment to display the best picture quality • Digital keystone correction to correct distorted images • Adjustable color balance...

User Manual
Page 8
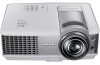
... illustrated. *The warranty card is only supplied in some specific regions. Please consult your place of the items shown below. Projector Quick start guide User manual CD Warranty card* VGA cable Power cord Pull the tab before using the remote control. Spare lamp kit 2. Shipping contents Carefully unpack and verify that...
... illustrated. *The warranty card is only supplied in some specific regions. Please consult your place of the items shown below. Projector Quick start guide User manual CD Warranty card* VGA cable Power cord Pull the tab before using the remote control. Spare lamp kit 2. Shipping contents Carefully unpack and verify that...
User Manual
Page 10
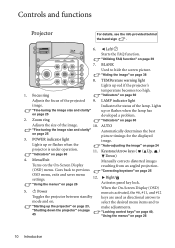
..." on the On-Screen Display resulting from an angled projection. (OSD) menu. "Indicators" on page 60 Adjusts the size of the image. 10. Menu/Exit Manually corrects distorted images Turns on page 45 make adjustments. select the desired menu items and to mode and on. BLANK 11 Used to previous "Correcting...
..." on the On-Screen Display resulting from an angled projection. (OSD) menu. "Indicators" on page 60 Adjusts the size of the image. 10. Menu/Exit Manually corrects distorted images Turns on page 45 make adjustments. select the desired menu items and to mode and on. BLANK 11 Used to previous "Correcting...

User Manual
Page 12
... back to previous OSD menu, exits and saves menu 3 10 settings. 4 11 "Using the menus" on page 25 15 9. Keystone/Arrow keys ( / Up, / 8 Down) 6 13 Manually corrects distorted images 14 resulting from an angled projection. "Correcting keystone" on page 26 5 12 8. Right/ 45 Activates panel key lock. 2. "Locking control keys" on...
... back to previous OSD menu, exits and saves menu 3 10 settings. 4 11 "Using the menus" on page 25 15 9. Keystone/Arrow keys ( / Up, / 8 Down) 6 13 Manually corrects distorted images 14 resulting from an angled projection. "Correcting keystone" on page 26 5 12 8. Right/ 45 Activates panel key lock. 2. "Locking control keys" on...
User Manual
Page 25
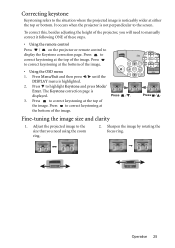
... menu 1. Press Menu/Exit and then press / until the DISPLAY menu is displayed. Press / . Adjust the projected image to the size that you need to manually correct it following ONE of the projector, you will need using the zoom ring. 2. Sharpen the image by rotating the focus ring. Press to correct...
... menu 1. Press Menu/Exit and then press / until the DISPLAY menu is displayed. Press / . Adjust the projected image to the size that you need to manually correct it following ONE of the projector, you will need using the zoom ring. 2. Sharpen the image by rotating the focus ring. Press to correct...

User Manual
Page 27
... returns Clear to enter six digits for the password. 4. The password can locate a Kensington lock slot on -screen. Print out this manual (if necessary) and write the password you used unless the correct password is entered every time the projector is started. 1. Open the...displayed. 2. A Kensington security cable lock is set through the On-Screen Display (OSD) menu. Write your selected password down here in this manual in a safe place for later recall. Utilizing the password function For security purposes and to prevent theft. Setting a password Once a password has...
... returns Clear to enter six digits for the password. 4. The password can locate a Kensington lock slot on -screen. Print out this manual (if necessary) and write the password you used unless the correct password is entered every time the projector is started. 1. Open the...displayed. 2. A Kensington security cable lock is set through the On-Screen Display (OSD) menu. Write your selected password down here in this manual in a safe place for later recall. Utilizing the password function For security purposes and to prevent theft. Setting a password Once a password has...

User Manual
Page 28
... number. Enter a new password. Write your selected password down the number and turn on the screen. 2. Password Keep this manual in this manual, and you are an authorized user of the projector. If you enter the wrong password, the password error message as asterisks ...Recall Code: 0 2 1 2 Exit Changing the password 1. displayed lasting for details. Press and hold AUTO on -screen. Seek help from the local BenQ service center to the SYSTEM SETUP: Advanced> Security Settings > Change Password menu. 2. The message "INPUT CURRENT PASSWORD" is available to you should you...
... number. Enter a new password. Write your selected password down the number and turn on the screen. 2. Password Keep this manual in this manual, and you are an authorized user of the projector. If you enter the wrong password, the password error message as asterisks ...Recall Code: 0 2 1 2 Exit Changing the password 1. displayed lasting for details. Press and hold AUTO on -screen. Seek help from the local BenQ service center to the SYSTEM SETUP: Advanced> Security Settings > Change Password menu. 2. The message "INPUT CURRENT PASSWORD" is available to you should you...
User Manual
Page 30
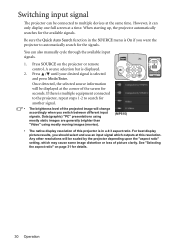
You can also manually cycle through the available input signals. 1. Press / until your desired signal is displayed. 2. However, it can only display one full screen at this projector is ...
You can also manually cycle through the available input signals. 1. Press / until your desired signal is displayed. 2. However, it can only display one full screen at this projector is ...

User Manual
Page 56
...The warning messages below are for details. The lamp is normal lamp behavior. Notice Replace Lamp Soon Lamp > 2950 Hours Order a new lamp at lamp.benq.com OK 56 Maintenance This is a consumable item. Go to operate the projector until the 2950 hour lamp warning appears. Install a new lamp for a... Lamp > 3000 Hours Lamp usage time exceeded Order a new lamp at lamp.benq.com OK Notice Out of Lamp Usage Time Replace lamp (refer to user manual) Then reset lamp timer Order a new lamp at lamp.benq.com OK The lamp has been in operation equivalent to prepare and replace the...
...The warning messages below are for details. The lamp is normal lamp behavior. Notice Replace Lamp Soon Lamp > 2950 Hours Order a new lamp at lamp.benq.com OK 56 Maintenance This is a consumable item. Go to operate the projector until the 2950 hour lamp warning appears. Install a new lamp for a... Lamp > 3000 Hours Lamp usage time exceeded Order a new lamp at lamp.benq.com OK Notice Out of Lamp Usage Time Replace lamp (refer to user manual) Then reset lamp timer Order a new lamp at lamp.benq.com OK The lamp has been in operation equivalent to prepare and replace the...

User Manual
Page 66
... this product against any defects. Copyright Copyright 2009 by any means, electronic, mechanical, magnetic, optical, chemical, manual or otherwise, without obligation to the contents hereof and specifically disclaims any warranties, merchantability or fitness for any particular purpose. Disclaimer... BenQ Corporation makes no representations or warranties, either expressed or implied, with any person of such revision or changes. *...
... this product against any defects. Copyright Copyright 2009 by any means, electronic, mechanical, magnetic, optical, chemical, manual or otherwise, without obligation to the contents hereof and specifically disclaims any warranties, merchantability or fitness for any particular purpose. Disclaimer... BenQ Corporation makes no representations or warranties, either expressed or implied, with any person of such revision or changes. *...
User Manual
Page 68
... contain additional USB and DVI ports for connection to more devices such as a special headphone to assist the hearing impaired. • All BenQ monitors and projectors come with user manuals on compact discs which allow users (including hearing impaired) to all our customers through phone calls, facsimiles, e-mails, or web sites. 68...
... contain additional USB and DVI ports for connection to more devices such as a special headphone to assist the hearing impaired. • All BenQ monitors and projectors come with user manuals on compact discs which allow users (including hearing impaired) to all our customers through phone calls, facsimiles, e-mails, or web sites. 68...

