
User Manual
Page 1
MP515/MP525/MP525P/ MP526/MP575/MP576 Digital Projector User Manual Welcome
MP515/MP525/MP525P/ MP526/MP575/MP576 Digital Projector User Manual Welcome
User Manual
Page 2
...a computer or monitor... 19 Connecting Video source devices....... 20 Operation 23 Starting up the projector 23 Adjusting the projected image 24 Using the menus 26 Securing the projector 27 Switching input signal 30 Magnifying and searching for details . 31 Selecting the aspect ratio...the sound 41 2 Table of contents Personalizing the projector menu display 41 Controlling the projector through a Lan environment (MP526/ MP576 only 42 Shutting down the projector 45 Menu operation 46 Maintenance 54 Care of the projector 54 Lamp information 55 Troubleshooting 61 Specifications 62 ...
...a computer or monitor... 19 Connecting Video source devices....... 20 Operation 23 Starting up the projector 23 Adjusting the projected image 24 Using the menus 26 Securing the projector 27 Switching input signal 30 Magnifying and searching for details . 31 Selecting the aspect ratio...the sound 41 2 Table of contents Personalizing the projector menu display 41 Controlling the projector through a Lan environment (MP526/ MP576 only 42 Shutting down the projector 45 Menu operation 46 Maintenance 54 Care of the projector 54 Lamp information 55 Troubleshooting 61 Specifications 62 ...

User Manual
Page 3
... occur. Safety Instructions 1. Save it for safety of information technology equipment. Important safety instructions 3 Do not look straight at the projector NOT stable. This projector is on the product. mains voltage between 100 to operate safely within a light beam may damage your eyes. It is under ...operation, you may fluctuate or cut out, it is 2. When the projector is a normal phenomenon and not a product defect. In some heated air and odor from its ventilation grill. However, to meet the ...
... occur. Safety Instructions 1. Save it for safety of information technology equipment. Important safety instructions 3 Do not look straight at the projector NOT stable. This projector is on the product. mains voltage between 100 to operate safely within a light beam may damage your eyes. It is under ...operation, you may fluctuate or cut out, it is 2. When the projector is a normal phenomenon and not a product defect. In some heated air and odor from its ventilation grill. However, to meet the ...

User Manual
Page 4
Do not operate lamps beyond the rated life deformed or even cause a fire. Do not stand the projector on the projector or remote control. 11. projector to fall , sustaining serious damage. 45 minutes prior to removing the lamp assembly for approximately product may cause the ...9. BLANK on end vertically. Do not place this could cause them to the projector. 4 Important safety instructions The during operation. The lamp becomes extremely hot unstable cart, stand, or table. Never replace the lamp ...
Do not operate lamps beyond the rated life deformed or even cause a fire. Do not stand the projector on the projector or remote control. 11. projector to fall , sustaining serious damage. 45 minutes prior to removing the lamp assembly for approximately product may cause the ...9. BLANK on end vertically. Do not place this could cause them to the projector. 4 Important safety instructions The during operation. The lamp becomes extremely hot unstable cart, stand, or table. Never replace the lamp ...
User Manual
Page 5
...Locations where temperatures may become excessively high, such as the inside which has its own removable cover. Do not place this projector with live parts. Do not cover this projector on a blanket, bedding or any other soft surface. - Do not place this 15. Do not block the ventilation ...holes. - voltages inside of air around the projector. - Do not place inflammables near fire alarms - Locations with all windows rolled up. - Under no circumstances should come into contact with a ...
...Locations where temperatures may become excessively high, such as the inside which has its own removable cover. Do not place this projector with live parts. Do not cover this projector on a blanket, bedding or any other soft surface. - Do not place this 15. Do not block the ventilation ...holes. - voltages inside of air around the projector. - Do not place inflammables near fire alarms - Locations with all windows rolled up. - Under no circumstances should come into contact with a ...
User Manual
Page 6
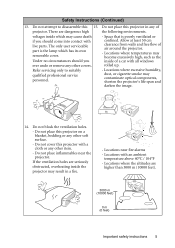
...not place liquids near or on the projector or place any objects upon it. projector. Using the projector when it from the power outlet and call BenQ to , the lamp. possible injury. Do not step on the horizontal surface during operation. If the projector does become wet, disconnect it is ...not fully horizontal may cause a malfunction of, or damage to have the projector serviced. 17. Always place the projector on a level, 18. Use only BenQ's Ceiling Mount Kit for ceiling mount doing so may cause it is capable of more than 15 degrees ...
...not place liquids near or on the projector or place any objects upon it. projector. Using the projector when it from the power outlet and call BenQ to , the lamp. possible injury. Do not step on the horizontal surface during operation. If the projector does become wet, disconnect it is ...not fully horizontal may cause a malfunction of, or damage to have the projector serviced. 17. Always place the projector on a level, 18. Use only BenQ's Ceiling Mount Kit for ceiling mount doing so may cause it is capable of more than 15 degrees ...
User Manual
Page 7
... password protected function • 3D color management allowing color adjustments to your liking • Selectable quick cooling function making the projector cool in a shorter time • FAQ to troubleshoot operational problems with one quick key press • Presentation timer for ...reliability and ease of the projected image will decline over time and may vary within the lamp manufacturers specifications. Introduction Projector features The projector integrates high-performance optical engine projection and a user-friendly design to projection distance. • The lamp brightness ...
... password protected function • 3D color management allowing color adjustments to your liking • Selectable quick cooling function making the projector cool in a shorter time • FAQ to troubleshoot operational problems with one quick key press • Presentation timer for ...reliability and ease of the projected image will decline over time and may vary within the lamp manufacturers specifications. Introduction Projector features The projector integrates high-performance optical engine projection and a user-friendly design to projection distance. • The lamp brightness ...

User Manual
Page 8
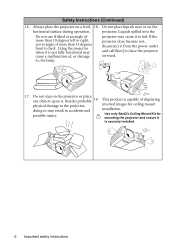
Ceiling mount kit 3. Standard accessories The supplied accessories will be suitable for detailed information. Soft carry case 8 Introduction Projector Quick start guide User manual CD Warranty card* VGA cable Power cord Pull the tab before using the remote control. RS232 cable 4. Remote control with ...
Ceiling mount kit 3. Standard accessories The supplied accessories will be suitable for detailed information. Soft carry case 8 Introduction Projector Quick start guide User manual CD Warranty card* VGA cable Power cord Pull the tab before using the remote control. RS232 cable 4. Remote control with ...

User Manual
Page 9
Projector exterior view Front/upper side 5 1 2 3 4 Rear/lower side (MP515) 14 15 16 17 19 (MP525/MP525P/MP575) 1. AC power cord inlet 10. RGB (PC)/Component ...
Projector exterior view Front/upper side 5 1 2 3 4 Rear/lower side (MP515) 14 15 16 17 19 (MP525/MP525P/MP575) 1. AC power cord inlet 10. RGB (PC)/Component ...
User Manual
Page 10
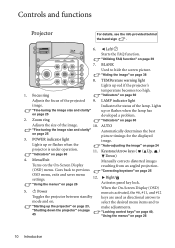
...4 10 7. "Indicators" on page 60 Adjusts the focus of the image. 10. POWER indicator light image. Lights up the projector" on page 23, "Shutting down the projector" on . Right/ Activates panel key lock. 5. II Power When the On-Screen Display (OSD) menu is under operation. ...Zoom ring up red if the projector's 11 temperature becomes too high. 1. AUTO "Fine-tuning the image size and clarity" on page 24 projector is activated, the #6, #11, and #12 Toggles the projector between standby keys are used as directional arrows to "Starting...
...4 10 7. "Indicators" on page 60 Adjusts the focus of the image. 10. POWER indicator light image. Lights up the projector" on page 23, "Shutting down the projector" on . Right/ Activates panel key lock. 5. II Power When the On-Screen Display (OSD) menu is under operation. ...Zoom ring up red if the projector's 11 temperature becomes too high. 1. AUTO "Fine-tuning the image size and clarity" on page 24 projector is activated, the #6, #11, and #12 Toggles the projector between standby keys are used as directional arrows to "Starting...

User Manual
Page 11
... to prevent possible damage to have a pleasant experience using your BenQ projector. You can purchase a BenQ projector ceiling mount kit from the ceiling due to an improper attachment through the use a proper fitting BenQ projector ceiling mount kit and that you also purchase a separate Kensington.... Introduction 11 SOURCE Displays the source selection bar. If you intend to mount your projector on page 30 Ceiling mounting the projector We want you purchased your BenQ projector, so we strongly recommend that you ensure it securely to the mounting bracket become loose...
... to prevent possible damage to have a pleasant experience using your BenQ projector. You can purchase a BenQ projector ceiling mount kit from the ceiling due to an improper attachment through the use a proper fitting BenQ projector ceiling mount kit and that you also purchase a separate Kensington.... Introduction 11 SOURCE Displays the source selection bar. If you intend to mount your projector on page 30 Ceiling mounting the projector We want you purchased your BenQ projector, so we strongly recommend that you ensure it securely to the mounting bracket become loose...

User Manual
Page 12
... resulting from an angled projection. mode and on page 10. "Auto-adjusting the image" on page 24 "Starting up the projector" on page 23, "Shutting down the projector" on . SOURCE Used to previous OSD menu, exits and saves menu 3 10 settings. 4 11 "Using the menus"...9 (OSD) menu. Freeze Freezes the projected image. BLANK 11. Volume +/- Digital Zoom (+, -) 12. "Magnifying and searching for the displayed Toggles the projector between standby image. "Selecting a picture mode" on page 39 When the On-Screen Display (OSD) menu is activated, the #3, #8, and #10 keys...
... resulting from an angled projection. mode and on page 10. "Auto-adjusting the image" on page 24 "Starting up the projector" on page 23, "Shutting down the projector" on . SOURCE Used to previous OSD menu, exits and saves menu 3 10 settings. 4 11 "Using the menus"...9 (OSD) menu. Freeze Freezes the projected image. BLANK 11. Volume +/- Digital Zoom (+, -) 12. "Magnifying and searching for the displayed Toggles the projector between standby image. "Selecting a picture mode" on page 39 When the On-Screen Display (OSD) menu is activated, the #3, #8, and #10 keys...
User Manual
Page 13
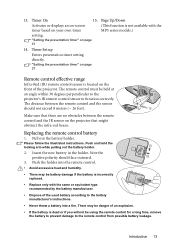
... 15° Make sure that might obstruct the infra-red beam. There may be held at an angle within 30 degrees perpendicular to the projector's IR remote control sensor to the battery manufacturer's instructions. • Never throw a battery into the remote control. • Avoid excessive ...• If the battery is not available with the same or equivalent type recommended by the battery manufacturer. • Dispose of the projector. "Setting the presentation timer" on the front of the used battery according to function correctly. Note the positive polarity should not exceed ...
... 15° Make sure that might obstruct the infra-red beam. There may be held at an angle within 30 degrees perpendicular to the projector's IR remote control sensor to the battery manufacturer's instructions. • Never throw a battery into the remote control. • Avoid excessive ...• If the battery is not available with the same or equivalent type recommended by the battery manufacturer. • Dispose of the projector. "Setting the presentation timer" on the front of the used battery according to function correctly. Note the positive polarity should not exceed ...

User Manual
Page 14
...this location with the projector placed near the floor behind the screen. turn the projector on the ceiling. 4. the projector for this location with the projector suspended upside-down from your dealer to mount your projector on . Purchase the BenQ Projector Ceiling Mount Kit from... rear projection screen and the BenQ Projector Ceiling Mount Kit are required for quick setup and portability. Set Rear Ceiling in front of your equipment. 14 Positioning your projector Front Ceiling Select this location with the projector Select this installation location. Rear...
...this location with the projector placed near the floor behind the screen. turn the projector on the ceiling. 4. the projector for this location with the projector suspended upside-down from your dealer to mount your projector on . Purchase the BenQ Projector Ceiling Mount Kit from... rear projection screen and the BenQ Projector Ceiling Mount Kit are required for quick setup and portability. Set Rear Ceiling in front of your equipment. 14 Positioning your projector Front Ceiling Select this location with the projector Select this installation location. Rear...
User Manual
Page 15
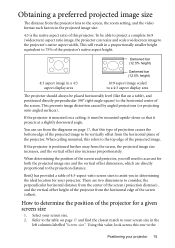
... vertical offset height of the projector from the diagrams on page 17 and find the closest match to be vertically offset from the screen, the projected image size increases, and the vertical offset also increases proportionately. When ceiling mounted, this projector. BenQ has provided a table of... the screen. To be able to the top edge of the projector for your projector 15 Refer to the table on page 17, that it projects at a slightly...
... vertical offset height of the projector from the diagrams on page 17 and find the closest match to be vertically offset from the screen, the projected image size increases, and the vertical offset also increases proportionately. When ceiling mounted, this projector. BenQ has provided a table of... the screen. To be able to the top edge of the projector for your projector 15 Refer to the table on page 17, that it projects at a slightly...
User Manual
Page 16
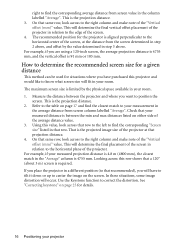
... distance. 2. The maximum screen size is limited by the value determined in your room. For example, if your measured distance is between the projector and where you are using a 120-inch screen, the average projection distance is 4755 mm, and the vertical offset is 91 mm or 183.... 3. Use the Keystone function to position the screen. Measure the distance between the min and max distances listed on page 25 for the projector is aligned perpendicular to center the image on page 17 and find the corresponding "Screen size" listed in the average distance from screen value ...
... distance. 2. The maximum screen size is limited by the value determined in your room. For example, if your measured distance is between the projector and where you are using a 120-inch screen, the average projection distance is 4755 mm, and the vertical offset is 91 mm or 183.... 3. Use the Keystone function to position the screen. Measure the distance between the min and max distances listed on page 25 for the projector is aligned perpendicular to center the image on page 17 and find the corresponding "Screen size" listed in the average distance from screen value ...

User Manual
Page 17
BenQ recommends that it , so as to make allowance for the center of lens dimensions of lens Vertical offset Projection distance Screen size Diagonal Inch mm W (... (mm) Vertical offset (mm) Min length (max. This will help you determine the exact mounting position so that if you intend to permanently install the projector, you permanently install it best suits your projector 17 zoom) Average Max length (min. Projection dimensions Refer to "Dimensions" on page 63 for this...
BenQ recommends that it , so as to make allowance for the center of lens dimensions of lens Vertical offset Projection distance Screen size Diagonal Inch mm W (... (mm) Vertical offset (mm) Min length (max. This will help you determine the exact mounting position so that if you intend to permanently install the projector, you permanently install it best suits your projector 17 zoom) Average Max length (min. Projection dimensions Refer to "Dimensions" on page 63 for this...

User Manual
Page 18
... cable Monitor Notebook or desktop computer A/V device (VGA) (DVI) 1 2 1 6 3 6 45 or 6 Speakers (MP525/ MP525P/MP575) (MP526/MP576) (MP515) 1. Connection When connecting a signal source to the projector, be included with the projector (see pages 19-22. Turn all equipment off before making any connections. 2.
... cable Monitor Notebook or desktop computer A/V device (VGA) (DVI) 1 2 1 6 3 6 45 or 6 Speakers (MP525/ MP525P/MP575) (MP526/MP576) (MP515) 1. Connection When connecting a signal source to the projector, be included with the projector (see pages 19-22. Turn all equipment off before making any connections. 2.

User Manual
Page 19
... can connect the MONITOR OUT signal output jack on the screen, you are connecting legacy version Macintosh computers. If you wish, you wish to a projector. Usually a key combo like FN + F3 or CRT/LCD key turns the external display on their external video ports when connected to use this... connection method when the projector is in the SYSTEM SETUP: Advanced menu. Press FN and the labeled function key simultaneously. Refer to your notebook's documentation to find your ...
... can connect the MONITOR OUT signal output jack on the screen, you are connecting legacy version Macintosh computers. If you wish, you wish to a projector. Usually a key combo like FN + F3 or CRT/LCD key turns the external display on their external video ports when connected to use this... connection method when the projector is in the SYSTEM SETUP: Advanced menu. Press FN and the labeled function key simultaneously. Refer to your notebook's documentation to find your ...

User Manual
Page 20
... Component Video source device" on page 21 Picture quality Best S-Video Video "Connecting an S-Video/ composite Video source device" on both the projector and the Video source device as might be expected in mono speaker which is not designed for, nor intended for informational purposes only. You ...need only connect the projector to a Video source device using just one built-in home theater or home cinema applications. It is designed to provide basic audio ...
... Component Video source device" on page 21 Picture quality Best S-Video Video "Connecting an S-Video/ composite Video source device" on both the projector and the Video source device as might be expected in mono speaker which is not designed for, nor intended for informational purposes only. You ...need only connect the projector to a Video source device using just one built-in home theater or home cinema applications. It is designed to provide basic audio ...


