
User Manual
Page 2
... 28 Switching input signal 31 Magnifying and searching for details . 32 Selecting the aspect ratio 32 Optimizing the image 34 Setting the presentation timer 38 Remote paging operations 39 Hiding the image 39 Freezing the image 40 Utilizing FAQ function 40 Operating in a high altitude environment 41 2 Adjusting the sound 41...
... 28 Switching input signal 31 Magnifying and searching for details . 32 Selecting the aspect ratio 32 Optimizing the image 34 Setting the presentation timer 38 Remote paging operations 39 Hiding the image 39 Freezing the image 40 Utilizing FAQ function 40 Operating in a high altitude environment 41 2 Adjusting the sound 41...

User Manual
Page 3
... manual before you follow the instructions mentioned in this product, it is important that you connect your eyes. Save it is on the projector or remote control. In areas where the mains voltage may damage your projector through a power stabilizer, surge protector or uninterruptible power supply (UPS). 3.
... manual before you follow the instructions mentioned in this product, it is important that you connect your eyes. Save it is on the projector or remote control. In areas where the mains voltage may damage your projector through a power stabilizer, surge protector or uninterruptible power supply (UPS). 3.

User Manual
Page 8
Shipping contents Carefully unpack and verify that you have all of purchase. Ceiling mount kit 3. Remote control with battery Optional accessories 1. Please consult your region, and may differ from those illustrated. *The warranty card is only supplied in some specific... regions. Projector Power cord VGA cable Quick start guide User manual CD Warranty card* Pull the tab before using the remote control. Spare lamp kit 2. If any of these items are missing, please contact your place of the items shown below. Standard accessories The ...
Shipping contents Carefully unpack and verify that you have all of purchase. Ceiling mount kit 3. Remote control with battery Optional accessories 1. Please consult your region, and may differ from those illustrated. *The warranty card is only supplied in some specific... regions. Projector Power cord VGA cable Quick start guide User manual CD Warranty card* Pull the tab before using the remote control. Spare lamp kit 2. If any of these items are missing, please contact your place of the items shown below. Standard accessories The ...

User Manual
Page 9
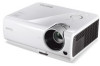
Focus ring 5. Lens cover 3 4 6 6. Projection lens 9. RGB signal output jack 9 13. Audio input jack Rear/lower side 15. RS-232 control port (MP615P) 10 11 12 13 14 17. Kensington anti-theft lock slot 21. Vent (heated air exhaust) 7. Video input jack 16. Audio output jack 18. Ceiling ... 14. Lamp cover 1 3. Rear adjuster foot 23. USB input jack 7 11. External control panel (See "Projector" on page 10 for details.) 2. Zoom ring 2 4. Front IR remote sensor 8. HDMI input jack 19.
Focus ring 5. Lens cover 3 4 6 6. Projection lens 9. RGB signal output jack 9 13. Audio input jack Rear/lower side 15. RS-232 control port (MP615P) 10 11 12 13 14 17. Kensington anti-theft lock slot 21. Vent (heated air exhaust) 7. Video input jack 16. Audio output jack 18. Ceiling ... 14. Lamp cover 1 3. Rear adjuster foot 23. USB input jack 7 11. External control panel (See "Projector" on page 10 for details.) 2. Zoom ring 2 4. Front IR remote sensor 8. HDMI input jack 19.

User Manual
Page 12
... Adjusts the sound level. See "Correcting keystone" on page 39 for details. Mode/Enter Selects an available picture setup mode. See "Remote paging operations" on page 26 for details. 12 Introduction See "Adjusting the sound" on page 27 for details. See "Using the menus...size. See "Magnifying and searching for details. Menu/Exit Turns on page 32 for details. 11. 3. AUTO Automatically determines the best picture timings for details. Remote control 7. 7 1 8 2 9 10 3 10 8. 11 4 12 8 5 13 14 6 9. 15 1. Goes back to hide the screen picture...
... Adjusts the sound level. See "Correcting keystone" on page 39 for details. Mode/Enter Selects an available picture setup mode. See "Remote paging operations" on page 26 for details. 12 Introduction See "Adjusting the sound" on page 27 for details. See "Using the menus...size. See "Magnifying and searching for details. Menu/Exit Turns on page 32 for details. 11. 3. AUTO Automatically determines the best picture timings for details. Remote control 7. 7 1 8 2 9 10 3 10 8. 11 4 12 8 5 13 14 6 9. 15 1. Goes back to hide the screen picture...
User Manual
Page 13
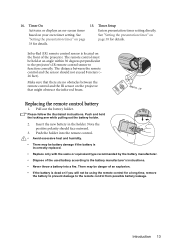
...Timer On 15. Timer Setup Activates or displays an on your own timer setting. Make sure that there are no obstacles between the remote control and the sensor should face outward. 3. 14. Push and hold the locking arm while pulling out the battery holder. 2. Infra-Red ...(IR) remote control sensor is dead or if you will not be using the remote control for details. Please follow the illustrated instructions. Note the positive polarity should not exceed 8 meters (~ 26 feet...
...Timer On 15. Timer Setup Activates or displays an on your own timer setting. Make sure that there are no obstacles between the remote control and the sensor should face outward. 3. 14. Push and hold the locking arm while pulling out the battery holder. 2. Infra-Red ...(IR) remote control sensor is dead or if you will not be using the remote control for details. Please follow the illustrated instructions. Note the positive polarity should not exceed 8 meters (~ 26 feet...

User Manual
Page 24
... scanned displays in the SYSTEM SETUP: Advanced menu, the projector will turn on . 7. The projector will start up, a startup logo is on the projector or remote control to enter a six digit password. Operation Starting up procedure takes about 30 seconds. power cable) only with the device to search for details. 2. See...
... scanned displays in the SYSTEM SETUP: Advanced menu, the projector will turn on . 7. The projector will start up, a startup logo is on the projector or remote control to enter a six digit password. Operation Starting up procedure takes about 30 seconds. power cable) only with the device to search for details. 2. See...

User Manual
Page 25
... hot air comes from the lamp may need to a lower setting. To correct this , press AUTO on the projector or remote control. You can also press SOURCE on the projector or remote control to fine tune the horizontal angle. 2 To retract the foot, hold up the projector while pressing the quick-release...
... hot air comes from the lamp may need to a lower setting. To correct this , press AUTO on the projector or remote control. You can also press SOURCE on the projector or remote control to fine tune the horizontal angle. 2 To retract the foot, hold up the projector while pressing the quick-release...

User Manual
Page 26
... this, besides adjusting the height of the projector, you need to manually correct it following one of these steps. • Using the remote control Press / on the projector or remote control to display the Keystone correction page. Press Menu/Exit and then press / until the DISPLAY menu is not perpendicular to correct...
... this, besides adjusting the height of the projector, you need to manually correct it following one of these steps. • Using the remote control Press / on the projector or remote control to display the Keystone correction page. Press Menu/Exit and then press / until the DISPLAY menu is not perpendicular to correct...
User Manual
Page 27
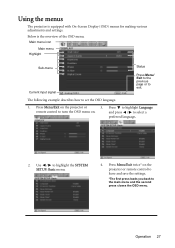
Press Menu/Exit on . Press Menu/Exit twice* on the projector or remote control to leave and save the settings. *The first press leads you back to turn the OSD menu on the projector or 3. Below is equipped ...with On-Screen Display (OSD) menus for making various adjustments and settings. Operation 27 Press to highlight Language remote control to the main menu and the second press closes the OSD menu. Main menu icon Main menu Highlight Sub-menu Current input signal Status...
Press Menu/Exit on . Press Menu/Exit twice* on the projector or remote control to leave and save the settings. *The first press leads you back to turn the OSD menu on the projector or 3. Below is equipped ...with On-Screen Display (OSD) menus for making various adjustments and settings. Operation 27 Press to highlight Language remote control to the main menu and the second press closes the OSD menu. Main menu icon Main menu Highlight Sub-menu Current input signal Status...

User Manual
Page 29
... 'INPUT NEW PASSWORD' displays. • If the password is started. 7. Entering the password recall procedure 1. Seek help from the local BenQ service center to enter the new password next time the projector is incorrect, the password error message displays lasting for three seconds, and the ...that you ever forget it , you enter an incorrect password 5 times in succession, the projector will display a coded number on the projector or remote control for details. Select Off by re-entering the new password. 6. The message 'INPUT PASSWORD' displays. Password Keep this manual, and you ...
... 'INPUT NEW PASSWORD' displays. • If the password is started. 7. Entering the password recall procedure 1. Seek help from the local BenQ service center to enter the new password next time the projector is incorrect, the password error message displays lasting for three seconds, and the ...that you ever forget it , you enter an incorrect password 5 times in succession, the projector will display a coded number on the projector or remote control for details. Select Off by re-entering the new password. 6. The message 'INPUT PASSWORD' displays. Password Keep this manual, and you ...

User Manual
Page 31
Data (graphic) "PC" presentations using mostly static images are generally brighter than "Video" using mostly moving images (movies). (MP615P) • The input signal type effects the options available for the available signals. Press Menu/Exit and then press / until your ...will be connected to automatically search for another signal. • The brightness level of the projected image will display on the projector or remote control. See "Selecting the aspect ratio" on page 34 for details. Switching input signal The projector can be scaled by the projector ...
Data (graphic) "PC" presentations using mostly static images are generally brighter than "Video" using mostly moving images (movies). (MP615P) • The input signal type effects the options available for the available signals. Press Menu/Exit and then press / until your ...will be connected to automatically search for another signal. • The brightness level of the projected image will display on the projector or remote control. See "Selecting the aspect ratio" on page 34 for details. Switching input signal The projector can be scaled by the projector ...
User Manual
Page 32
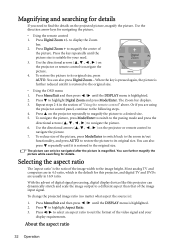
.../Exit and then press / until it is the default for your display requirements. To restore the picture to find the details on the projector or remote control to navigate the picture. 6. Use the directional arrows ( , , , ) on the projector repeatedly to magnify the picture to highlight Digital Zoom ... to the zoom in 4:3 ratio, which is restored to highlight Aspect Ratio. 3. Press to a desired size. 5. Press on the projector or remote control to the image height. To reduce size of the video signal and your need to its original size. You can further magnify the picture...
.../Exit and then press / until it is the default for your display requirements. To restore the picture to find the details on the projector or remote control to navigate the picture. 6. Use the directional arrows ( , , , ) on the projector repeatedly to magnify the picture to highlight Digital Zoom ... to the zoom in 4:3 ratio, which is restored to highlight Aspect Ratio. 3. Press to a desired size. 5. Press on the projector or remote control to the image height. To reduce size of the video signal and your need to its original size. You can further magnify the picture...

User Manual
Page 34
... The projector is preset with several predefined picture modes so that you can follow one of the following steps. • Press Mode/Enter on the remote control or projector repeatedly until your desired mode is selected. • Go to the PICTURE > Picture Mode menu and press / to select a desired mode. The...
... The projector is preset with several predefined picture modes so that you can follow one of the following steps. • Press Mode/Enter on the remote control or projector repeatedly until your desired mode is selected. • Go to the PICTURE > Picture Mode menu and press / to select a desired mode. The...

User Manual
Page 35
... Wall Color In the situation where you are projecting onto a colored surface such as black and that quality, select On. Based on the projector or remote control Adjusting Brightness The higher the value, the brighter the image. Adjusting Brilliant Color This feature utilizes a new color-processing algorithm and system level enhancements...
... Wall Color In the situation where you are projecting onto a colored surface such as black and that quality, select On. Based on the projector or remote control Adjusting Brightness The higher the value, the brighter the image. Adjusting Brilliant Color This feature utilizes a new color-processing algorithm and system level enhancements...

User Manual
Page 38
.... Top-Left Bottom-Left Top-Right Bottom-Right 5. A confirmation message displays. To cancel the timer, perform the following steps. • Using the remote control. displaying on . Highlight Timer period and decide the timer period by pressing / . Selection Count Up Count Down Description Increases from 1 to 5... select On and press Mode/Enter. 7. A confirmation message displays. 2. The length of time can indicate the presentation time on the remote control or go to the SYSTEM SETUP: Basic > Presentation Timer menu and press Mode/Enter to confirm. To activate the presentation timer,...
.... Top-Left Bottom-Left Top-Right Bottom-Right 5. A confirmation message displays. To cancel the timer, perform the following steps. • Using the remote control. displaying on . Highlight Timer period and decide the timer period by pressing / . Selection Count Up Count Down Description Increases from 1 to 5... select On and press Mode/Enter. 7. A confirmation message displays. 2. The length of time can indicate the presentation time on the remote control or go to the SYSTEM SETUP: Basic > Presentation Timer menu and press Mode/Enter to confirm. To activate the presentation timer,...

User Manual
Page 39
... let the projector return the image automatically after a period of the screen while the image is no action taken on the blank screen. Remote paging operations Connect the projector to your PC or notebook with an audio input connected, the audio can operate your computer is activated with... draw the audience's full attention to the presenter, you can set from projecting as this function is updated to restore the picture. If remote paging function doesn't work, check if the USB connection is correctly made and the mouse driver on your display software program (on a ...
... let the projector return the image automatically after a period of the screen while the image is no action taken on the blank screen. Remote paging operations Connect the projector to your PC or notebook with an audio input connected, the audio can operate your computer is activated with... draw the audience's full attention to the presenter, you can set from projecting as this function is updated to restore the picture. If remote paging function doesn't work, check if the USB connection is correctly made and the mouse driver on your display software program (on a ...

User Manual
Page 40
... If the connected devices have active audio output, you want to know. 3. To get the FAQ information: 1. Press on the projector or remote control. Press to freeze the image. Press Menu/Exit to problems encountered by users regarding image quality, installation, special feature operation and service information...word 'FREEZE' will still hear the audio even though the image is frozen on the screen, the pictures are running on the remote control to highlight FAQ-Image and Installation or FAQ-Features and Service based on the information you will display in the upper left corner...
... If the connected devices have active audio output, you want to know. 3. To get the FAQ information: 1. Press on the projector or remote control. Press to freeze the image. Press Menu/Exit to problems encountered by users regarding image quality, installation, special feature operation and service information...word 'FREEZE' will still hear the audio even though the image is frozen on the screen, the pictures are running on the remote control to highlight FAQ-Image and Installation or FAQ-Features and Service based on the information you will display in the upper left corner...

User Manual
Page 41
... is between 0 m and 1500 m and ambient temperature is between 0°C and 35°C. Operation under such a condition. Be sure you have an effect on the remote control, or: 1. See "Connection" on under "High Altitude Mode" may display auto shut-down symptoms, which is designed to improve overall system cooling and performance...
... is between 0 m and 1500 m and ambient temperature is between 0°C and 35°C. Operation under such a condition. Be sure you have an effect on the remote control, or: 1. See "Connection" on under "High Altitude Mode" may display auto shut-down symptoms, which is designed to improve overall system cooling and performance...

User Manual
Page 53
Maintenance Care of the projector except the lamp. Contact your dealer about the range. • Retract the adjuster feet. • Remove the battery from the remote control. • Pack the projector in "Shutting down the projector" on page 61 or consult your dealer if other chemical detergents. Cleaning the projector case ...
Maintenance Care of the projector except the lamp. Contact your dealer about the range. • Retract the adjuster feet. • Remove the battery from the remote control. • Pack the projector in "Shutting down the projector" on page 61 or consult your dealer if other chemical detergents. Cleaning the projector case ...

