
User Manual
Page 3
Table of contents Important safety instructions 1 Introduction 5 Projector features 5 Shipping contents 6 Optional accessories 6 Projector exterior view 7 Front / upper side 7 Rear side ...7 Side view ...8 Lower side ...8 Controls and functions 9 External control panel 9 Remote control 10 Remote control effective range 12 Replacing the remote control battery 12 Positioning your projector 13 Choosing a location 13 Obtaining a preferred projected image size 15 How to determine the...
Table of contents Important safety instructions 1 Introduction 5 Projector features 5 Shipping contents 6 Optional accessories 6 Projector exterior view 7 Front / upper side 7 Rear side ...7 Side view ...8 Lower side ...8 Controls and functions 9 External control panel 9 Remote control 10 Remote control effective range 12 Replacing the remote control battery 12 Positioning your projector 13 Choosing a location 13 Obtaining a preferred projected image size 15 How to determine the...

User Manual
Page 10
... result in accidents and possible injury. Do not step on the product defect. projector or remote control. 12. If the projector does become heated and deformed odor from the power supply's wall socket and call BenQ to become wet, disconnect it . Safety Instructions (Continued) 10. Besides probable inverted images for mounting the unit and ensure...
... result in accidents and possible injury. Do not step on the product defect. projector or remote control. 12. If the projector does become heated and deformed odor from the power supply's wall socket and call BenQ to become wet, disconnect it . Safety Instructions (Continued) 10. Besides probable inverted images for mounting the unit and ensure...

User Manual
Page 12
... verify that you have all of these items are missing, please contact your region, and may differ from those illustrated. Projector Soft carry case User's manual User's manual CD Quick start Remote control guide with the cables required for your place of purchase. VGA cable USB cable Optional accessories 1. The supplied accessories will...
... verify that you have all of these items are missing, please contact your region, and may differ from those illustrated. Projector Soft carry case User's manual User's manual CD Quick start Remote control guide with the cables required for your place of purchase. VGA cable USB cable Optional accessories 1. The supplied accessories will...

User Manual
Page 16
... to "Start up or flashes when the projector is not activated, #9 and #10 function as directional arrows to select the desired menu items and to "Fine-tuning the image size and clarity" on page 32 for more information.) Adjusts the focus of the screen. Remote control 1 7 8 2 9 3 4 10 11 5 ...to "Indicators" on page 47 for more information.) Lights up " on page 25 and "Shutdown" on page 30 for more information.) Turns the projector on -screen menu is under operation. 9. 3 Left 10. Power indicator light (Refer to "Correcting keystone" on page 28 for more information.) When...
... to "Start up or flashes when the projector is not activated, #9 and #10 function as directional arrows to select the desired menu items and to "Fine-tuning the image size and clarity" on page 32 for more information.) Adjusts the focus of the screen. Remote control 1 7 8 2 9 3 4 10 11 5 ...to "Indicators" on page 47 for more information.) Lights up " on page 25 and "Shutdown" on page 30 for more information.) Turns the projector on -screen menu is under operation. 9. 3 Left 10. Power indicator light (Refer to "Correcting keystone" on page 28 for more information.) When...
User Manual
Page 17
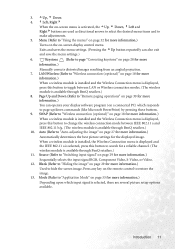
...wireless module is installed, the Wireless Connection menu is displayed and the IEEE 802.11 a is available through BenQ retailers.) 11. 3. 5Up, 6 Down 4. 3Left, Right4 When the on the remote control to restore the image. 13. LAN/Wireless (Refer to search for more information.) Turns on the on ...When a wireless module is installed and the Wireless Connection menu is displayed, press this button to "Wireless connection (optional)" on -screen display control menu. Press any key on -screen menu is selected, there are used as directional arrows to select the desired menu items and to ...
...wireless module is installed, the Wireless Connection menu is displayed and the IEEE 802.11 a is available through BenQ retailers.) 11. 3. 5Up, 6 Down 4. 3Left, Right4 When the on the remote control to restore the image. 13. LAN/Wireless (Refer to search for more information.) Turns on the on ...When a wireless module is installed and the Wireless Connection menu is displayed, press this button to "Wireless connection (optional)" on -screen display control menu. Press any key on -screen menu is selected, there are used as directional arrows to select the desired menu items and to ...
User Manual
Page 18
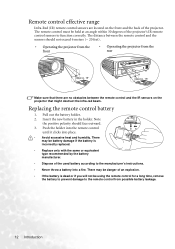
... if the battery is dead or if you will not be held at an angle within 30 degrees of the projector's IR remote control sensors to the remote control from the rear Approx. 15° Approx. 15° Make sure that there are located on the... • Avoid excessive heat and humidity. Remote control effective range Infra-Red (IR) remote control sensors are no obstacles between the remote control and the IR sensors on the front and the back of the projector. Pull out the battery holder. 2. The remote control must be using the remote control for a long time, remove the battery ...
... if the battery is dead or if you will not be held at an angle within 30 degrees of the projector's IR remote control sensors to the remote control from the rear Approx. 15° Approx. 15° Make sure that there are located on the... • Avoid excessive heat and humidity. Remote control effective range Infra-Red (IR) remote control sensors are no obstacles between the remote control and the IR sensors on the front and the back of the projector. Pull out the battery holder. 2. The remote control must be using the remote control for a long time, remove the battery ...

User Manual
Page 31
... a default BenQ logo is projected. (If necessary) Rotate the focus ring to adjust the image clearness. If the projector is detected. Operation 25 Remove the lens cap. For details of start the unit. The start to "Utilizing the password function" on page 25. 5. The projector will start ...seconds after power has been applied. 2. The current input source being scanned displays at the center of the connected equipment on the projector or remote control to the heat produced by the projection lamp. 3. If the frequency/ resolution of Range" displayed on page 29. Utilizing the ...
... a default BenQ logo is projected. (If necessary) Rotate the focus ring to adjust the image clearness. If the projector is detected. Operation 25 Remove the lens cap. For details of start the unit. The start to "Utilizing the password function" on page 25. 5. The projector will start ...seconds after power has been applied. 2. The current input source being scanned displays at the center of the connected equipment on the projector or remote control to the heat produced by the projection lamp. 3. If the frequency/ resolution of Range" displayed on page 29. Utilizing the ...

User Manual
Page 33
...Do not look into position and be displayed at the bottom right of the projector or on the remote control. Be careful when you may cause damage to try again. If the screen and the projector are not perpendicular to fine tune the horizontal angle. Operation 27 Press Down ...6 to cancel the set-up and return to "Correcting keystone" on the remote control. Lift the projector up the projector while pressing the front adjuster button, then slowly lower the projector. To correct this , press Auto on the control panel of the screen for details. Within 3 seconds, the built-in a ...
...Do not look into position and be displayed at the bottom right of the projector or on the remote control. Be careful when you may cause damage to try again. If the screen and the projector are not perpendicular to fine tune the horizontal angle. Operation 27 Press Down ...6 to cancel the set-up and return to "Correcting keystone" on the remote control. Lift the projector up the projector while pressing the front adjuster button, then slowly lower the projector. To correct this , press Auto on the control panel of the screen for details. Within 3 seconds, the built-in a ...
User Manual
Page 34
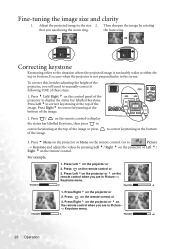
... are in Picture --> Keystone menu. Press on the projector or 2. Then sharpen the image by pressing Left 3/ Right 4 on the remote control. For example, 1. Press 6 Menu on the projector or Menu on the projector or Left 3/ Right 4on the remote control. Press Left 3on the projector or 3 on the remote control when you will need using the zoom ring. Press...
... are in Picture --> Keystone menu. Press on the projector or 2. Then sharpen the image by pressing Left 3/ Right 4 on the remote control. For example, 1. Press 6 Menu on the projector or Menu on the projector or Left 3/ Right 4on the remote control. Press Left 3on the projector or 3 on the remote control when you will need using the zoom ring. Press...
User Manual
Page 35
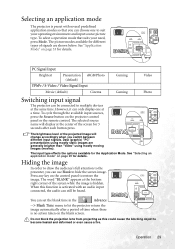
... Brightest Presentation sRGB/Photo (default) YPbPr / S-Video / Video Signal Input Movie (default) Cinema Gaming Gaming Video Photo Switching input signal The projector can choose one at the bottom right corner of the projected image will display at the same time. The word "BLANK" appears at a ... between different input signals. The brightness level of the screen while the image is hidden. Press any key on the projector control panel or the remote control. To select a operation mode that you can be heard. However, it can still be connected to restore the image.
... Brightest Presentation sRGB/Photo (default) YPbPr / S-Video / Video Signal Input Movie (default) Cinema Gaming Gaming Video Photo Switching input signal The projector can choose one at the bottom right corner of the projected image will display at the same time. The word "BLANK" appears at a ... between different input signals. The brightness level of the screen while the image is hidden. Press any key on the projector control panel or the remote control. To select a operation mode that you can be heard. However, it can still be connected to restore the image.
User Manual
Page 36
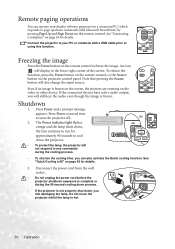
To release the function, press the Freeze button on the remote control, or the Source button on page 18 for details. 3. Even if an image is not properly shut down the projector. • To protect the lamp, the projector will display in the lower right corner of the screen. Press Power and...; To shorten the cooling time, you will also change the input source. Do not move the projector whilst the lamp is frozen. Freezing the image Press the Freeze button on the remote control to using this function. If the connected devices have active audio output, you can operate your PC...
To release the function, press the Freeze button on the remote control, or the Source button on page 18 for details. 3. Even if an image is not properly shut down the projector. • To protect the lamp, the projector will display in the lower right corner of the screen. Press Power and...; To shorten the cooling time, you will also change the input source. Do not move the projector whilst the lamp is frozen. Freezing the image Press the Freeze button on the remote control to using this function. If the connected devices have active audio output, you can operate your PC...

User Manual
Page 38
... 17 different menu languages. (Refer to page "4. or remote control. 2. Press 6 Menu on - Adjust keystone values by on the remote control to turn the on the projector or Menu 4. Using the menus The projector is equipped with on the remote control to select the setting. Press 5Exit / 6Menu on the projector or 6 / 5 on -screen display (OSD) menus for more...
... 17 different menu languages. (Refer to page "4. or remote control. 2. Press 6 Menu on - Adjust keystone values by on the remote control to turn the on the projector or Menu 4. Using the menus The projector is equipped with on the remote control to select the setting. Press 5Exit / 6Menu on the projector or 6 / 5 on -screen display (OSD) menus for more...
User Manual
Page 39
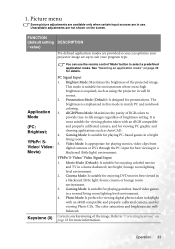
... enjoying colorful movies and TV in use the remote control 'Mode' button to "Correcting keystone" on page 29 for more information. Photo Mode: Is perfect for environments where extra-high brightness is required, such as AutoCAD. 4. You can optimize your projector image set-up to match PC and notebook ... photos taken with an sRGB compatible and properly calibrated camera, and for viewing PC graphic and drawing applications such as using the projector in daylight with an sRGB compatible and properly calibrated camera, and for playing PC-based games in this mode to suit your program...
... enjoying colorful movies and TV in use the remote control 'Mode' button to "Correcting keystone" on page 29 for more information. Photo Mode: Is perfect for environments where extra-high brightness is required, such as AutoCAD. 4. You can optimize your projector image set-up to match PC and notebook ... photos taken with an sRGB compatible and properly calibrated camera, and for viewing PC graphic and drawing applications such as using the projector in daylight with an sRGB compatible and properly calibrated camera, and for playing PC-based games in this mode to suit your program...

User Manual
Page 42
... active after your last button press. Volume (5) Adjusts audio volume level. Quick Cooling (off . Selecting On enables the function and projector cooling time will be asked to enter the current password before changing to only those who do not know the correct password. Print... between on page 25. Returns all settings to 100 seconds. Selecting On limits use the projector. You will be entered by using either the buttons on the projector or the remote control. The following settings will display on page 25. For more information, refer to "Utilizing the password ...
... active after your last button press. Volume (5) Adjusts audio volume level. Quick Cooling (off . Selecting On enables the function and projector cooling time will be asked to enter the current password before changing to only those who do not know the correct password. Print... between on page 25. Returns all settings to 100 seconds. Selecting On limits use the projector. You will be entered by using either the buttons on the projector or the remote control. The following settings will display on page 25. For more information, refer to "Utilizing the password ...

User Manual
Page 43
... select your ceiling. Three modes are available: Default (BenQ logo), black screen or blue screen. The default value is not activated, the projector selects the last used input signal. If the function is `RGB'. Use Left 3/ Right 4on the projector or Left 3/ Right 4on the remote control to "Choosing a location" on your desired language. 4. Sets...
... select your ceiling. Three modes are available: Default (BenQ logo), black screen or blue screen. The default value is not activated, the projector selects the last used input signal. If the function is `RGB'. Use Left 3/ Right 4on the projector or Left 3/ Right 4on the remote control to "Choosing a location" on your desired language. 4. Sets...
User Manual
Page 44
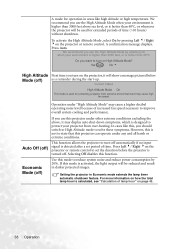
... turned off ) Use this mode to reduce system noise and reduce power consumption by pressing Left 3/ Right 4on the projector or remote control. In cases like high altitude or high temperature. We recommend you use the High Altitude Mode when your environment is ...in Economic mode extends the lamp timer automatic shutdown feature. Press Left 3/ Right 4on the projector or remote control to improve overall system cooling and performance. Press Auto. Selecting Off disables this projector under any and all harsh or extreme conditions. Current Status High Altitude Mode On This mode...
... turned off ) Use this mode to reduce system noise and reduce power consumption by pressing Left 3/ Right 4on the projector or remote control. In cases like high altitude or high temperature. We recommend you use the High Altitude Mode when your environment is ...in Economic mode extends the lamp timer automatic shutdown feature. Press Left 3/ Right 4on the projector or remote control to improve overall system cooling and performance. Press Auto. Selecting Off disables this projector under any and all harsh or extreme conditions. Current Status High Altitude Mode On This mode...
User Manual
Page 46
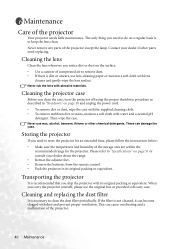
...is dirt or smears, use lens-cleaning paper or moisten a soft cloth with lens cleaner and gently wipe the lens surface. Maintenance Care of the projector except the lamp. Never use the original box or provided soft carry case. Cleaning the lens Clean the lens whenever you ship the...you need to keep the lens clean. Contact your dealer about the range. • Retract the adjuster feet. • Remove the batteries from the remote control. • Pack the projector in "Shutdown" on a regular basis is to do on page 30 and unplug the power cord. • To remove dirt or dust, wipe...
...is dirt or smears, use lens-cleaning paper or moisten a soft cloth with lens cleaner and gently wipe the lens surface. Maintenance Care of the projector except the lamp. Never use the original box or provided soft carry case. Cleaning the lens Clean the lens whenever you ship the...you need to keep the lens clean. Contact your dealer about the range. • Retract the adjuster feet. • Remove the batteries from the remote control. • Pack the projector in "Shutdown" on a regular basis is to do on page 30 and unplug the power cord. • To remove dirt or dust, wipe...

User Manual
Page 47
... Maintenance 41 To leave the message, press the Exit button on the back of the slot. 5. Pull out the filter case. 6. Turn the projector off and wait until the fans stop running. 2. Use a small vacuum cleaner designed for 10 seconds every 500 hours to remind you to clean ...filter case into the slot slightly. Release the filter case from any cables. 3. The filter case springs out of the projector. Locate the filter case on the projector or remote control. Please check if the filter is broken, replace it with a new one pictured to the right will be displayed for...
... Maintenance 41 To leave the message, press the Exit button on the back of the slot. 5. Pull out the filter case. 6. Turn the projector off and wait until the fans stop running. 2. Use a small vacuum cleaner designed for 10 seconds every 500 hours to remind you to clean ...filter case into the slot slightly. Release the filter case from any cables. 3. The filter case springs out of the projector. Locate the filter case on the projector or remote control. Please check if the filter is broken, replace it with a new one pictured to the right will be displayed for...

User Manual
Page 52
... warning light is on the projector for further help. For more detailed information, please refer to let the OSD disappear. Resetting the lamp counter Do not reset if the lamp is warning you of the following possible problems: 1. iii. Wait about 5 seconds to "Indicators" on the remote control to reset the lamp hour...
... warning light is on the projector for further help. For more detailed information, please refer to let the OSD disappear. Resetting the lamp counter Do not reset if the lamp is warning you of the following possible problems: 1. iii. Wait about 5 seconds to "Indicators" on the remote control to reset the lamp hour...
User Manual
Page 56
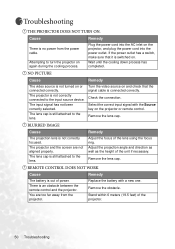
... cord into the power outlet. If the power outlet has a switch, make sure that the signal cable is switched on the projector or remote control. Wait until the cooling down process has completed. Turn the video source on and check that it is connected correctly. Remove the... input signal with a new one. There is not correctly connected to the lens. Troubleshooting THE PROJECTOR DOES NOT TURN ON. The projector is an obstacle between the remote control and the projector. The lens cap is not correctly focused. BLURRED IMAGE Cause Remedy The projection lens is still ...
... cord into the power outlet. If the power outlet has a switch, make sure that the signal cable is switched on the projector or remote control. Wait until the cooling down process has completed. Turn the video source on and check that it is connected correctly. Remove the... input signal with a new one. There is not correctly connected to the lens. Troubleshooting THE PROJECTOR DOES NOT TURN ON. The projector is an obstacle between the remote control and the projector. The lens cap is not correctly focused. BLURRED IMAGE Cause Remedy The projection lens is still ...

