
User Manual
Page 1
MP723 Digital Projector User Manual Welcome
MP723 Digital Projector User Manual Welcome
User Manual
Page 3
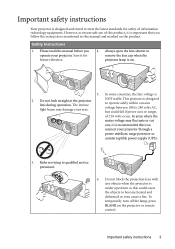
In some countries, the line voltage is under operation as this manual before you connect your projector through a power stabilizer, surge protector or uninterruptible power supply (UPS). 3. The intense light beam may fluctuate or cut out, it is important that...lens shutter or remove the lens cap when the projector lamp is designed and tested to ensure safe use of this manual and marked on the product. Important safety instructions Your projector is on. 5. Do not look straight at the projector lens during operation. This projector is designed to operate safely within a mains ...
In some countries, the line voltage is under operation as this manual before you connect your projector through a power stabilizer, surge protector or uninterruptible power supply (UPS). 3. The intense light beam may fluctuate or cut out, it is important that...lens shutter or remove the lens cap when the projector lamp is designed and tested to ensure safe use of this manual and marked on the product. Important safety instructions Your projector is on. 5. Do not look straight at the projector lens during operation. This projector is designed to operate safely within a mains ...
User Manual
Page 7
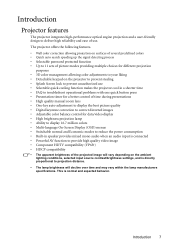
...; Selectable quick cooling function makes the projector cool in a shorter time • FAQ to troubleshoot operational problems with one quick button press • Presentation timer for a better control of time during presentations • High quality manual zoom lens • One-key auto...high quality video image • Component HDTV compatibility (YPbPr) • HDCP compatibility • The apparent brightness of use. The projector offers the following features. • Wall color correction allowing projection on surfaces of several predefined colors • Quick auto search ...
...; Selectable quick cooling function makes the projector cool in a shorter time • FAQ to troubleshoot operational problems with one quick button press • Presentation timer for a better control of time during presentations • High quality manual zoom lens • One-key auto...high quality video image • Component HDTV compatibility (YPbPr) • HDCP compatibility • The apparent brightness of use. The projector offers the following features. • Wall color correction allowing projection on surfaces of several predefined colors • Quick auto search ...
User Manual
Page 8
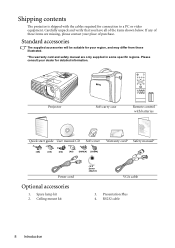
Please consult your region, and may differ from those illustrated. *The warranty card and safety manual are missing, please contact your place of the items shown below. Presentation Plus 4. Carefully unpack and verify that you have all of...video equipment. Ceiling mount kit (3-2 power adaptor) VGA cable 3. RS232 cable 8 Introduction Spare lamp kit 2. Shipping contents The projector is shipped with batteries Quick start guide User manual CD Soft cover Warranty card* Safety manual* (UK) (US) (EU) (AU) (KOREA) (CHINA) Power cord Optional accessories 1. If any of these items...
Please consult your region, and may differ from those illustrated. *The warranty card and safety manual are missing, please contact your place of the items shown below. Presentation Plus 4. Carefully unpack and verify that you have all of...video equipment. Ceiling mount kit (3-2 power adaptor) VGA cable 3. RS232 cable 8 Introduction Spare lamp kit 2. Shipping contents The projector is shipped with batteries Quick start guide User manual CD Soft cover Warranty card* Safety manual* (UK) (US) (EU) (AU) (KOREA) (CHINA) Power cord Optional accessories 1. If any of these items...
User Manual
Page 10
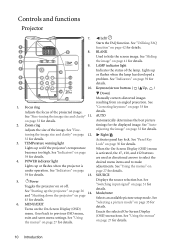
... bar. Goes back to make Lights up the projector" on page 45 for details. Controls and functions Projector 7. See "Hiding 4 the image" on page 35 for details. Keystone/Arrow buttons ( / Up, / 14 Down) 10 Manually corrects distorted images resulting from an angled projection. See...SOURCE 5. Selects an available picture setup mode. See "Indicators" on page 42 for 7 12 details. 8 13 10. Lights up red if the projector's temperature becomes too high. See "Indicators" on under operation. See "Using the menus" on page 59 for details. 2 9 8. See "Starting ...
... bar. Goes back to make Lights up the projector" on page 45 for details. Controls and functions Projector 7. See "Hiding 4 the image" on page 35 for details. Keystone/Arrow buttons ( / Up, / 14 Down) 10 Manually corrects distorted images resulting from an angled projection. See...SOURCE 5. Selects an available picture setup mode. See "Indicators" on page 42 for 7 12 details. 8 13 10. Lights up red if the projector's temperature becomes too high. See "Indicators" on under operation. See "Using the menus" on page 59 for details. 2 9 8. See "Starting ...

User Manual
Page 11
ASPECT Selects the display aspect ratio. See 12. Keystone/Arrow buttons ( / Up, / Down) Manually corrects distorted images resulting from an angled projection. See "Adjusting Brightness" on page 43 for details. CONTRAST Adjusts contrast. BLANK Used to previous OSD menu, .... 45 for details. II Power 10. See "Using the menus" on page 36 for details. See "Adjusting Contrast" on page 27 for details. Toggles the projector on the On-Screen Display (OSD) menu. MENU/EXIT Turns on or off. See "Hiding the image" on your startup screen. TIMER ON/SHOW Activates...
ASPECT Selects the display aspect ratio. See 12. Keystone/Arrow buttons ( / Up, / Down) Manually corrects distorted images resulting from an angled projection. See "Adjusting Brightness" on page 43 for details. CONTRAST Adjusts contrast. BLANK Used to previous OSD menu, .... 45 for details. II Power 10. See "Using the menus" on page 36 for details. See "Adjusting Contrast" on page 27 for details. Toggles the projector on the On-Screen Display (OSD) menu. MENU/EXIT Turns on or off. See "Hiding the image" on your startup screen. TIMER ON/SHOW Activates...

User Manual
Page 28
... use it is usually the combination of key(s) and lock. Once the key pad is removed from the projector, you keep the manual in case they are taken together with the projector. To remove the control keypad: 1. Locate the screw locations on the rear side of the control keypad.... See item 11 on the projector is detachable. Print out this manual, and keep the control key pad and remote control away from the projector. 5. If not, purchase a lock, like Kensington lock, to secure the projector. Securing the projector Using a security cable lock The projector has to be set through the...
... use it is usually the combination of key(s) and lock. Once the key pad is removed from the projector, you keep the manual in case they are taken together with the projector. To remove the control keypad: 1. Locate the screw locations on the rear side of the control keypad.... See item 11 on the projector is detachable. Print out this manual, and keep the control key pad and remote control away from the projector. 5. If not, purchase a lock, like Kensington lock, to secure the projector. Securing the projector Using a security cable lock The projector has to be set through the...
User Manual
Page 29
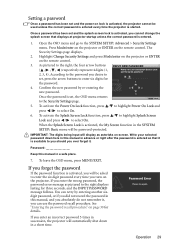
... every time you cannot change the splash screen that it is started. Password Keep this manual, and you can retry by re-entering the new password. Operation 29 Press Mode/enter on the projector or ENTER on the remote control. 3. If you enter an incorrect password 5 times ... the password If the password function is activated, you will automatically shut down here in this manual in this manual in a short time. See "Entering the password recall procedure" on the projector. Confirm the new password by entering another sixdigit password, or if you did not record the...
... every time you cannot change the splash screen that it is started. Password Keep this manual, and you can retry by re-entering the new password. Operation 29 Press Mode/enter on the projector or ENTER on the remote control. 3. If you enter an incorrect password 5 times ... the password If the password function is activated, you will automatically shut down here in this manual in this manual in a short time. See "Entering the password recall procedure" on the projector. Confirm the new password by entering another sixdigit password, or if you did not record the...
User Manual
Page 30
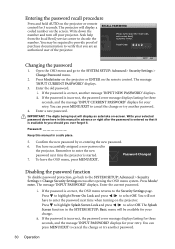
...to highlight Power On Lock and press / to decode the number. The projector will be required to provide proof of the projector. Enter the old password. Enter a new password. Password Keep this manual in a safe place. 5. Password Changed 7. Entering the password recall procedure... Press and hold AUTO on the screen. Seek help from the local BenQ service center to select...
...to highlight Power On Lock and press / to decode the number. The projector will be required to provide proof of the projector. Enter the old password. Enter a new password. Password Keep this manual in a safe place. 5. Password Changed 7. Entering the password recall procedure... Press and hold AUTO on the screen. Seek help from the local BenQ service center to select...
User Manual
Page 31
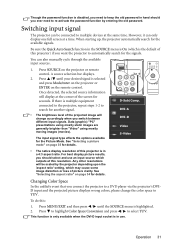
... for details. Operation 31 Once detected, the selected source information will be connected to re-activate the password function by the projector depending upon the 'aspect ratio' setting, which may cause some image distortion or loss of the screen for the signals. ... picture clarity. Switching input signal The projector can be scaled by entering the old password. When starting up, the projector automatically search for the Picture Mode. You can only display one full screen at a time. However, it can also manually cycle through the available input sources....
... for details. Operation 31 Once detected, the selected source information will be connected to re-activate the password function by the projector depending upon the 'aspect ratio' setting, which may cause some image distortion or loss of the screen for the signals. ... picture clarity. Switching input signal The projector can be scaled by entering the old password. When starting up, the projector automatically search for the Picture Mode. You can only display one full screen at a time. However, it can also manually cycle through the available input sources....
User Manual
Page 33
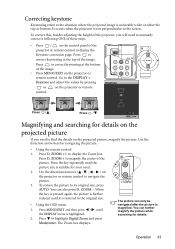
Go to find the details on the projected picture If you will need to manually correct it is highlighted. 2. MENU Back Magnifying and searching for details. ZOOM + to display the Zoom bar. You can further magnify the picture while searching... page. ZOOM -. Press to its original size, press AUTO. To correct this, besides adjusting the height of the image. • Press MENU/EXIT on the projector or remote control to navigate the picture. 3. Press / . Press D. Press the key repeatedly until the DISPLAY menu is restored to the original size. • ...
Go to find the details on the projected picture If you will need to manually correct it is highlighted. 2. MENU Back Magnifying and searching for details. ZOOM + to display the Zoom bar. You can further magnify the picture while searching... page. ZOOM -. Press to its original size, press AUTO. To correct this, besides adjusting the height of the image. • Press MENU/EXIT on the projector or remote control to navigate the picture. 3. Press / . Press D. Press the key repeatedly until the DISPLAY menu is restored to the original size. • ...

User Manual
Page 55
...lamp warning appears. It is time to replace the lamp, please install a new lamp or consult your dealer. Turn the power off and let the projector cool for details. See "Indicators" on page 59 for 45 minutes. The lamp brightness diminishes with "Economic Mode" selected (See "Lamp Mode (Normal)"... be replaced after turning the power back on page 51), you to User manual) Then reset lamp timer OK Maintenance 55 Install a new lamp for 4000 hours. An old lamp may cause a malfunction in the projector and in operation for optimal performance. Notice Replace Lamp Soon Lamp > 3950 ...
...lamp warning appears. It is time to replace the lamp, please install a new lamp or consult your dealer. Turn the power off and let the projector cool for details. See "Indicators" on page 59 for 45 minutes. The lamp brightness diminishes with "Economic Mode" selected (See "Lamp Mode (Normal)"... be replaced after turning the power back on page 51), you to User manual) Then reset lamp timer OK Maintenance 55 Install a new lamp for 4000 hours. An old lamp may cause a malfunction in the projector and in operation for optimal performance. Notice Replace Lamp Soon Lamp > 3950 ...

User Manual
Page 65
... or implied, with any warranty claim. All rights reserved. In the event this product against any defects in accordance with BenQ's written instructions, especially the ambient humidity must be replacement of their respective companies or organizations. For other rights which vary ...electronic, mechanical, magnetic, optical, chemical, manual or otherwise, without obligation to operate the projector in -between 0°C and 35°C, altitude lower than 4920 feet, and avoiding to notify any person of such revision or changes. *DLP, Digital Micromirror Device and DMD are copyrights...
... or implied, with any warranty claim. All rights reserved. In the event this product against any defects in accordance with BenQ's written instructions, especially the ambient humidity must be replacement of their respective companies or organizations. For other rights which vary ...electronic, mechanical, magnetic, optical, chemical, manual or otherwise, without obligation to operate the projector in -between 0°C and 35°C, altitude lower than 4920 feet, and avoiding to notify any person of such revision or changes. *DLP, Digital Micromirror Device and DMD are copyrights...

