
User Manual
Page 1
MP723 Digital Projector User Manual Welcome
MP723 Digital Projector User Manual Welcome
User Manual
Page 2
...18 Connecting a computer or monitor... 18 Connecting Video source devices....... 21 Operation 26 Starting up the projector 26 Using the menus 27 Securing the projector 28 Switching input signal 31 Adjusting the projected image 32 Magnifying and searching for details on the ... screen .......43 Adjusting the sound 44 Personalizing the projector menu display 44 Shutting down the projector 45 Menu operation 46 Maintenance 53 Care of the projector 53 Lamp information 54 Troubleshooting 60 Specifications 61 Projector specifications 61 Dimensions 62 Timing chart 63 Warranty and...
...18 Connecting a computer or monitor... 18 Connecting Video source devices....... 21 Operation 26 Starting up the projector 26 Using the menus 27 Securing the projector 28 Switching input signal 31 Adjusting the projected image 32 Magnifying and searching for details on the ... screen .......43 Adjusting the sound 44 Personalizing the projector menu display 44 Shutting down the projector 45 Menu operation 46 Maintenance 53 Care of the projector 53 Lamp information 54 Troubleshooting 60 Specifications 61 Projector specifications 61 Dimensions 62 Timing chart 63 Warranty and...
User Manual
Page 3
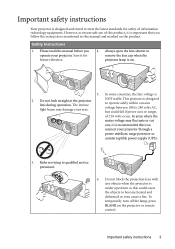
...temporarily turn off the lamp, press BLANK on . 5. Save it for safety of this product, it is important that you connect your projector through a power stabilizer, surge protector or uninterruptible power supply (UPS). 3. NOT stable. Refer servicing to ensure safe use of information ...technology equipment. Safety Instructions 1. This projector is designed to operate safely within a mains voltage between 100 to 240 volts AC, but could cause the objects to become heated...
...temporarily turn off the lamp, press BLANK on . 5. Save it for safety of this product, it is important that you connect your projector through a power stabilizer, surge protector or uninterruptible power supply (UPS). 3. NOT stable. Refer servicing to ensure safe use of information ...technology equipment. Safety Instructions 1. This projector is designed to operate safely within a mains voltage between 100 to 240 volts AC, but could cause the objects to become heated...

User Manual
Page 4
...break on an unstable cart, stand, or table. Under no circumstances should you should come into contact with live parts. When the projector is a normal phenomenon and not a product defect. 4 Important safety instructions There are dangerous high voltages inside which has its ventilation grill. Allow the... cool for replacement. 10. The product may cause death if you ever undo or remove any electronic components unless the projector is the lamp which may fall, sustaining serious damage. 11. Do not attempt to removing the lamp assembly for approximately 45 minutes...
...break on an unstable cart, stand, or table. Under no circumstances should you should come into contact with live parts. When the projector is a normal phenomenon and not a product defect. 4 Important safety instructions There are dangerous high voltages inside which has its ventilation grill. Allow the... cool for replacement. 10. The product may cause death if you ever undo or remove any electronic components unless the projector is the lamp which may fall, sustaining serious damage. 11. Do not attempt to removing the lamp assembly for approximately 45 minutes...
User Manual
Page 5
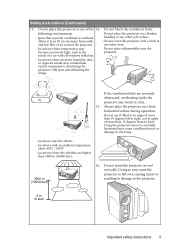
... near fire alarms - Locations where excessive humidity, dust, or cigarette smoke may become excessively high, such as the inside the projector may cause the projector to fall over, causing injury or resulting in damage to , the lamp. - Do not block the ventilation holes. Locations ...where the altitudes are seriously obstructed, overheating inside of the 14. Do not place this projector in a fire. 15. Always place the projector on end vertically. Locations near the projector. - If the ventilation holes are higher than 15 degrees front to right, nor at least...
... near fire alarms - Locations where excessive humidity, dust, or cigarette smoke may become excessively high, such as the inside the projector may cause the projector to fall over, causing injury or resulting in damage to , the lamp. - Do not block the ventilation holes. Locations ...where the altitudes are seriously obstructed, overheating inside of the 14. Do not place this projector in a fire. 15. Always place the projector on end vertically. Locations near the projector. - If the ventilation holes are higher than 15 degrees front to right, nor at least...
User Manual
Page 6
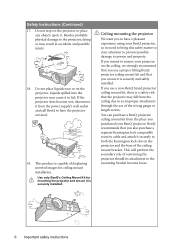
... and attach it to have a pleasant experience using your BenQ projector. You can purchase a BenQ projector ceiling mount kit from the ceiling due to an improper attachment through the use a proper fitting BenQ projector ceiling mount kit and that you intend to mount your projector on the projector or place any objects upon it is securely installed. This...
... and attach it to have a pleasant experience using your BenQ projector. You can purchase a BenQ projector ceiling mount kit from the ceiling due to an improper attachment through the use a proper fitting BenQ projector ceiling mount kit and that you intend to mount your projector on the projector or place any objects upon it is securely installed. This...
User Manual
Page 7
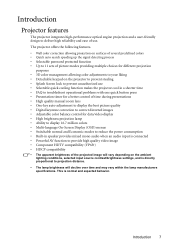
...Up to 11 sets of the projected image will decline over time and may vary within the lamp manufacturers specifications. Introduction Projector features The projector integrates high-performance optical engine projection and a user-friendly design to projection distance. • The lamp brightness will ... expected behavior. This is directly proportional to deliver high reliability and ease of use • Selectable quick cooling function makes the projector cool in a shorter time • FAQ to troubleshoot operational problems with one quick button press • Presentation timer for a...
...Up to 11 sets of the projected image will decline over time and may vary within the lamp manufacturers specifications. Introduction Projector features The projector integrates high-performance optical engine projection and a user-friendly design to projection distance. • The lamp brightness will ... expected behavior. This is directly proportional to deliver high reliability and ease of use • Selectable quick cooling function makes the projector cool in a shorter time • FAQ to troubleshoot operational problems with one quick button press • Presentation timer for a...
User Manual
Page 8
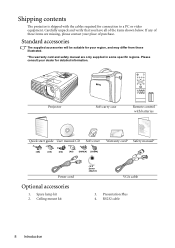
... Spare lamp kit 2. Ceiling mount kit (3-2 power adaptor) VGA cable 3. Carefully unpack and verify that you have all of purchase. PUSH Projector Soft carry case Remote control with the cables required for detailed information. Please consult your place of the items shown below. If any of these... items are only supplied in some specific regions. Shipping contents The projector is shipped with batteries Quick start guide User manual CD Soft cover Warranty card* Safety manual* (UK) (US) (EU) (AU) (KOREA...
... Spare lamp kit 2. Ceiling mount kit (3-2 power adaptor) VGA cable 3. Carefully unpack and verify that you have all of purchase. PUSH Projector Soft carry case Remote control with the cables required for detailed information. Please consult your place of the items shown below. If any of these... items are only supplied in some specific regions. Shipping contents The projector is shipped with batteries Quick start guide User manual CD Soft cover Warranty card* Safety manual* (UK) (US) (EU) (AU) (KOREA...

User Manual
Page 9
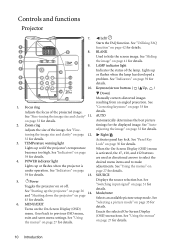
... connect these devices. 22. Quick-release button 5. Front IR remote sensor 8 9. Rear IR remote sensor 19 20 21 22 23 15. Video input socket 16. Projector exterior view Front/upper side 1 2 3 4 PUSH Rear/lower side 14 15 16 17 18 10 11 12 13 4 1. External control panel (See... "Projector" on page 10 6 for how 24 to trigger external devices such as an electric screen or light control, etc. RGB (PC)/Component video (YPbPr/ YCbCr) ...
... connect these devices. 22. Quick-release button 5. Front IR remote sensor 8 9. Rear IR remote sensor 19 20 21 22 23 15. Video input socket 16. Projector exterior view Front/upper side 1 2 3 4 PUSH Rear/lower side 14 15 16 17 18 10 11 12 13 4 1. External control panel (See... "Projector" on page 10 6 for how 24 to trigger external devices such as an electric screen or light control, etc. RGB (PC)/Component video (YPbPr/ YCbCr) ...
User Manual
Page 10
... up 10 or flashes when the lamp has developed a 6 11 problem. See "Using the menus" on page 42 for details. 10 Introduction See Toggles the projector on page 27 for 7 12 details. 8 13 10. Selects an available picture setup mode. See "Using the menus" the menus" on or off. See "Fine... activated, the #7, #10, and #12 buttons are used as directional arrows to select the desired menu items and to make Lights up the projector" on page 26 14. Adjusts the size of the lamp. II Power Displays the source selection bar. Turns on page 59 for details. See "Fine- ...
... up 10 or flashes when the lamp has developed a 6 11 problem. See "Using the menus" on page 42 for details. 10 Introduction See Toggles the projector on page 27 for 7 12 details. 8 13 10. Selects an available picture setup mode. See "Using the menus" the menus" on or off. See "Fine... activated, the #7, #10, and #12 buttons are used as directional arrows to select the desired menu items and to make Lights up the projector" on page 26 14. Adjusts the size of the lamp. II Power Displays the source selection bar. Turns on page 59 for details. See "Fine- ...

User Manual
Page 11
II Power 10. See "Starting up the projector" on page 26 and "Shutting down the projector" on page 36 for details. 2. CAPTURE Captures the projected picture and save it as your own startup screen" on page 34 for details. Goes back ... function. ENTER Enacts the selected On-Screen Display (OSD) menu item. CONTRAST Adjusts contrast. See "Adjusting Contrast" on page 11. 45 for details. Toggles the projector on page 33 for details. See "Correcting keystone" on or off. See "Hiding the image" on page 36 for details. BRIGHTNESS Adjusts brightness. See "Adjusting...
II Power 10. See "Starting up the projector" on page 26 and "Shutting down the projector" on page 36 for details. 2. CAPTURE Captures the projected picture and save it as your own startup screen" on page 34 for details. Goes back ... function. ENTER Enacts the selected On-Screen Display (OSD) menu item. CONTRAST Adjusts contrast. See "Adjusting Contrast" on page 11. 45 for details. Toggles the projector on page 33 for details. See "Correcting keystone" on or off. See "Hiding the image" on page 36 for details. BRIGHTNESS Adjusts brightness. See "Adjusting...

User Manual
Page 12
...Information'' prior to press and hold LASER for details. and the indicator lights up /down commands (like Microsoft PowerPoint). MUTE Toggles projector audio between on the Magnifies or reduces the projected image remote control is for 14. AUTO Automatically determines the best picture timings ...Magnifying and searching for details. Do not look into the laser light window or shine the laser light beam on the projector. D. selected, selects an available picture mode. SOURCE Displays the source selection bar. When the On-Screen Display (OSD) menu is ...
...Information'' prior to press and hold LASER for details. and the indicator lights up /down commands (like Microsoft PowerPoint). MUTE Toggles projector audio between on the Magnifies or reduces the projected image remote control is for 14. AUTO Automatically determines the best picture timings ...Magnifying and searching for details. Do not look into the laser light window or shine the laser light beam on the projector. D. selected, selects an available picture mode. SOURCE Displays the source selection bar. When the On-Screen Display (OSD) menu is ...

User Manual
Page 13
... battery cover, turn the remote control over to view its back, push on the finger grip on the front and the back of the projector. Avoid leaving the remote control and batteries in an excessive heat or humid environment like the kitchen, bathroom, sauna, sunroom or in the ... by the battery manufacturer. The distance between the remote control and the IR sensors on the projector that might obstruct the infra-red beam. • Operating the projector from the • Operating the projector from possible battery leakage. The remote control must be held at an angle within 30 degrees ...
... battery cover, turn the remote control over to view its back, push on the finger grip on the front and the back of the projector. Avoid leaving the remote control and batteries in an excessive heat or humid environment like the kitchen, bathroom, sauna, sunroom or in the ... by the battery manufacturer. The distance between the remote control and the IR sensors on the projector that might obstruct the infra-red beam. • Operating the projector from the • Operating the projector from possible battery leakage. The remote control must be held at an angle within 30 degrees ...

User Manual
Page 14
... the ceiling in the SYSTEM SETUP: Basic > Projector Position menu after you turn the projector on . Purchase the BenQ Projector Ceiling Mounting Kit from your dealer to mount your projector on . 4. Note that a special rear projection screen is designed to position the projector for this location with the projector suspended upside-down from the ceiling behind the...
... the ceiling in the SYSTEM SETUP: Basic > Projector Position menu after you turn the projector on . Purchase the BenQ Projector Ceiling Mounting Kit from your dealer to mount your projector on . 4. Note that a special rear projection screen is designed to position the projector for this location with the projector suspended upside-down from the ceiling behind the...

User Manual
Page 15
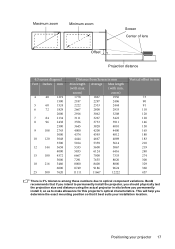
...image displayed by angled projections (or projecting onto angled surfaces). This will result in a proportionally smaller height equivalent to 75% of the projector's native aspect height. 4:3 aspect image in the room can be placed horizontally level (like older style reel-to select an input (...aspect-ratio screen sizes to the projection distance. BenQ has provided a table of the scaled 16:9 aspect image projection area). Positioning your projector. All inputs (other than composite Video being fed a 16:9 aspect signal). If the projector is mounted on page 17, that it must ...
...image displayed by angled projections (or projecting onto angled surfaces). This will result in a proportionally smaller height equivalent to 75% of the projector's native aspect height. 4:3 aspect image in the room can be placed horizontally level (like older style reel-to select an input (...aspect-ratio screen sizes to the projection distance. BenQ has provided a table of the scaled 16:9 aspect image projection area). Positioning your projector. All inputs (other than composite Video being fed a 16:9 aspect signal). If the projector is mounted on page 17, that it must ...

User Manual
Page 16
... make note of the average distance value. 3. How to the edge of the screen, at those projection distances. If you place the projector in step 3 above , and offset by the physical space available in the Average column is required. If you can be used for these...". The recommended position for details. Use the Keystone function to position the screen. This will determine the final vertical offset placement of the projector in relation to determine the recommended screen size for a given distance This method can be adjusted (using a 120 inch screen, the average...
... make note of the average distance value. 3. How to the edge of the screen, at those projection distances. If you place the projector in step 3 above , and offset by the physical space available in the Average column is required. If you can be used for these...". The recommended position for details. Use the Keystone function to position the screen. This will determine the final vertical offset placement of the projector in relation to determine the recommended screen size for a given distance This method can be adjusted (using a 120 inch screen, the average...
User Manual
Page 17
... 146 150 165 180 183 210 219 240 274 300 329 360 457 There is 3% tolerance among these numbers due to make allowance for this projector's optical characteristics. zoom) zoom) 1778 1867 1956 2187 2297 2406 2222 2333 2444 2667 2800 2933 2916 3062 3208 3111 3267 3422 3556 3733 3911... 7291 7655 8020 8000 8400 8800 8749 9186 9624 11111 11667 12222 Vertical offset in mm Min length Average Max length (with max. (with min. BenQ recommends that it , so as to optical component variations.
... 146 150 165 180 183 210 219 240 274 300 329 360 457 There is 3% tolerance among these numbers due to make allowance for this projector's optical characteristics. zoom) zoom) 1778 1867 1956 2187 2297 2406 2222 2333 2444 2667 2800 2933 2916 3062 3208 3111 3267 3422 3556 3733 3911... 7291 7655 8020 8000 8400 8800 8749 9186 9624 11111 11667 12222 Vertical offset in mm Min length Average Max length (with max. (with min. BenQ recommends that it , so as to optical component variations.

User Manual
Page 18
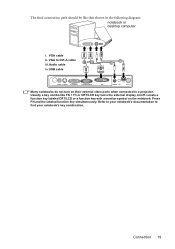
..., take a USB cable and connect the larger end to the USB port of the computer, and the smaller end to the USB socket on the projector. Connect the DVI end of the VGA to cable to DVI-A cable: 1. IN DVI-A cable to both IBM® compatibles and Macintosh® ...Shipping contents" on the PC or notebook. If you to connect it to the DVI signal input signal input socket on the projector. 3. Connecting a computer or monitor Connecting a computer The projector provides a VGA and DVI input sockets that allow you wish to make use the remote paging function, take a suitable audio...
..., take a USB cable and connect the larger end to the USB port of the computer, and the smaller end to the USB socket on the projector. Connect the DVI end of the VGA to cable to DVI-A cable: 1. IN DVI-A cable to both IBM® compatibles and Macintosh® ...Shipping contents" on the PC or notebook. If you to connect it to the DVI signal input signal input socket on the projector. 3. Connecting a computer or monitor Connecting a computer The projector provides a VGA and DVI input sockets that allow you wish to make use the remote paging function, take a suitable audio...
User Manual
Page 19
... i. Locate a function key labeled CRT/LCD or a function key with a monitor symbol on their external video ports when connected to find your notebook's documentation to a projector. Refer to your notebook's key combination. The final connection path should be like FN + F3 or CRT/LCD key turns the external display on/off...
... i. Locate a function key labeled CRT/LCD or a function key with a monitor symbol on their external video ports when connected to find your notebook's documentation to a projector. Refer to your notebook's key combination. The final connection path should be like FN + F3 or CRT/LCD key turns the external display on/off...

User Manual
Page 20
...) i. Connect the VGA end of the video monitor. The final connection path should be equipped with a DVI input socket. 1. monitor. 3. Connect the projector to a computer as on the screen, you want to view your presentation close-up on a monitor as well as described in the following the instructions... below. Connecting a monitor If you can connect the D-SUB OUT signal output socket on the projector to an external monitor with a VGA or VGA to the D-SUB OUT socket on the the D-SUB OUT socket on page 18. IN socket...
...) i. Connect the VGA end of the video monitor. The final connection path should be equipped with a DVI input socket. 1. monitor. 3. Connect the projector to a computer as on the screen, you want to view your presentation close-up on a monitor as well as described in the following the instructions... below. Connecting a monitor If you can connect the D-SUB OUT signal output socket on the projector to an external monitor with a VGA or VGA to the D-SUB OUT socket on the the D-SUB OUT socket on page 18. IN socket...


