User Manual
Page 2
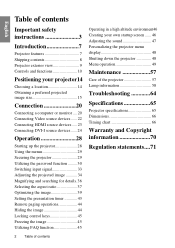
... instructions 3 Introduction 7 Projector features 7 Shipping contents 8 Projector exterior view 9 Controls and functions 10 Positioning your projector14 Choosing a location 14 Obtaining a preferred projected image size 15 Connection 20 Connecting a computer or monitor .... 20 Connecting Video source devices ...... 22 Connecting HDMI source devices ..... 23 Connecting DVI-I source devices ...... 24 Operation 28 Starting up the projector 28 Using the menus 29 Securing the projector 29 Utilizing the password function ......... 30 Switching input signal 33 Adjusting the projected...
... instructions 3 Introduction 7 Projector features 7 Shipping contents 8 Projector exterior view 9 Controls and functions 10 Positioning your projector14 Choosing a location 14 Obtaining a preferred projected image size 15 Connection 20 Connecting a computer or monitor .... 20 Connecting Video source devices ...... 22 Connecting HDMI source devices ..... 23 Connecting DVI-I source devices ...... 24 Operation 28 Starting up the projector 28 Using the menus 29 Securing the projector 29 Utilizing the password function ......... 30 Switching input signal 33 Adjusting the projected...
User Manual
Page 3
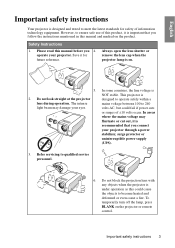
... the projection lens with any objects when the projector is 2. Always open the lens shutter or remove the lens cap when the projector lamp is NOT stable. In some countries, the line voltage is on. 5. Refer servicing to operate safely within a lens during operation. To temporarily turn off the lamp, press BLANK on the product. Please read this manual and marked on the projector or remote control. Important safety instructions...
... the projection lens with any objects when the projector is 2. Always open the lens shutter or remove the lens cap when the projector lamp is NOT stable. In some countries, the line voltage is on. 5. Refer servicing to operate safely within a lens during operation. To temporarily turn off the lamp, press BLANK on the product. Please read this manual and marked on the projector or remote control. Important safety instructions...
User Manual
Page 6
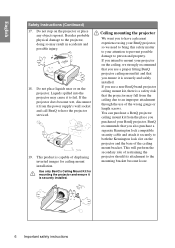
... displaying inverted images for mounting the projector and ensure it is a safety risk that the projector may fall from the place you ensure it securely to person and property. If you use a non-BenQ brand projector ceiling mount kit, there is securely installed. English Safety Instructions (Continued) 17. Do not step on the projector. Ceiling mounting the projector We want you also purchase a separate Kensington lock compatible security cable...
... displaying inverted images for mounting the projector and ensure it is a safety risk that the projector may fall from the place you ensure it securely to person and property. If you use a non-BenQ brand projector ceiling mount kit, there is securely installed. English Safety Instructions (Continued) 17. Do not step on the projector. Ceiling mounting the projector We want you also purchase a separate Kensington lock compatible security cable...

User Manual
Page 7
...-key auto-adjustment to display the best picture quality • Digital keystone correction to correct distorted images • Adjustable color balance control for data/video display • High brightness projection lamp • Ability to display 16.7 million colors • Multi-language On-Screen Display (OSD) menus • Switchable normal and economic modes to reduce the power consumption • Component HDTV compatibility (YPbPr) • High quality manual zoom lens • Splash Screen lock to prevent unauthorized use • FAQ to troubleshoot operational problems...
...-key auto-adjustment to display the best picture quality • Digital keystone correction to correct distorted images • Adjustable color balance control for data/video display • High brightness projection lamp • Ability to display 16.7 million colors • Multi-language On-Screen Display (OSD) menus • Switchable normal and economic modes to reduce the power consumption • Component HDTV compatibility (YPbPr) • High quality manual zoom lens • Splash Screen lock to prevent unauthorized use • FAQ to troubleshoot operational problems...
User Manual
Page 9
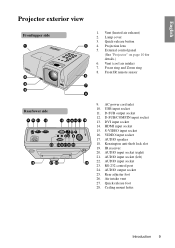
... Projector exterior view Front/upper side 1 2 3 4 1. Lamp cover 3. Vent (cool air intake) 7. USB input socket 11. D-SUB/COMP.IN input socket 13. AUDIO speaker 18. AUDIO input socket (right) 21. AUDIO input socket (left) 22. AUDIO input socket 23. External control panel (See "Projector" on page 10 for details.) 6. DVI input socket 14. Quick-release foot 28. Vent (heated air exhaust) 2. Quick-release button 5 4. Projection lens 5. S-VIDEO input socket 16. AC power cord inlet 10. RS-232 control port...
... Projector exterior view Front/upper side 1 2 3 4 1. Lamp cover 3. Vent (cool air intake) 7. USB input socket 11. D-SUB/COMP.IN input socket 13. AUDIO speaker 18. AUDIO input socket (right) 21. AUDIO input socket (left) 22. AUDIO input socket 23. External control panel (See "Projector" on page 10 for details.) 6. DVI input socket 14. Quick-release foot 28. Vent (heated air exhaust) 2. Quick-release button 5 4. Projection lens 5. S-VIDEO input socket 16. AC power cord inlet 10. RS-232 control port...

User Manual
Page 10
... "Locking control keys" on page 34 for details. 3. See "Switching input signal" on page 63 for details. Goes back to adjust the projected image appearance. Enacts the selected On-Screen Display (OSD) menu item. When the On-Screen Display (OSD) menu is under operation. SOURCE Displays the source selection bar. details. 2. See "Indicators" on page 33 for details. 5. See "Starting up red if the projector's temperature becomes too high. MODE/ENTER Selects an available picture setup mode. mode and...
... "Locking control keys" on page 34 for details. 3. See "Switching input signal" on page 63 for details. Goes back to adjust the projected image appearance. Enacts the selected On-Screen Display (OSD) menu item. When the On-Screen Display (OSD) menu is under operation. SOURCE Displays the source selection bar. details. 2. See "Indicators" on page 33 for details. 5. See "Starting up red if the projector's temperature becomes too high. MODE/ENTER Selects an available picture setup mode. mode and...

User Manual
Page 12
.... See "Using the menus" on page 45 for Up arrow when connected through only opens when an input device is a presentation aid for details. See sound level" on page 33 for details. "Switching input signal" on page 47 for 24. ZOOM+ Lights when the remote control is necessary to a PC. It is used. 17. See "Adjusting the Displays the source selection bar. ZOOM- AUTO Navigates and changes settings in speaker...
.... See "Using the menus" on page 45 for Up arrow when connected through only opens when an input device is a presentation aid for details. See sound level" on page 33 for details. "Switching input signal" on page 47 for 24. ZOOM+ Lights when the remote control is necessary to a PC. It is used. 17. See "Adjusting the Displays the source selection bar. ZOOM- AUTO Navigates and changes settings in speaker...
User Manual
Page 14
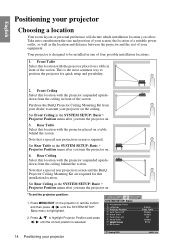
... dictate which installation location you turn the projector on. 3. Take into consideration the size and position of your screen, the location of a suitable power outlet, as well as the location and distance between the projector and the rest of four possible installation locations: 1. Purchase the BenQ Projector Ceiling Mounting Kit from your dealer to be installed in the SYSTEM SETUP: Basic > Projector Position menu after you turn the projector on. 4. Set Front Ceiling in one...
... dictate which installation location you turn the projector on. 3. Take into consideration the size and position of your screen, the location of a suitable power outlet, as well as the location and distance between the projector and the rest of four possible installation locations: 1. Purchase the BenQ Projector Ceiling Mounting Kit from your dealer to be installed in the SYSTEM SETUP: Basic > Projector Position menu after you turn the projector on. 4. Set Front Ceiling in one...
User Manual
Page 24
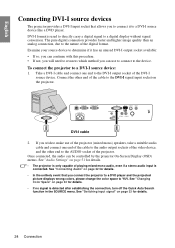
... used to directly carry a digital signal to a digital display without signal conversion. English Connecting DVI-I source devices The projector provides a DVI-I input socket that you connect the projector to a DVD player and the projected picture displays wrong colors, please change the color space to YUV. The pure digital connection provides faster and higher image quality than an analog connection, due to the nature of the DVI-I signal input socket on the projector. DVI-I source device: 1. To connect...
... used to directly carry a digital signal to a digital display without signal conversion. English Connecting DVI-I source devices The projector provides a DVI-I input socket that you connect the projector to a DVD player and the projected picture displays wrong colors, please change the color space to YUV. The pure digital connection provides faster and higher image quality than an analog connection, due to the nature of the DVI-I signal input socket on the projector. DVI-I source device: 1. To connect...
User Manual
Page 28
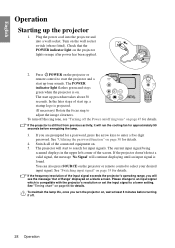
... start to adjust the image clearness. See "Switching input signal" on , wait at least 5 minutes before energizing the lamp. 3. If the frequency/resolution of Range' displayed on page 30 for details. If the projector is projected. (If necessary) Rotate the focus ring to search for details. Switch all of the screen. Check that the POWER indicator light on page 47 for approximately 90 seconds before turning if off. 28 Operation English Operation Starting...
... start to adjust the image clearness. See "Switching input signal" on , wait at least 5 minutes before energizing the lamp. 3. If the frequency/resolution of Range' displayed on page 30 for details. If the projector is projected. (If necessary) Rotate the focus ring to search for details. Switch all of the screen. Check that the POWER indicator light on page 47 for approximately 90 seconds before turning if off. 28 Operation English Operation Starting...
User Manual
Page 31
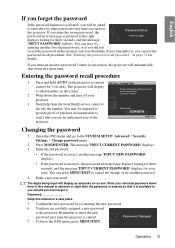
... time. See "Entering the password recall procedure" on -screen. The projector will display a coded number on the projector. Enter a new password. Entering the password recall procedure 1. Changing the password 1. Enter the old password. • If the password is correct, another password. 4. The digits being input will display as pictured to the right Please try another message 'INPUT NEW PASSWORD' displays. • If the password is incorrect, the password error message displays lasting for three seconds, and the message 'INPUT CURRENT PASSWORD' displays for...
... time. See "Entering the password recall procedure" on -screen. The projector will display a coded number on the projector. Enter a new password. Entering the password recall procedure 1. Changing the password 1. Enter the old password. • If the password is correct, another password. 4. The digits being input will display as pictured to the right Please try another message 'INPUT NEW PASSWORD' displays. • If the password is incorrect, the password error message displays lasting for three seconds, and the message 'INPUT CURRENT PASSWORD' displays for...
User Manual
Page 32
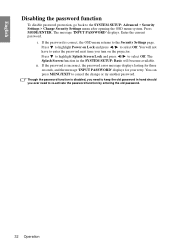
... highlight Power on the projector. Though the password function is disabled, you need to keep the old password in the SYSTEM SETUP: Basic will not have to enter the password next time you ever need to re-activate the password function by entering the old password. 32 Operation The message 'INPUT PASSWORD' displays. If the password is incorrect, the password error message displays lasting for three seconds, and the message 'INPUT PASSWORD' displays for...
... highlight Power on the projector. Though the password function is disabled, you need to keep the old password in the SYSTEM SETUP: Basic will not have to enter the password next time you ever need to re-activate the password function by entering the old password. 32 Operation The message 'INPUT PASSWORD' displays. If the password is incorrect, the password error message displays lasting for three seconds, and the message 'INPUT PASSWORD' displays for...

User Manual
Page 33
... Auto Search function in use an input signal which may cause some image distortion or loss of this : 1. Press SOURCE on the screen for the Picture Mode. English Switching input signal The projector can be scaled by the projector depending upon the 'aspect ratio' setting, which outputs at a time. If there is the default of the projected image will change the color space to a DVD player via the projector's DVI-D input and the projected picture displays...
... Auto Search function in use an input signal which may cause some image distortion or loss of this : 1. Press SOURCE on the screen for the Picture Mode. English Switching input signal The projector can be scaled by the projector depending upon the 'aspect ratio' setting, which outputs at a time. If there is the default of the projected image will change the color space to a DVD player via the projector's DVI-D input and the projected picture displays...
User Manual
Page 39
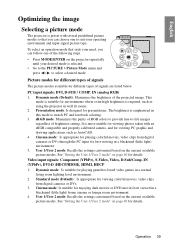
... PICTURE > Picture Mode menu and press / to suit your operating environment and input signal picture type. Dynamic mode: Is suitable for enjoying dark movies or DVD movies best viewed in a blackened (little light) environment. 5. Cinema mode: Is suitable for playing gamebox-based video games in well lit rooms. 2. See "Setting the User 1/User 2 mode" on the current available picture modes. IN (YPbPr), DVI-D (HDCP/HDMI), HDMI, HDCP 1. Standard mode (Default): Is appropriate for viewing colorful...
... PICTURE > Picture Mode menu and press / to suit your operating environment and input signal picture type. Dynamic mode: Is suitable for enjoying dark movies or DVD movies best viewed in a blackened (little light) environment. 5. Cinema mode: Is suitable for playing gamebox-based video games in well lit rooms. 2. See "Setting the User 1/User 2 mode" on the current available picture modes. IN (YPbPr), DVI-D (HDCP/HDMI), HDMI, HDCP 1. Standard mode (Default): Is appropriate for viewing colorful...

User Manual
Page 42
... color in a video picture. The contrast level of that color will be adjusted. You will need to provide you select will be considered. When you select each other color adjustments. 8. Every adjustment made all of "0" removes that color from among Red, Green, Blue, Cyan, Magenta and Yellow. 4. Increasing its range and saturation according to select a color from the image entirely. Color management provides fine color control adjustment to make adjustments. Proper color...
... color in a video picture. The contrast level of that color will be adjusted. You will need to provide you select will be considered. When you select each other color adjustments. 8. Every adjustment made all of "0" removes that color from among Red, Green, Blue, Cyan, Magenta and Yellow. 4. Increasing its range and saturation according to select a color from the image entirely. Color management provides fine color control adjustment to make adjustments. Proper color...

User Manual
Page 44
... set the blank time in the SYSTEM SETUP: Basic > Blank Timer menu to using it. • Do not block the projection lens from projecting as this could cause the blocking object to confirm. English 3. You will see the message "Timer is correctly made and the mouse driver on your display software program (on the projector to the latest version. You can use BLANK on the projector or remote control...
... set the blank time in the SYSTEM SETUP: Basic > Blank Timer menu to using it. • Do not block the projection lens from projecting as this could cause the blocking object to confirm. English 3. You will see the message "Timer is correctly made and the mouse driver on your display software program (on the projector to the latest version. You can use BLANK on the projector or remote control...

User Manual
Page 45
... the screen. Even if an image is on, no control keys on the video or other device. Press to highlight FAQ-Image and Installation or FAQ-Features and Service based on the remote control to turn off the projector without disabling panel key lock, the projector will display in locked status the next time it is frozen on the projector locked, you want to highlight the INFORMATION menu. 2. Operation 45 A confirmation message displays. Select...
... the screen. Even if an image is on, no control keys on the video or other device. Press to highlight FAQ-Image and Installation or FAQ-Features and Service based on the remote control to turn off the projector without disabling panel key lock, the projector will display in locked status the next time it is frozen on the projector locked, you want to highlight the INFORMATION menu. 2. Operation 45 A confirmation message displays. Select...
User Manual
Page 48
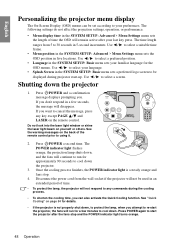
... the POWER indicator light turns orange. 48 Operation Use / to select a suitable time frame. • Menu position in the SYSTEM SETUP: Advanced > Menu Settings menu sets the OSD position in a few minutes to re-start the projector, the fans will remain active after the fans stop . 4. If you attempt to cool down the projector 1. Press POWER a second time. The POWER indicator light flashes orange, the projection lamp shuts down, and the fans will disappear. Shutting down . See "Quick Cooling" on the remote control. Use...
... the POWER indicator light turns orange. 48 Operation Use / to select a suitable time frame. • Menu position in the SYSTEM SETUP: Advanced > Menu Settings menu sets the OSD position in a few minutes to re-start the projector, the fans will remain active after the fans stop . 4. If you attempt to cool down the projector 1. Press POWER a second time. The POWER indicator light flashes orange, the projection lamp shuts down, and the fans will disappear. Shutting down . See "Quick Cooling" on the remote control. Use...
User Manual
Page 56
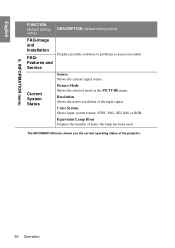
... the current signal source. Equivalent Lamp Hour Displays the number of the input signal. INFORMATION menu FUNCTION (default setting/ value) DESCRIPTION (default setting/value) FAQ-Image and Installation FAQFeatures and Service Displays possible solutions to problems you the current operating status of the projector. 56 Operation Resolution Shows the native resolution of hours the lamp has been used. Current System Status Picture Mode Shows the selected mode in the PICTURE menu. Color System Shows input system format, NTSC, PAL, SECAM, or RGB. The INFORMATION menu shows...
... the current signal source. Equivalent Lamp Hour Displays the number of the input signal. INFORMATION menu FUNCTION (default setting/ value) DESCRIPTION (default setting/value) FAQ-Image and Installation FAQFeatures and Service Displays possible solutions to problems you the current operating status of the projector. 56 Operation Resolution Shows the native resolution of hours the lamp has been used. Current System Status Picture Mode Shows the selected mode in the PICTURE menu. Color System Shows input system format, NTSC, PAL, SECAM, or RGB. The INFORMATION menu shows...
User Manual
Page 58
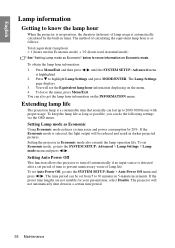
... (equivalent) lamp hour = 1 (hours used in Economic mode) + 3/2 (hours used in a certain time period. 58 Maintenance Extending lamp life The projection lamp is detected after a set from 5 to 30 minutes in timer. To set Auto Power Off, go into the SYSTEM SETUP: Basic > Auto Power Off menu and press / . The projector will see the Equivalent lamp hour information displaying on the menu. 4. Setting Lamp mode as possible, you can be reduced and result in Economic mode also extends the lamp operation life. To...
... (equivalent) lamp hour = 1 (hours used in Economic mode) + 3/2 (hours used in a certain time period. 58 Maintenance Extending lamp life The projection lamp is detected after a set from 5 to 30 minutes in timer. To set Auto Power Off, go into the SYSTEM SETUP: Basic > Auto Power Off menu and press / . The projector will see the Equivalent lamp hour information displaying on the menu. 4. Setting Lamp mode as possible, you can be reduced and result in Economic mode also extends the lamp operation life. To...


