User Manual
Page 2
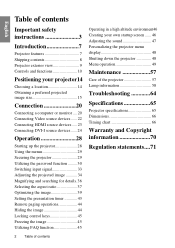
...22 Connecting HDMI source devices ..... 23 Connecting DVI-I source devices ...... 24 Operation 28 Starting up the projector 28 Using the menus 29 Securing the projector 29 Utilizing the password function ......... 30 Switching input signal 33 Adjusting the projected image 34 Magnifying and ... ...... 46 Adjusting the sound 47 Personalizing the projector menu display 48 Shutting down the projector 48 Menu operation 49 Maintenance 57 Care of the projector 57 Lamp information 58 Troubleshooting 64 Specifications 65 Projector specifications 65 Dimensions 66 Timing chart 66 Warranty ...
...22 Connecting HDMI source devices ..... 23 Connecting DVI-I source devices ...... 24 Operation 28 Starting up the projector 28 Using the menus 29 Securing the projector 29 Utilizing the password function ......... 30 Switching input signal 33 Adjusting the projected image 34 Magnifying and ... ...... 46 Adjusting the sound 47 Personalizing the projector menu display 48 Shutting down the projector 48 Menu operation 49 Maintenance 57 Care of the projector 57 Lamp information 58 Troubleshooting 64 Specifications 65 Projector specifications 65 Dimensions 66 Timing chart 66 Warranty ...
User Manual
Page 3
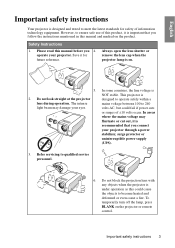
...fire. Do not block the projection lens with any objects when the projector is on. 5. Always open the lens shutter or remove the lens cap when the projector lamp is under operation as this manual and marked on the projector or remote control. The intense mains voltage between 100 to 240 ...light beam may fluctuate or cut out, it is recommended that you 4. To temporarily turn off the lamp, press BLANK on the...
...fire. Do not block the projection lens with any objects when the projector is on. 5. Always open the lens shutter or remove the lens cap when the projector lamp is under operation as this manual and marked on the projector or remote control. The intense mains voltage between 100 to 240 ...light beam may fluctuate or cut out, it is recommended that you 4. To temporarily turn off the lamp, press BLANK on the...
User Manual
Page 4
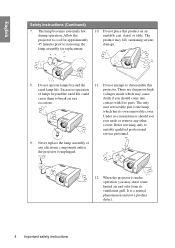
... product may sense some heated air and odor from its own removable cover. Allow the projector to cool for replacement. 10. There are dangerous high of lamps beyond the 11. When the projector is a normal phenomenon and not a product defect. 4 Important safety instructions It is... under operation, you ever undo or remove any electronic components unless the projector is the lamp which may cause cause them to disassemble this product on rare death if you should you may fall, sustaining serious damage. ...
... product may sense some heated air and odor from its own removable cover. Allow the projector to cool for replacement. 10. There are dangerous high of lamps beyond the 11. When the projector is a normal phenomenon and not a product defect. 4 Important safety instructions It is... under operation, you ever undo or remove any electronic components unless the projector is the lamp which may cause cause them to disassemble this product on rare death if you should you may fall, sustaining serious damage. ...

User Manual
Page 5
... become excessively high, such as the inside the projector may cause the projector to fall over, causing injury or resulting in damage to , the lamp. - Always place the projector on a blanket, bedding or any other item. - Locations near the projector. - Do not block the ventilation holes. Do... not cover this projector in a fire. 15. Doing so may result in any ...
... become excessively high, such as the inside the projector may cause the projector to fall over, causing injury or resulting in damage to , the lamp. - Always place the projector on a blanket, bedding or any other item. - Locations near the projector. - Do not block the ventilation holes. Do... not cover this projector in a fire. 15. Doing so may result in any ...

User Manual
Page 7
... lighting conditions, selected input signal contrast/brightness settings, and is normal and expected behavior. Introduction 7 English Introduction Projector features The projector integrates high-performance optical engine projection and a user-friendly design to deliver high reliability and ease of use •... Digital keystone correction to correct distorted images • Adjustable color balance control for data/video display • High brightness projection lamp • Ability to display 16.7 million colors • Multi-language On-Screen Display (OSD) menus • Switchable normal...
... lighting conditions, selected input signal contrast/brightness settings, and is normal and expected behavior. Introduction 7 English Introduction Projector features The projector integrates high-performance optical engine projection and a user-friendly design to deliver high reliability and ease of use •... Digital keystone correction to correct distorted images • Adjustable color balance control for data/video display • High brightness projection lamp • Ability to display 16.7 million colors • Multi-language On-Screen Display (OSD) menus • Switchable normal...
User Manual
Page 8
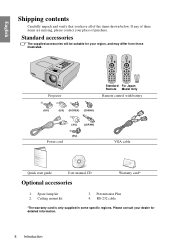
Projector Standard For Japan Remote Model Only Remote control with battery (UK) (US) (KOREA) (CHINA) (AU) (JAPAN) (EU) Power cord VGA cable Quick start guide User ... your dealer for detailed information. 8 Introduction Presentation Plus 4. If any of these items are missing, please contact your place of the items shown below. Spare lamp kit 2. English Shipping contents Carefully unpack and verify that you have all of purchase.
Projector Standard For Japan Remote Model Only Remote control with battery (UK) (US) (KOREA) (CHINA) (AU) (JAPAN) (EU) Power cord VGA cable Quick start guide User ... your dealer for detailed information. 8 Introduction Presentation Plus 4. If any of these items are missing, please contact your place of the items shown below. Spare lamp kit 2. English Shipping contents Carefully unpack and verify that you have all of purchase.
User Manual
Page 9
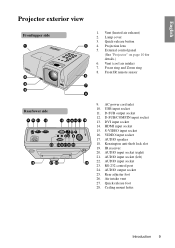
Lamp cover 3. Vent (cool air intake) 7. Focus ring and Zoom ring 8. USB input socket 11. AUDIO speaker 18. AUDIO...socket 25. Ceiling mount holes Introduction 9 D-SUB/COMP.IN input socket 13. AUDIO input socket (right) 21. External control panel (See "Projector" on page 10 for details.) 6. Front IR remote sensor 6 7 78 Rear/lower side 9 10 11 12 13 14 15 16 17... lock slot 19. AC power cord inlet 10. D-SUB output socket 12. VIDEO input socket 17. English Projector exterior view Front/upper side 1 2 3 4 1. Quick-release button 5 4. DVI input socket 14.
Lamp cover 3. Vent (cool air intake) 7. Focus ring and Zoom ring 8. USB input socket 11. AUDIO speaker 18. AUDIO...socket 25. Ceiling mount holes Introduction 9 D-SUB/COMP.IN input socket 13. AUDIO input socket (right) 21. External control panel (See "Projector" on page 10 for details.) 6. Front IR remote sensor 6 7 78 Rear/lower side 9 10 11 12 13 14 15 16 17... lock slot 19. AC power cord inlet 10. D-SUB output socket 12. VIDEO input socket 17. English Projector exterior view Front/upper side 1 2 3 4 1. Quick-release button 5 4. DVI input socket 14.

User Manual
Page 10
... "Locking control keys" on . English Controls and functions Projector 6. 9 1 2 3 10 4 5 7. 11 6 7 12 8. 8 13 10 9. 1. LAMP indicator light Indicates the status of the lamp. Lights up red if the projector's temperature becomes too high. POWER indicator light Lights up the projector" on page 28 and "Shutting down the projector" on page 29 for details. 5. Lights up or...
... "Locking control keys" on . English Controls and functions Projector 6. 9 1 2 3 10 4 5 7. 11 6 7 12 8. 8 13 10 9. 1. LAMP indicator light Indicates the status of the lamp. Lights up red if the projector's temperature becomes too high. POWER indicator light Lights up the projector" on page 28 and "Shutting down the projector" on page 29 for details. 5. Lights up or...
User Manual
Page 28
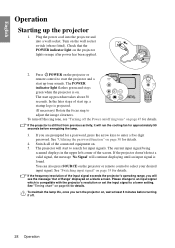
... off ring tone" on page 66 for details. 4. See "Timing chart" on page 47 for input signals. To turn the projector on, wait at least 5 minutes before energizing the lamp. 3. If the projector is still hot from previous activity, it will start up procedure takes about 30 seconds. See "Switching input signal" on...
... off ring tone" on page 66 for details. 4. See "Timing chart" on page 47 for input signals. To turn the projector on, wait at least 5 minutes before energizing the lamp. 3. If the projector is still hot from previous activity, it will start up procedure takes about 30 seconds. See "Switching input signal" on...
User Manual
Page 34
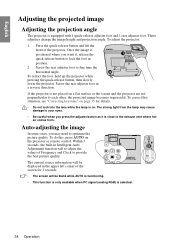
... quality. To correct this , press AUTO on the projector or remote control. The strong light from . These adjusters change the image height and projection angle. If the projector is close to the exhaust vent where hot air comes from the lamp may need to fine tune the horizontal angle. 2... of the screen for details. • Do not look into the lens while the lamp is selected. 34 Operation Screw the rear adjuster foot in Intelligent Auto Adjustment function will re-adjust the values of the projector. To do this situation, see "Correcting keystone" on page 35 for 3 seconds. ...
... quality. To correct this , press AUTO on the projector or remote control. The strong light from . These adjusters change the image height and projection angle. If the projector is close to the exhaust vent where hot air comes from the lamp may need to fine tune the horizontal angle. 2... of the screen for details. • Do not look into the lens while the lamp is selected. 34 Operation Screw the rear adjuster foot in Intelligent Auto Adjustment function will re-adjust the values of the projector. To do this situation, see "Correcting keystone" on page 35 for 3 seconds. ...
User Manual
Page 48
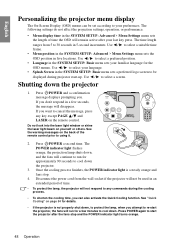
... cooling process finishes, the POWER indicator light is not properly shut down, to protect the lamp, when you don't respond in the SYSTEM SETUP: Basic menu sets a preferred logo screen to be set according to re-start the projector, the fans will run for the OSD menus. English Personalizing the... down, and the fans will not respond to cool down. See "Quick Cooling" on the back of time. • To protect the lamp, the projector will continue to run for a few seconds, the message will remain active after the fans stop . 4. Disconnect the power cord from 5 to cancel the...
... cooling process finishes, the POWER indicator light is not properly shut down, to protect the lamp, when you don't respond in the SYSTEM SETUP: Basic menu sets a preferred logo screen to be set according to re-start the projector, the fans will run for the OSD menus. English Personalizing the... down, and the fans will not respond to cool down. See "Quick Cooling" on the back of time. • To protect the lamp, the projector will continue to run for a few seconds, the message will remain active after the fans stop . 4. Disconnect the power cord from 5 to cancel the...
User Manual
Page 50
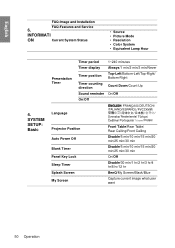
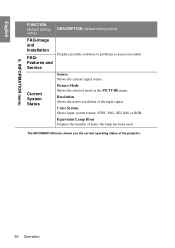
...Status • Source • Picture Mode • Resolution • Color System • Equivalent Lamp Hour Presentation Timer Timer period 1~240 minutes Timer display Always/1 min/2 min/3 min/Never Timer position... On/Off On/Off 4. English FAQ-Image and Installation FAQ-Features and Service 6. SYSTEM SETUP: Basic Language Projector Position Auto Power Off Blank Timer Panel Key Lock Sleep Timer Splash Screen My Screen Front Table/Rear Table/ Rear...On/Off Disable/30 min/1 hr/2 hr/3 hr/4 hr/8 hr/12 hr BenQ/My Screen/Black/Blue Capture current image what user want 50 Operation
...Status • Source • Picture Mode • Resolution • Color System • Equivalent Lamp Hour Presentation Timer Timer period 1~240 minutes Timer display Always/1 min/2 min/3 min/Never Timer position... On/Off On/Off 4. English FAQ-Image and Installation FAQ-Features and Service 6. SYSTEM SETUP: Basic Language Projector Position Auto Power Off Blank Timer Panel Key Lock Sleep Timer Splash Screen My Screen Front Table/Rear Table/ Rear...On/Off Disable/30 min/1 hr/2 hr/3 hr/4 hr/8 hr/12 hr BenQ/My Screen/Black/Blue Capture current image what user want 50 Operation
User Manual
Page 51
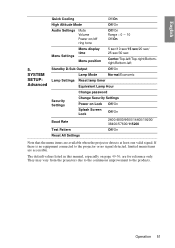
...2400/4800/9600/14400/19200/ 38400/57600/115200 Test Pattern Off/On Reset All Settings Note that the menu items are available when the projector detects at least one valid signal. If there is no signal detected, limited menu items are for reference only. They may vary from ... sec/10 sec/15 sec/20 sec/ 25 sec/30 sec Center/Top-left/Top-right/Bottomright/Bottom-left Standby D-Sub Output Off/On Lamp Mode Normal/Economic Lamp Settings Reset lamp timer Equivalent Lamp Hour Change password Security Settings Change Security Settings Power on page 49-56, are accessible. English 5.
...2400/4800/9600/14400/19200/ 38400/57600/115200 Test Pattern Off/On Reset All Settings Note that the menu items are available when the projector detects at least one valid signal. If there is no signal detected, limited menu items are for reference only. They may vary from ... sec/10 sec/15 sec/20 sec/ 25 sec/30 sec Center/Top-left/Top-right/Bottomright/Bottom-left Standby D-Sub Output Off/On Lamp Mode Normal/Economic Lamp Settings Reset lamp timer Equivalent Lamp Hour Change password Security Settings Change Security Settings Power on page 49-56, are accessible. English 5.
User Manual
Page 55
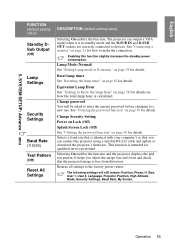
... "Utilizing the password function" on page 58 for details. Operation 55 Selecting On enables the function and the projector displays the grid test pattern. Returns all settings to a new one. Lamp Mode (Normal) See "Setting Lamp mode as Economic" on page 30 for how to devices. Change password You will still remain: Position...
... "Utilizing the password function" on page 58 for details. Operation 55 Selecting On enables the function and the projector displays the grid test pattern. Returns all settings to a new one. Lamp Mode (Normal) See "Setting Lamp mode as Economic" on page 30 for how to devices. Change password You will still remain: Position...
User Manual
Page 56
...-Image and Installation FAQFeatures and Service Displays possible solutions to problems you the current operating status of the projector. 56 Operation Resolution Shows the native resolution of hours the lamp has been used. Equivalent Lamp Hour Displays the number of the input signal. The INFORMATION menu shows you may encounter. Current System Status...
...-Image and Installation FAQFeatures and Service Displays possible solutions to problems you the current operating status of the projector. 56 Operation Resolution Shows the native resolution of hours the lamp has been used. Equivalent Lamp Hour Displays the number of the input signal. The INFORMATION menu shows you may encounter. Current System Status...

User Manual
Page 57
.... Storing the projector If you carry the projector yourself, please ...projector in "Shutting down the projector" on the surface. • Use a canister of compressed air to store the projector... for an extended time, please follow the instructions below: • Make sure the temperature and humidity of the storage area are within the recommended range for the projector.... Cleaning the lens Clean the lens whenever you clean the case, turn the projector...Cleaning the projector case Before ...projector Your projector needs little maintenance. English Maintenance Care of the...
.... Storing the projector If you carry the projector yourself, please ...projector in "Shutting down the projector" on the surface. • Use a canister of compressed air to store the projector... for an extended time, please follow the instructions below: • Make sure the temperature and humidity of the storage area are within the recommended range for the projector.... Cleaning the lens Clean the lens whenever you clean the case, turn the projector...Cleaning the projector case Before ...projector Your projector needs little maintenance. English Maintenance Care of the...
User Manual
Page 58
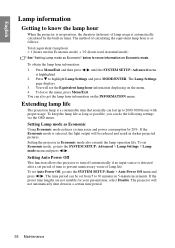
... period of time to prevent unnecessary waste of lamp life. Setting the projector in a certain time period. 58 Maintenance To set Economic mode, go into the SYSTEM SETUP: Advanced > Lamp Settings > Lamp mode menu and press / . To obtain the lamp hour information: 1. You will not automatically shut...preset time lengths are not suitable for more information on the INFORMATION menu. English Lamp information Getting to know the lamp hour When the projector is in operation, the duration (in hours) of lamp usage is automatically calculated by 20%. Press to 2000-3000 hours with proper usage...
... period of time to prevent unnecessary waste of lamp life. Setting the projector in a certain time period. 58 Maintenance To set Economic mode, go into the SYSTEM SETUP: Advanced > Lamp Settings > Lamp mode menu and press / . To obtain the lamp hour information: 1. You will not automatically shut...preset time lengths are not suitable for more information on the INFORMATION menu. English Lamp information Getting to know the lamp hour When the projector is in operation, the duration (in hours) of lamp usage is automatically calculated by 20%. Press to 2000-3000 hours with proper usage...
User Manual
Page 59
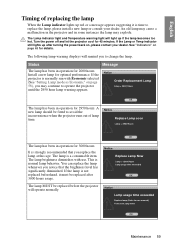
... manual) Then reset lamp timer OK Maintenance 59 The lamp MUST be fitted to change the lamp. Turn the power off and let the projector cool for optimal performance. Notice Replace Lamp Now Lamp > 3000 Hours Lamp usage time exceeded OK Notice Lamp usage time exceeded Replace lamp (Refer to replace the lamp, please install a new lamp or consult your dealer...
... manual) Then reset lamp timer OK Maintenance 59 The lamp MUST be fitted to change the lamp. Turn the power off and let the projector cool for optimal performance. Notice Replace Lamp Now Lamp > 3000 Hours Lamp usage time exceeded OK Notice Lamp usage time exceeded Replace lamp (Refer to replace the lamp, please install a new lamp or consult your dealer...

User Manual
Page 60
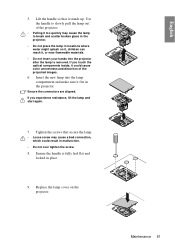
...Loosen the screws that you purchase a BenQ projector lamp for approximately 45 minutes until the lamp has cooled. 2. If the lamp is hot, avoid burns by fractured lamp. • To reduce the risk of electrical shock, always turn the power on with the lamp cover removed. • Do not ...the cover pops up. 3. Consult your fingers between the lamp and the projector. Remove the lamp cover. 4. Press the lamp cover down from the projector, it is removed. • This lamp contains mercury. The sharp edges inside the projector may cause injuries. 60 Maintenance Turn the power off ...
...Loosen the screws that you purchase a BenQ projector lamp for approximately 45 minutes until the lamp has cooled. 2. If the lamp is hot, avoid burns by fractured lamp. • To reduce the risk of electrical shock, always turn the power on with the lamp cover removed. • Do not ...the cover pops up. 3. Consult your fingers between the lamp and the projector. Remove the lamp cover. 4. Press the lamp cover down from the projector, it is removed. • This lamp contains mercury. The sharp edges inside the projector may cause injuries. 60 Maintenance Turn the power off ...
User Manual
Page 61
... break and scatter broken glass in the projector. • Do not place the lamp in the projector. Ensure the connectors are aligned. Lift the handle so that secure the lamp. • Loose screw may cause the lamp to slowly pull the lamp out of the projector. • Pulling it too quickly may...reach it fits in locations where water might splash on the projector. Insert the new lamp into the lamp compartment and make sure it , or near flammable materials. • Do not insert your hands into the projector after the lamp is fully laid flat and locked in malfunction. • Do...
... break and scatter broken glass in the projector. • Do not place the lamp in the projector. Ensure the connectors are aligned. Lift the handle so that secure the lamp. • Loose screw may cause the lamp to slowly pull the lamp out of the projector. • Pulling it too quickly may...reach it fits in locations where water might splash on the projector. Insert the new lamp into the lamp compartment and make sure it , or near flammable materials. • Do not insert your hands into the projector after the lamp is fully laid flat and locked in malfunction. • Do...


