User Manual
Page 2
...22 Connecting HDMI source devices ..... 23 Connecting DVI-I source devices ...... 24 Operation 28 Starting up the projector 28 Using the menus 29 Securing the projector 29 Utilizing the password function ......... 30 Switching input signal 33 Adjusting the projected image 34 Magnifying and ... ...... 46 Adjusting the sound 47 Personalizing the projector menu display 48 Shutting down the projector 48 Menu operation 49 Maintenance 57 Care of the projector 57 Lamp information 58 Troubleshooting 64 Specifications 65 Projector specifications 65 Dimensions 66 Timing chart 66 Warranty ...
...22 Connecting HDMI source devices ..... 23 Connecting DVI-I source devices ...... 24 Operation 28 Starting up the projector 28 Using the menus 29 Securing the projector 29 Utilizing the password function ......... 30 Switching input signal 33 Adjusting the projected image 34 Magnifying and ... ...... 46 Adjusting the sound 47 Personalizing the projector menu display 48 Shutting down the projector 48 Menu operation 49 Maintenance 57 Care of the projector 57 Lamp information 58 Troubleshooting 64 Specifications 65 Projector specifications 65 Dimensions 66 Timing chart 66 Warranty ...
User Manual
Page 3
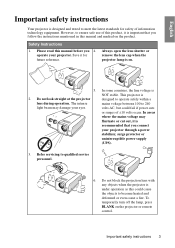
Safety Instructions 1. Always open the lens shutter or remove the lens cap when the projector lamp is on the product. In some countries, the line voltage is 2. The intense mains voltage between 100 to 240 light beam ...lens during operation. Important safety instructions 3 However, to ensure safe use of information technology equipment. To temporarily turn off the lamp, press BLANK on the projector or remote control. operate your projector through a power stabilizer, surge protector or uninterruptible power supply (UPS). 3. In areas where the mains voltage may damage ...
Safety Instructions 1. Always open the lens shutter or remove the lens cap when the projector lamp is on the product. In some countries, the line voltage is 2. The intense mains voltage between 100 to 240 light beam ...lens during operation. Important safety instructions 3 However, to ensure safe use of information technology equipment. To temporarily turn off the lamp, press BLANK on the projector or remote control. operate your projector through a power stabilizer, surge protector or uninterruptible power supply (UPS). 3. In areas where the mains voltage may damage ...
User Manual
Page 4
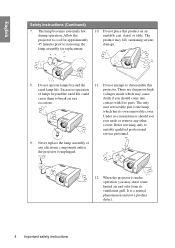
...service personnel. 9. Do not place this rated lamp life. Excessive operation projector. There are dangerous high of lamps beyond the 11. Under no circumstances should come into occasions. Never replace the lamp assembly or any electronic components unless the projector is under operation, you ever undo or remove... any other covers. Refer servicing only to removing the lamp assembly for replacement. 10. When the projector is unplugged. 12. Do not attempt to break on an unstable cart, stand, or table. The product ...
...service personnel. 9. Do not place this rated lamp life. Excessive operation projector. There are dangerous high of lamps beyond the 11. Under no circumstances should come into occasions. Never replace the lamp assembly or any electronic components unless the projector is under operation, you ever undo or remove... any other covers. Refer servicing only to removing the lamp assembly for replacement. 10. When the projector is unplugged. 12. Do not attempt to break on an unstable cart, stand, or table. The product ...

User Manual
Page 5
...projector's life span and darkening the image. Allow at angle of air around the projector. - Do not cover this projector... near the projector. - Locations with a cloth... inside the projector may become ...projector when it is poorly ventilated or confined. Doing so may cause the projector to back. English Safety Instructions (Continued) 13. Always place the projector...projector. 0 m (0 feet) Important safety instructions 5 Do not stand the projector on a level, horizontal surface during operation. - Do not block the ventilation holes. Do not place this projector...
...projector's life span and darkening the image. Allow at angle of air around the projector. - Do not cover this projector... near the projector. - Locations with a cloth... inside the projector may become ...projector when it is poorly ventilated or confined. Doing so may cause the projector to back. English Safety Instructions (Continued) 13. Always place the projector...projector. 0 m (0 feet) Important safety instructions 5 Do not stand the projector on a level, horizontal surface during operation. - Do not block the ventilation holes. Do not place this projector...

User Manual
Page 7
This is directly proportional to projection distance. • The lamp brightness will decline over time and may vary within the lamp manufacturers specifications. The projector offers the following features. • Wall color correction allowing projection on surfaces of several predefined colors • Quick auto search speeding up the signal detecting ...
This is directly proportional to projection distance. • The lamp brightness will decline over time and may vary within the lamp manufacturers specifications. The projector offers the following features. • Wall color correction allowing projection on surfaces of several predefined colors • Quick auto search speeding up the signal detecting ...
User Manual
Page 8
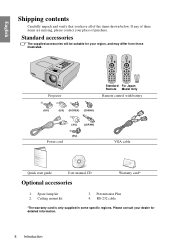
Spare lamp kit 2. Please consult your dealer for your place of purchase. Standard accessories The supplied accessories will be suitable for detailed information. 8 Introduction Ceiling mount kit 3. Projector Standard For Japan Remote Model Only Remote control with battery (UK) (US) (KOREA) (CHINA) (AU) (JAPAN) (EU) Power cord VGA cable Quick start guide User...
Spare lamp kit 2. Please consult your dealer for your place of purchase. Standard accessories The supplied accessories will be suitable for detailed information. 8 Introduction Ceiling mount kit 3. Projector Standard For Japan Remote Model Only Remote control with battery (UK) (US) (KOREA) (CHINA) (AU) (JAPAN) (EU) Power cord VGA cable Quick start guide User...
User Manual
Page 9
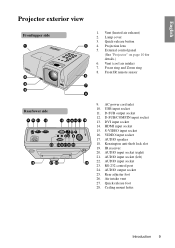
... foot 26. Ceiling mount holes Introduction 9 Focus ring and Zoom ring 8. DVI input socket 14. AUDIO input socket (right) 21. Air intake vent 27. English Projector exterior view Front/upper side 1 2 3 4 1. AC power cord inlet 10. Quick-release foot 28. Vent (heated air exhaust) 2. Vent (cool air intake) ...sensor 6 7 78 Rear/lower side 9 10 11 12 13 14 15 16 17 18 24 23 22 21 20 19 28 27 26 25 9. Lamp cover 3. Quick-release button 5 4. Projection lens 5. D-SUB/COMP.IN input socket 13. VIDEO input socket 17. AUDIO speaker 18. AUDIO input socket (...
... foot 26. Ceiling mount holes Introduction 9 Focus ring and Zoom ring 8. DVI input socket 14. AUDIO input socket (right) 21. Air intake vent 27. English Projector exterior view Front/upper side 1 2 3 4 1. AC power cord inlet 10. Quick-release foot 28. Vent (heated air exhaust) 2. Vent (cool air intake) ...sensor 6 7 78 Rear/lower side 9 10 11 12 13 14 15 16 17 18 24 23 22 21 20 19 28 27 26 25 9. Lamp cover 3. Quick-release button 5 4. Projection lens 5. D-SUB/COMP.IN input socket 13. VIDEO input socket 17. AUDIO speaker 18. AUDIO input socket (...

User Manual
Page 10
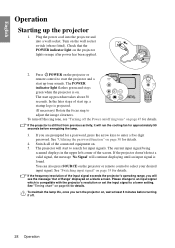
... resulting from an angled projection. SOURCE Displays the source selection bar. LAMP indicator light Indicates the status of the lamp. POWER Toggles the projector between standby 12. See "Starting up or flashes when the lamp has developed a problem. Goes back to hide the screen picture. ... keystone" on page 63 for details. See "Indicators" on page 35 for details. 3. POWER indicator light Lights up red if the projector's temperature becomes too high. See "Utilizing FAQ function" on page 35 for details. 4. See "Fine-tuning the image size and clarity...
... resulting from an angled projection. SOURCE Displays the source selection bar. LAMP indicator light Indicates the status of the lamp. POWER Toggles the projector between standby 12. See "Starting up or flashes when the lamp has developed a problem. Goes back to hide the screen picture. ... keystone" on page 63 for details. See "Indicators" on page 35 for details. 3. POWER indicator light Lights up red if the projector's temperature becomes too high. See "Utilizing FAQ function" on page 35 for details. 4. See "Fine-tuning the image size and clarity...
User Manual
Page 28
...of the connected equipment on , wait at least 5 minutes before energizing the lamp. 3. You can also press SOURCE on page 47 for details. If the frequency/resolution of the input signal exceeds the projector's operating range, you will start up procedure takes about 30 seconds. If you...a lower setting. The POWER indicator light flashes green and stays green when the projector is compatible with the projector's resolution or set the input signal to select your desired input signal. To maintain the lamp life, once you are prompted for a password, press the arrow keys to ...
...of the connected equipment on , wait at least 5 minutes before energizing the lamp. 3. You can also press SOURCE on page 47 for details. If the frequency/resolution of the input signal exceeds the projector's operating range, you will start up procedure takes about 30 seconds. If you...a lower setting. The POWER indicator light flashes green and stays green when the projector is compatible with the projector's resolution or set the input signal to select your desired input signal. To maintain the lamp life, once you are prompted for a password, press the arrow keys to ...
User Manual
Page 34
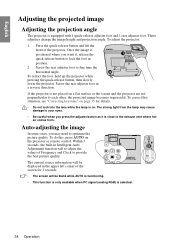
..., then slowly lower the projector. To correct this , press AUTO on . These adjusters change the image height and projection angle. Press the quick-release button and lift the front of the screen for details. • Do not look into the lens while the lamp is selected. 34 Operation... is close to the exhaust vent where hot air comes from the lamp may need to optimize the picture quality. Screw the rear adjuster foot in position. 2. English Adjusting the projected image Adjusting the projection angle The projector is not placed on a flat surface or the screen and the...
..., then slowly lower the projector. To correct this , press AUTO on . These adjusters change the image height and projection angle. Press the quick-release button and lift the front of the screen for details. • Do not look into the lens while the lamp is selected. 34 Operation... is close to the exhaust vent where hot air comes from the lamp may need to optimize the picture quality. Screw the rear adjuster foot in position. 2. English Adjusting the projected image Adjusting the projection angle The projector is not placed on a flat surface or the screen and the...
User Manual
Page 48
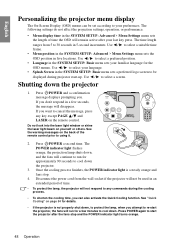
...) menus can also activate the Quick Cooling function. If you . The POWER indicator light flashes orange, the projection lamp shuts down the projector 1. The time length ranges from the wall socket if the projector will continue to cool down. Press POWER and a confirmation message displays prompting you don't respond in the SYSTEM SETUP... minutes to run for the OSD menus. Press POWER a second time. Use / to 30 seconds in an extended period of time. • To protect the lamp, the projector will disappear. Use / to be used in 5-second increments.
...) menus can also activate the Quick Cooling function. If you . The POWER indicator light flashes orange, the projection lamp shuts down the projector 1. The time length ranges from the wall socket if the projector will continue to cool down. Press POWER and a confirmation message displays prompting you don't respond in the SYSTEM SETUP... minutes to run for the OSD menus. Press POWER a second time. Use / to 30 seconds in an extended period of time. • To protect the lamp, the projector will disappear. Use / to be used in 5-second increments.
User Manual
Page 50
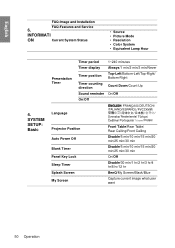
...8226; Source • Picture Mode • Resolution • Color System • Equivalent Lamp Hour Presentation Timer Timer period 1~240 minutes Timer display Always/1 min/2 min/3 min/Never ...Timer counting direction Count Down/Count Up Sound reminder On/Off On/Off 4. SYSTEM SETUP: Basic Language Projector Position Auto Power Off Blank Timer Panel Key Lock Sleep Timer Splash Screen My Screen Front Table/Rear... On/Off Disable/30 min/1 hr/2 hr/3 hr/4 hr/8 hr/12 hr BenQ/My Screen/Black/Blue Capture current image what user want 50 Operation English FAQ-Image and Installation FAQ-Features...
...8226; Source • Picture Mode • Resolution • Color System • Equivalent Lamp Hour Presentation Timer Timer period 1~240 minutes Timer display Always/1 min/2 min/3 min/Never ...Timer counting direction Count Down/Count Up Sound reminder On/Off On/Off 4. SYSTEM SETUP: Basic Language Projector Position Auto Power Off Blank Timer Panel Key Lock Sleep Timer Splash Screen My Screen Front Table/Rear... On/Off Disable/30 min/1 hr/2 hr/3 hr/4 hr/8 hr/12 hr BenQ/My Screen/Black/Blue Capture current image what user want 50 Operation English FAQ-Image and Installation FAQ-Features...
User Manual
Page 51
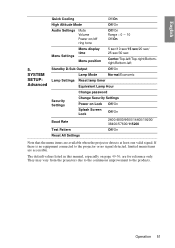
They may vary from the projectors due to the continuous improvement to the projector or no signal detected, limited menu items are accessible. SYSTEM SETUP: Advanced Quick Cooling Off/On High Altitude Mode Off/On Audio Settings ...Center/Top-left/Top-right/Bottomright/Bottom-left Standby D-Sub Output Off/On Lamp Mode Normal/Economic Lamp Settings Reset lamp timer Equivalent Lamp Hour Change password Security Settings Change Security Settings Power on page 49-56, are available when the projector detects at least one valid signal. Operation 51 English 5. The default ...
They may vary from the projectors due to the continuous improvement to the projector or no signal detected, limited menu items are accessible. SYSTEM SETUP: Advanced Quick Cooling Off/On High Altitude Mode Off/On Audio Settings ...Center/Top-left/Top-right/Bottomright/Bottom-left Standby D-Sub Output Off/On Lamp Mode Normal/Economic Lamp Settings Reset lamp timer Equivalent Lamp Hour Change password Security Settings Change Security Settings Power on page 49-56, are available when the projector detects at least one valid signal. Operation 51 English 5. The default ...
User Manual
Page 55
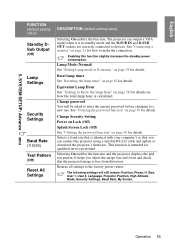
... a suitable RS-232 cable and update or download the projector's firmware. Lamp Mode (Normal) See "Setting Lamp mode as Economic" on page 62 for details. Selecting On enables the function and the projector displays the grid test pattern. Returns all settings to devices. The following settings will be asked to enter the current password...
... a suitable RS-232 cable and update or download the projector's firmware. Lamp Mode (Normal) See "Setting Lamp mode as Economic" on page 62 for details. Selecting On enables the function and the projector displays the grid test pattern. Returns all settings to devices. The following settings will be asked to enter the current password...
User Manual
Page 56
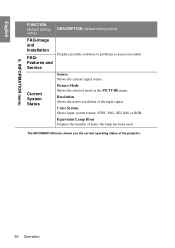
... and Service Displays possible solutions to problems you the current operating status of the projector. 56 Operation The INFORMATION menu shows you may encounter. English 6. Source Shows the current signal source. Color System Shows input system format, NTSC, PAL, SECAM, or RGB. Equivalent Lamp Hour Displays the number of the input signal.
... and Service Displays possible solutions to problems you the current operating status of the projector. 56 Operation The INFORMATION menu shows you may encounter. English 6. Source Shows the current signal source. Color System Shows input system format, NTSC, PAL, SECAM, or RGB. Equivalent Lamp Hour Displays the number of the input signal.

User Manual
Page 57
... case with a soft, lint-free cloth. • To remove stubborn dirt or stains, moisten a soft cloth with abrasive materials. Storing the projector If you clean the case, turn the projector off using the proper shutdown procedure as described in its original packing or equivalent. Cleaning the lens Clean the lens whenever you... moisten a soft cloth with its original packing or equivalent. These can damage the case. Maintenance 57 Then wipe the case. English Maintenance Care of the projector except the lamp. Never rub the lens with water and a neutral pH detergent.
... case with a soft, lint-free cloth. • To remove stubborn dirt or stains, moisten a soft cloth with abrasive materials. Storing the projector If you clean the case, turn the projector off using the proper shutdown procedure as described in its original packing or equivalent. Cleaning the lens Clean the lens whenever you... moisten a soft cloth with its original packing or equivalent. These can damage the case. Maintenance 57 Then wipe the case. English Maintenance Care of the projector except the lamp. Never rub the lens with water and a neutral pH detergent.
User Manual
Page 58
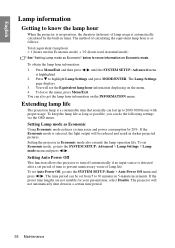
...the built-in 5-minute increments. Setting the projector in normal mode) See "Setting Lamp mode as follows: Total (equivalent) lamp hour = 1 (hours used in Economic mode) + 3/2 (hours used in Economic mode also extends the lamp operation life. The projector will not automatically shut down in darker projected... a certain time period. 58 Maintenance Setting Auto Power Off This function allows the projector to turn off automatically if no input source is highlighted. 2. Press to highlight Lamp Settings and press MODE/ENTER. You will be set period of time to prevent unnecessary...
...the built-in 5-minute increments. Setting the projector in normal mode) See "Setting Lamp mode as follows: Total (equivalent) lamp hour = 1 (hours used in Economic mode) + 3/2 (hours used in Economic mode also extends the lamp operation life. The projector will not automatically shut down in darker projected... a certain time period. 58 Maintenance Setting Auto Power Off This function allows the projector to turn off automatically if no input source is highlighted. 2. Press to highlight Lamp Settings and press MODE/ENTER. You will be set period of time to prevent unnecessary...
User Manual
Page 59
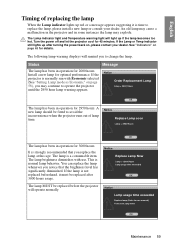
... a consumable item. Notice Replace Lamp Now Lamp > 3000 Hours Lamp usage time exceeded OK Notice Lamp usage time exceeded Replace lamp (Refer to avoid the inconvenience when the projector runs out of replacing the lamp When the Lamp indicator lights up if the lamp becomes too hot. Notice Order Replacement Lamp Lamp > 2000 Hours OK The lamp has been in some instances...
... a consumable item. Notice Replace Lamp Now Lamp > 3000 Hours Lamp usage time exceeded OK Notice Lamp usage time exceeded Replace lamp (Refer to avoid the inconvenience when the projector runs out of replacing the lamp When the Lamp indicator lights up if the lamp becomes too hot. Notice Order Replacement Lamp Lamp > 2000 Hours OK The lamp has been in some instances...

User Manual
Page 60
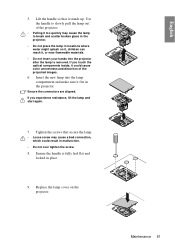
... that you purchase a BenQ projector lamp for approximately 45 minutes until the lamp has cooled. 2. Remove the lamp cover. 4. Consult your local hazardous waste regulations to dispose of electrical shock, always turn the power on with the lamp cover removed. • Do not insert your fingers between the lamp and the projector. Press the lamp cover down from the...
... that you purchase a BenQ projector lamp for approximately 45 minutes until the lamp has cooled. 2. Remove the lamp cover. 4. Consult your local hazardous waste regulations to dispose of electrical shock, always turn the power on with the lamp cover removed. • Do not insert your fingers between the lamp and the projector. Press the lamp cover down from the...
User Manual
Page 61
If you touch the optical components inside, it could result in locations where water might splash on the projector. Replace the lamp cover on it, children can reach it stands up. Ensure the connectors are aligned. Tighten the screws that it , or near flammable ... you experience resistance, lift the lamp and start again. 7. Insert the new lamp into the projector after the lamp is fully laid flat and locked in the projector. Maintenance 61 Use the handle to break and scatter broken glass in the projector. • Do not place the lamp in malfunction. • Do not...
If you touch the optical components inside, it could result in locations where water might splash on the projector. Replace the lamp cover on it, children can reach it stands up. Ensure the connectors are aligned. Tighten the screws that it , or near flammable ... you experience resistance, lift the lamp and start again. 7. Insert the new lamp into the projector after the lamp is fully laid flat and locked in the projector. Maintenance 61 Use the handle to break and scatter broken glass in the projector. • Do not place the lamp in malfunction. • Do not...


