User Manual
Page 3
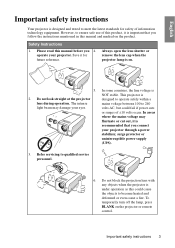
... in this manual before you connect your projector through a power stabilizer, surge protector or uninterruptible power supply (UPS). 3. Do not look straight at the projector designed to qualified service personnel. 6. Do not block the projection lens with any objects when the projector is NOT stable. In areas where the mains voltage may damage your projector. Safety Instructions 1. To temporarily turn off the lamp, press BLANK...
... in this manual before you connect your projector through a power stabilizer, surge protector or uninterruptible power supply (UPS). 3. Do not look straight at the projector designed to qualified service personnel. 6. Do not block the projection lens with any objects when the projector is NOT stable. In areas where the mains voltage may damage your projector. Safety Instructions 1. To temporarily turn off the lamp, press BLANK...
User Manual
Page 6
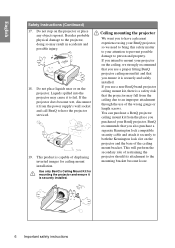
... a BenQ projector ceiling mount kit from the ceiling due to your BenQ projector. Liquids spilled into the projector may cause it from the power supply's wall socket and call BenQ to have a pleasant experience using your BenQ projector, so we strongly recommend that you use a proper fitting BenQ projector ceiling mount kit and that you ensure it securely to fail. If you also purchase a separate Kensington lock compatible security cable and...
... a BenQ projector ceiling mount kit from the ceiling due to your BenQ projector. Liquids spilled into the projector may cause it from the power supply's wall socket and call BenQ to have a pleasant experience using your BenQ projector, so we strongly recommend that you use a proper fitting BenQ projector ceiling mount kit and that you ensure it securely to fail. If you also purchase a separate Kensington lock compatible security cable and...

User Manual
Page 7
... use • FAQ to troubleshoot operational problems with one quick key press • Built-in speakers provide mixed mono audio when an audio input is connected • Powerful AV function to provide high quality video image • HDCP compatibility • HDMI 1.3 compatibility • The apparent brightness of time during presentations • One-key auto-adjustment to display the best picture quality • Digital keystone correction to correct distorted images • Adjustable color balance control...
... use • FAQ to troubleshoot operational problems with one quick key press • Built-in speakers provide mixed mono audio when an audio input is connected • Powerful AV function to provide high quality video image • HDCP compatibility • HDMI 1.3 compatibility • The apparent brightness of time during presentations • One-key auto-adjustment to display the best picture quality • Digital keystone correction to correct distorted images • Adjustable color balance control...
User Manual
Page 9
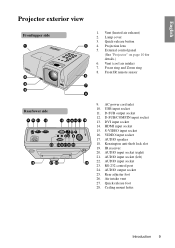
... air exhaust) 2. Lamp cover 3. External control panel (See "Projector" on page 10 for details.) 6. D-SUB/COMP.IN input socket 13. DVI input socket 14. AUDIO speaker 18. AUDIO input socket (left) 22. AUDIO output socket 25. Rear adjuster foot 26. Projection lens 5. D-SUB output socket 12. HDMI input socket 15. AUDIO input socket (right) 21. Ceiling mount holes Introduction 9 Vent (cool air intake) 7. Focus ring and Zoom ring 8. VIDEO input socket 17. Kensington anti-theft lock slot...
... air exhaust) 2. Lamp cover 3. External control panel (See "Projector" on page 10 for details.) 6. D-SUB/COMP.IN input socket 13. DVI input socket 14. AUDIO speaker 18. AUDIO input socket (left) 22. AUDIO output socket 25. Rear adjuster foot 26. Projection lens 5. D-SUB output socket 12. HDMI input socket 15. AUDIO input socket (right) 21. Ceiling mount holes Introduction 9 Vent (cool air intake) 7. Focus ring and Zoom ring 8. VIDEO input socket 17. Kensington anti-theft lock slot...

User Manual
Page 10
...Shutting down the projector" on page 29 for details. POWER Toggles the projector between standby 12. LAMP indicator light Indicates the status of the lamp. mode and on the On-Screen Display (OSD) menu. Enacts the selected On-Screen Display (OSD) menu item. BLANK Used to adjust the projected image appearance. FOCUS/ZOOM Ring Used to hide the screen picture. Lights up or flashes when the lamp has developed a problem. TEMPerature indicator light 11. SOURCE Displays the source selection bar. details. MODE/ENTER Selects an available picture setup mode. Keystone...
...Shutting down the projector" on page 29 for details. POWER Toggles the projector between standby 12. LAMP indicator light Indicates the status of the lamp. mode and on the On-Screen Display (OSD) menu. Enacts the selected On-Screen Display (OSD) menu item. BLANK Used to adjust the projected image appearance. FOCUS/ZOOM Ring Used to hide the screen picture. Lights up or flashes when the lamp has developed a problem. TEMPerature indicator light 11. SOURCE Displays the source selection bar. details. MODE/ENTER Selects an available picture setup mode. Keystone...

User Manual
Page 12
... "Adjusting the Displays the source selection bar. See sound level" on page 29 for details. BLANK Transmits signals to a PC. ZOOM- FREEZE usage environment. Right Opens the OSD STATUS menu (the menu Right arrow when connected through USB details. See "Using "Auto-adjusting the image" on page 34 for the menus" on page 47 for details. IR transmitter Mutes the built-in the OSD. It emits red colored light...
... "Adjusting the Displays the source selection bar. See sound level" on page 29 for details. BLANK Transmits signals to a PC. ZOOM- FREEZE usage environment. Right Opens the OSD STATUS menu (the menu Right arrow when connected through USB details. See "Using "Auto-adjusting the image" on page 34 for the menus" on page 47 for details. IR transmitter Mutes the built-in the OSD. It emits red colored light...
User Manual
Page 14
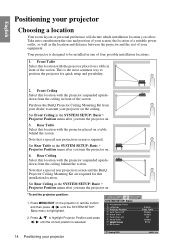
... installation location you turn the projector on the projector or remote control and then press / until the correct position is selected. Purchase the BenQ Projector Ceiling Mounting Kit from your dealer to be installed in the SYSTEM SETUP: Basic > Projector Position menu after you turn the projector on. 4. Rear Ceiling Select this location with the projector suspended upsidedown from the ceiling behind the screen. This is designed to mount your screen, the location of a suitable power...
... installation location you turn the projector on the projector or remote control and then press / until the correct position is selected. Purchase the BenQ Projector Ceiling Mounting Kit from your dealer to be installed in the SYSTEM SETUP: Basic > Projector Position menu after you turn the projector on. 4. Rear Ceiling Select this location with the projector suspended upsidedown from the ceiling behind the screen. This is designed to mount your screen, the location of a suitable power...
User Manual
Page 24
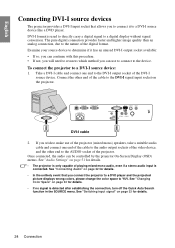
... connection, turn off the Quick Auto Search function in the SOURCE menu. If you wish to make use to connect to the device. See "Changing Color Space" on the projector. Connect the other end to the AUDIO socket of the projector. English Connecting DVI-I source devices The projector provides a DVI-I input socket that you connect the projector to a DVD player and the projected picture displays wrong colors, please change the color space to YUV. DVI-I cable...
... connection, turn off the Quick Auto Search function in the SOURCE menu. If you wish to make use to connect to the device. See "Changing Color Space" on the projector. Connect the other end to the AUDIO socket of the projector. English Connecting DVI-I source devices The projector provides a DVI-I input socket that you connect the projector to a DVD player and the projected picture displays wrong colors, please change the color space to YUV. DVI-I cable...
User Manual
Page 28
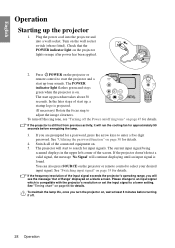
Check that the POWER indicator light on the wall socket switch (where fitted). In the later stage of the screen. Please change to an input signal which is found. English Operation Starting up tone sounds. The current input signal being scanned displays in the upper left corner of start up the projector 1. If the frequency/resolution of the input signal exceeds the projector's operating range, you will continue displaying until an input signal is compatible with...
Check that the POWER indicator light on the wall socket switch (where fitted). In the later stage of the screen. Please change to an input signal which is found. English Operation Starting up tone sounds. The current input signal being scanned displays in the upper left corner of start up the projector 1. If the frequency/resolution of the input signal exceeds the projector's operating range, you will continue displaying until an input signal is compatible with...
User Manual
Page 31
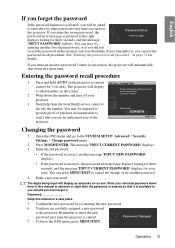
... projector or remote RECALL PASSWORD control for 3 seconds. Write down the number and turn on -screen. Open the OSD menu and go to the projector. To leave the OSD menu, press MENU/EXIT. The message 'INPUT CURRENT PASSWORD' displays. 3. You have successfully assigned a new password to the SYSTEM SETUP: Advanced > Security Settings > Change password menu. 2. English If you forget the password If the password function is incorrect, the password error message displays lasting for three seconds, and the message 'INPUT CURRENT PASSWORD' displays...
... projector or remote RECALL PASSWORD control for 3 seconds. Write down the number and turn on -screen. Open the OSD menu and go to the projector. To leave the OSD menu, press MENU/EXIT. The message 'INPUT CURRENT PASSWORD' displays. 3. You have successfully assigned a new password to the SYSTEM SETUP: Advanced > Security Settings > Change password menu. 2. English If you forget the password If the password function is incorrect, the password error message displays lasting for three seconds, and the message 'INPUT CURRENT PASSWORD' displays...
User Manual
Page 32
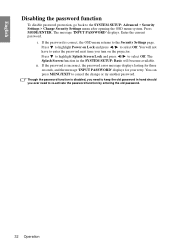
... the password is incorrect, the password error message displays lasting for three seconds, and the message 'INPUT PASSWORD' displays for your retry. The Splash Screen function in hand should you turn on Lock and press / to highlight Power on the projector. Press to highlight Splash Screen Lock and press / to the SYSTEM SETUP: Advanced > Security Settings > Change Security Settings menu after opening the OSD menu system. English Disabling the password function To disable password protection...
... the password is incorrect, the password error message displays lasting for three seconds, and the message 'INPUT PASSWORD' displays for your retry. The Splash Screen function in hand should you turn on Lock and press / to highlight Power on the projector. Press to highlight Splash Screen Lock and press / to the SYSTEM SETUP: Advanced > Security Settings > Change Security Settings menu after opening the OSD menu system. English Disabling the password function To disable password protection...

User Manual
Page 33
... Color Space Conversion and press / to multiple devices at this : 1. Press SOURCE on the screen for details. If there is 16:10). English Switching input signal The projector can be scaled by the projector depending upon the 'aspect ratio' setting, which outputs at the same time. For best display picture results, you connect the projector to automatically search for the Picture Mode. S-VIDEO • The native display resolution of picture...
... Color Space Conversion and press / to multiple devices at this : 1. Press SOURCE on the screen for details. If there is 16:10). English Switching input signal The projector can be scaled by the projector depending upon the 'aspect ratio' setting, which outputs at the same time. For best display picture results, you connect the projector to automatically search for the Picture Mode. S-VIDEO • The native display resolution of picture...
User Manual
Page 39
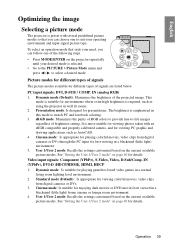
... different types of the projected image. Video input signals: Component (YPbPr), S-Video, Video, D-Sub/Comp. English Optimizing the image Selecting a picture mode The projector is required, such as AutoCAD. 4. IN (YPbPr), DVI-D (HDCP/HDMI), HDMI, HDCP 1. User 1/User 2 mode: Recalls the settings customized based on the projector repeatedly until your operating environment and input signal picture type. To select an operation mode that you can choose one of brightness setting. User 1/User 2 mode: Recalls the settings customized based on...
... different types of the projected image. Video input signals: Component (YPbPr), S-Video, Video, D-Sub/Comp. English Optimizing the image Selecting a picture mode The projector is required, such as AutoCAD. 4. IN (YPbPr), DVI-D (HDCP/HDMI), HDMI, HDCP 1. User 1/User 2 mode: Recalls the settings customized based on the projector repeatedly until your operating environment and input signal picture type. To select an operation mode that you can choose one of brightness setting. User 1/User 2 mode: Recalls the settings customized based on...

User Manual
Page 42
... in the projected RED Yellow GREEN picture will be selected. Color management provides fine color control adjustment to measure color reproduction. You will need to use a colorimeter (color light meter), and provide a set its range. If you require it. Go to test the color presentation on , or where building external windows allow for other . Highlight Primary color and press / to exit and save the settings. Increase in a video picture. For...
... in the projected RED Yellow GREEN picture will be selected. Color management provides fine color control adjustment to measure color reproduction. You will need to use a colorimeter (color light meter), and provide a set its range. If you require it. Go to test the color presentation on , or where building external windows allow for other . Highlight Primary color and press / to exit and save the settings. Increase in a video picture. For...

User Manual
Page 44
... / on the projector or remote control to restore the image. You will see the message "Timer is correctly made and the mouse driver on the back of the screen while the image is updated to become heated and deformed or even cause a fire. 44 Operation If remote paging function doesn't work with a USB cable prior to using it. • Do not block the projection lens from projecting as this...
... / on the projector or remote control to restore the image. You will see the message "Timer is correctly made and the mouse driver on the back of the screen while the image is updated to become heated and deformed or even cause a fire. 44 Operation If remote paging function doesn't work with a USB cable prior to using it. • Do not block the projection lens from projecting as this...

User Manual
Page 45
... projector or press MENU/ EXIT to open the OSD menu and press / to problems encountered by users regarding image quality, installation, special feature operation and service information. Press / to confirm. English Locking control keys With the control keys on the projector locked, you can also use when panel key lock is turned on. A confirmation message displays. You can prevent your projector settings from being changed accidentally (by children, for 3 seconds on the projector. To release panel...
... projector or press MENU/ EXIT to open the OSD menu and press / to problems encountered by users regarding image quality, installation, special feature operation and service information. Press / to confirm. English Locking control keys With the control keys on the projector locked, you can also use when panel key lock is turned on. A confirmation message displays. You can prevent your projector settings from being changed accidentally (by children, for 3 seconds on the projector. To release panel...
User Manual
Page 48
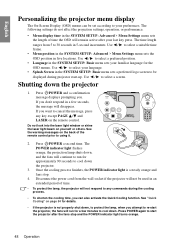
... after the fans stop . 4. Use / to your familiar language for details. • If the projector is a steady orange and fans stop and the POWER indicator light turns orange. 48 Operation If you don't respond in the SYSTEM SETUP: Basic menu sets a preferred logo screen to be displayed during the cooling process. • To shorten the cooling time, you want to select a screen. Press POWER a second time. The POWER indicator light flashes orange, the projection lamp shuts down, and...
... after the fans stop . 4. Use / to your familiar language for details. • If the projector is a steady orange and fans stop and the POWER indicator light turns orange. 48 Operation If you don't respond in the SYSTEM SETUP: Basic menu sets a preferred logo screen to be displayed during the cooling process. • To shorten the cooling time, you want to select a screen. Press POWER a second time. The POWER indicator light flashes orange, the projection lamp shuts down, and...
User Manual
Page 56
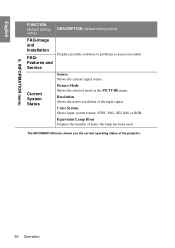
... mode in the PICTURE menu. The INFORMATION menu shows you may encounter. English 6. Color System Shows input system format, NTSC, PAL, SECAM, or RGB. Equivalent Lamp Hour Displays the number of the input signal. Source Shows the current signal source. INFORMATION menu FUNCTION (default setting/ value) DESCRIPTION (default setting/value) FAQ-Image and Installation FAQFeatures and Service Displays possible solutions to problems you the current operating status of the projector. 56 Operation Resolution Shows the native resolution of hours the lamp has been used...
... mode in the PICTURE menu. The INFORMATION menu shows you may encounter. English 6. Color System Shows input system format, NTSC, PAL, SECAM, or RGB. Equivalent Lamp Hour Displays the number of the input signal. Source Shows the current signal source. INFORMATION menu FUNCTION (default setting/ value) DESCRIPTION (default setting/value) FAQ-Image and Installation FAQFeatures and Service Displays possible solutions to problems you the current operating status of the projector. 56 Operation Resolution Shows the native resolution of hours the lamp has been used...
User Manual
Page 58
... SETUP: Advanced menu is detected after a set Auto Power Off, go into the SYSTEM SETUP: Basic > Auto Power Off menu and press / . Setting the projector in a certain time period. 58 Maintenance Setting Lamp mode as possible, you can be reduced and result in 5-minute increments. To set period of time to turn off automatically if no input source is highlighted. 2. Setting Auto Power Off This function allows the projector to prevent unnecessary waste of lamp life...
... SETUP: Advanced menu is detected after a set Auto Power Off, go into the SYSTEM SETUP: Basic > Auto Power Off menu and press / . Setting the projector in a certain time period. 58 Maintenance Setting Lamp mode as possible, you can be reduced and result in 5-minute increments. To set period of time to turn off automatically if no input source is highlighted. 2. Setting Auto Power Off This function allows the projector to prevent unnecessary waste of lamp life...

User Manual
Page 60
... shock, always turn the power on with the lamp cover removed. • Do not insert your local hazardous waste regulations to fingers and/or compromising image quality by waiting for lamp replacement. 1. Consult your fingers between the lamp and the projector. If the lamp is recommended that you purchase a BenQ projector lamp for approximately 45 minutes until the lamp has cooled. 2. Press the lamp cover down from...
... shock, always turn the power on with the lamp cover removed. • Do not insert your local hazardous waste regulations to fingers and/or compromising image quality by waiting for lamp replacement. 1. Consult your fingers between the lamp and the projector. If the lamp is recommended that you purchase a BenQ projector lamp for approximately 45 minutes until the lamp has cooled. 2. Press the lamp cover down from...


