

User Manual
Page 2
... 8 Projector exterior view 9 Controls and functions 10 Positioning your projector14 Choosing a location 14 Obtaining a preferred projected image size 15 Connection 21 Connecting a computer or monitor... 21 Connecting Video source devices....... 22 Operation 27 Starting up the projector 27 Using the menus 28 Securing the projector 29 Switching input signal 32 Adjusting the projected image 33 Magnifying and searching for details on the projected picture 34 Selecting the aspect ratio 35 Optimizing the image 37 Setting the presentation timer...
... 8 Projector exterior view 9 Controls and functions 10 Positioning your projector14 Choosing a location 14 Obtaining a preferred projected image size 15 Connection 21 Connecting a computer or monitor... 21 Connecting Video source devices....... 22 Operation 27 Starting up the projector 27 Using the menus 28 Securing the projector 29 Switching input signal 32 Adjusting the projected image 33 Magnifying and searching for details on the projected picture 34 Selecting the aspect ratio 35 Optimizing the image 37 Setting the presentation timer...
User Manual
Page 3
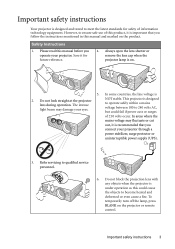
... or even cause a fire. Save it is recommended that you follow the instructions mentioned in this manual before you connect your projector. Always open the lens shutter or remove the lens cap when the projector lamp is on the projector or remote control. Important safety instructions 3 NOT stable. This projector is 2. The intense light beam may fluctuate or cut out, it for safety of ±10...
... or even cause a fire. Save it is recommended that you follow the instructions mentioned in this manual before you connect your projector. Always open the lens shutter or remove the lens cap when the projector lamp is on the projector or remote control. Important safety instructions 3 NOT stable. This projector is 2. The intense light beam may fluctuate or cut out, it for safety of ±10...

User Manual
Page 6
... of displaying inverted images for ceiling mount installation. Ceiling mounting the projector We want you intend to an improper attachment through the use a non-BenQ brand projector ceiling mount kit, there is securely installed. You can purchase a BenQ projector ceiling mount kit from the ceiling due to mount your projector on the projector. If you also purchase a separate Kensington lock compatible security cable and attach it . Besides probable physical damage to person and property. Use only BenQ's Ceiling Mount...
... of displaying inverted images for ceiling mount installation. Ceiling mounting the projector We want you intend to an improper attachment through the use a non-BenQ brand projector ceiling mount kit, there is securely installed. You can purchase a BenQ projector ceiling mount kit from the ceiling due to mount your projector on the projector. If you also purchase a separate Kensington lock compatible security cable and attach it . Besides probable physical damage to person and property. Use only BenQ's Ceiling Mount...

User Manual
Page 7
...; FAQ to troubleshoot operational problems with one quick button press • Presentation timer for a better control of time during presentations • High quality manual zoom lens • One-key auto-adjustment to display the best picture quality • Digital keystone correction to correct distorted images • Adjustable color balance control for data/video display • High brightness projection lamp • Ability to display 16.7 million colors • Multi-language On-Screen Display (OSD) menus • Switchable normal and Economic modes to reduce...
...; FAQ to troubleshoot operational problems with one quick button press • Presentation timer for a better control of time during presentations • High quality manual zoom lens • One-key auto-adjustment to display the best picture quality • Digital keystone correction to correct distorted images • Adjustable color balance control for data/video display • High brightness projection lamp • Ability to display 16.7 million colors • Multi-language On-Screen Display (OSD) menus • Switchable normal and Economic modes to reduce...
User Manual
Page 9
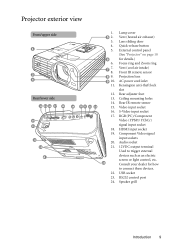
... adjuster foot 13. Ceiling mounting holes 14. Audio socket 21. 12VDC output terminal Used to trigger external devices such as an electric screen or light control, etc. 24 Consult your dealer for details.) 6. RS232 control port 24. Speaker grill Introduction 9 Video input socket 16. S-Video input socket 17. HDMI input socket 19. USB socket 23. Vent (cool air intake) 8. RGB (PC)/Component Video (YPbPr/ YCbCr) signal input socket 18. Lamp cover 5 2. External control panel (See "Projector...
... adjuster foot 13. Ceiling mounting holes 14. Audio socket 21. 12VDC output terminal Used to trigger external devices such as an electric screen or light control, etc. 24 Consult your dealer for details.) 6. RS232 control port 24. Speaker grill Introduction 9 Video input socket 16. S-Video input socket 17. HDMI input socket 19. USB socket 23. Vent (cool air intake) 8. RGB (PC)/Component Video (YPbPr/ YCbCr) signal input socket 18. Lamp cover 5 2. External control panel (See "Projector...

User Manual
Page 10
... selected On-Screen Display exits and saves menu settings. II Power Displays the source selection bar. Selects an available picture setup mode. Goes back to make Lights up the projector" on page page 28 for details. 61 for details. See "Using (OSD) menu item. See "Utilizing FAQ 1 function" on page 43 for details. 2 9 8. LAMP indicator light 5 Indicates the status of the image. Lights up red if the projector's temperature becomes too high. Focus ring "Correcting keystone" on...
... selected On-Screen Display exits and saves menu settings. II Power Displays the source selection bar. Selects an available picture setup mode. Goes back to make Lights up the projector" on page page 28 for details. 61 for details. See "Using (OSD) menu item. See "Utilizing FAQ 1 function" on page 43 for details. 2 9 8. LAMP indicator light 5 Indicates the status of the image. Lights up red if the projector's temperature becomes too high. Focus ring "Correcting keystone" on...

User Manual
Page 12
... searching for professionals. FREEZE presentation aid for 14. MUTE Toggles projector audio between on yourself or others. See "Remote paging operations" on a connected PC) which input signal is visible. Right/ back of children. See "Switching input signal" on the projector. SOURCE Displays the source selection bar. 13. D. selected, selects an available picture mode. It emits red Freezes the projected image. See "Auto- Locks the buttons on page 32 for details. 12 Introduction
... searching for professionals. FREEZE presentation aid for 14. MUTE Toggles projector audio between on yourself or others. See "Remote paging operations" on a connected PC) which input signal is visible. Right/ back of children. See "Switching input signal" on the projector. SOURCE Displays the source selection bar. 13. D. selected, selects an available picture mode. It emits red Freezes the projected image. See "Auto- Locks the buttons on page 32 for details. 12 Introduction
User Manual
Page 21
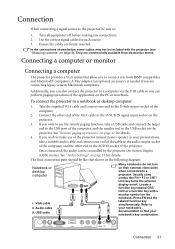
... VGA cable to the USB socket on the projector. 3. See "Remote paging operations" on the PC or notebook. If you wish to use of the projector (mixed mono) speaker in the following diagram: Notebook or desktop computer i. The final connection path should be controlled by the projector On-Screen Display (OSD) menus. USB cable i ii Many notebooks do not turn on their external video ports when connected to the USB port...
... VGA cable to the USB socket on the projector. 3. See "Remote paging operations" on the PC or notebook. If you wish to use of the projector (mixed mono) speaker in the following diagram: Notebook or desktop computer i. The final connection path should be controlled by the projector On-Screen Display (OSD) menus. USB cable i ii Many notebooks do not turn on their external video ports when connected to the USB port...
User Manual
Page 26
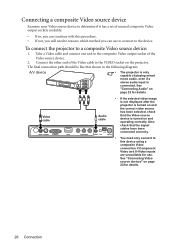
... is connected. Connect the other end of the Video cable to a composite Video source device: 1. Video cable Audio cable • If the selected video image is not displayed after the projector is turned on page 22 for details. 26 Connection Take a Video cable and connect one end to the composite Video output socket of playing mixed mono audio, even if a stereo audio input is turned on page 22 for details. See "Connecting Video source devices" on and operating...
... is connected. Connect the other end of the Video cable to a composite Video source device: 1. Video cable Audio cable • If the selected video image is not displayed after the projector is turned on page 22 for details. 26 Connection Take a Video cable and connect one end to the composite Video output socket of playing mixed mono audio, even if a stereo audio input is turned on page 22 for details. See "Connecting Video source devices" on and operating...

User Manual
Page 27
... seconds. Operation Starting up , a "Power On Tone" will be heard. If the frequency/resolution of start the projector. Operation 27 The start to adjust the image clearness. The current input source being scanned displays in the upper left corner of the connected equipment on page 32 for input signals. Turn on the projector lights orange after power has been applied. 2. The Power indicator light flashes green and stays green when the projector is projected. (If necessary) Rotate the focus ring to...
... seconds. Operation Starting up , a "Power On Tone" will be heard. If the frequency/resolution of start the projector. Operation 27 The start to adjust the image clearness. The current input source being scanned displays in the upper left corner of the connected equipment on page 32 for input signals. Turn on the projector lights orange after power has been applied. 2. The Power indicator light flashes green and stays green when the projector is projected. (If necessary) Rotate the focus ring to...

User Manual
Page 28
... menu. DISPLAY Wall Color Aspect Ratio Keystone Position Phase H. Press MENU/EXIT on the projector or 3. Size Digital Zoom Current input signal Analog RGB Off Auto ENTER 0 0 Status Press MENU/ EXIT to the previous page or to your familiar language first. 1. Below is equipped with On-Screen Display (OSD) menus for making various adjustments and settings. Size Digital Zoom Analog RGB Off Auto 0 0 MENU Exit SYSTEM SETUP: Basic Presentation Timer Language Projector Position Auto Power Off Blank Timer Panel Key Lock Timer Controller...
... menu. DISPLAY Wall Color Aspect Ratio Keystone Position Phase H. Press MENU/EXIT on the projector or 3. Size Digital Zoom Current input signal Analog RGB Off Auto ENTER 0 0 Status Press MENU/ EXIT to the previous page or to your familiar language first. 1. Below is equipped with On-Screen Display (OSD) menus for making various adjustments and settings. Size Digital Zoom Analog RGB Off Auto 0 0 MENU Exit SYSTEM SETUP: Basic Presentation Timer Language Projector Position Auto Power Off Blank Timer Panel Key Lock Timer Controller...

User Manual
Page 30
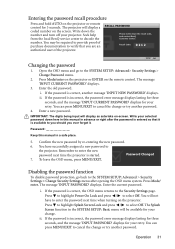
..., the four arrow buttons INPUT NEW PASSWORD ( , , , ) respectively represent 4 digits (1, 2, 3, 4). When the Splash Screen Lock is started. Write your selected password down in advance or right after the password is entered so that displays at projector startup unless the correct password is set, the OSD menu returns to the Security Settings page. Password Keep this manual in this manual in a short time. If you forget the password If the password function is available...
..., the four arrow buttons INPUT NEW PASSWORD ( , , , ) respectively represent 4 digits (1, 2, 3, 4). When the Splash Screen Lock is started. Write your selected password down in advance or right after the password is entered so that displays at projector startup unless the correct password is set, the OSD menu returns to the Security Settings page. Password Keep this manual in this manual in a short time. If you forget the password If the password function is available...
User Manual
Page 31
... AUTO on the projector or remote control for your retry. Seek help from the local BenQ service center to select Off. Recall Code: 0 2 1 2 MENU Exit Changing the password 1. i. ii. Password Keep this manual in a safe place. 5. Password Changed 7. Press Mode/ enter. Press to highlight Splash Screen Lock and press / to decode the number. If the password is incorrect, the password error message displays lasting for three seconds, and the message 'INPUT PASSWORD' displays for your change or try another password. The projector...
... AUTO on the projector or remote control for your retry. Seek help from the local BenQ service center to select Off. Recall Code: 0 2 1 2 MENU Exit Changing the password 1. i. ii. Password Keep this manual in a safe place. 5. Password Changed 7. Press Mode/ enter. Press to highlight Splash Screen Lock and press / to decode the number. If the password is incorrect, the password error message displays lasting for three seconds, and the message 'INPUT PASSWORD' displays for your change or try another password. The projector...

User Manual
Page 38
... the projector or remote control. +30 +50 +70 The higher the value, the brighter the image. YPbPr/S-Video/Video/HDMI Signal Input 1. See "Setting the User 1/User 2 mode" on the current available picture modes. In the PICTURE menu, highlight Picture Mode and press / to your selected input and viewing environment. +30 +50 +70 38 Operation This function is only available when User 1, or User 2 mode is selected. The confirmation message 'Setting Saved' displays. Adjusting Contrast Press CONTRAST on the remote control...
... the projector or remote control. +30 +50 +70 The higher the value, the brighter the image. YPbPr/S-Video/Video/HDMI Signal Input 1. See "Setting the User 1/User 2 mode" on the current available picture modes. In the PICTURE menu, highlight Picture Mode and press / to your selected input and viewing environment. +30 +50 +70 38 Operation This function is only available when User 1, or User 2 mode is selected. The confirmation message 'Setting Saved' displays. Adjusting Contrast Press CONTRAST on the remote control...
User Manual
Page 44
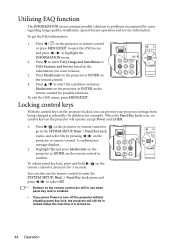
... remote control are still in locked status the next time it is enabled. • If you want to know. 3. A confirmation message displays. 2. Press to select FAQ-Image and Installation or FAQ-Features and Service based on the information you press Power to turn off the projector without disabling panel key lock, the projector will operate except Power and LASER. 1. Press / to select the a problem and press Mode/enter on the projector...
... remote control are still in locked status the next time it is enabled. • If you want to know. 3. A confirmation message displays. 2. Press to select FAQ-Image and Installation or FAQ-Features and Service based on the information you press Power to turn off the projector without disabling panel key lock, the projector will operate except Power and LASER. 1. Press / to select the a problem and press Mode/enter on the projector...

User Manual
Page 48
...; Color System • Equivalent Lamp Hour 48 Operation Menu operation Menu system Please note that the on-screen display (OSD) menus vary according to the signal type selected. Keystone 4:3/16:9/Auto/Real DISPLAY Position Phase H. Size Digital Zoom PC source: Dynamic/Presentation/sRGB/Cinema/ Picture Mode User 1/User 2 Video source: Dynamic/Standard/Cinema/User 1/ User 2 Reference Mode PC source: Dynamic/Presentation/sRGB/Cinema Video source: Dynamic/Standard/Cinema Brightness Contrast 2. Main menu Sub-menu Options Wall Color Off/Light Yellow/Pink/Light Green/Blue...
...; Color System • Equivalent Lamp Hour 48 Operation Menu operation Menu system Please note that the on-screen display (OSD) menus vary according to the signal type selected. Keystone 4:3/16:9/Auto/Real DISPLAY Position Phase H. Size Digital Zoom PC source: Dynamic/Presentation/sRGB/Cinema/ Picture Mode User 1/User 2 Video source: Dynamic/Standard/Cinema/User 1/ User 2 Reference Mode PC source: Dynamic/Presentation/sRGB/Cinema Video source: Dynamic/Standard/Cinema Brightness Contrast 2. Main menu Sub-menu Options Wall Color Off/Light Yellow/Pink/Light Green/Blue...
User Manual
Page 53
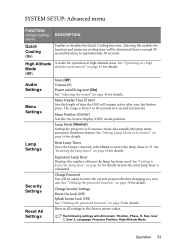
Menu Display Time (5 sec) Sets the length of hours the lamp has been used. Lamp Mode (Normal) Setting the projector in 5-second increments. Returns all settings to '0'. See "Setting Lamp Mode as Economic" on page 29 for details. Change Security Settings Power On Lock (Off) Splash Screen Lock (Off) See "Utilizing the password function" on page 56 for details. Operation 53 SYSTEM SETUP: Advanced menu FUNCTION (default setting / DESCRIPTION value) Quick Cooling (On) Enables or disables the Quick...
Menu Display Time (5 sec) Sets the length of hours the lamp has been used. Lamp Mode (Normal) Setting the projector in 5-second increments. Returns all settings to '0'. See "Setting Lamp Mode as Economic" on page 29 for details. Change Security Settings Power On Lock (Off) Splash Screen Lock (Off) See "Utilizing the password function" on page 56 for details. Operation 53 SYSTEM SETUP: Advanced menu FUNCTION (default setting / DESCRIPTION value) Quick Cooling (On) Enables or disables the Quick...
User Manual
Page 56
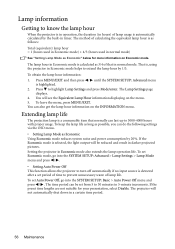
... press Mode/enter. Extending lamp life The projection lamp is a consumable item that in normal mode. If the Economic mode is selected, the light output will see the Equivalent Lamp Hour information displaying on the menu. 5. Setting the projector in a certain time period. 56 Maintenance To set Economic mode, go into the SYSTEM SETUP: Advanced > Lamp Settings > Lamp Mode menu and press / . • Setting Auto Power Off This function allows the projector to turn off automatically if no input source...
... press Mode/enter. Extending lamp life The projection lamp is a consumable item that in normal mode. If the Economic mode is selected, the light output will see the Equivalent Lamp Hour information displaying on the menu. 5. Setting the projector in a certain time period. 56 Maintenance To set Economic mode, go into the SYSTEM SETUP: Advanced > Lamp Settings > Lamp Mode menu and press / . • Setting Auto Power Off This function allows the projector to turn off automatically if no input source...
User Manual
Page 58
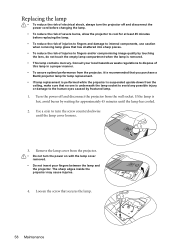
... disconnect the power cord before changing the lamp. • To reduce the risk of severe burns, allow the projector to cool for approximately 45 minutes until the lamp cover loosens. 3. Replacing the lamp • To reduce the risk of electrical shock, always turn the screw counterclockwise until the lamp has cooled. 2. Use a coin to fingers and/or compromising image quality by touching the lens, do...
... disconnect the power cord before changing the lamp. • To reduce the risk of severe burns, allow the projector to cool for approximately 45 minutes until the lamp cover loosens. 3. Replacing the lamp • To reduce the risk of electrical shock, always turn the screw counterclockwise until the lamp has cooled. 2. Use a coin to fingers and/or compromising image quality by touching the lens, do...

User Manual
Page 62
... Adjust the focus of the projector. Remedy Replace the batteries with the SOURCE key on or connected correctly. Remove the obstacle. Open the lens cover. Adjust the projection angle and direction as well as the height of power. Please see "Entering the password recall procedure" on the projector, and plug the power cord into the power outlet. The projector is switched on . No picture Cause Remedy The video source is still closed . Blurred image...
... Adjust the focus of the projector. Remedy Replace the batteries with the SOURCE key on or connected correctly. Remove the obstacle. Open the lens cover. Adjust the projection angle and direction as well as the height of power. Please see "Entering the password recall procedure" on the projector, and plug the power cord into the power outlet. The projector is switched on . No picture Cause Remedy The video source is still closed . Blurred image...


