
User Manual
Page 2
... Optimizing the image 32 Setting the presentation timer 35 Freezing the image 37 Hiding the image 37 Utilizing FAQ function 38 Locking control keys 38 Operating in a high altitude environment 39 Adjusting the sound 39 Personalizing the projector menu display 40 Controlling the projector through a Lan environment 40 Shutting down the projector 43 Menu operation 44 Maintenance 53 Care of the projector 53 Lamp information 54 Troubleshooting 60 Specifications 61 Projector specifications 61 Dimensions 62 Ceiling mount installation 62 Timing chart...
... Optimizing the image 32 Setting the presentation timer 35 Freezing the image 37 Hiding the image 37 Utilizing FAQ function 38 Locking control keys 38 Operating in a high altitude environment 39 Adjusting the sound 39 Personalizing the projector menu display 40 Controlling the projector through a Lan environment 40 Shutting down the projector 43 Menu operation 44 Maintenance 53 Care of the projector 53 Lamp information 54 Troubleshooting 60 Specifications 61 Projector specifications 61 Dimensions 62 Ceiling mount installation 62 Timing chart...

User Manual
Page 3
... open the lens shutter or remove the lens cap when the projector lamp is on the projector or remote control. 4. lens during operation. Refer servicing to ensure safe use of this could cause the objects to 240 volts AC, but could fail if power cuts or surges of information technology equipment. This projector is designed future reference. Do not look straight at the projector uninterruptible power supply (UPS...
... open the lens shutter or remove the lens cap when the projector lamp is on the projector or remote control. 4. lens during operation. Refer servicing to ensure safe use of this could cause the objects to 240 volts AC, but could fail if power cuts or surges of information technology equipment. This projector is designed future reference. Do not look straight at the projector uninterruptible power supply (UPS...

User Manual
Page 7
... the projector cool in a shorter time • FAQ to troubleshoot operational problems with one quick key press • Presentation timer for better control of time during presentations • One-key auto-adjustment to display the best picture quality • Digital keystone correction to correct distorted images • Adjustable color balance control for data/video display • Ability to display 16.7 million colors • Multi-language On-Screen Display (OSD) menus • Switchable normal and economic modes...
... the projector cool in a shorter time • FAQ to troubleshoot operational problems with one quick key press • Presentation timer for better control of time during presentations • One-key auto-adjustment to display the best picture quality • Digital keystone correction to correct distorted images • Adjustable color balance control for data/video display • Ability to display 16.7 million colors • Multi-language On-Screen Display (OSD) menus • Switchable normal and economic modes...
User Manual
Page 9
... button Lens cover Focus ring Vent (cool air intake) Front IR remote sensor Projection lens AC power jack Kensington anti-theft lock slot Rear adjuster foot Ceiling mount holes Rear IR remote sensor RJ45 LAN input jack RS232 control port RGB signal output jack HDMI-input port RGB (PC)/Component Video (YPbPr/ YCbCr) signal input jack S-Video input jack Video input jack Audio (L/R) input jacks Audio input jack Audio output jack 12V DC output terminal Used to connect these devices. Speaker grill 4 24 Introduction 9 Lamp cover External control panel (See "Controls...
... button Lens cover Focus ring Vent (cool air intake) Front IR remote sensor Projection lens AC power jack Kensington anti-theft lock slot Rear adjuster foot Ceiling mount holes Rear IR remote sensor RJ45 LAN input jack RS232 control port RGB signal output jack HDMI-input port RGB (PC)/Component Video (YPbPr/ YCbCr) signal input jack S-Video input jack Video input jack Audio (L/R) input jacks Audio input jack Audio output jack 12V DC output terminal Used to connect these devices. Speaker grill 4 24 Introduction 9 Lamp cover External control panel (See "Controls...
User Manual
Page 10
... On-Screen Display (OSD) menu item. "Switching input signal" on page 38 6. LAMP indicator light 11 Indicates the status of the projected image. AUTO Adjusts the focus of the lamp. "Starting up or flashes when the projector is activated, the #5, #10, and #11 keys are used as directional arrows to select the desired menu items and to make adjustments. Left/ 12. SOURCE Displays the source selection bar. TEMPerature warning light 7 Lights up 12 or flashes when the lamp has developed a 13 problem. 10 "Indicators...
... On-Screen Display (OSD) menu item. "Switching input signal" on page 38 6. LAMP indicator light 11 Indicates the status of the projected image. AUTO Adjusts the focus of the lamp. "Starting up or flashes when the projector is activated, the #5, #10, and #11 keys are used as directional arrows to select the desired menu items and to make adjustments. Left/ 12. SOURCE Displays the source selection bar. TEMPerature warning light 7 Lights up 12 or flashes when the lamp has developed a 13 problem. 10 "Indicators...

User Manual
Page 12
... the remote control prior to using it and the indicator lights up red. "Auto-adjusting the image" on the projector. "Locking control keys" on the select the desired menu items and to make back of children. 12 Introduction See the warning messages on page 38 / Operating the LASER pointer The Laser Pointer is necessary to others. SOURCE Activates or displays an on and Enters presentation timer setting directly. AUTO 22. Keystone/Arrow buttons...
... the remote control prior to using it and the indicator lights up red. "Auto-adjusting the image" on the projector. "Locking control keys" on the select the desired menu items and to make back of children. 12 Introduction See the warning messages on page 38 / Operating the LASER pointer The Laser Pointer is necessary to others. SOURCE Activates or displays an on and Enters presentation timer setting directly. AUTO 22. Keystone/Arrow buttons...

User Manual
Page 13
.... Introduction 13 Remote control effective range Infra-Red (IR) remote control sensors are no obstacles between the remote control and the sensors should not exceed 8 meters (~ 26 feet). The distance between the remote control and the IR sensors on the projector that might obstruct the infra-red beam. • Operating the projector from the front • Operating the projector from possible battery leakage. The cover will not...
.... Introduction 13 Remote control effective range Infra-Red (IR) remote control sensors are no obstacles between the remote control and the sensors should not exceed 8 meters (~ 26 feet). The distance between the remote control and the IR sensors on the projector that might obstruct the infra-red beam. • Operating the projector from the front • Operating the projector from possible battery leakage. The cover will not...
User Manual
Page 19
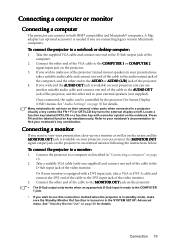
... following the instructions below: To connect the projector to a projector. Or if your projector, you are connecting legacy version Macintosh computers. Once connected, the audio can connect the MONITOR OUT signal output jack on their external video ports when connected to a monitor: 1. Take a suitable VGA cable (only one supplied) and connect one end to use this connection method when the projector is available on your external speakers (not supplied). A Mac adapter (an optional...
... following the instructions below: To connect the projector to a projector. Or if your projector, you are connecting legacy version Macintosh computers. Once connected, the audio can connect the MONITOR OUT signal output jack on their external video ports when connected to a monitor: 1. Take a suitable VGA cable (only one supplied) and connect one end to use this connection method when the projector is available on your external speakers (not supplied). A Mac adapter (an optional...

User Manual
Page 21
... a stereo audio input is only capable of the projector. 4. green to green, blue to blue, and red to an HDMI device: 1. Connection 21 If you can be controlled by the projector On-Screen Display (OSD) menus. Once connected, the audio can continue with 3 RCA type connectors to the color of the video device. 2. See "Connecting audio" on the projector. 3. Connecting an HDMI device You should use to connect to a Component Video source device: 1. Take an HDMI cable and connect one...
... a stereo audio input is only capable of the projector. 4. green to green, blue to blue, and red to an HDMI device: 1. Connection 21 If you can be controlled by the projector On-Screen Display (OSD) menus. Once connected, the audio can continue with 3 RCA type connectors to the color of the video device. 2. See "Connecting audio" on the projector. 3. Connecting an HDMI device You should use to connect to a Component Video source device: 1. Take an HDMI cable and connect one...

User Manual
Page 23
... POWER indicator light flashes green and stays green when the projector is activated for the first time, select your desired input signal. The projector will start the projector. Check that the POWER indicator light on . If it is found. The start up the projector 1. Operation Starting up , a startup logo is still hot from previous activity, it will run the cooling fan for approximately 90 seconds before energizing the lamp. 4. Press Power on the projector or remote control...
... POWER indicator light flashes green and stays green when the projector is activated for the first time, select your desired input signal. The projector will start the projector. Check that the POWER indicator light on . If it is found. The start up the projector 1. Operation Starting up , a startup logo is still hot from previous activity, it will run the cooling fan for approximately 90 seconds before energizing the lamp. 4. Press Power on the projector or remote control...
User Manual
Page 25
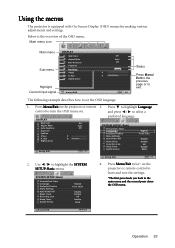
... control to set the OSD language. 1. Use / to select a DISPLAY preferred language. SYSTEM SETUP: Basic Presentation Timer Language Projector Position Menu Settings Auto Power Off Blank Timer Panel Key Lock Sleep Timer Splash Screen English Front Table Disable Disable Off Disable BenQ 4. Main menu icon Main menu Sub-menu DISPLAY Wall Color Aspect Ratio Auto Keystone Keystone Position Phase H. and press / to highlight the SYSTEM SETUP: Basic menu. Press Menu/Exit twice* on the projector or remote 3. Size Digital Zoom Analog RGB Off Auto...
... control to set the OSD language. 1. Use / to select a DISPLAY preferred language. SYSTEM SETUP: Basic Presentation Timer Language Projector Position Menu Settings Auto Power Off Blank Timer Panel Key Lock Sleep Timer Splash Screen English Front Table Disable Disable Off Disable BenQ 4. Main menu icon Main menu Sub-menu DISPLAY Wall Color Aspect Ratio Auto Keystone Keystone Position Phase H. and press / to highlight the SYSTEM SETUP: Basic menu. Press Menu/Exit twice* on the projector or remote 3. Size Digital Zoom Analog RGB Off Auto...

User Manual
Page 26
... manual, and keep the manual in a safe place. 5. Press Mode/Enter. As pictured to the SYSTEM SETUP: Advanced > Security Settings menu. Once the password is available to the password you used unless the correct password is entered every time the projector is usually a combination of the projector. The password can locate a Kensington lock slot on -screen. Open the OSD menu and go to the right, the four arrow keys ( , INPUT NEW PASSWORD , , ) respectively represent 4 digits...
... manual, and keep the manual in a safe place. 5. Press Mode/Enter. As pictured to the SYSTEM SETUP: Advanced > Security Settings menu. Once the password is available to the password you used unless the correct password is entered every time the projector is usually a combination of the projector. The password can locate a Kensington lock slot on -screen. Open the OSD menu and go to the right, the four arrow keys ( , INPUT NEW PASSWORD , , ) respectively represent 4 digits...

User Manual
Page 27
... assigned a new password to decode the number. The projector RECALL PASSWORD will display as pictured to enter the six-digit password every time you turn off your retry. Seek help from the local BenQ service Please write down the number and turn on page 27 for your projector. 3. Enter the old password. IMPORTANT: The digits being input will display a coded number on -screen. digit password, or if you ever forget it is incorrect, the password error message displays lasting for...
... assigned a new password to decode the number. The projector RECALL PASSWORD will display as pictured to enter the six-digit password every time you turn off your retry. Seek help from the local BenQ service Please write down the number and turn on page 27 for your projector. 3. Enter the old password. IMPORTANT: The digits being input will display a coded number on -screen. digit password, or if you ever forget it is incorrect, the password error message displays lasting for...

User Manual
Page 28
... image keystoning, be sure the Auto Keystone function in hand should you will not have to enter the password next time when turning on the projector or remote control to keep the old password in the DISPLAY menu is correct, the OSD menu returns to the SYSTEM SETUP: Advanced > Security Settings > Power On Lock menu after opening the OSD menu system. The Keystone correction page displays. 3. You will need to display the Keystone correction page. The message "INPUT PASSWORD" displays...
... image keystoning, be sure the Auto Keystone function in hand should you will not have to enter the password next time when turning on the projector or remote control to keep the old password in the DISPLAY menu is correct, the OSD menu returns to the SYSTEM SETUP: Advanced > Security Settings > Power On Lock menu after opening the OSD menu system. The Keystone correction page displays. 3. You will need to display the Keystone correction page. The message "INPUT PASSWORD" displays...

User Manual
Page 42
... the remote network operation page. The info page displays the information and status of its location and the person in the projector. You can adjust the Lan Control Settings. ii. You can name the projector, keep track of this projector has been password-protected. iv. Once set , access to the remote network operation on this projector. After making the adjustments, press the Send button and the data will be saved in charge of remote network operation...
... the remote network operation page. The info page displays the information and status of its location and the person in the projector. You can adjust the Lan Control Settings. ii. You can name the projector, keep track of this projector has been password-protected. iv. Once set , access to the remote network operation on this projector. After making the adjustments, press the Send button and the data will be saved in charge of remote network operation...
User Manual
Page 44
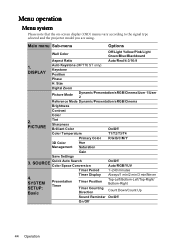
...-screen display (OSD) menus vary according to the signal type selected and the projector model you are using. Size Digital Zoom Picture Mode Dynamic/Presentation/sRGB/Cinema/User 1/User 2 Reference Mode Dynamic/Presentation/sRGB/Cinema Brightness Contrast Color 2. DISPLAY Auto Keystone (MP776 ST only) Keystone Position Phase H. PICTURE Tint Sharpness Brilliant Color On/Off Color Temperature T1/T2/T3/T4 Primary Color R/G/B/C/M/Y 3D Color Hue Management Saturation Gain Save Settings 3. Main menu Sub-menu Options Wall Color Off/Light Yellow/Pink/Light Green/Blue...
...-screen display (OSD) menus vary according to the signal type selected and the projector model you are using. Size Digital Zoom Picture Mode Dynamic/Presentation/sRGB/Cinema/User 1/User 2 Reference Mode Dynamic/Presentation/sRGB/Cinema Brightness Contrast Color 2. DISPLAY Auto Keystone (MP776 ST only) Keystone Position Phase H. PICTURE Tint Sharpness Brilliant Color On/Off Color Temperature T1/T2/T3/T4 Primary Color R/G/B/C/M/Y 3D Color Hue Management Saturation Gain Save Settings 3. Main menu Sub-menu Options Wall Color Off/Light Yellow/Pink/Light Green/Blue...

User Manual
Page 49
...-Screen Display (OSD) menu position. Disables or enables all panel key functions except Power on the projector and keys on page 35 for details. The following options are available: BenQ logo, Black screen, Blue screen. SYSTEM SETUP: Basic menu Function (default setting/value) Quick Auto Search (On) Color Space Conversion (depends on the selected input signal) Presentation Timer (Off) Language (English) Projector Position (Front Table) Menu Settings Auto Power Off (Disable) Blank Timer (Disable) Panel Key Lock...
...-Screen Display (OSD) menu position. Disables or enables all panel key functions except Power on the projector and keys on page 35 for details. The following options are available: BenQ logo, Black screen, Blue screen. SYSTEM SETUP: Basic menu Function (default setting/value) Quick Auto Search (On) Color Space Conversion (depends on the selected input signal) Presentation Timer (Off) Language (English) Projector Position (Front Table) Menu Settings Auto Power Off (Disable) Blank Timer (Disable) Panel Key Lock...

User Manual
Page 52
INFORMATION menu Source Shows the current signal source. Equivalent Lamp Hour Displays the number of your projector. 52 Operation Picture Mode Shows the selected mode in the PICTURE menu. Color System Shows input system format: NTSC, PAL, SECAM, or RGB. Firmware Version Shows the firmware version of hours the lamp has been used. Displays possible solutions to problems you may encounter. Function (default setting / value) Description FAQ-Image and Installation FAQ- Features and Service 6. Current System Status Resolution Shows the native resolution of...
INFORMATION menu Source Shows the current signal source. Equivalent Lamp Hour Displays the number of your projector. 52 Operation Picture Mode Shows the selected mode in the PICTURE menu. Color System Shows input system format: NTSC, PAL, SECAM, or RGB. Firmware Version Shows the firmware version of hours the lamp has been used. Displays possible solutions to problems you may encounter. Function (default setting / value) Description FAQ-Image and Installation FAQ- Features and Service 6. Current System Status Resolution Shows the native resolution of...

User Manual
Page 54
... the lamp operation life. To set Economic mode, go into the SYSTEM SETUP: Advanced > Lamp Settings > Lamp Mode menu and press / . • Setting Auto Power Off This function allows the projector to turn off automatically if no input signal is detected after a set Auto Power Off, go into the SYSTEM SETUP: Basic > Auto Power Off menu and press / . The time period can also get the lamp hour information on Economic mode. To obtain the lamp hour information: 1. To leave the menu, press Menu...
... the lamp operation life. To set Economic mode, go into the SYSTEM SETUP: Advanced > Lamp Settings > Lamp Mode menu and press / . • Setting Auto Power Off This function allows the projector to turn off automatically if no input signal is detected after a set Auto Power Off, go into the SYSTEM SETUP: Basic > Auto Power Off menu and press / . The time period can also get the lamp hour information on Economic mode. To obtain the lamp hour information: 1. To leave the menu, press Menu...

User Manual
Page 69
... color-coded to help users easily connecting products to computer systems correctly. • Some models of BenQ's monitors and projectors contain additional USB and DVI ports for connection to more devices such as Adobe Reader via a connected computer system. Other types of documents may be easily read by including the assistive features as below: • BenQ's monitors have colored "Power" indicators. The default timing setting is automatically turned on every time...
... color-coded to help users easily connecting products to computer systems correctly. • Some models of BenQ's monitors and projectors contain additional USB and DVI ports for connection to more devices such as Adobe Reader via a connected computer system. Other types of documents may be easily read by including the assistive features as below: • BenQ's monitors have colored "Power" indicators. The default timing setting is automatically turned on every time...


