
User Manual
Page 1
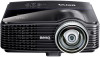
MP772 ST/MP776 ST Digital Projector User Manual Welcome
MP772 ST/MP776 ST Digital Projector User Manual Welcome

User Manual
Page 7
...; Short throw lens to create larger images with less distance between the projector and the screen • Filter free design to lower maintenance and operating costs • Auto keystone function (for the MP776 ST) to correct image keystoning automatically • Brilliant color / VIDI to ... Presentation timer for better control of time during presentations • One-key auto-adjustment to display the best picture quality • Digital keystone correction to correct distorted images • Adjustable color balance control for data/video display • Ability to display 16.7 million ...
...; Short throw lens to create larger images with less distance between the projector and the screen • Filter free design to lower maintenance and operating costs • Auto keystone function (for the MP776 ST) to correct image keystoning automatically • Brilliant color / VIDI to ... Presentation timer for better control of time during presentations • One-key auto-adjustment to display the best picture quality • Digital keystone correction to correct distorted images • Adjustable color balance control for data/video display • Ability to display 16.7 million ...

User Manual
Page 11
...Adjusting Brightness" on page 25 9. Goes back to hide the screen image. Left/ Starts the FAQ function. Adjusts the sound level. DIGITAL ZOOM+/DIGITAL ZOOM- FREEZE Freezes the projected image. CAPTURE (This function is not available with the MP7 series models) 4. "Using the menus" on... page 33 For details, see the info. ENTER Activates the selected On-Screen Display (OSD) menu item. 11. POWER Toggles the projector between standby...
...Adjusting Brightness" on page 25 9. Goes back to hide the screen image. Left/ Starts the FAQ function. Adjusts the sound level. DIGITAL ZOOM+/DIGITAL ZOOM- FREEZE Freezes the projected image. CAPTURE (This function is not available with the MP7 series models) 4. "Using the menus" on... page 33 For details, see the info. ENTER Activates the selected On-Screen Display (OSD) menu item. 11. POWER Toggles the projector between standby...

User Manual
Page 23
... a startup logo is found. The POWER indicator light flashes green and stays green when the projector is closed, it could become deformed due to enter a six-digit password. If the projector is activated for the first time, select your desired input signal. screen instructions. 5. Please ...change to search for details. Open the lens cover. The projector will see "Turning off the Power on/off ring...
... a startup logo is found. The POWER indicator light flashes green and stays green when the projector is closed, it could become deformed due to enter a six-digit password. If the projector is activated for the first time, select your desired input signal. screen instructions. 5. Please ...change to search for details. Open the lens cover. The projector will see "Turning off the Power on/off ring...
User Manual
Page 25
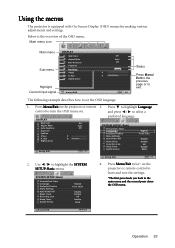
... the previous page or to select a DISPLAY preferred language. and press / to exit. Size Digital Zoom Analog RGB Off Auto Off 0 0 MENU Exit SYSTEM SETUP: Basic Presentation Timer Language Projector Position Menu Settings Auto Power Off Blank Timer Panel Key Lock Sleep Timer Splash Screen English Front Table... Disable Disable Off Disable BenQ Analog RGB MENU Exit 2. Analog RGB MENU Exit Operation 25 Press Menu/Exit on the projector or remote control to leave and save the settings. *The first press leads you back...
... the previous page or to select a DISPLAY preferred language. and press / to exit. Size Digital Zoom Analog RGB Off Auto Off 0 0 MENU Exit SYSTEM SETUP: Basic Presentation Timer Language Projector Position Menu Settings Auto Power Off Blank Timer Panel Key Lock Sleep Timer Splash Screen English Front Table... Disable Disable Off Disable BenQ Analog RGB MENU Exit 2. Analog RGB MENU Exit Operation 25 Press Menu/Exit on the projector or remote control to leave and save the settings. *The first press leads you back...

User Manual
Page 26
...To leave the OSD menu, press Menu/Exit. 26 Operation Securing the projector Using a security cable lock The projector has to be installed in a safe place to the right, the four arrow keys ( , INPUT NEW PASSWORD , , ) respectively represent 4 digits (1, 2, 3, 4). Print out this manual (if necessary) and write... desire to set , the OSD menu returns to secure the projector. According to the password you used unless the correct password is entered every time the projector is set , press the arrow keys to enter six digits for the password. 4. Setting a password Once a password has...
...To leave the OSD menu, press Menu/Exit. 26 Operation Securing the projector Using a security cable lock The projector has to be installed in a safe place to the right, the four arrow keys ( , INPUT NEW PASSWORD , , ) respectively represent 4 digits (1, 2, 3, 4). Print out this manual (if necessary) and write... desire to set , the OSD menu returns to secure the projector. According to the password you used unless the correct password is entered every time the projector is set , press the arrow keys to enter six digits for the password. 4. Setting a password Once a password has...

User Manual
Page 27
..., you are an MENU Exit authorized user of purchase documentation to enter the six-digit password every time you turn off your projector. 3. Seek help from the local BenQ service Please write down the number and turn on the projector. The message "INPUT CURRENT PASSWORD" displays. 3. Enter the old password. If the password is...
..., you are an MENU Exit authorized user of purchase documentation to enter the six-digit password every time you turn off your projector. 3. Seek help from the local BenQ service Please write down the number and turn on the projector. The message "INPUT CURRENT PASSWORD" displays. 3. Enter the old password. If the password is...

User Manual
Page 30
... is restored to magnify the center of the video signal and your need to find the details on the projector or remote control to its original size, press AUTO. Magnifying and searching for details If you need ...., press Mode/Enter to switch to the panning mode and press the directional arrows ( , , , ) on the projector or remote control to show the current setting. 2. You can dynamically stretch and scale the image output to a different ... the ratio of the image input signal. With the advent of digital signal processing, digital display devices like this projector can also press...
... is restored to magnify the center of the video signal and your need to find the details on the projector or remote control to its original size, press AUTO. Magnifying and searching for details If you need ...., press Mode/Enter to switch to the panning mode and press the directional arrows ( , , , ) on the projector or remote control to show the current setting. 2. You can dynamically stretch and scale the image output to a different ... the ratio of the image input signal. With the advent of digital signal processing, digital display devices like this projector can also press...
User Manual
Page 32
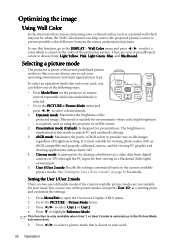
...Press Menu/Exit to -life images regardless of RGB colors to provide true-to open the On-Screen Display (OSD) menu. 2. Selecting a picture mode The projector is emphasized in this function, go to the DISPLAY > Wall Color menu and press / to highlight Reference Mode. sRGB mode: Maximizes the purity of brightness... your desired mode is required, such as using the projector in well lit rooms. 2. It is closest to select a picture mode that is selected up in the Picture Mode sub-menu item. 5. To use this mode to choose from digital cameras or DVs through the PC input for best viewing...
...Press Menu/Exit to -life images regardless of RGB colors to provide true-to open the On-Screen Display (OSD) menu. 2. Selecting a picture mode The projector is emphasized in this function, go to the DISPLAY > Wall Color menu and press / to highlight Reference Mode. sRGB mode: Maximizes the purity of brightness... your desired mode is required, such as using the projector in well lit rooms. 2. It is closest to select a picture mode that is selected up in the Picture Mode sub-menu item. 5. To use this mode to choose from digital cameras or DVs through the PC input for best viewing...
User Manual
Page 44
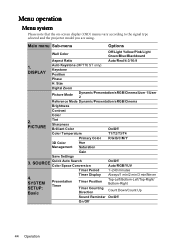
... Color Temperature T1/T2/T3/T4 Primary Color R/G/B/C/M/Y 3D Color Hue Management Saturation Gain Save Settings 3. DISPLAY Auto Keystone (MP776 ST only) Keystone Position Phase H. SYSTEM SETUP: Basic Presentation Timer Timer Display Always/1 min/2 min/3 min/Never Timer Position Top-Left...-Left/Top-Right/ Bottom-Right Timer Counting Direction Count Down/Count Up Sound Reminder On/Off On/Off 44 Operation Size Digital Zoom Picture Mode Dynamic/Presentation/sRGB/Cinema/User 1/User 2 Reference Mode Dynamic/Presentation/sRGB/Cinema Brightness Contrast Color 2. Menu...
... Color Temperature T1/T2/T3/T4 Primary Color R/G/B/C/M/Y 3D Color Hue Management Saturation Gain Save Settings 3. DISPLAY Auto Keystone (MP776 ST only) Keystone Position Phase H. SYSTEM SETUP: Basic Presentation Timer Timer Display Always/1 min/2 min/3 min/Never Timer Position Top-Left...-Left/Top-Right/ Bottom-Right Timer Counting Direction Count Down/Count Up Sound Reminder On/Off On/Off 44 Operation Size Digital Zoom Picture Mode Dynamic/Presentation/sRGB/Cinema/User 1/User 2 Reference Mode Dynamic/Presentation/sRGB/Cinema Brightness Contrast Color 2. Menu...

User Manual
Page 61
... ST) Digital - HDMI V1.3 x 1 Audio signal input Audio in PC audio jack x 1 RCA audio jack (L/R) x 2 Environmental Requirements Operating temperature 0°C-40°C at sea level Operating relative humidity 10%-90% (without notice. Optical Resolution 1024 x 768 XGA Display system 1-CHIP DMD Lens F/Number F = 2.6 Lamp (MP772 ST) 210 W lamp (MP776 ST) 280 W lamp Electrical Power supply (MP772 ST...
... ST) Digital - HDMI V1.3 x 1 Audio signal input Audio in PC audio jack x 1 RCA audio jack (L/R) x 2 Environmental Requirements Operating temperature 0°C-40°C at sea level Operating relative humidity 10%-90% (without notice. Optical Resolution 1024 x 768 XGA Display system 1-CHIP DMD Lens F/Number F = 2.6 Lamp (MP772 ST) 210 W lamp (MP776 ST) 280 W lamp Electrical Power supply (MP772 ST...

User Manual
Page 67
...obtain warranty service, immediately notify the dealer from which vary from time to time in the contents hereof without obligation to operate the projector in material and workmanship, under normal usage and storage. For other rights which you may be void if the customer fails to... this product against any warranty claim. Copyright Copyright 2009 by any person of such revision or changes. *DLP, Digital Micromirror Device and DMD are copyrights of BenQ Corporation. No part of this publication and to make changes from country to the contents hereof and specifically disclaims any...
...obtain warranty service, immediately notify the dealer from which vary from time to time in the contents hereof without obligation to operate the projector in material and workmanship, under normal usage and storage. For other rights which you may be void if the customer fails to... this product against any warranty claim. Copyright Copyright 2009 by any person of such revision or changes. *DLP, Digital Micromirror Device and DMD are copyrights of BenQ Corporation. No part of this publication and to make changes from country to the contents hereof and specifically disclaims any...


