
MS510 User Manual
Page 2
... 7 Shipping contents 8 Projector exterior view 9 Controls and functions 10 Positioning your projector14 Choosing a location 14 Obtaining a preferred projected image size 15 Connection 18 Connecting a computer or monitor... 19 Connecting Video source devices....... 20 Operation 24 Starting up the projector 24 Adjusting the... 31 Magnifying and searching for details . 32 Selecting the aspect ratio 32 Optimizing the image 34 Creating your own startup screen ...... 37 Setting the presentation timer 38 Remote paging operations 39 Hiding the image 39 Freezing the image 40 Utilizing FAQ ...
... 7 Shipping contents 8 Projector exterior view 9 Controls and functions 10 Positioning your projector14 Choosing a location 14 Obtaining a preferred projected image size 15 Connection 18 Connecting a computer or monitor... 19 Connecting Video source devices....... 20 Operation 24 Starting up the projector 24 Adjusting the... 31 Magnifying and searching for details . 32 Selecting the aspect ratio 32 Optimizing the image 34 Creating your own startup screen ...... 37 Setting the presentation timer 38 Remote paging operations 39 Hiding the image 39 Freezing the image 40 Utilizing FAQ ...

MS510 User Manual
Page 10
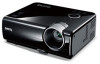
...See "Correcting keystone" on page 9. 26 for details. 5. Mode/Enter Selects an available picture setup mode. Goes back to hide the screen picture. tuning the image size and clarity" on page 26 for details. 3. See "Indicators" on page 31 for details. 4. See "Switching input signal" on...the image" on page 61 for details. See "Fine- Activates the selected On-Screen Display (OSD) menu item. See "Indicators" on page 25 for details. See "Fine-tuning the image size and clarity" on page 27 for details. Lights up red if the projector's temperature...
...See "Correcting keystone" on page 9. 26 for details. 5. Mode/Enter Selects an available picture setup mode. Goes back to hide the screen picture. tuning the image size and clarity" on page 26 for details. 3. See "Indicators" on page 31 for details. 4. See "Switching input signal" on...the image" on page 61 for details. See "Fine- Activates the selected On-Screen Display (OSD) menu item. See "Indicators" on page 25 for details. See "Fine-tuning the image size and clarity" on page 27 for details. Lights up red if the projector's temperature...

MS510 User Manual
Page 12
...See "Utilizing FAQ function" on page 40 for details. Capture Captures current displayed screen to previous OSD menu, exits and saves menu settings. Digital Zoom keys (+, -) 14. Magnifies or reduces the projected picture size. Volume +/- Goes back to be MyScreen. See "Using the menus" on ...page 31 for details. See "Switching input signal" on page 27 for details. 4. Toggles the projector between standby mode and on the On-Screen Display (OSD) menu. See ...
...See "Utilizing FAQ function" on page 40 for details. Capture Captures current displayed screen to previous OSD menu, exits and saves menu settings. Digital Zoom keys (+, -) 14. Magnifies or reduces the projected picture size. Volume +/- Goes back to be MyScreen. See "Using the menus" on ...page 31 for details. See "Switching input signal" on page 27 for details. 4. Toggles the projector between standby mode and on the On-Screen Display (OSD) menu. See ...

MS510 User Manual
Page 14
...Choosing a location Your room layout or personal preference will dictate which installation location you select. Take into consideration the size and position of your screen, the location of a suitable power outlet, as well as the location and distance between the projector and the ... suspended upsidedown from your projector on . 3. Set Rear Ceiling in front of the screen. Front Table Select this installation location. Note that a special rear projection screen and the BenQ Projector Ceiling Mounting Kit are required for quick setup and portability. 2. Your room layout...
...Choosing a location Your room layout or personal preference will dictate which installation location you select. Take into consideration the size and position of your screen, the location of a suitable power outlet, as well as the location and distance between the projector and the ... suspended upsidedown from your projector on . 3. Set Rear Ceiling in front of the screen. Front Table Select this installation location. Note that a special rear projection screen and the BenQ Projector Ceiling Mounting Kit are required for quick setup and portability. 2. Your room layout...

MS510 User Manual
Page 15
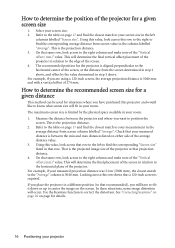
...angled surfaces). If the projector is mounted on page 17, that it must be able to the projection distance. BenQ has provided a table of 4:3-aspect-ratio screen sizes to assist you will result in a proportionally smaller height equivalent to 75% of the projector's native aspect height. ...4:3 aspect image in determining the ideal location for both the projected image size and the vertical offset dimension, which ...
...angled surfaces). If the projector is mounted on page 17, that it must be able to the projection distance. BenQ has provided a table of 4:3-aspect-ratio screen sizes to assist you will result in a proportionally smaller height equivalent to 75% of the projector's native aspect height. ...4:3 aspect image in determining the ideal location for both the projected image size and the vertical offset dimension, which ...
MS510 User Manual
Page 16
...column and make note of the "Vertical offset (mm)" value. On that same row, look across that row to the left columns labelled "Screen size". Check that your projector This will occur. Looking across this value, look across to the right column and make note of the "Vertical offset ...situations where you will have purchased this row to the right to find the corresponding "Screen size" listed in that row. The maximum screen size is 5040 mm and with a vertical offset of 274 mm. Select your screen size in step 3 above , and offset by the physical space available in your measured ...
...column and make note of the "Vertical offset (mm)" value. On that same row, look across that row to the left columns labelled "Screen size". Check that your projector This will occur. Looking across this value, look across to the right column and make note of the "Vertical offset ...situations where you will have purchased this row to the right to find the corresponding "Screen size" listed in that row. The maximum screen size is 5040 mm and with a vertical offset of 274 mm. Select your screen size in step 3 above , and offset by the physical space available in your measured ...

MS510 User Manual
Page 17
... determine the exact mounting position so that if you intend to permanently install the projector, you should physically test the projection size and distance using the actual projector in situ before calculating the appropriate position. Positioning your installation location. zoom) 30 762 ...to make allowance for the center of lens dimensions of lens Vertical offset Projection distance Screen size Distance from screen (mm) Diagonal W H Min length Average Max length Inch mm (mm) (mm) (max. BenQ recommends that it , so as to optical component variations. This will help you...
... determine the exact mounting position so that if you intend to permanently install the projector, you should physically test the projection size and distance using the actual projector in situ before calculating the appropriate position. Positioning your installation location. zoom) 30 762 ...to make allowance for the center of lens dimensions of lens Vertical offset Projection distance Screen size Distance from screen (mm) Diagonal W H Min length Average Max length Inch mm (mm) (mm) (max. BenQ recommends that it , so as to optical component variations. This will help you...

MS510 User Manual
Page 26
...the top of the image. Press to the situation where the projected image is noticeably wider at the bottom of the image. Press to the screen. The Keystone correction page displays. 3. Then sharpen the image by rotating the focus ring. It occurs when the projector is highlighted. 2. ... projector or remote control to display the Keystone correction page. the image or press to highlight Keystone and press Mode/Enter. Press to the size that you will need using the zoom ring. 2. Adjust the projected image to correct keystoning at the bottom of the image. •...
...the top of the image. Press to the situation where the projected image is noticeably wider at the bottom of the image. Press to the screen. The Keystone correction page displays. 3. Then sharpen the image by rotating the focus ring. It occurs when the projector is highlighted. 2. ... projector or remote control to display the Keystone correction page. the image or press to highlight Keystone and press Mode/Enter. Press to the size that you will need using the zoom ring. 2. Adjust the projected image to correct keystoning at the bottom of the image. •...

MS510 User Manual
Page 33
...it displays them with a 16:10 aspect ratio. You may also need to fit the projector's native resolution in the center of the screen with out aspect alteration. This is most suitable for the incoming image which are active areas. About the aspect ratio In the pictures below... portions are already in 4:3 nor 16:9 and you want 16:10 picture to increase the image size if necessary. You could adjust the zoom setting or move the projector towards the screen to make most suitable for images which is suitable for 4:3 images like computer monitors, standard definition...
...it displays them with a 16:10 aspect ratio. You may also need to fit the projector's native resolution in the center of the screen with out aspect alteration. This is most suitable for the incoming image which are active areas. About the aspect ratio In the pictures below... portions are already in 4:3 nor 16:9 and you want 16:10 picture to increase the image size if necessary. You could adjust the zoom setting or move the projector towards the screen to make most suitable for images which is suitable for 4:3 images like computer monitors, standard definition...
MS510 User Manual
Page 43
... Aspect Ratio Auto/Real/4:3/16:9/16:10 Keystone Position 1. DISPLAY Phase H. Menu operation Menu system Please note that the on-screen display (OSD) menus vary according to the signal type selected. Size Digital Zoom 3D Sync On/Off 3D Sync Invert Disable/Invert Teaching Template Blackboard Whiteboard Letter Formation/Musical Staff/ Worksheet...
... Aspect Ratio Auto/Real/4:3/16:9/16:10 Keystone Position 1. DISPLAY Phase H. Menu operation Menu system Please note that the on-screen display (OSD) menus vary according to the signal type selected. Size Digital Zoom 3D Sync On/Off 3D Sync Invert Disable/Invert Teaching Template Blackboard Whiteboard Letter Formation/Musical Staff/ Worksheet...
MS510 User Manual
Page 52
... page 28 for details. A mode for details. Audio Settings Mute Sets the mute function. Equivalent lamp hour See "Getting to capture screen. If you can connect the projector using a suitable RS-232 cable and update or download the projector's firmware. Selecting On enables the... function and the projector displays the grid test pattern. It helps you adjust the image size and focus and check that you attempt to a few seconds. 5. SYSTEM SETUP: Advanced menu FUNCTION (default setting/ value) DESCRIPTION (...
... page 28 for details. A mode for details. Audio Settings Mute Sets the mute function. Equivalent lamp hour See "Getting to capture screen. If you can connect the projector using a suitable RS-232 cable and update or download the projector's firmware. Selecting On enables the... function and the projector displays the grid test pattern. It helps you adjust the image size and focus and check that you attempt to a few seconds. 5. SYSTEM SETUP: Advanced menu FUNCTION (default setting/ value) DESCRIPTION (...
MS510 User Manual
Page 53
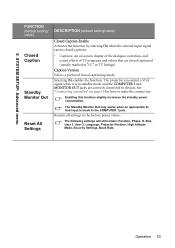
...standby mode and the COMPUTER 1 and MONITOR OUT jacks are closed captioned (usually marked as "CC" in TV listings). Selecting On enables the function. Size, User 1, User 2, Language, Projector Position, High Altitude Mode, Security Settings, Baud Rate. The following settings will still remain: Position, Phase, H.... the function by selecting On when the selected input signal carries closed captioning mode. See "Connecting a monitor" on -screen display of the dialogue, narration, and sound effects of TV programs and videos that are correctly connected to the factory preset values.
...standby mode and the COMPUTER 1 and MONITOR OUT jacks are closed captioned (usually marked as "CC" in TV listings). Selecting On enables the function. Size, User 1, User 2, Language, Projector Position, High Altitude Mode, Security Settings, Baud Rate. The following settings will still remain: Position, Phase, H.... the function by selecting On when the selected input signal carries closed captioning mode. See "Connecting a monitor" on -screen display of the dialogue, narration, and sound effects of TV programs and videos that are correctly connected to the factory preset values.


