

MX660P User Manual
Page 2
... projected image 18 Using the menus 20 Securing the projector 21 Switching input signal 24 Magnifying and searching for details . 25 Selecting the aspect ratio 25 Optimizing the image 27 Setting the presentation timer 30 Remote paging operations 31 Freezing the image 31 Hiding the ...image 31 Utilizing FAQ function 31 Locking control keys 32 Operating in a high altitude environment 32 Creating your own startup screen ...... 32 Adjusting the sound 33 Controlling the projector through a LAN ...
... projected image 18 Using the menus 20 Securing the projector 21 Switching input signal 24 Magnifying and searching for details . 25 Selecting the aspect ratio 25 Optimizing the image 27 Setting the presentation timer 30 Remote paging operations 31 Freezing the image 31 Hiding the ...image 31 Utilizing FAQ function 31 Locking control keys 32 Operating in a high altitude environment 32 Creating your own startup screen ...... 32 Adjusting the sound 33 Controlling the projector through a LAN ...

MX660P User Manual
Page 3
...could fail if power cuts or surges of information technology equipment. Save it is important that you connect your projector through a power stabilizer, surge protector or 2. to operate safely within a mains voltage between 100 to 240 ...turn off the lamp, press BLANK on the product. In areas where the mains voltage may damage your projector. The intense light beam may fluctuate or cut out, it is recommended that you 5. Do not block the ...Refer servicing to ensure safe use of this manual and marked on the projector or remote control. 4. Do not look straight at the...
...could fail if power cuts or surges of information technology equipment. Save it is important that you connect your projector through a power stabilizer, surge protector or 2. to operate safely within a mains voltage between 100 to 240 ...turn off the lamp, press BLANK on the product. In areas where the mains voltage may damage your projector. The intense light beam may fluctuate or cut out, it is recommended that you 5. Do not block the ...Refer servicing to ensure safe use of this manual and marked on the projector or remote control. 4. Do not look straight at the...

MX660P User Manual
Page 8
RS232 cable Projector Power cord VGA cable Quick start guide User manual CD Warranty card* Capture Remote control with battery Pull the tab before using the remote control. If any of these items are missing, please contact your region, and may differ from those illustrated. *The warranty card is only supplied in ...
RS232 cable Projector Power cord VGA cable Quick start guide User manual CD Warranty card* Capture Remote control with battery Pull the tab before using the remote control. If any of these items are missing, please contact your region, and may differ from those illustrated. *The warranty card is only supplied in ...

MX660P User Manual
Page 9
...release button 5. Speaker grill 7 8 9. S-Video input jack Video input jack 21. Top IR remote sensor 6. USB ports 17. RGB (PC)/Component Video (YPbPr/ YCbCr) signal input jack 11 20...18. External control panel (See "Controls and functions" on page 10 2 for details.) 5 1 3. Focus and Zoom ring 7. Front IR remote sensor 9 10. Front adjuster foot 15. Vent (heated air exhaust) 6 4. Lamp cover 2. RGB signal output jack 15 16 17 18 ... 23 23. Rear adjuster foot 13. RS232 control port Rear/lower side 16. Projector exterior view Front/upper side 1.
...release button 5. Speaker grill 7 8 9. S-Video input jack Video input jack 21. Top IR remote sensor 6. USB ports 17. RGB (PC)/Component Video (YPbPr/ YCbCr) signal input jack 11 20...18. External control panel (See "Controls and functions" on page 10 2 for details.) 5 1 3. Focus and Zoom ring 7. Front IR remote sensor 9 10. Front adjuster foot 15. Vent (heated air exhaust) 6 4. Lamp cover 2. RGB signal output jack 15 16 17 18 ... 23 23. Rear adjuster foot 13. RS232 control port Rear/lower side 16. Projector exterior view Front/upper side 1.

MX660P User Manual
Page 11
... size. 7. CAPTURE Selects an available picture setup mode. MENU/EXIT Turns on . 2. POWER Displays the source selection bar. Toggles the projector between standby mode 13. Freeze Freezes the projected image. 3. Left/ 15. Remote control 1 2 3 Capture 4 5 6 9. Goes back to hide the screen picture. 6. MODE/ENTER and on the On-Screen Display (OSD) menu...
... size. 7. CAPTURE Selects an available picture setup mode. MENU/EXIT Turns on . 2. POWER Displays the source selection bar. Toggles the projector between standby mode 13. Freeze Freezes the projected image. 3. Left/ 15. Remote control 1 2 3 Capture 4 5 6 9. Goes back to hide the screen picture. 6. MODE/ENTER and on the On-Screen Display (OSD) menu...

MX660P User Manual
Page 12
... the battery holder. 2. Insert the new battery in the holder. Push the holder into the remote control. • Avoid excessive heat and humidity. • There may be held at an angle within 30 degrees perpendicular to the projector's IR remote control sensors to the battery manufacturer's instructions. • Never throw a battery into a fire...
... the battery holder. 2. Insert the new battery in the holder. Push the holder into the remote control. • Avoid excessive heat and humidity. • There may be held at an angle within 30 degrees perpendicular to the projector's IR remote control sensors to the battery manufacturer's instructions. • Never throw a battery into a fire...

MX660P User Manual
Page 17
...equipment on the power outlet switch (where fitted). You can also press SOURCE on page 63 for details. 5. See "Timing chart" on the projector or remote control to a lower setting. Operation Starting up , a "Power On Tone" will be heard. The POWER indicator light flashes green and stays green... on page 33 for details. As soon as electric shock and fire. 2. Plug the power cord into the projector and into a power outlet. See "Switching input signal" on the remote control to start up , a startup logo is still hot from previous activity, it will continue displaying until an...
...equipment on the power outlet switch (where fitted). You can also press SOURCE on page 63 for details. 5. See "Timing chart" on the projector or remote control to a lower setting. Operation Starting up , a "Power On Tone" will be heard. The POWER indicator light flashes green and stays green... on page 33 for details. As soon as electric shock and fire. 2. Plug the power cord into the projector and into a power outlet. See "Switching input signal" on the remote control to start up , a startup logo is still hot from previous activity, it will continue displaying until an...

MX660P User Manual
Page 18
.... • This function is only available when PC signal (analog RGB) is not placed on a flat surface or the screen and the projector are not perpendicular to optimize the picture quality. The current source information will be displayed in a reverse direction. Sharpen the image by rotating the...you may cause damage to provide the best picture quality. Screw the rear adjuster foot in the corner of the projector. To correct this , press AUTO on the projector or remote control. Fine-tuning the image size and clarity 1. Press the quick-release button and lift the front of the...
.... • This function is only available when PC signal (analog RGB) is not placed on a flat surface or the screen and the projector are not perpendicular to optimize the picture quality. The current source information will be displayed in a reverse direction. Sharpen the image by rotating the...you may cause damage to provide the best picture quality. Screw the rear adjuster foot in the corner of the projector. To correct this , press AUTO on the projector or remote control. Fine-tuning the image size and clarity 1. Press the quick-release button and lift the front of the...
MX660P User Manual
Page 19
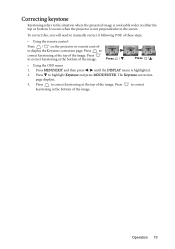
... 19 Correcting keystone Keystoning refers to the situation where the projected image is highlighted. 2. Press to display the Keystone correction page. It occurs when the projector is not perpendicular to highlight Keystone and press MODE/ENTER. Press / . • Using the OSD menu 1. Press to the screen. To correct this, ...you will need to manually correct it following ONE of these steps. • Using the remote control Press / on the projector or remote control to correct keystoning at either the top or bottom.
... 19 Correcting keystone Keystoning refers to the situation where the projected image is highlighted. 2. Press to display the Keystone correction page. It occurs when the projector is not perpendicular to highlight Keystone and press MODE/ENTER. Press / . • Using the OSD menu 1. Press to the screen. To correct this, ...you will need to manually correct it following ONE of these steps. • Using the remote control Press / on the projector or remote control to correct keystoning at either the top or bottom.

MX660P User Manual
Page 20
...On Disable MENU Exit SYSTEM SETUP: Basic Presentation Timer Language Projector Position Menu Settings Operation Settings Remote Receiver Panel Key Lock Background Color Splash Screen MyScreen English Front Table Front+Top Off BenQ BenQ Analog RGB MENU Exit 2. Main menu icon Main menu... Basic menu. SYSTEM SETUP: Basic Presentation Timer Language Projector Position Menu Settings Operation Settings Remote Receiver Panel Key Lock Background Color Splash Screen MyScreen Analog RGB English Front Table Front+Top Off BenQ BenQ MENU Exit 4. DISPLAY Wall Color Aspect Ratio Keystone Position...
...On Disable MENU Exit SYSTEM SETUP: Basic Presentation Timer Language Projector Position Menu Settings Operation Settings Remote Receiver Panel Key Lock Background Color Splash Screen MyScreen English Front Table Front+Top Off BenQ BenQ Analog RGB MENU Exit 2. Main menu icon Main menu... Basic menu. SYSTEM SETUP: Basic Presentation Timer Language Projector Position Menu Settings Operation Settings Remote Receiver Panel Key Lock Background Color Splash Screen MyScreen Analog RGB English Front Table Front+Top Off BenQ BenQ MENU Exit 4. DISPLAY Wall Color Aspect Ratio Keystone Position...

MX660P User Manual
Page 22
... you will be required to provide proof of purchase documentation to verify that you are an MENU Exit authorized user of the projector. 22 Operation If you enter the wrong password, the Password Error password error message as pictured to decode the number. digit ...to the right displays Please try again. lasting for 3 seconds. Press and hold AUTO on the projector. Seek help from the local BenQ service Please write down the number and turn on the projector or remote control for 3 seconds, and the INPUT PASSWORD message follows. You can use the password recall procedure...
... you will be required to provide proof of purchase documentation to verify that you are an MENU Exit authorized user of the projector. 22 Operation If you enter the wrong password, the Password Error password error message as pictured to decode the number. digit ...to the right displays Please try again. lasting for 3 seconds. Press and hold AUTO on the projector. Seek help from the local BenQ service Please write down the number and turn on the projector or remote control for 3 seconds, and the INPUT PASSWORD message follows. You can use the password recall procedure...

MX660P User Manual
Page 24
...1. To do this resolution. To select the source: • Using the remote control or projector Press one full screen at the corner of the Source buttons on the remote control, or press SOURCE on the projector repeatedly until your desired signal is selected and press MODE/ENTER. For best ...press / to automatically search for another signal. • The brightness level of picture clarity. See "Selecting the aspect ratio" on the projector or remote control. Press / until the SOURCE menu is in use an input signal which may cause some image distortion or loss of the projected ...
...1. To do this resolution. To select the source: • Using the remote control or projector Press one full screen at the corner of the Source buttons on the remote control, or press SOURCE on the projector repeatedly until your desired signal is selected and press MODE/ENTER. For best ...press / to automatically search for another signal. • The brightness level of picture clarity. See "Selecting the aspect ratio" on the projector or remote control. Press / until the SOURCE menu is in use an input signal which may cause some image distortion or loss of the projected ...
MX660P User Manual
Page 25
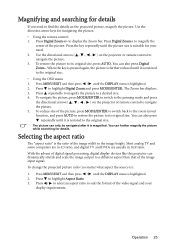
Press the key repeatedly until the picture size is magnified. Use the directional arrows ( , , , ) on the projector or remote control to a desired size. 4. When the key is pressed again, the picture is further reduced until the DISPLAY menu is ): 1. Press repeatedly to magnify...input signal. Press MENU/EXIT and then press / until it is suitable for your display requirements. Press Digital Zoom+ to find the details on the projector or remote control to display the Zoom bar. Press to highlight Aspect Ratio. 3. Press MENU/EXIT and then press / until it is highlighted. 2. Press to...
Press the key repeatedly until the picture size is magnified. Use the directional arrows ( , , , ) on the projector or remote control to a desired size. 4. When the key is pressed again, the picture is further reduced until the DISPLAY menu is ): 1. Press repeatedly to magnify...input signal. Press MENU/EXIT and then press / until it is suitable for your display requirements. Press Digital Zoom+ to find the details on the projector or remote control to display the Zoom bar. Press to highlight Aspect Ratio. 3. Press MENU/EXIT and then press / until it is highlighted. 2. Press to...
MX660P User Manual
Page 27
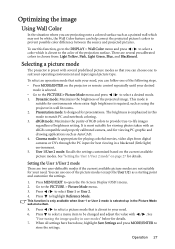
... Reference Mode. The brightness is preset with an sRGB compatible and properly calibrated camera, and for details. 7. Selecting a picture mode The projector is emphasized in this function, go to the DISPLAY > Wall Color menu and press / to prevent possible color difference between the source and... projected pictures. Dynamic mode: Maximizes the brightness of the following steps. • Press MODE/ENTER on the projector or remote control repeatedly until your need, you can help correct the projected picture's colors to select a color which is selected up in user...
... Reference Mode. The brightness is preset with an sRGB compatible and properly calibrated camera, and for details. 7. Selecting a picture mode The projector is emphasized in this function, go to the DISPLAY > Wall Color menu and press / to prevent possible color difference between the source and... projected pictures. Dynamic mode: Maximizes the brightness of the following steps. • Press MODE/ENTER on the projector or remote control repeatedly until your need, you can help correct the projected picture's colors to select a color which is selected up in user...

MX660P User Manual
Page 28
... white. 3. T4: Makes images appear reddish white. *About color temperatures: There are common in video and natural scenes, so the projector reproduces images in mid-tone images, which makes the image unrealistic. Adjusting Sharpness The higher the value, the sharper the picture becomes.... 8. The confirmation message "Setting Saved" displays. Based on the projector or remote control. Adjusting Brightness The higher the value, the brighter the image. Adjust this to these functions by highlighting them and pressing ...
... white. 3. T4: Makes images appear reddish white. *About color temperatures: There are common in video and natural scenes, so the projector reproduces images in mid-tone images, which makes the image unrealistic. Adjusting Sharpness The higher the value, the sharper the picture becomes.... 8. The confirmation message "Setting Saved" displays. Based on the projector or remote control. Adjusting Brightness The higher the value, the brighter the image. Adjust this to these functions by highlighting them and pressing ...

MX660P User Manual
Page 29
... selected. Only in the range will include colors consisted of that color in classroom, meeting room, or lounge room situations where lights remain on the projector or remote control and the 3D Color Management page displays. 3. Increase in permanent installations with suitable guidance, or even an experienced professional installer. Press to measure...
... selected. Only in the range will include colors consisted of that color in classroom, meeting room, or lounge room situations where lights remain on the projector or remote control and the 3D Color Management page displays. 3. Increase in permanent installations with suitable guidance, or even an experienced professional installer. Press to measure...

MX660P User Manual
Page 30
... Displays the timer on the screen. Press MENU/EXIT to confirm. If you have made all of time can indicate the presentation time on the projector or remote control to exit and save the settings. You will see the message "Timer is On" displaying on screen in 5minute increments. A confirmation message displays...
... Displays the timer on the screen. Press MENU/EXIT to confirm. If you have made all of time can indicate the presentation time on the projector or remote control to exit and save the settings. You will see the message "Timer is On" displaying on screen in 5minute increments. A confirmation message displays...
MX660P User Manual
Page 31
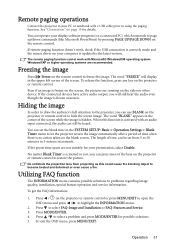
...the paging function. Utilizing FAQ function The INFORMATION menu contains possible solutions to freeze the image. To get the FAQ information: 1. Remote paging operations Connect the projector to your presentation, select Disable. Freezing the image Press Freeze on the video or other device. The word "FREEZE" will ... select a problem and press MODE/ENTER for details. To exit the OSD menu, press MENU/EXIT. You can use BLANK on the projector or remote control to page up/down commands (like Microsoft PowerPoint) by pressing PAGE UP/PAGE DOWN on a connected PC) which responds to hide ...
...the paging function. Utilizing FAQ function The INFORMATION menu contains possible solutions to freeze the image. To get the FAQ information: 1. Remote paging operations Connect the projector to your presentation, select Disable. Freezing the image Press Freeze on the video or other device. The word "FREEZE" will ... select a problem and press MODE/ENTER for details. To exit the OSD menu, press MENU/EXIT. You can use BLANK on the projector or remote control to page up/down commands (like Microsoft PowerPoint) by pressing PAGE UP/PAGE DOWN on a connected PC) which responds to hide ...

MX660P User Manual
Page 32
... be in a high altitude environment We recommend you use the High Altitude Mode when your projector from among BenQ logo, Black or Blue screen, you use the remote control to enter the SYSTEM SETUP: Basic > Panel Key Lock menu and press / to protect your environment is between 0°C-35...°C. Creating your own startup screen In addition to selecting the projector preset startup screen from ...
... be in a high altitude environment We recommend you use the High Altitude Mode when your projector from among BenQ logo, Black or Blue screen, you use the remote control to enter the SYSTEM SETUP: Basic > Panel Key Lock menu and press / to protect your environment is between 0°C-35...°C. Creating your own startup screen In addition to selecting the projector preset startup screen from ...

MX660P User Manual
Page 34
... Once you have to plug a BenQ wireless dongle (optional) to the USB Type A connector on the projector, and then only a few OSD configuration steps are for the projector and the projector is on or in standby mode, you can manage and control the projector from the actual design. 1. Enter...network. Make sure the Status is turned on the same local area network to highlight Wireless LAN and press MODE/ENTER. 4. Controlling the projector remotely through a LAN environment You can use any computer that is version 7.0 or higher. • The screenshots in the address bar of...
... Once you have to plug a BenQ wireless dongle (optional) to the USB Type A connector on the projector, and then only a few OSD configuration steps are for the projector and the projector is on or in standby mode, you can manage and control the projector from the actual design. 1. Enter...network. Make sure the Status is turned on the same local area network to highlight Wireless LAN and press MODE/ENTER. 4. Controlling the projector remotely through a LAN environment You can use any computer that is version 7.0 or higher. • The screenshots in the address bar of...


