
User Manual
Page 2
... instructions 3 Introduction 7 Projector features 7 Shipping contents 8 Projector exterior view 10 Positioning your projector 17 Choosing a location 17 Obtaining a preferred projected image size 18 Connection 20 Connecting a computer or monitor...21 Connecting Video source devices.......22 Operation 26 Starting up the projector 26 Adjusting the projected image 27 Using the menus 30 Securing the projector 31 Switching input signal 33 Magnifying and searching for details ...34 Selecting the aspect ratio 35 Optimizing the image 36 Setting the presentation timer...
... instructions 3 Introduction 7 Projector features 7 Shipping contents 8 Projector exterior view 10 Positioning your projector 17 Choosing a location 17 Obtaining a preferred projected image size 18 Connection 20 Connecting a computer or monitor...21 Connecting Video source devices.......22 Operation 26 Starting up the projector 26 Adjusting the projected image 27 Using the menus 30 Securing the projector 31 Switching input signal 33 Magnifying and searching for details ...34 Selecting the aspect ratio 35 Optimizing the image 36 Setting the presentation timer...
User Manual
Page 3
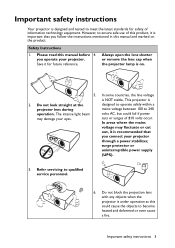
... block the projection lens with any objects when the projector is on the product. The intense light beam may fluctuate or cut out, it is NOT stable. Always open the lens shutter or remove the lens cap when the projector lamp is under operation as this product, it is 2. you follow the instructions mentioned in this manual before 4. Important safety instructions Your projector is designed...
... block the projection lens with any objects when the projector is on the product. The intense light beam may fluctuate or cut out, it is NOT stable. Always open the lens shutter or remove the lens cap when the projector lamp is under operation as this product, it is 2. you follow the instructions mentioned in this manual before 4. Important safety instructions Your projector is designed...

User Manual
Page 7
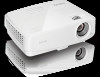
... 3D movies, videos and sporting events in a more flexible. Auto Power Off function allows the projector to life. By presenting the depth of the images, you to projection distance. • The lamp brightness will vary depending on the ambient lighting conditions, selected input signal contrast/ brightness settings, and is proportional to restart the projector immediately within the lamp manufacturers specifications. Introduction 7 Introduction Projector features This model is one...
... 3D movies, videos and sporting events in a more flexible. Auto Power Off function allows the projector to life. By presenting the depth of the images, you to projection distance. • The lamp brightness will vary depending on the ambient lighting conditions, selected input signal contrast/ brightness settings, and is proportional to restart the projector immediately within the lamp manufacturers specifications. Introduction 7 Introduction Projector features This model is one...
User Manual
Page 11
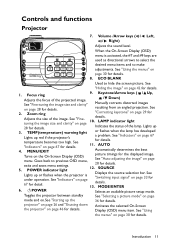
... image size and clarity" on the On-Screen Display (OSD) menu. a problem. AUTO 4. Turns on page details. 10. Displays the source selection bar. II POWER Selects an available picture setup mode. See "Using the menus" on page 28 for details. 11. POWER indicator light picture timings for details. See "Auto-adjusting the image" on page 30 for detail. See "Indicators" on .See "Starting up red if the projector's temperature becomes too high. Toggles the projector between standby See "Selecting a picture mode" on page mode...
... image size and clarity" on the On-Screen Display (OSD) menu. a problem. AUTO 4. Turns on page details. 10. Displays the source selection bar. II POWER Selects an available picture setup mode. See "Using the menus" on page 28 for details. 11. POWER indicator light picture timings for details. See "Auto-adjusting the image" on page 30 for detail. See "Indicators" on .See "Starting up red if the projector's temperature becomes too high. Toggles the projector between standby See "Selecting a picture mode" on page mode...

User Manual
Page 13
Activates the selected On-Screen 3 3 Display (OSD) menu item. Digital Zoom keys (+, -) Showing the status information of time with 70% 15 lamp power saving. Menu/Exit searching for details" on the On-Screen Display (OSD) details. Activates or displays an on-screen timer See "Using the menus" on page 30 for Turns on page 34 for details. See Enters presentation timer setting directly. Remote control 4. SmartEco 8 18 Displays the lamp mode selection 19 bar(Normal...
Activates the selected On-Screen 3 3 Display (OSD) menu item. Digital Zoom keys (+, -) Showing the status information of time with 70% 15 lamp power saving. Menu/Exit searching for details" on the On-Screen Display (OSD) details. Activates or displays an on-screen timer See "Using the menus" on page 30 for Turns on page 34 for details. See Enters presentation timer setting directly. Remote control 4. SmartEco 8 18 Displays the lamp mode selection 19 bar(Normal...
User Manual
Page 17
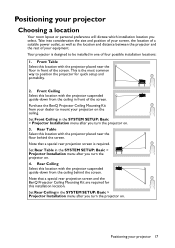
... location with the projector suspended upside-down from your projector on the ceiling. Front Ceiling Select this location with the projector placed near the floor behind the screen. Positioning your equipment. Note that a special rear projection screen and the BenQ Projector Ceiling Mounting Kit are required for quick setup and portability. 2. Set Rear Table in the SYSTEM SETUP: Basic > Projector Installation menu after you turn the projector on . 3. Set Rear Ceiling in the SYSTEM SETUP: Basic > Projector Installation menu...
... location with the projector suspended upside-down from your projector on the ceiling. Front Ceiling Select this location with the projector placed near the floor behind the screen. Positioning your equipment. Note that a special rear projection screen and the BenQ Projector Ceiling Mounting Kit are required for quick setup and portability. 2. Set Rear Table in the SYSTEM SETUP: Basic > Projector Installation menu after you turn the projector on . 3. Set Rear Ceiling in the SYSTEM SETUP: Basic > Projector Installation menu...
User Manual
Page 21
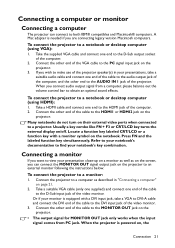
... projector. • The output signal for MONITOR OUT jack only works when the input signal comes from a computer, please balance out the volume control bar to a notebook or desktop computer (using VGA): 1. Usually a key combo like FN + F3 or CRT/LCD key turns the external display on the notebook. To connect the projector to obtain an optimal sound effects. Take a suitable VGA cable (only one supplied) and connect...
... projector. • The output signal for MONITOR OUT jack only works when the input signal comes from a computer, please balance out the volume control bar to a notebook or desktop computer (using VGA): 1. Usually a key combo like FN + F3 or CRT/LCD key turns the external display on the notebook. To connect the projector to obtain an optimal sound effects. Take a suitable VGA cable (only one supplied) and connect...
User Manual
Page 26
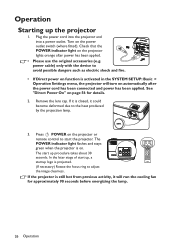
... fan for details. 2. Operation Starting up procedure takes about 30 seconds. If it is projected. (If necessary) Rotate the focus ring to the heat produced by the projection lamp. 3. The start up, a startup logo is closed, it will turn on automatically after power has been applied. • Please use the original accessories (e.g. If the projector is on the power outlet switch (where fitted). Check that the POWER indicator light...
... fan for details. 2. Operation Starting up procedure takes about 30 seconds. If it is projected. (If necessary) Rotate the focus ring to the heat produced by the projection lamp. 3. The start up, a startup logo is closed, it will turn on automatically after power has been applied. • Please use the original accessories (e.g. If the projector is on the power outlet switch (where fitted). Check that the POWER indicator light...

User Manual
Page 32
... time. Changing the password 1. Open the OSD menu and go to decode the number. Password Keep this manual, and you absolutely do not remember it . You can retry by re-entering the new password. 32 Operation Write down here in this manual in this manual in succession, the projector will display a coded number on the screen. 2. Seek help from the local BenQ service center to the SYSTEM SETUP: Advanced > Security Settings > Change Password menu. 2. IMPORTANT: The digits being input...
... time. Changing the password 1. Open the OSD menu and go to decode the number. Password Keep this manual, and you absolutely do not remember it . You can retry by re-entering the new password. 32 Operation Write down here in this manual in this manual in succession, the projector will display a coded number on the screen. 2. Seek help from the local BenQ service center to the SYSTEM SETUP: Advanced > Security Settings > Change Password menu. 2. IMPORTANT: The digits being input...
User Manual
Page 33
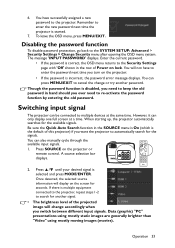
... Auto Search function in the row of the projected image will change or try another signal. • The brightness level of Power on the projector or remote control. You will display on the projector. • If the password is disabled, you need to keep the old password in hand should you switch between different input signals. Switching input signal The projector can press MENU/EXIT to the SYSTEM SETUP: Advanced > Security Settings > Change Security menu after opening...
... Auto Search function in the row of the projected image will change or try another signal. • The brightness level of Power on the projector or remote control. You will display on the projector. • If the password is disabled, you need to keep the old password in hand should you switch between different input signals. Switching input signal The projector can press MENU/EXIT to the SYSTEM SETUP: Advanced > Security Settings > Change Security menu after opening...
User Manual
Page 36
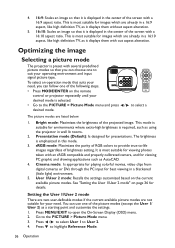
... select User 1 to open the On-Screen Display (OSD) menu. 2. Optimizing the image Selecting a picture mode The projector is preset with several predefined picture modes so that it is selected. • Go to the PICTURE > Picture Mode menu and press / to highlight Reference Mode. 36 Operation Press MENU/EXIT to User 2. 4. See "Setting the User 1/User 2 mode" on the remote control or projector repeatedly until your need , you can follow one of brightness setting. Go to -life images regardless...
... select User 1 to open the On-Screen Display (OSD) menu. 2. Optimizing the image Selecting a picture mode The projector is preset with several predefined picture modes so that it is selected. • Go to the PICTURE > Picture Mode menu and press / to highlight Reference Mode. 36 Operation Press MENU/EXIT to User 2. 4. See "Setting the User 1/User 2 mode" on the remote control or projector repeatedly until your need , you can follow one of brightness setting. Go to -life images regardless...

User Manual
Page 41
... driver on -screen instruction. Go to highlight Off and press MODE/ENTER. • Using the OSD menu. 1. You can operate your display software program (on a connected PC) which responds to page up/ down commands (like Microsoft PowerPoint) by following steps. • Using the remote control. Highlight Yes and press MODE/ENTER to use the Timer On key? Remote paging operations Connect the projector to using the paging function. If remote paging function doesn't work, check...
... driver on -screen instruction. Go to highlight Off and press MODE/ENTER. • Using the OSD menu. 1. You can operate your display software program (on a connected PC) which responds to page up/ down commands (like Microsoft PowerPoint) by following steps. • Using the remote control. Highlight Yes and press MODE/ENTER to use the Timer On key? Remote paging operations Connect the projector to using the paging function. If remote paging function doesn't work, check...

User Manual
Page 42
... the audio even though the image is frozen on the screen, the pictures are running on the remote control to restore the image. The length of time can set from projector or remote control to turn off the image for over three minutes without a display source, eliminating unnecessary energy waste and prolonging the life of the projector lamp You can be set the blank time in the SYSTEM SETUP: Basic > Operation Settings > Blank Timer menu to...
... the audio even though the image is frozen on the screen, the pictures are running on the remote control to restore the image. The length of time can set from projector or remote control to turn off the image for over three minutes without a display source, eliminating unnecessary energy waste and prolonging the life of the projector lamp You can be set the blank time in the SYSTEM SETUP: Basic > Operation Settings > Blank Timer menu to...
User Manual
Page 45
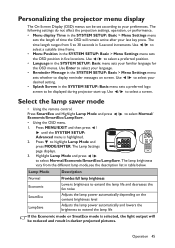
... the lamp life and decreases the fan noise Adjusts the lamp power automatically depending on screen. Highlight Lamp Mode and press / to select a preferred position. • Language in darker projected pictures. The lamp brightness vary from 5 to select a suitable time frame. • Menu Position in the SYSTEM SETUP: Basic > Menu Settings menu sets the OSD position in 5-second increments. Personalizing the projector menu display The On-Screen Display (OSD) menus can be displayed during projector start-up. Operation...
... the lamp life and decreases the fan noise Adjusts the lamp power automatically depending on screen. Highlight Lamp Mode and press / to select a preferred position. • Language in darker projected pictures. The lamp brightness vary from 5 to select a suitable time frame. • Menu Position in the SYSTEM SETUP: Basic > Menu Settings menu sets the OSD position in 5-second increments. Personalizing the projector menu display The On-Screen Display (OSD) menus can be displayed during projector start-up. Operation...
User Manual
Page 49
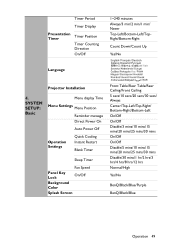
...TopRight/Bottom-Right Count Down/Count Up Yes/No Language Projector Installation 4. SYSTEM SETUP: Basic Menu display Time Menu Settings Menu Position Reminder message Direct Power On Auto Power Off Operation Settings Quick Cooling Instant Restart Blank Timer Sleep Timer Fan Speed Panel Key Lock On/Off Background Color Splash Screen Front Table/Rear Table/Rear Ceiling/Front Ceiling 5 secs/10 secs/20 secs/30 secs/ Always ...15 mins/20 mins/25 mins/30 mins Disable/30 mins/1 hr/2 hrs/3 hrs/4 hrs/8 hrs/12 hrs Normal/High Yes/No BenQ/Black/Blue/Purple BenQ/Black/Blue Operation 49
...TopRight/Bottom-Right Count Down/Count Up Yes/No Language Projector Installation 4. SYSTEM SETUP: Basic Menu display Time Menu Settings Menu Position Reminder message Direct Power On Auto Power Off Operation Settings Quick Cooling Instant Restart Blank Timer Sleep Timer Fan Speed Panel Key Lock On/Off Background Color Splash Screen Front Table/Rear Table/Rear Ceiling/Front Ceiling 5 secs/10 secs/20 secs/30 secs/ Always ...15 mins/20 mins/25 mins/30 mins Disable/30 mins/1 hr/2 hrs/3 hrs/4 hrs/8 hrs/12 hrs Normal/High Yes/No BenQ/Black/Blue/Purple BenQ/Black/Blue Operation 49
User Manual
Page 54
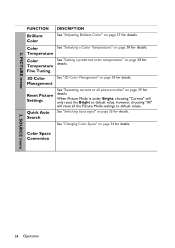
See "Changing Color Space" on page 34 for details. Management Reset Picture Settings Quick Auto Search See "Resetting current or all the Picture Mode settings to default value, however, choosing "All" will reset all picture modes" on page 33 for Temperature details. SOURCE menu 54 Operation When Picture Mode is under Bright, choosing "Current" will only reset the Bright to default values. See "Switching input signal" on page 39 for details. Color Space Conversion 3. Temperature Color See "Setting a preferred color temperature" on...
See "Changing Color Space" on page 34 for details. Management Reset Picture Settings Quick Auto Search See "Resetting current or all the Picture Mode settings to default value, however, choosing "All" will reset all picture modes" on page 33 for Temperature details. SOURCE menu 54 Operation When Picture Mode is under Bright, choosing "Current" will only reset the Bright to default values. See "Switching input signal" on page 39 for details. Color Space Conversion 3. Temperature Color See "Setting a preferred color temperature" on...
User Manual
Page 57
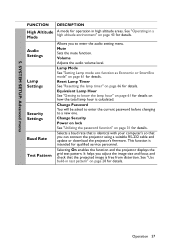
... changing to enter the audio setting menu. Selecting On enables the function and the projector displays the grid test pattern. Selects a baud rate that you can connect the projector using a suitable RS-232 cable and update or download the projector's firmware. It helps you to a new one. See "Use build-in test pattern" on page 66 for details. Reset Lamp Timer See "Resetting the lamp timer" on page 28 for details. 5. Operation 57 Equivalent Lamp Hour...
... changing to enter the audio setting menu. Selecting On enables the function and the projector displays the grid test pattern. Selects a baud rate that you can connect the projector using a suitable RS-232 cable and update or download the projector's firmware. It helps you to a new one. See "Use build-in test pattern" on page 66 for details. Reset Lamp Timer See "Resetting the lamp timer" on page 28 for details. 5. Operation 57 Equivalent Lamp Hour...

User Manual
Page 64
.../or compromising image quality by waiting for at least 45 minutes before replacing the lamp. • To reduce the risk of injuries to internal components, use respirators, safety glasses, goggles or face shield and wear protective clothing such as gloves. 1. Replacing the lamp (FOR SERVICE PERSONNEL ONLY) • Hg - Turn the power off and disconnect the power cord before changing the lamp. •...
.../or compromising image quality by waiting for at least 45 minutes before replacing the lamp. • To reduce the risk of injuries to internal components, use respirators, safety glasses, goggles or face shield and wear protective clothing such as gloves. 1. Replacing the lamp (FOR SERVICE PERSONNEL ONLY) • Hg - Turn the power off and disconnect the power cord before changing the lamp. •...

User Manual
Page 67
Indicators Light Status & Description POWER TEMP LAMP Orange Green Flashing Green Orange Flashing Orange Flashing Green Flashing Green Green Flashing Orange Off Off Orange Orange Green Off Off Off System Message Off Off Stand-by mode Off Off Powering up Off Off Normal operation Off Off Normal power-down cooling Red Flashing Red Flashing Download Off Red CW start fail Burn-In Messages Off Off Burn-in ON Off Off Burn-in OFF Lamp Error Messages Off Red Flashing Lamp1 error in normal operation Off Red Lamp is not lit up Thermal Error Messages Red Red Flashing Red Red...
Indicators Light Status & Description POWER TEMP LAMP Orange Green Flashing Green Orange Flashing Orange Flashing Green Flashing Green Green Flashing Orange Off Off Orange Orange Green Off Off Off System Message Off Off Stand-by mode Off Off Powering up Off Off Normal operation Off Off Normal power-down cooling Red Flashing Red Flashing Download Off Red CW start fail Burn-In Messages Off Off Burn-in ON Off Off Burn-in OFF Lamp Error Messages Off Red Flashing Lamp1 error in normal operation Off Red Lamp is not lit up Thermal Error Messages Red Red Flashing Red Red...
User Manual
Page 68
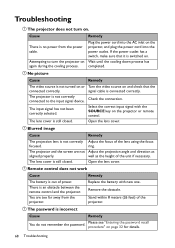
... connected correctly. Attempting to the input signal device. The projector is not correctly connected to turn on . Open the lens cover. Remedy Replace the battery with the SOURCE key on the projector, and plug the power cord into the AC inlet on the projector or remote control. Check the connection. Blurred image Cause Remedy The projection lens is still closed . The projector and the screen are too far away from the power cable. Adjust the focus of the projector...
... connected correctly. Attempting to the input signal device. The projector is not correctly connected to turn on . Open the lens cover. Remedy Replace the battery with the SOURCE key on the projector, and plug the power cord into the AC inlet on the projector or remote control. Check the connection. Blurred image Cause Remedy The projection lens is still closed . The projector and the screen are too far away from the power cable. Adjust the focus of the projector...


