MW632ST Data Sheet
Page 1
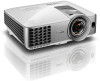
Eco 220W. Standby MW632ST DIGITAL PROJECTOR Features Native WXGA (1280x800) Resolution 3,200 ANSI Lumens, 13,000:1 Contrast Ratio 0.9 Short Throw Lens Design Up to 10,000 Hours Long Lamp Life HDMI x 2, ...
Eco 220W. Standby MW632ST DIGITAL PROJECTOR Features Native WXGA (1280x800) Resolution 3,200 ANSI Lumens, 13,000:1 Contrast Ratio 0.9 Short Throw Lens Design Up to 10,000 Hours Long Lamp Life HDMI x 2, ...
MW632ST Data Sheet
Page 2
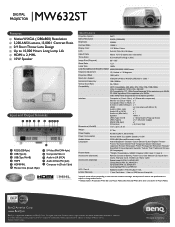
Distance Chart MW632ST Digital Projector Screen Size Diagonal W Inch mm (inch) 40 1016 34 60 1524 50 80 2032 68 100 2540 85 120 3048 101 140 3556 118 160 ...
Distance Chart MW632ST Digital Projector Screen Size Diagonal W Inch mm (inch) 40 1016 34 60 1524 50 80 2032 68 100 2540 85 120 3048 101 140 3556 118 160 ...
MW632ST Quick Start Guide
Page 6
... the exact mounting position so that if you intend to make allowance for this projector's optical characteristics. BenQ recommends that it , so as to permanently install the projector, you should physically test the projection size and distance using the actual projector in a 4:3 aspect ratio Screen size Diagonal Inch mm W (mm) 40 1016 813 50...
... the exact mounting position so that if you intend to make allowance for this projector's optical characteristics. BenQ recommends that it , so as to permanently install the projector, you should physically test the projection size and distance using the actual projector in a 4:3 aspect ratio Screen size Diagonal Inch mm W (mm) 40 1016 813 50...
MW632ST Quick Start Guide
Page 7
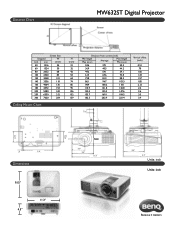
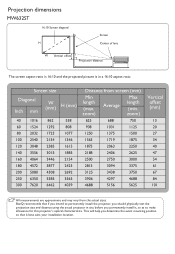
... are approximate and may vary from screen (mm) Min length (max. BenQ recommends that it , so as to permanently install the projector, you should physically test the projection size and distance using the actual projector in a 16:10 aspect ratio Screen size Diagonal Inch mm W (mm...min. This will help you determine the exact mounting position so that if you intend to make allowance for this projector's optical characteristics. Projection dimensions MW632ST 16:10 Screen diagonal H Screen Center of lens W Vertical offset Projection distance The screen aspect ratio is 16:...
... are approximate and may vary from screen (mm) Min length (max. BenQ recommends that it , so as to permanently install the projector, you should physically test the projection size and distance using the actual projector in a 16:10 aspect ratio Screen size Diagonal Inch mm W (mm...min. This will help you determine the exact mounting position so that if you intend to make allowance for this projector's optical characteristics. Projection dimensions MW632ST 16:10 Screen diagonal H Screen Center of lens W Vertical offset Projection distance The screen aspect ratio is 16:...
MW632ST User Manual
Page 1
MS630ST/MX631ST/MW632ST Digital Projector User Manual
MS630ST/MX631ST/MW632ST Digital Projector User Manual
MW632ST User Manual
Page 2
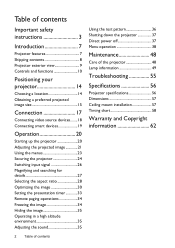
...17 Connecting video source devices........18 Connecting smart devices 19 Operation 20 Starting up the projector 20 Adjusting the projected image 21 Using the menus 23 Securing the projector 24 Switching input signal 26 Magnifying and searching for details 27 Selecting the aspect ...Table of contents Using the test pattern 36 Shutting down the projector 37 Direct power off 37 Menu operation 38 Maintenance 48 Care of the projector 48 Lamp information 49 Troubleshooting 55 Specifications 56 Projector specifications 56 Dimensions 57 Ceiling mount installation 57 Timing chart ...
...17 Connecting video source devices........18 Connecting smart devices 19 Operation 20 Starting up the projector 20 Adjusting the projected image 21 Using the menus 23 Securing the projector 24 Switching input signal 26 Magnifying and searching for details 27 Selecting the aspect ...Table of contents Using the test pattern 36 Shutting down the projector 37 Direct power off 37 Menu operation 38 Maintenance 48 Care of the projector 48 Lamp information 49 Troubleshooting 55 Specifications 56 Projector specifications 56 Dimensions 57 Ceiling mount installation 57 Timing chart ...
MW632ST User Manual
Page 3
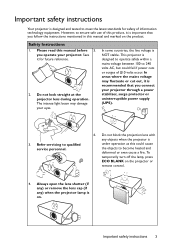
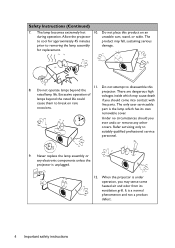
...the instructions mentioned in this manual before 5. Do not block the projection lens with any ) when the projector lamp is on. Important safety instructions 3 you connect your projector through a power stabilizer, surge protector or uninterruptible power supply (UPS). 3. The intense light beam may...deformed or even cause a fire. To temporarily turn off the lamp, press ECO BLANK on the product. Important safety instructions Your projector is designed and tested to meet the latest standards for future reference. 2. However, to qualified service personnel. 6. Refer servicing ...
...the instructions mentioned in this manual before 5. Do not block the projection lens with any ) when the projector lamp is on. Important safety instructions 3 you connect your projector through a power stabilizer, surge protector or uninterruptible power supply (UPS). 3. The intense light beam may...deformed or even cause a fire. To temporarily turn off the lamp, press ECO BLANK on the product. Important safety instructions Your projector is designed and tested to meet the latest standards for future reference. 2. However, to qualified service personnel. 6. Refer servicing ...
MW632ST User Manual
Page 4
... or table. Do not operate lamps beyond the rated life could if you ever undo or remove any electronic components unless the projector is a normal phenomenon and not a product defect. 4 Important safety instructions There are dangerous high rated lamp life. The only ...damage. Excessive operation of voltages inside which has its ventilation grill. for approximately 45 minutes product may cause death lamps beyond the projector. Under no circumstances should you should come into contact with cause them to suitably qualified professional service personnel. 9. It is ...
... or table. Do not operate lamps beyond the rated life could if you ever undo or remove any electronic components unless the projector is a normal phenomenon and not a product defect. 4 Important safety instructions There are dangerous high rated lamp life. The only ...damage. Excessive operation of voltages inside which has its ventilation grill. for approximately 45 minutes product may cause death lamps beyond the projector. Under no circumstances should you should come into contact with cause them to suitably qualified professional service personnel. 9. It is ...
MW632ST User Manual
Page 5
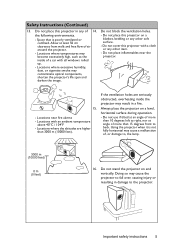
...to , the lamp. 3000 m (10000 feet) 0 m (0 feet) 16. Do not cover this projector on a blanket, bedding or any of air around the projector. - Using the projector when it is poorly ventilated or confined. the following environments. - Locations where excessive humidity, dust, or ...a cloth or any other soft surface. - Locations where temperatures may become excessively high, such as the inside the projector may contaminate optical components, shorten the projector's life span and darken the image. Do not block the ventilation holes. - Locations with an ambient temperature above...
...to , the lamp. 3000 m (10000 feet) 0 m (0 feet) 16. Do not cover this projector on a blanket, bedding or any of air around the projector. - Using the projector when it is poorly ventilated or confined. the following environments. - Locations where excessive humidity, dust, or ...a cloth or any other soft surface. - Locations where temperatures may become excessively high, such as the inside the projector may contaminate optical components, shorten the projector's life span and darken the image. Do not block the ventilation holes. - Locations with an ambient temperature above...
MW632ST User Manual
Page 6
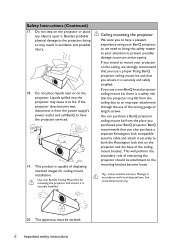
... we need to bring this safety matter to your attention to prevent possible damage to fail. If the projector does become loose. You can purchase a BenQ projector ceiling mount kit from the place you intend to the mounting bracket become wet, disconnect it . Lamp ...Important safety instructions If you to both the Kensington lock slot on the projector. Ceiling mounting the projector We want you use a non-BenQ brand projector ceiling mount kit, there is securely and safely installed. BenQ recommends that you also purchase a separate Kensington lock compatible security cable and ...
... we need to bring this safety matter to your attention to prevent possible damage to fail. If the projector does become loose. You can purchase a BenQ projector ceiling mount kit from the place you intend to the mounting bracket become wet, disconnect it . Lamp ...Important safety instructions If you to both the Kensington lock slot on the projector. Ceiling mounting the projector We want you use a non-BenQ brand projector ceiling mount kit, there is securely and safely installed. BenQ recommends that you also purchase a separate Kensington lock compatible security cable and ...
MW632ST User Manual
Page 7
Auto Power Off function allows the projector to turn off the projector. Introduction 7 By presenting the depth of the images, you can wear BenQ 3D glasses to enjoy the 3D movies, videos and sporting events in 10W speaker(s) providing mixed mono audio when an audio input is connected •...; Quick Cooling, Auto Power Off, Direct Power On Quick Cooling function speeds up the projector automatically when the power is ...
Auto Power Off function allows the projector to turn off the projector. Introduction 7 By presenting the depth of the images, you can wear BenQ 3D glasses to enjoy the 3D movies, videos and sporting events in 10W speaker(s) providing mixed mono audio when an audio input is connected •...; Quick Cooling, Auto Power Off, Direct Power On Quick Cooling function speeds up the projector automatically when the power is ...
MW632ST User Manual
Page 8
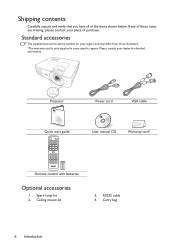
... suitable for your dealer for detailed information. Spare lamp kit 2. Ceiling mount kit 3. Shipping contents Carefully unpack and verify that you have all of purchase. Projector QDuigiictkalSPtraortjeGctuoidr e Quick start guide Power cord VGA cable User manual CD Warranty card* Remote control with batteries Optional accessories 1. Please consult your region, and may...
... suitable for your dealer for detailed information. Spare lamp kit 2. Ceiling mount kit 3. Shipping contents Carefully unpack and verify that you have all of purchase. Projector QDuigiictkalSPtraortjeGctuoidr e Quick start guide Power cord VGA cable User manual CD Warranty card* Remote control with batteries Optional accessories 1. Please consult your region, and may...
MW632ST User Manual
Page 9
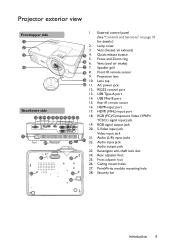
Projector exterior view Front/upper side 1 2 3 4 Rear/lower side 12 13 14 15 16 17 18 19 20 21 22 11 25 24 27 26 26 ...
Projector exterior view Front/upper side 1 2 3 4 Rear/lower side 12 13 14 15 16 17 18 19 20 21 22 11 25 24 27 26 26 ...
MW632ST User Manual
Page 10
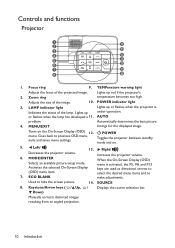
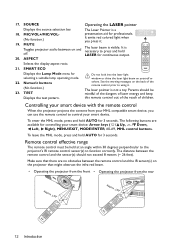
...) Manually corrects distorted images resulting from an angled projection. 10 Introduction Controls and functions Projector 1 2 3 9 10 4 11 5 6 8 12 7 13 8 14 1. Adjusts the size of the projected image. Increases the projector volume. 6. When the On-Screen Display (OSD) menu is Indicates the status of...light Adjusts the focus of the image. 10. Left/ 13. Focus ring 9. LAMP indicator light Lights up or flashes when the projector is activated, the #5, #8, and #13 Activates the selected On-Screen Display keys are used as directional arrows to hide the screen ...
...) Manually corrects distorted images resulting from an angled projection. 10 Introduction Controls and functions Projector 1 2 3 9 10 4 11 5 6 8 12 7 13 8 14 1. Adjusts the size of the projected image. Increases the projector volume. 6. When the On-Screen Display (OSD) menu is Indicates the status of...light Adjusts the focus of the image. 10. Left/ 13. Focus ring 9. LAMP indicator light Lights up or flashes when the projector is activated, the #5, #8, and #13 Activates the selected On-Screen Display keys are used as directional arrows to hide the screen ...
MW632ST User Manual
Page 11
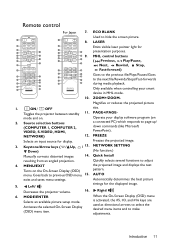
...displays the test Turns on . MODE/ENTER Selects an available picture setup mode. ECO BLANK Used to adjust 4. ZOOM+/ZOOM- Toggles the projector between standby 11. mode and on the On-Screen Display (OSD) pattern. Freezes the projected image. 3. Automatically determines the best picture... to hide the screen picture. 1 1 8. menu. Keystone/Arrow keys ( / Up, / 13. AUTO exits and saves menu settings. Decreases the projector volume. 16. Activates the selected On-Screen Display (OSD) menu item. When the On-Screen Display (OSD) menu is activated, the #5, #3, and...
...displays the test Turns on . MODE/ENTER Selects an available picture setup mode. ECO BLANK Used to adjust 4. ZOOM+/ZOOM- Toggles the projector between standby 11. mode and on the On-Screen Display (OSD) pattern. Freezes the projected image. 3. Automatically determines the best picture... to hide the screen picture. 1 1 8. menu. Keystone/Arrow keys ( / Up, / 13. AUTO exits and saves menu settings. Decreases the projector volume. 16. Activates the selected On-Screen Display (OSD) menu item. When the On-Screen Display (OSD) menu is activated, the #5, #3, and...
MW632ST User Manual
Page 12
...and the IR sensor(s) on yourself or others. Make sure that might obstruct the infra-red beam. • Operating the projector from the front • Operating the projector from your smart device. The Laser Pointer is visible. It is not a toy. It emits red colored light when ...compatible smart device, you press it . ASPECT Selects the display aspect ratio. 21. Controlling your smart device with the remote control When the projector projects the content from the rear Approx. +30º Approx. +30º 12 Introduction Do not look into the laser light window ...
...and the IR sensor(s) on yourself or others. Make sure that might obstruct the infra-red beam. • Operating the projector from the front • Operating the projector from your smart device. The Laser Pointer is visible. It is not a toy. It emits red colored light when ...compatible smart device, you press it . ASPECT Selects the display aspect ratio. 21. Controlling your smart device with the remote control When the projector projects the content from the rear Approx. +30º Approx. +30º 12 Introduction Do not look into the laser light window ...
MW632ST User Manual
Page 14
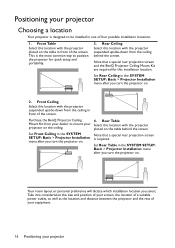
... the ceiling. Note that a special rear projection screen and the BenQ Projector Ceiling Mount Kit are required for quick setup and portability. 3. Purchase the BenQ Projector Ceiling Mount Kit from the ceiling in the SYSTEM SETUP: Basic > Projector Installation menu after you turn the projector on. 4. Set Front Ceiling in front of the screen. Take into...
... the ceiling. Note that a special rear projection screen and the BenQ Projector Ceiling Mount Kit are required for quick setup and portability. 3. Purchase the BenQ Projector Ceiling Mount Kit from the ceiling in the SYSTEM SETUP: Basic > Projector Installation menu after you turn the projector on. 4. Set Front Ceiling in front of the screen. Take into...
MW632ST User Manual
Page 15
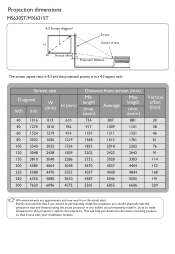
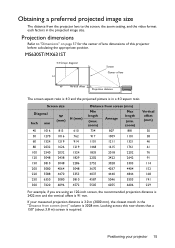
...Screen Center of this row shows that a 150'' (about 3.8 m) screen is 91 mm. zoom) Average Max length (min. If your projector 15 Looking across this projector before calculating the appropriate position. Projection dimensions Refer to the screen, the zoom setting, and the video format each factors in a 4:3 aspect ...4064 220 5588 4470 250 6350 5080 300 7620 6096 610 762 914 1219 1524 1829 2286 3048 3353 3810 4572 Distance from the projector lens to "Dimensions" on page 57 for the center of lens dimensions of lens W Vertical offset Projection distance The screen aspect ...
...Screen Center of this row shows that a 150'' (about 3.8 m) screen is 91 mm. zoom) Average Max length (min. If your projector 15 Looking across this projector before calculating the appropriate position. Projection dimensions Refer to the screen, the zoom setting, and the video format each factors in a 4:3 aspect ...4064 220 5588 4470 250 6350 5080 300 7620 6096 610 762 914 1219 1524 1829 2286 3048 3353 3810 4572 Distance from the projector lens to "Dimensions" on page 57 for the center of lens dimensions of lens W Vertical offset Projection distance The screen aspect ...
MW632ST User Manual
Page 16
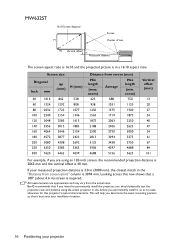
...it best suits your installation location. 16 Positioning your projector Looking across this row shows that it , so as to permanently install the projector, you intend to make allowance for this projector's optical characteristics. BenQ recommends that if you should physically test the projection ...size and distance using an 120-inch screen, the recommended projection distance is 2063 mm and the vertical offset is 40 mm. MW632ST 16...
...it best suits your installation location. 16 Positioning your projector Looking across this row shows that it , so as to permanently install the projector, you intend to make allowance for this projector's optical characteristics. BenQ recommends that if you should physically test the projection ...size and distance using an 120-inch screen, the recommended projection distance is 2063 mm and the vertical offset is 40 mm. MW632ST 16...
MW632ST User Manual
Page 17
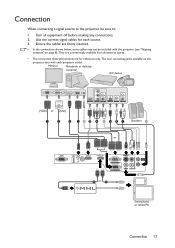
... to: 1. Use the correct signal cables for reference only. Connection When connecting a signal source to the projector, be included with the projector (see "Shipping contents" on the projector vary with each source. 3. Ensure the cables are for each projector model. Monitor Notebook or desktop computer A/V device (VGA) or (DVI) 1 2 3 1 8 10 4 8 5 6 7 Speakers 8 or 9 or 10...
... to: 1. Use the correct signal cables for reference only. Connection When connecting a signal source to the projector, be included with the projector (see "Shipping contents" on the projector vary with each source. 3. Ensure the cables are for each projector model. Monitor Notebook or desktop computer A/V device (VGA) or (DVI) 1 2 3 1 8 10 4 8 5 6 7 Speakers 8 or 9 or 10...


