MW665 and MX666 User Manual
Page 1
MX666/MW665 Digital Projector User Manual
MX666/MW665 Digital Projector User Manual
MW665 and MX666 User Manual
Page 2
...Connecting video source devices........20 Connecting smart devices (MX666)...21 Operation 22 Starting up the projector 22 Adjusting the projected image 23 Using the menus 25 Securing the projector 26 Switching input signal 28 Magnifying and searching for details ...29 Selecting the aspect ... 39 Presenting from a USB Reader 40 Shutting down the projector 41 Direct power off 41 Menu operation 42 Maintenance 53 Care of the projector 53 Lamp information 54 Troubleshooting 60 Specifications 61 Projector specifications 61 Dimensions 62 Ceiling mount installation 62 Timing chart ...
...Connecting video source devices........20 Connecting smart devices (MX666)...21 Operation 22 Starting up the projector 22 Adjusting the projected image 23 Using the menus 25 Securing the projector 26 Switching input signal 28 Magnifying and searching for details ...29 Selecting the aspect ... 39 Presenting from a USB Reader 40 Shutting down the projector 41 Direct power off 41 Menu operation 42 Maintenance 53 Care of the projector 53 Lamp information 54 Troubleshooting 60 Specifications 61 Projector specifications 61 Dimensions 62 Ceiling mount installation 62 Timing chart ...
MW665 and MX666 User Manual
Page 3
...marked on the product. The intense light beam may fluctuate or cut out, it is important that you operate your projector. In areas where the mains voltage may damage your projector through a power stabilizer, surge protector or uninterruptible power supply (UPS). 3. To temporarily turn off the lamp, press...instructions mentioned in this product, it for safety of ±10 volts occur. Do not block the projection lens with any ) when the projector lamp is designed to operate safely within a mains voltage between 100 to 240 volts AC, but could cause the objects to become heated ...
...marked on the product. The intense light beam may fluctuate or cut out, it is important that you operate your projector. In areas where the mains voltage may damage your projector through a power stabilizer, surge protector or uninterruptible power supply (UPS). 3. To temporarily turn off the lamp, press...instructions mentioned in this product, it for safety of ±10 volts occur. Do not block the projection lens with any ) when the projector lamp is designed to operate safely within a mains voltage between 100 to 240 volts AC, but could cause the objects to become heated ...
MW665 and MX666 User Manual
Page 4
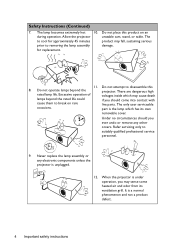
... hot 10. Do not operate lamps beyond the rated life could if you ever undo or remove any electronic components unless the projector is a normal phenomenon and not a product defect. 4 Important safety instructions Never replace the lamp assembly or any other covers....circumstances should you should come into contact with cause them to suitably qualified professional service personnel. 9. Safety Instructions (Continued) 7. Allow the projector unstable cart, stand, or table. Do not attempt to removing the lamp assembly damage. Refer servicing only to break on an during...
... hot 10. Do not operate lamps beyond the rated life could if you ever undo or remove any electronic components unless the projector is a normal phenomenon and not a product defect. 4 Important safety instructions Never replace the lamp assembly or any other covers....circumstances should you should come into contact with cause them to suitably qualified professional service personnel. 9. Safety Instructions (Continued) 7. Allow the projector unstable cart, stand, or table. Do not attempt to removing the lamp assembly damage. Refer servicing only to break on an during...
MW665 and MX666 User Manual
Page 5
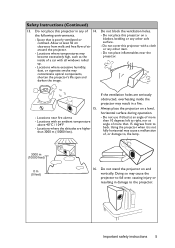
... not place inflammables near fire alarms - Locations with a cloth or any of 14. If the ventilation holes are higher than 15 degrees front to the projector. Do not use if tilted at an angle of more than 10 degrees left to , the lamp. 3000 m (10000 feet) 0 m (0 feet... from walls and free flow of a car with all windows rolled up. - Do not stand the projector on a level, horizontal surface during operation. - Doing so may contaminate optical components, shorten the projector's life span and darken the image. Locations where temperatures may cause a malfunction of more than 3000 ...
... not place inflammables near fire alarms - Locations with a cloth or any of 14. If the ventilation holes are higher than 15 degrees front to the projector. Do not use if tilted at an angle of more than 10 degrees left to , the lamp. 3000 m (10000 feet) 0 m (0 feet... from walls and free flow of a car with all windows rolled up. - Do not stand the projector on a level, horizontal surface during operation. - Doing so may contaminate optical components, shorten the projector's life span and darken the image. Locations where temperatures may cause a malfunction of more than 3000 ...
MW665 and MX666 User Manual
Page 6
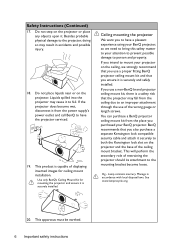
...for ceiling mount installation. Hg - Besides probable physical damage to the projector, doing so may fall from the power supply's power outlet and call BenQ to an improper attachment through the use a proper fitting BenQ projector ceiling mount kit and that you also purchase a separate Kensington lock ...wet, disconnect it is capable of the ceiling mount bracket. If you use a non-BenQ brand projector ceiling mount kit, there is securely and safely installed. If you intend to your BenQ projector. Do not place liquids near or on the ceiling, we need to bring this safety...
...for ceiling mount installation. Hg - Besides probable physical damage to the projector, doing so may fall from the power supply's power outlet and call BenQ to an improper attachment through the use a proper fitting BenQ projector ceiling mount kit and that you also purchase a separate Kensington lock ...wet, disconnect it is capable of the ceiling mount bracket. If you use a non-BenQ brand projector ceiling mount kit, there is securely and safely installed. If you intend to your BenQ projector. Do not place liquids near or on the ceiling, we need to bring this safety...
MW665 and MX666 User Manual
Page 7
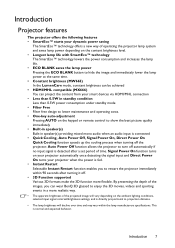
... Power Off, Signal Power On, Direct Power On Quick Cooling function speeds up the cooling process when turning off the projector. Introduction 7 Introduction Projector features The projector offers the following features • SmartEco™ starts your dynamic power saving The SmartEco™ technology offers a new way... immediately lower the lamp power at the same time. • Constant brightness (MW665) In the LumenCare mode, constant brightness can be achieved • HDMI/MHL compatible (MX666) You can wear BenQ 3D glassed to enjoy the 3D movies, videos and sporting events in a more...
... Power Off, Signal Power On, Direct Power On Quick Cooling function speeds up the cooling process when turning off the projector. Introduction 7 Introduction Projector features The projector offers the following features • SmartEco™ starts your dynamic power saving The SmartEco™ technology offers a new way... immediately lower the lamp power at the same time. • Constant brightness (MW665) In the LumenCare mode, constant brightness can be achieved • HDMI/MHL compatible (MX666) You can wear BenQ 3D glassed to enjoy the 3D movies, videos and sporting events in a more...
MW665 and MX666 User Manual
Page 8
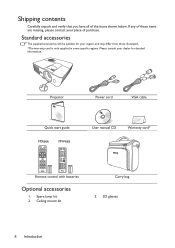
Projector QDuigiictkalSPtraortjeGctuoidr e Quick start guide MX666 MW665 Power cord VGA cable User manual CD Warranty card* Remote control with batteries Optional accessories 1. Standard accessories The supplied accessories will be suitable for detailed ...
Projector QDuigiictkalSPtraortjeGctuoidr e Quick start guide MX666 MW665 Power cord VGA cable User manual CD Warranty card* Remote control with batteries Optional accessories 1. Standard accessories The supplied accessories will be suitable for detailed ...
MW665 and MX666 User Manual
Page 9
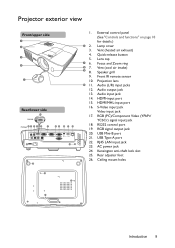
... 15. External control panel (See "Controls and functions" on page 10 for details.) 6 2. Quick-release button 5. USB Mini-B port 21. Projector exterior view Front/upper side 1 2 3 4 5 Rear/lower side 15 MX666 MW665 11 12 13 14 16 17 18 19 20 21 22 23 24 25 26 26 1. RGB signal output jack...
... 15. External control panel (See "Controls and functions" on page 10 for details.) 6 2. Quick-release button 5. USB Mini-B port 21. Projector exterior view Front/upper side 1 2 3 4 5 Rear/lower side 15 MX666 MW665 11 12 13 14 16 17 18 19 20 21 22 23 24 25 26 26 1. RGB signal output jack...
MW665 and MX666 User Manual
Page 10
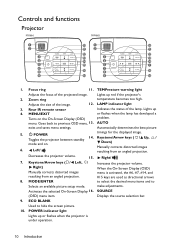
.... 15. Right/ 7. Adjusts the size of the lamp. Rear IR remote sensor Indicates the status of the image. 12. Controls and functions Projector MX666 MW665 1 10 1 10 2 11 2 11 12 12 3 13 3 13 4 14 4 14 5 15 5 7 6 8 16 7 8 16 9 14 9 14 1. MENU/EXIT or flashes when the lamp has developed a Turns ...
.... 15. Right/ 7. Adjusts the size of the lamp. Rear IR remote sensor Indicates the status of the image. 12. Controls and functions Projector MX666 MW665 1 10 1 10 2 11 2 11 12 12 3 13 3 13 4 14 4 14 5 15 5 7 6 8 16 7 8 16 9 14 9 14 1. MENU/EXIT or flashes when the lamp has developed a Turns ...

MW665 and MX666 User Manual
Page 11
... laser pointer light for display. ZOOM+/ZOOM- LASER 2. Only available when controlling your smart device in MHL mode. ON/ OFF Toggles the projector between standby mode and on the On-Screen Display (OSD) menu. MHL control buttons NETWORK) ( Previous, Play/Pause, Selects an input... source for presentation purposes. Left/ Decreases the projector volume. 6. Activates the selected On-Screen Display (OSD) menu item. VIDEO, S-VIDEO, HDMI, 9. Goes back to the previous file/Plays/...
... laser pointer light for display. ZOOM+/ZOOM- LASER 2. Only available when controlling your smart device in MHL mode. ON/ OFF Toggles the projector between standby mode and on the On-Screen Display (OSD) menu. MHL control buttons NETWORK) ( Previous, Play/Pause, Selects an input... source for presentation purposes. Left/ Decreases the projector volume. 6. Activates the selected On-Screen Display (OSD) menu item. VIDEO, S-VIDEO, HDMI, 9. Goes back to the previous file/Plays/...
MW665 and MX666 User Manual
Page 12
...20. See the warning messages on the back of children. (No function.) Controlling your smart device with the remote control (MX666) When the projector projects the content from your smart device: Arrow keys ( / Up, / Down, Left, Right), MENU/EXIT, MODE/ENTER, #0-#9, MHL control buttons. Increases ...the projector volume. MIC/VOL+/MIC/VOL- MUTE Operate your smart device. Numeric buttons menu. NETWORK SETTING Displays the Lamp Mode menu for controlling your MHL ...
...20. See the warning messages on the back of children. (No function.) Controlling your smart device with the remote control (MX666) When the projector projects the content from your smart device: Arrow keys ( / Up, / Down, Left, Right), MENU/EXIT, MODE/ENTER, #0-#9, MHL control buttons. Increases ...the projector volume. MIC/VOL+/MIC/VOL- MUTE Operate your smart device. Numeric buttons menu. NETWORK SETTING Displays the Lamp Mode menu for controlling your MHL ...
MW665 and MX666 User Manual
Page 13
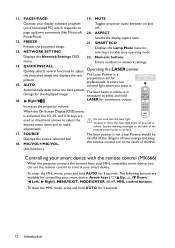
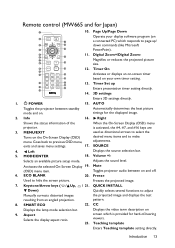
...MENU/EXIT used as directional arrows to adjust Manually corrects distorted images resulting from an angled projection. Volume +/- POWER 15. AUTO Toggles the projector between on the On-Screen Display (OSD) menu. Info 16. Mute (OSD) menu item. Freezes the projected image. 7. Keystone/... picture 8 18 size. 9 18 12. SOURCE 4. ECO BLANK 20. Teaching template Enters Teaching template setting directly. Remote control (MW665 and for the displayed image. 2. Freeze Used to make adjustments. the projected image and displays the test pattern. 8. SMART ECO ...
...MENU/EXIT used as directional arrows to adjust Manually corrects distorted images resulting from an angled projection. Volume +/- POWER 15. AUTO Toggles the projector between on the On-Screen Display (OSD) menu. Info 16. Mute (OSD) menu item. Freezes the projected image. 7. Keystone/... picture 8 18 size. 9 18 12. SOURCE 4. ECO BLANK 20. Teaching template Enters Teaching template setting directly. Remote control (MW665 and for the displayed image. 2. Freeze Used to make adjustments. the projected image and displays the test pattern. 8. SMART ECO ...
MW665 and MX666 User Manual
Page 14
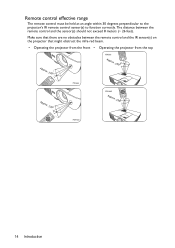
Remote control effective range The remote control must be held at an angle within 30 degrees perpendicular to the projector's IR remote control sensor(s) to function correctly. Make sure that there are no obstacles between the remote control and the sensor(s) should not exceed 8... meters (~ 26 feet). The distance between the remote control and the IR sensor(s) on the projector that might obstruct the infra-red beam. • Operating the projector from the front • Operating the projector from the top Approx. +30º MX666 Approx. +30º Approx. +30º MX666...
Remote control effective range The remote control must be held at an angle within 30 degrees perpendicular to the projector's IR remote control sensor(s) to function correctly. Make sure that there are no obstacles between the remote control and the sensor(s) should not exceed 8... meters (~ 26 feet). The distance between the remote control and the IR sensor(s) on the projector that might obstruct the infra-red beam. • Operating the projector from the front • Operating the projector from the top Approx. +30º MX666 Approx. +30º Approx. +30º MX666...
MW665 and MX666 User Manual
Page 16
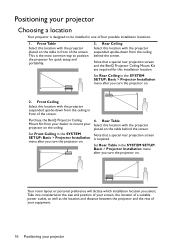
... that a special rear projection screen and the BenQ Projector Ceiling Mount Kit are required for quick setup and portability. 3. This is the most common way to mount your dealer to position the projector for this location with the projector placed on . Set Rear Ceiling in one ...of the screen. Purchase the BenQ Projector Ceiling Mount Kit from your projector on . 4. Set Front Ceiling in front of four possible installation ...
... that a special rear projection screen and the BenQ Projector Ceiling Mount Kit are required for quick setup and portability. 3. This is the most common way to mount your dealer to position the projector for this location with the projector placed on . Set Rear Ceiling in one ...of the screen. Purchase the BenQ Projector Ceiling Mount Kit from your projector on . 4. Set Front Ceiling in front of four possible installation ...
MW665 and MX666 User Manual
Page 17
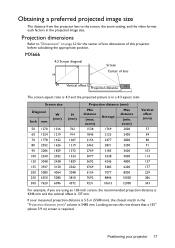
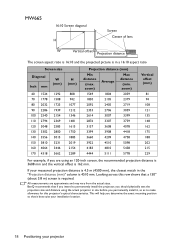
... you are using an 120-inch screen, the recommended projection distance is 4246 mm and the vertical offset is 137 mm. If your projector 17 zoom) Average Max distance (min. Positioning your measured projection distance is 5.5 m (5500 mm), the closest match in the "...Center of this row shows that a 155'' (about 3.9 m) screen is required. Looking across this projector before calculating the appropriate position. Obtaining a preferred projected image size The distance from the projector lens to "Dimensions" on page 62 for the center of lens dimensions of lens W Vertical offset...
... you are using an 120-inch screen, the recommended projection distance is 4246 mm and the vertical offset is 137 mm. If your projector 17 zoom) Average Max distance (min. Positioning your measured projection distance is 5.5 m (5500 mm), the closest match in the "...Center of this row shows that a 155'' (about 3.9 m) screen is required. Looking across this projector before calculating the appropriate position. Obtaining a preferred projected image size The distance from the projector lens to "Dimensions" on page 62 for the center of lens dimensions of lens W Vertical offset...
MW665 and MX666 User Manual
Page 18
... 229 For example, if you are approximate and may vary from the actual sizes. BenQ recommends that if you intend to make allowance for this row shows that it , so as to permanently install the projector, you should physically test the projection size and distance using an 120-inch screen,... the recommended projection distance is 3608 mm and the vertical offset is 162 mm. MW665 16:10 Screen diagonal H Screen Center of lens W Vertical ...
... 229 For example, if you are approximate and may vary from the actual sizes. BenQ recommends that if you intend to make allowance for this row shows that it , so as to permanently install the projector, you should physically test the projection size and distance using an 120-inch screen,... the recommended projection distance is 3608 mm and the vertical offset is 162 mm. MW665 16:10 Screen diagonal H Screen Center of lens W Vertical ...
MW665 and MX666 User Manual
Page 19
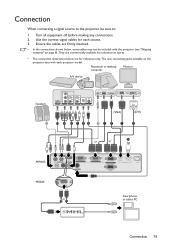
... below , some cables may not be sure to the projector, be included with the projector (see "Shipping contents" on the projector vary with each source. 3. They are for each projector model. Notebook or desktop computer Monitor A/V device Speakers (VGA) 7 10 4 8 7 6 5 71 3 1 (DVI) 2 or or 9 MW665 MX666 or 10 11 Smartphone or tablet PC Connection 19...
... below , some cables may not be sure to the projector, be included with the projector (see "Shipping contents" on the projector vary with each source. 3. They are for each projector model. Notebook or desktop computer Monitor A/V device Speakers (VGA) 7 10 4 8 7 6 5 71 3 1 (DVI) 2 or or 9 MW665 MX666 or 10 11 Smartphone or tablet PC Connection 19...
MW665 and MX666 User Manual
Page 20
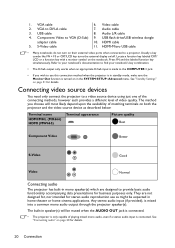
...provides a different level of playing mixed mono audio, even if a stereo audio input is mixed into a common mono audio output through the projector speaker(s). Audio cable 3. Component Video to DVI-A cable 7. USB cable 8. USB flash drive/USB wireless dongle adapter cable 10. Usually a...external video ports when connected to use as described below: Terminal name HDMI/MHL (MX666) HDMI (MW665) Terminal appearance Picture quality Best Component Video Better S-Video Good Video Normal Connecting audio The projector has built-in home theater or home cinema applications.
...provides a different level of playing mixed mono audio, even if a stereo audio input is mixed into a common mono audio output through the projector speaker(s). Audio cable 3. Component Video to DVI-A cable 7. USB cable 8. USB flash drive/USB wireless dongle adapter cable 10. Usually a...external video ports when connected to use as described below: Terminal name HDMI/MHL (MX666) HDMI (MW665) Terminal appearance Picture quality Best Component Video Better S-Video Good Video Normal Connecting audio The projector has built-in home theater or home cinema applications.
MW665 and MX666 User Manual
Page 21
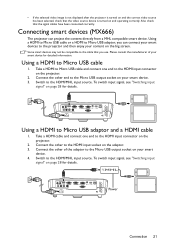
...to Micro USB adaptor, you use. Switch to the HDMI/MHL input source. To switch input signal, see "Switching input signal" on the projector. 2. Connect the other of your smart device. 4. Power Connection 21 Using a HDMI to Micro USB adaptor and a HDMI cable 1. Connecting ...smart devices (MX666) The projector can connect your smart devices to the Micro USB output socket on the projector. 2. Using a HDMI to Micro USB cable 1. Please consult the manufacturer of the adaptor to the...
...to Micro USB adaptor, you use. Switch to the HDMI/MHL input source. To switch input signal, see "Switching input signal" on the projector. 2. Connect the other of your smart device. 4. Power Connection 21 Using a HDMI to Micro USB adaptor and a HDMI cable 1. Connecting ...smart devices (MX666) The projector can connect your smart devices to the Micro USB output socket on the projector. 2. Using a HDMI to Micro USB cable 1. Please consult the manufacturer of the adaptor to the...


