
MW712 Data Sheet
Page 1
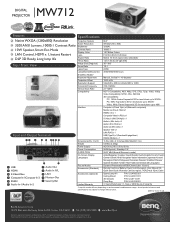
... Mode LAN Control, HDMI x 1, Instant Restart Contrast Ratio Display Color Lens 10000:1 1.07 Billion Colors F=2.55-3.06,f=21-25.6mm DLP 3D Ready, Long lamp life Aspect Ratio Throw Ratio Native 16:10 (5 aspect ratio selectable) 1.46-1.60 (62.25" @6.56ft) Top / Front View Image Size (Diagonal) Zoom Ratio 30"~300" 1.2:1 Lamp Type 230W Lamp(Normal/Economic/ 3500/5000/6500 hours SmartEco Mode)* Keystone Adjustment Manual, Vertical +/- 40 degrees Projection Offset 120% ±5% Resolution Support VGA...
... Mode LAN Control, HDMI x 1, Instant Restart Contrast Ratio Display Color Lens 10000:1 1.07 Billion Colors F=2.55-3.06,f=21-25.6mm DLP 3D Ready, Long lamp life Aspect Ratio Throw Ratio Native 16:10 (5 aspect ratio selectable) 1.46-1.60 (62.25" @6.56ft) Top / Front View Image Size (Diagonal) Zoom Ratio 30"~300" 1.2:1 Lamp Type 230W Lamp(Normal/Economic/ 3500/5000/6500 hours SmartEco Mode)* Keystone Adjustment Manual, Vertical +/- 40 degrees Projection Offset 120% ±5% Resolution Support VGA...
User Manual
Page 2
... view 9 Controls and functions 10 Positioning your projector 14 Choosing a location 14 Obtaining a preferred projected image size 15 Connection 18 Connecting a computer or monitor...19 Connecting Video source devices.......21 Operation 25 Starting up the projector 25 Adjusting the projected image 26 Using the menus 28 Securing the projector 29 Switching input signal 31 Magnifying and searching for details ...32 Selecting the aspect ratio 32 Optimizing the image 34 Creating your own startup screen......37 Setting...
... view 9 Controls and functions 10 Positioning your projector 14 Choosing a location 14 Obtaining a preferred projected image size 15 Connection 18 Connecting a computer or monitor...19 Connecting Video source devices.......21 Operation 25 Starting up the projector 25 Adjusting the projected image 26 Using the menus 28 Securing the projector 29 Switching input signal 31 Magnifying and searching for details ...32 Selecting the aspect ratio 32 Optimizing the image 34 Creating your own startup screen......37 Setting...
User Manual
Page 3
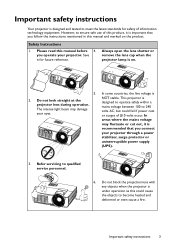
... information technology equipment. Important safety instructions 3 you connect your projector through a power stabilizer, surge protector or uninterruptible power supply (UPS). 3. The intense light beam may fluctuate or cut out, it is 2. In areas where the mains voltage may damage your projector. Always open the lens shutter or remove the lens cap when the projector lamp is under operation as this manual and marked on . 5. Please read...
... information technology equipment. Important safety instructions 3 you connect your projector through a power stabilizer, surge protector or uninterruptible power supply (UPS). 3. The intense light beam may fluctuate or cut out, it is 2. In areas where the mains voltage may damage your projector. Always open the lens shutter or remove the lens cap when the projector lamp is under operation as this manual and marked on . 5. Please read...
User Manual
Page 7
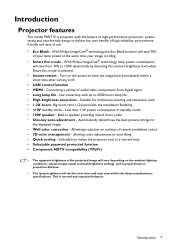
... deliver the user benefit of high reliability, environmentfriendly and ease of your lamp power at the same time your image is projector with up to have the image back immediately within a short time after turning it off . • LAN control function • HDMI - With Philips ImageCare® technology,the Eco Blank function will save 70% of use. • Eco Blank - Introduction Projector features The model MW712 is...
... deliver the user benefit of high reliability, environmentfriendly and ease of your lamp power at the same time your image is projector with up to have the image back immediately within a short time after turning it off . • LAN control function • HDMI - With Philips ImageCare® technology,the Eco Blank function will save 70% of use. • Eco Blank - Introduction Projector features The model MW712 is...
User Manual
Page 10
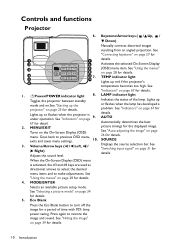
... On-Screen Display (OSD) menu is details. MODE/ENTER Selects an available picture setup mode. See "Indicators" on page menu. Goes back to make adjustments. Press again to turn off the image for details. 4. Controls and functions Projector 6. See "Using the menus" 9 on page 31 for details. II Power/POWER indicator light 8. problem. See "Indicators" on page 28 for a period of the lamp. under operation. AUTO 67 for the displayed image. Automatically determines the best 2. MENU/EXIT picture timings...
... On-Screen Display (OSD) menu is details. MODE/ENTER Selects an available picture setup mode. See "Indicators" on page menu. Goes back to make adjustments. Press again to turn off the image for details. 4. Controls and functions Projector 6. See "Using the menus" 9 on page 31 for details. II Power/POWER indicator light 8. problem. See "Indicators" on page 28 for a period of the lamp. under operation. AUTO 67 for the displayed image. Automatically determines the best 2. MENU/EXIT picture timings...
User Manual
Page 12
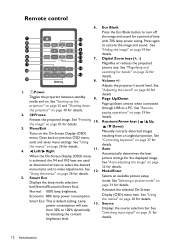
... a period of time with 70% lamp power saving. mode and on page 32 for details. "Using the menus" on the On-Screen Display (OSD) menu. Volume +/Adjusts the projector's sound level. See "Magnifying and searching for details" on . II Power Toggles the projector between standby 9. Menu/Exit Turns on page 28 for details. Digital Zoom keys (+, -) Magnifies or reduces the projected picture size. from an angled projection. See "Freezing 10. Remote control 6. 1 10 2 11...
... a period of time with 70% lamp power saving. mode and on page 32 for details. "Using the menus" on the On-Screen Display (OSD) menu. Volume +/Adjusts the projector's sound level. See "Magnifying and searching for details" on . II Power Toggles the projector between standby 9. Menu/Exit Turns on page 28 for details. Digital Zoom keys (+, -) Magnifies or reduces the projected picture size. from an angled projection. See "Freezing 10. Remote control 6. 1 10 2 11...
User Manual
Page 13
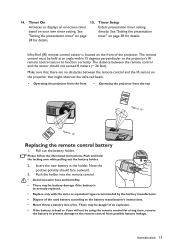
.... 15° Replacing the remote control battery 1. Introduction 13 See directly. Make sure that might obstruct the infra-red beam. • Operating the projector from the front • Operating the projector from possible battery leakage. Insert the new battery in the holder. There may be using the remote control for details. Timer Setup Activates or displays an on-screen timer Enters presentation timer setting based on the projector that there...
.... 15° Replacing the remote control battery 1. Introduction 13 See directly. Make sure that might obstruct the infra-red beam. • Operating the projector from the front • Operating the projector from possible battery leakage. Insert the new battery in the holder. There may be using the remote control for details. Timer Setup Activates or displays an on-screen timer Enters presentation timer setting based on the projector that there...
User Manual
Page 19
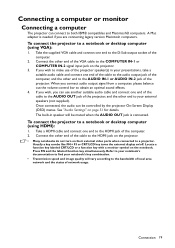
... or CRT/LCD key turns the external display on the notebook. See "Audio Settings" on the projector. 3. A Mac adapter is connected. The built-in your notebook's key combination. • Transmission speed and image quality will be controlled by the projector On-Screen Display (OSD) menus. Connecting a computer or monitor Connecting a computer The projector can be muted when the AUDIO OUT jack is needed if you connect audio output signal from a computer...
... or CRT/LCD key turns the external display on the notebook. See "Audio Settings" on the projector. 3. A Mac adapter is connected. The built-in your notebook's key combination. • Transmission speed and image quality will be controlled by the projector On-Screen Display (OSD) menus. Connecting a computer or monitor Connecting a computer The projector can be muted when the AUDIO OUT jack is needed if you connect audio output signal from a computer...
User Manual
Page 25
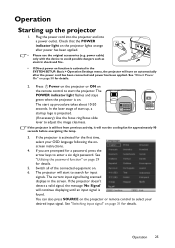
The POWER indicator light flashes and stays green when the projector is on . 6. If the projector is found. Operation 25 power cable) only with the device to enter a six digit password. If you are prompted for the first time, select your desired input signal. Switch all of start the projector. Check that the POWER indicator light on page 31 for details. See "Utilizing the password function" on function is activated in the screen. In the...
The POWER indicator light flashes and stays green when the projector is on . 6. If the projector is found. Operation 25 power cable) only with the device to enter a six digit password. If you are prompted for the first time, select your desired input signal. Switch all of start the projector. Check that the POWER indicator light on page 31 for details. See "Utilizing the password function" on function is activated in the screen. In the...
User Manual
Page 29
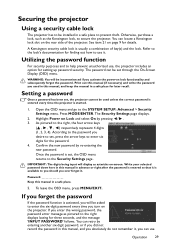
... pictured to use Operation 29 You can be asked to enter the six-digit password every time you desire to set through the On-Screen Display (OSD) menu. Print out this manual (if necessary) and write the password you can locate a Kensington lock slot on Lock and select On by re-entering the new password. Once the password is started. 1. As pictured to the SYSTEM SETUP: Advanced > Security Settings menu. IMPORTANT: The digits being input...
... pictured to use Operation 29 You can be asked to enter the six-digit password every time you desire to set through the On-Screen Display (OSD) menu. Print out this manual (if necessary) and write the password you can locate a Kensington lock slot on Lock and select On by re-entering the new password. Once the password is started. 1. As pictured to the SYSTEM SETUP: Advanced > Security Settings menu. IMPORTANT: The digits being input...
User Manual
Page 30
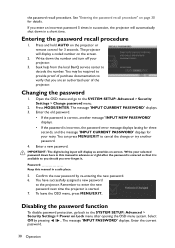
... hold AUTO on the projector or remote control for details. You may be required to provide proof of purchase documentation to decode the number. The message 'INPUT CURRENT PASSWORD' displays. 3. Password Keep this manual in advance or right after opening the OSD menu system. Select Off by re-entering the new password. 6. Seek help from the local BenQ service center to verify that it . Changing the password 1. You have successfully assigned a new password...
... hold AUTO on the projector or remote control for details. You may be required to provide proof of purchase documentation to decode the number. The message 'INPUT CURRENT PASSWORD' displays. 3. Password Keep this manual in advance or right after opening the OSD menu system. Select Off by re-entering the new password. 6. Seek help from the local BenQ service center to verify that it . Changing the password 1. You have successfully assigned a new password...

User Manual
Page 31
... ratio' setting, which is the default of this projector) if you turn on the screen for the Picture Mode. A source selection bar displays. 2. For best display picture results, you should you connect the projector to a DVD player via the projector's HDMI input and the projected picture displays wrong colors, please change or try another signal. • The brightness level of the projected image will display on the projector. • If the password is incorrect, the password error message displays lasting for...
... ratio' setting, which is the default of this projector) if you turn on the screen for the Picture Mode. A source selection bar displays. 2. For best display picture results, you should you connect the projector to a DVD player via the projector's HDMI input and the projected picture displays wrong colors, please change or try another signal. • The brightness level of the projected image will display on the projector. • If the password is incorrect, the password error message displays lasting for...
User Manual
Page 34
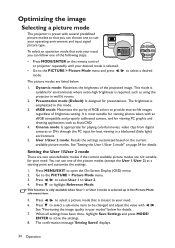
... -life images regardless of brightness setting. The confirmation message 'Setting Saved' displays. 34 Operation It is most suitable for viewing photos taken with an sRGB compatible and properly calibrated camera, and for your need . User 1/User 2 mode: Recalls the settings customized based on the remote control or projector repeatedly until your operating environment and input signal picture type. to store the settings. 8. The brightness is selected up in a blackened (little light...
... -life images regardless of brightness setting. The confirmation message 'Setting Saved' displays. 34 Operation It is most suitable for viewing photos taken with an sRGB compatible and properly calibrated camera, and for your need . User 1/User 2 mode: Recalls the settings customized based on the remote control or projector repeatedly until your operating environment and input signal picture type. to store the settings. 8. The brightness is selected up in a blackened (little light...
User Manual
Page 37
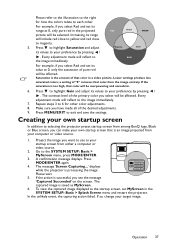
... your own startup screen that color from either a computer or video source. 2. A confirmation message displays. The message 'Screen Capturing...' The captured image is too high, that color in a video picture. If the saturation is saved as the startup screen, set MyScreen in the projected picture will be selected. Press to highlight Gain and adjust its values to selecting the projector preset startup screen from among BenQ logo, Black or Blue screen, you can...
... your own startup screen that color from either a computer or video source. 2. A confirmation message displays. The message 'Screen Capturing...' The captured image is too high, that color in a video picture. If the saturation is saved as the startup screen, set MyScreen in the projected picture will be selected. Press to highlight Gain and adjust its values to selecting the projector preset startup screen from among BenQ logo, Black or Blue screen, you can...
User Manual
Page 39
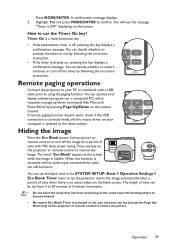
... SYSTEM SETUP: Basic > Operation Settings > Eco Blank Timer menu to the latest version. Remote paging operations Connect the projector to your display software program (on a connected PC) which responds to activate the timer or not by following the on the remote control. You can set the blank time in 5-minute increments. • Do not block the projection lens from projector or remote control to turn off the image for a period of time with an audio input connected,the audio...
... SYSTEM SETUP: Basic > Operation Settings > Eco Blank Timer menu to the latest version. Remote paging operations Connect the projector to your display software program (on a connected PC) which responds to activate the timer or not by following the on the remote control. You can set the blank time in 5-minute increments. • Do not block the projection lens from projector or remote control to turn off the image for a period of time with an audio input connected,the audio...
User Manual
Page 46
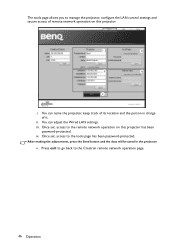
... the projector, keep track of its location and the person in the projector. Once set , access to the remote network operation on this projector has been password-protected. After making the adjustments, press the Send button and the data will be saved in charge of it. i iii ii iv v i. ii. v. iii. Press exit to go back to the Crestron remote network operation page. 46 Operation Once set , access...
... the projector, keep track of its location and the person in the projector. Once set , access to the remote network operation on this projector has been password-protected. After making the adjustments, press the Send button and the data will be saved in charge of it. i iii ii iv v i. ii. v. iii. Press exit to go back to the Crestron remote network operation page. 46 Operation Once set , access...
User Manual
Page 51
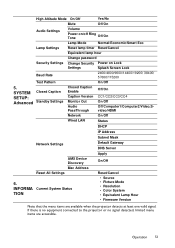
... Eco Lamp Settings Reset lamp timer Reset/Cancel Equivalent lamp hour Change password Security Settings Change Security Power on Lock Settings Splash Screen Lock Baud Rate 2400/4800/9600/14400/19200/ 38400/ 57600/115200 Test Pattern On/Off 5. SYSTEM Closed Caption SETUP: Advanced Standby Settings Closed Caption Enable Caption Version Monitor Out Audio PassThrough Off/On CC1/CC2/CC3/CC4 On/Off Off/Computer1/Computer2/Video,Svideo/HDMI Network On/Off Wired LAN Status DHCP IP Address...
... Eco Lamp Settings Reset lamp timer Reset/Cancel Equivalent lamp hour Change password Security Settings Change Security Power on Lock Settings Splash Screen Lock Baud Rate 2400/4800/9600/14400/19200/ 38400/ 57600/115200 Test Pattern On/Off 5. SYSTEM Closed Caption SETUP: Advanced Standby Settings Closed Caption Enable Caption Version Monitor Out Audio PassThrough Off/On CC1/CC2/CC3/CC4 On/Off Off/Computer1/Computer2/Video,Svideo/HDMI Network On/Off Wired LAN Status DHCP IP Address...
User Manual
Page 59
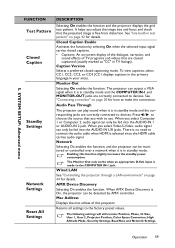
... -screen display of the dialogue, narration, and sound effects of this function slightly increases the standby power consumption. Mac Address Displays the mac adress of TV programs and videos that are closed captioning mode. Monitor Out Selecting On enables the function. The Monitor Out only works when an appropriate D-Sub input is selected since the HDMI cable carries audio signal. SYSTEM SETUP: Advanced menu FUNCTION Test Pattern Closed Caption Standby Settings Network Settings Reset...
... -screen display of the dialogue, narration, and sound effects of this function slightly increases the standby power consumption. Mac Address Displays the mac adress of TV programs and videos that are closed captioning mode. Monitor Out Selecting On enables the function. The Monitor Out only works when an appropriate D-Sub input is selected since the HDMI cable carries audio signal. SYSTEM SETUP: Advanced menu FUNCTION Test Pattern Closed Caption Standby Settings Network Settings Reset...
User Manual
Page 62
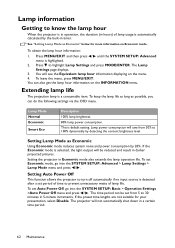
... Equivalent lamp hour information displaying on the INFORMATION menu. See "Setting Lamp Mode as possible, you can do the following settings via the OSD menu. To keep the lamp life as long as Economic" below for your presentation, select Disable. If the Economic mode is default setting. Setting Auto Power Off This function allows the projector to turn off automatically if no input source is automatically calculated by the built-in timer. If...
... Equivalent lamp hour information displaying on the INFORMATION menu. See "Setting Lamp Mode as possible, you can do the following settings via the OSD menu. To keep the lamp life as long as Economic" below for your presentation, select Disable. If the Economic mode is default setting. Setting Auto Power Off This function allows the projector to turn off automatically if no input source is automatically calculated by the built-in timer. If...
User Manual
Page 68
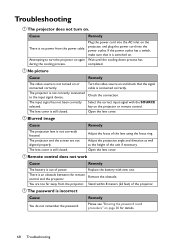
... lens cover. Troubleshooting The projector does not turn the projector on the projector, and plug the power cord into the AC inlet on again Wait until the cooling down process has during the cooling process. Blurred image Cause Remedy The projection lens is not correctly connected to turn on and check that it is switched on the projector or remote control. The projector is not correctly focused. Turn the video source on . Check the connection. Open the lens cover. Adjust...
... lens cover. Troubleshooting The projector does not turn the projector on the projector, and plug the power cord into the AC inlet on again Wait until the cooling down process has during the cooling process. Blurred image Cause Remedy The projection lens is not correctly connected to turn on and check that it is switched on the projector or remote control. The projector is not correctly focused. Turn the video source on . Check the connection. Open the lens cover. Adjust...


