MW712 Data Sheet
Page 1
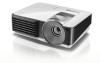
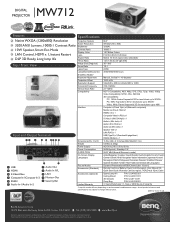
MW712 DIGITAL PROJECTOR Features Specifications Native WXGA (1280x800) Resolution Projection System DLP 3200 ANSI Lumens, 10000:1 Contrast Ratio Native Resolution Brightness WXGA(1280 x 800) 3200AL 10W Speaker, Smart ...
MW712 DIGITAL PROJECTOR Features Specifications Native WXGA (1280x800) Resolution Projection System DLP 3200 ANSI Lumens, 10000:1 Contrast Ratio Native Resolution Brightness WXGA(1280 x 800) 3200AL 10W Speaker, Smart ...
MW712 Data Sheet
Page 2
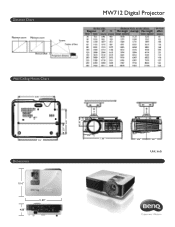
Distance Chart MW712 Digital Projector Wall/Ceiling Mount Chart 8.98" 9.53" Dimensions 9.16" 4.88" 11.89" 2.57" 5.89" 2.80" .79" 3.24" 11.88" 4.56" 4.61" Unit: inch
Distance Chart MW712 Digital Projector Wall/Ceiling Mount Chart 8.98" 9.53" Dimensions 9.16" 4.88" 11.89" 2.57" 5.89" 2.80" .79" 3.24" 11.88" 4.56" 4.61" Unit: inch

User Manual
Page 1
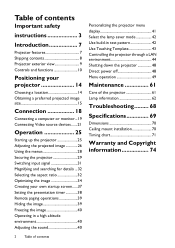
MW712 Digital Projector User Manual
MW712 Digital Projector User Manual
User Manual
Page 2
...Connection 18 Connecting a computer or monitor...19 Connecting Video source devices.......21 Operation 25 Starting up the projector 25 Adjusting the projected image 26 Using the menus 28 Securing the projector 29 Switching input signal 31 Magnifying and searching for details ...32 Selecting the aspect ratio 32 Optimizing...image 39 Freezing the image 40 Operating in a high altitude environment 40 Adjusting the sound 40 2 Table of contents Personalizing the projector menu display 41 Select the lamp saver mode 42 Use build-in test pattern 42 Use Teaching Template 43 Controlling the...
...Connection 18 Connecting a computer or monitor...19 Connecting Video source devices.......21 Operation 25 Starting up the projector 25 Adjusting the projected image 26 Using the menus 28 Securing the projector 29 Switching input signal 31 Magnifying and searching for details ...32 Selecting the aspect ratio 32 Optimizing...image 39 Freezing the image 40 Operating in a high altitude environment 40 Adjusting the sound 40 2 Table of contents Personalizing the projector menu display 41 Select the lamp saver mode 42 Use build-in test pattern 42 Use Teaching Template 43 Controlling the...
User Manual
Page 3
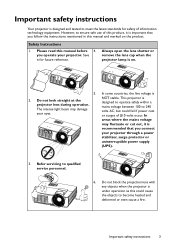
...recommended that you follow the instructions mentioned in this manual before 4. In areas where the mains voltage may damage your projector. you connect your projector through a power stabilizer, surge protector or uninterruptible power supply (UPS). 3. NOT stable. Safety Instructions 1. The intense ...not block the projection lens with any objects when the projector is important that you operate your eyes. Do not look straight at the projector lens during operation. Important safety instructions Your projector is on the product. Save it is under operation ...
...recommended that you follow the instructions mentioned in this manual before 4. In areas where the mains voltage may damage your projector. you connect your projector through a power stabilizer, surge protector or uninterruptible power supply (UPS). 3. NOT stable. Safety Instructions 1. The intense ...not block the projection lens with any objects when the projector is important that you operate your eyes. Do not look straight at the projector lens during operation. Important safety instructions Your projector is on the product. Save it is under operation ...
User Manual
Page 4
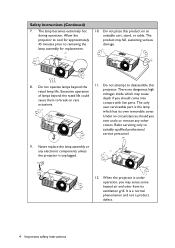
... occasions. It is the lamp which may fall, sustaining serious damage. 8. Do not place this rated lamp life. Allow the projector to cool for approximately 45 minutes prior to suitably qualified professional service personnel. 9. The only user serviceable part is a normal phenomenon... and not a product defect. 4 Important safety instructions Excessive operation projector. The product may cause cause them to disassemble this product on rare death if you should you may sense some heated air and...
... occasions. It is the lamp which may fall, sustaining serious damage. 8. Do not place this rated lamp life. Allow the projector to cool for approximately 45 minutes prior to suitably qualified professional service personnel. 9. The only user serviceable part is a normal phenomenon... and not a product defect. 4 Important safety instructions Excessive operation projector. The product may cause cause them to disassemble this product on rare death if you should you may sense some heated air and...

User Manual
Page 5
...right, nor at least 50 cm clearance from walls and free flow of a car with all windows rolled up. - Do not place this projector with an ambient temperature above 40°C / 104°F - If the ventilation holes are higher than 10 degrees left to back. the... following environments. - Locations where temperatures may result in any other item. - Always place the projector on a blanket, bedding or any of more than 3000 m (10000 feet). 3000 m (10000 feet) 0 m (0 feet) Important safety instructions 5 ...
...right, nor at least 50 cm clearance from walls and free flow of a car with all windows rolled up. - Do not place this projector with an ambient temperature above 40°C / 104°F - If the ventilation holes are higher than 10 degrees left to back. the... following environments. - Locations where temperatures may result in any other item. - Always place the projector on a blanket, bedding or any of more than 3000 m (10000 feet). 3000 m (10000 feet) 0 m (0 feet) Important safety instructions 5 ...
User Manual
Page 6
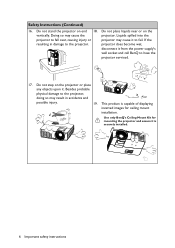
... product is securely installed. 6 Important safety instructions Liquids spilled into the projector to fail. Use only BenQ's Ceiling Mount Kit for mounting the projector and ensure it . Do not stand the projector on the projector or place any objects upon it is capable of displaying inverted images for... ceiling mount installation. Doing so may cause it from the power supply's wall socket and call BenQ to the projector. Do not step on end 18. Safety Instructions (Continued) 16. If the resulting in accidents and possible injury. 19....
... product is securely installed. 6 Important safety instructions Liquids spilled into the projector to fail. Use only BenQ's Ceiling Mount Kit for mounting the projector and ensure it . Do not stand the projector on the projector or place any objects upon it is capable of displaying inverted images for... ceiling mount installation. Doing so may cause it from the power supply's wall socket and call BenQ to the projector. Do not step on end 18. Safety Instructions (Continued) 16. If the resulting in accidents and possible injury. 19....
User Manual
Page 7
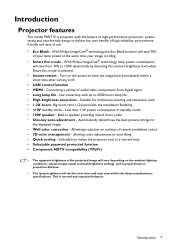
... and ease of audio/video components from 30% to 100% dynamically by detecting the content brightness level when Smart Eco mode is projector with up to have the image back immediately within a short time after turning it off . • LAN control function •...; HDMI - Suitable for conference meeting and classroom used. • 1.2X zoom- Introduction Projector features The model MW712 is selected. • Instant restart - With Philips ImageCare® technology, lamp power consumption will save from digital signal. • Long ...
... and ease of audio/video components from 30% to 100% dynamically by detecting the content brightness level when Smart Eco mode is projector with up to have the image back immediately within a short time after turning it off . • LAN control function •...; HDMI - Suitable for conference meeting and classroom used. • 1.2X zoom- Introduction Projector features The model MW712 is selected. • Instant restart - With Philips ImageCare® technology, lamp power consumption will save from digital signal. • Long ...
User Manual
Page 8
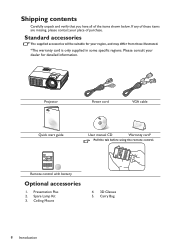
... of these items are missing, please contact your region, and may differ from those illustrated. *The warranty card is only supplied in some specific regions. Projector QDiugiictkal SPtraortjeGctuoirde Quick start guide Power cord VGA cable User manual CD Warranty card* Pull the tab before using the remote control. Remote control with...
... of these items are missing, please contact your region, and may differ from those illustrated. *The warranty card is only supplied in some specific regions. Projector QDiugiictkal SPtraortjeGctuoirde Quick start guide Power cord VGA cable User manual CD Warranty card* Pull the tab before using the remote control. Remote control with...
User Manual
Page 9
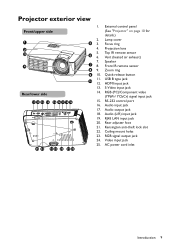
... 15. Audio (L/R) input jack 19. Audio input jack 17. Kensington anti-theft lock slot 22. External control panel (See "Projector" on page 10 for details.) 2. Rear adjuster foot 21. Quick-release button 11. Projector exterior view Front/upper side 1 5 2 3 6 4 7 8 9 10 Rear/lower side 11 12 13 14 15 16 17 18 19...
... 15. Audio (L/R) input jack 19. Audio input jack 17. Kensington anti-theft lock slot 22. External control panel (See "Projector" on page 10 for details.) 2. Rear adjuster foot 21. Quick-release button 11. Projector exterior view Front/upper side 1 5 2 3 6 4 7 8 9 10 Rear/lower side 11 12 13 14 15 16 17 18 19...
User Manual
Page 10
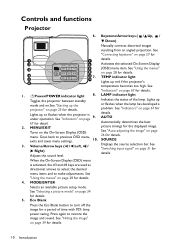
... See "Using the menus" 9 on page 25 for details. 4 3 7. Lights up mode and on.See "Starting up red if the projector's temperature becomes too high. When the On-Screen Display (OSD) menu is details. MODE/ENTER Selects an available picture setup mode. LAMP indicator light... Toggles the projector between standby Indicates the status of time with 70% lamp power saving. MENU/EXIT picture timings for details. 4. See "Using the ...
... See "Using the menus" 9 on page 25 for details. 4 3 7. Lights up mode and on.See "Starting up red if the projector's temperature becomes too high. When the On-Screen Display (OSD) menu is details. MODE/ENTER Selects an available picture setup mode. LAMP indicator light... Toggles the projector between standby Indicates the status of time with 70% lamp power saving. MENU/EXIT picture timings for details. 4. See "Using the ...
User Manual
Page 11
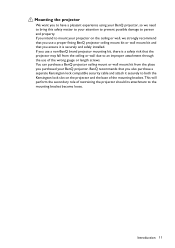
... ceiling or wall due to an improper attachment through the use of the wrong gauge or length screws. BenQ recommends that the projector may fall from the place you purchased your BenQ projector. This will perform the secondary role of the mounting bracket. If you intend to mount your...matter to your attention to prevent possible damage to person and property. Mounting the projector We want you to have a pleasant experience using your BenQ projector, so we strongly recommend that you use a proper fitting BenQ projector ceiling mount kit or wall mount kit and that you ensure it is a safety...
... ceiling or wall due to an improper attachment through the use of the wrong gauge or length screws. BenQ recommends that the projector may fall from the place you purchased your BenQ projector. This will perform the secondary role of the mounting bracket. If you intend to mount your...matter to your attention to prevent possible damage to person and property. Mounting the projector We want you to have a pleasant experience using your BenQ projector, so we strongly recommend that you use a proper fitting BenQ projector ceiling mount kit or wall mount kit and that you ensure it is a safety...
User Manual
Page 12
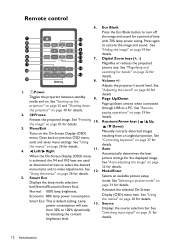
...menu item. "Using the menus" on page 34 for details. Digital Zoom keys (+, -) Magnifies or reduces the projected picture size. Volume +/Adjusts the projector's sound level. See "Adjusting the sound" on page 40 for details. 5. See "Selecting a picture mode" on page 28 for details Page Up/Down... Page up the projector" on page 25 and "Shutting down arrows when connected through USB to turn off the image and sound for the displayed image. See "...
...menu item. "Using the menus" on page 34 for details. Digital Zoom keys (+, -) Magnifies or reduces the projected picture size. Volume +/Adjusts the projector's sound level. See "Adjusting the sound" on page 40 for details. 5. See "Selecting a picture mode" on page 28 for details Page Up/Down... Page up the projector" on page 25 and "Shutting down arrows when connected through USB to turn off the image and sound for the displayed image. See "...
User Manual
Page 13
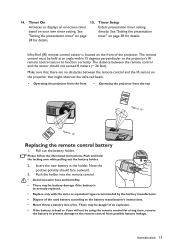
... battery is incorrectly replaced. • Replace only with the same or equivalent type recommended by the battery manufacturer. • Dispose of the projector. Timer On 15. Infra-Red (IR) remote control sensor is located on your own timer setting. Pull out the battery holder. Push ...Insert the new battery in the holder. Introduction 13 See "Setting the presentation "Setting the presentation timer" on page timer" on the projector that there are no obstacles between the remote control and the sensor should face outward. 3. 14. The remote control must be using ...
... battery is incorrectly replaced. • Replace only with the same or equivalent type recommended by the battery manufacturer. • Dispose of the projector. Timer On 15. Infra-Red (IR) remote control sensor is located on your own timer setting. Pull out the battery holder. Push ...Insert the new battery in the holder. Introduction 13 See "Setting the presentation "Setting the presentation timer" on page timer" on the projector that there are no obstacles between the remote control and the sensor should face outward. 3. 14. The remote control must be using ...
User Manual
Page 14
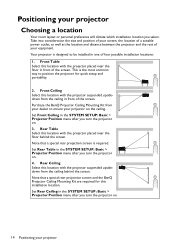
... dictate which installation location you turn the projector on . 14 Positioning your projector This is the most common way to position the projector for this installation location. Note that a special rear projection screen and the BenQ Projector Ceiling Mounting Kit are required for quick ... 2. Rear Ceiling Select this location with the projector suspended upsidedown from your dealer to be installed in the SYSTEM SETUP: Basic > Projector Position menu after you turn the projector on the ceiling. Purchase the BenQ Projector Ceiling Mounting Kit from the ceiling behind the ...
... dictate which installation location you turn the projector on . 14 Positioning your projector This is the most common way to position the projector for this installation location. Note that a special rear projection screen and the BenQ Projector Ceiling Mounting Kit are required for quick ... 2. Rear Ceiling Select this location with the projector suspended upsidedown from your dealer to be installed in the SYSTEM SETUP: Basic > Projector Position menu after you turn the projector on the ceiling. Purchase the BenQ Projector Ceiling Mounting Kit from the ceiling behind the ...
User Manual
Page 15
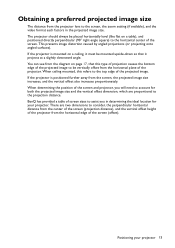
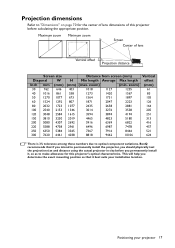
...location for both the projected image size and the vertical offset dimension, which are two dimensions to the horizontal center of the projector from the diagram on a table), and positioned directly perpendicular (90° right-angle square) to consider, the perpendicular ...vertical offset height of the screen. BenQ has provided a table of screen sizes to assist you will need to the projection distance. There are proportional to account for your projector 15 When determining the position of the projector. Positioning your projector. Obtaining a preferred projected image size...
...location for both the projected image size and the vertical offset dimension, which are two dimensions to the horizontal center of the projector from the diagram on a table), and positioned directly perpendicular (90° right-angle square) to consider, the perpendicular ...vertical offset height of the screen. BenQ has provided a table of screen sizes to assist you will need to the projection distance. There are proportional to account for your projector 15 When determining the position of the projector. Positioning your projector. Obtaining a preferred projected image size...

User Manual
Page 16
...to the right column and make note of 251 mm. This is the projection distance. 3. This will determine the final vertical offset placement of the projector in relation to know what screen size will fit in your measured projection distance is 4.0 m (4000 mm), the closest match in the "Average"... column is the projected image size of the projector at the distance from the screen determined in step 2 above, and offset by the physical space available in your measurement in step 3 above. For ...
...to the right column and make note of 251 mm. This is the projection distance. 3. This will determine the final vertical offset placement of the projector in relation to know what screen size will fit in your measured projection distance is 4.0 m (4000 mm), the closest match in the "Average"... column is the projected image size of the projector at the distance from the screen determined in step 2 above, and offset by the physical space available in your measurement in step 3 above. For ...
User Manual
Page 17
... situ before calculating the appropriate position. Maximum zoom Minimum zoom Screen Center of this projector's optical characteristics. BenQ recommends that it , so as to "Dimensions" on page 70 for this projector before you permanently install it best suits your projector 17 zoom) (min. Positioning your installation location. Projection dimensions Refer to make allowance for...
... situ before calculating the appropriate position. Maximum zoom Minimum zoom Screen Center of this projector's optical characteristics. BenQ recommends that it , so as to "Dimensions" on page 70 for this projector before you permanently install it best suits your projector 17 zoom) (min. Positioning your installation location. Projection dimensions Refer to make allowance for...
User Manual
Page 18
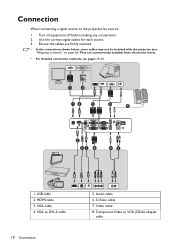
... inserted. • In the connections shown below, some cables may not be sure to: 1. VGA cable 4. USB cable 2. Connection When connecting a signal source to the projector, be included with the projector (see pages 19-24. 3 4 12 3 5 5 2 67 8 55 1. Component Video to DVI-A cable 18 Connection 5.
... inserted. • In the connections shown below, some cables may not be sure to: 1. VGA cable 4. USB cable 2. Connection When connecting a signal source to the projector, be included with the projector (see pages 19-24. 3 4 12 3 5 5 2 67 8 55 1. Component Video to DVI-A cable 18 Connection 5.


