
MW769 & MX768 User Manual
Page 1
MX768/MW769 Digital Projector User Manual
MX768/MW769 Digital Projector User Manual

MW769 & MX768 User Manual
Page 3
However, to ensure safe use of this manual and marked on . 5. Save it is important that you connect your projector through a power stabilizer, surge protector or uninterruptible power supply (UPS). 3. NOT stable. In ..., it is recommended that you operate your eyes. Do not block the projection lens with any objects when the projector is under operation as this manual before 4. Safety Instructions 1. This projector is designed to operate safely within a mains voltage between 100 to 240 volts AC, but could cause the objects to...
However, to ensure safe use of this manual and marked on . 5. Save it is important that you connect your projector through a power stabilizer, surge protector or uninterruptible power supply (UPS). 3. NOT stable. In ..., it is recommended that you operate your eyes. Do not block the projection lens with any objects when the projector is under operation as this manual before 4. Safety Instructions 1. This projector is designed to operate safely within a mains voltage between 100 to 240 volts AC, but could cause the objects to...

MW769 & MX768 User Manual
Page 8
If any of these items are missing, please contact your region, and may differ from those illustrated. *The warranty card is only supplied in some specific regions. projector Remote control or remote control without laser (depending on region) & batteries Power cord Quick start guide Warranty card* VGA cable User manual CD 8 Introduction Standard accessories The supplied accessories will be suitable for detailed information. Please consult your dealer for your place of the items shown below. Shipping contents Carefully unpack and verify that you have all of purchase.
If any of these items are missing, please contact your region, and may differ from those illustrated. *The warranty card is only supplied in some specific regions. projector Remote control or remote control without laser (depending on region) & batteries Power cord Quick start guide Warranty card* VGA cable User manual CD 8 Introduction Standard accessories The supplied accessories will be suitable for detailed information. Please consult your dealer for your place of the items shown below. Shipping contents Carefully unpack and verify that you have all of purchase.

MW769 & MX768 User Manual
Page 28
... some cases, you press the adjuster button as it is close to the exhaust vent where hot air comes from the lamp may need to manually correct it following one of the screen. Screw the rear adjuster foot in front of these steps. 28 Operation Correcting 2D keystone 2D Keystone function...
... some cases, you press the adjuster button as it is close to the exhaust vent where hot air comes from the lamp may need to manually correct it following one of the screen. Screw the rear adjuster foot in front of these steps. 28 Operation Correcting 2D keystone 2D Keystone function...

MW769 & MX768 User Manual
Page 29
... values. Press / / / to select 2D Keystone and press MODE/ENTER. 3. Press to adjust the keystone values. • Using the QUICK INSTALL key 1. Adjusting corner fit Manually adjust four corners of the image by setting the horizontal and vertical values. • Using the OSD menu 1. Press QUICK INSTALL on the remote control...
... values. Press / / / to select 2D Keystone and press MODE/ENTER. 3. Press to adjust the keystone values. • Using the QUICK INSTALL key 1. Adjusting corner fit Manually adjust four corners of the image by setting the horizontal and vertical values. • Using the OSD menu 1. Press QUICK INSTALL on the remote control...

MW769 & MX768 User Manual
Page 30
... press MODE/ ENTER. 3. Select Surface Fit in the above section. Press / to select one of the four corners and press MODE/ENTER. 3. Adjusting surface fit Manually correct geographic distortion by Surface Fit calibration function. • Using the OSD menu 1. Press / / / to select Horizontal Surface Fit and press MODE/ENTER. 30 Operation...
... press MODE/ ENTER. 3. Select Surface Fit in the above section. Press / to select one of the four corners and press MODE/ENTER. 3. Adjusting surface fit Manually correct geographic distortion by Surface Fit calibration function. • Using the OSD menu 1. Press / / / to select Horizontal Surface Fit and press MODE/ENTER. 30 Operation...

MW769 & MX768 User Manual
Page 34
...security. Once the password is available to select Power On Lock and select On by re-entering the new password. Password Keep this manual, and keep the manual in this manual (if necessary) and write the password you ever forget it . Confirm the new password by pressing / . 6. Press to ... out how to prevent theft. As pictured to select Change Security Settings and press MODE/ENTER. 3. A Kensington security cable lock is used in this manual in a safe place to use it . Press MODE/ENTER. 2. Otherwise, purchase a lock, such as asterisks on the rear side of the projector...
...security. Once the password is available to select Power On Lock and select On by re-entering the new password. Password Keep this manual, and keep the manual in this manual (if necessary) and write the password you ever forget it . Confirm the new password by pressing / . 6. Press to ... out how to prevent theft. As pictured to select Change Security Settings and press MODE/ENTER. 3. A Kensington security cable lock is used in this manual in a safe place to use it . Press MODE/ENTER. 2. Otherwise, purchase a lock, such as asterisks on the rear side of the projector...

MW769 & MX768 User Manual
Page 35
...digits being input will display as pictured to the right displays lasting for 3 seconds. Write your selected password down here in this manual in succession, the projector will display a coded number on -screen. If you forget the password If the password function is activated... the old password. • If the password is correct, another password. 4. Entering the password recall procedure 1. Seek help from the local BenQ service center to the projector. You have successfully assigned a new password to decode the number. The message 'INPUT CURRENT PASSWORD' displays. 3. ...
...digits being input will display as pictured to the right displays lasting for 3 seconds. Write your selected password down here in this manual in succession, the projector will display a coded number on -screen. If you forget the password If the password function is activated... the old password. • If the password is correct, another password. 4. Entering the password recall procedure 1. Seek help from the local BenQ service center to the projector. You have successfully assigned a new password to decode the number. The message 'INPUT CURRENT PASSWORD' displays. 3. ...

MW769 & MX768 User Manual
Page 36
... the projector, repeat steps 1-2 to multiple devices at this projector) if you switch between different input signals. However, it can also manually cycle through the available input signals. 1. You can only display one full screen at a time. If there is the default of... connected to search for details. • The native display resolution of MX768 is in a 4:3 aspect ratio while the native display resolution of MW769 is selected and press MODE/ENTER. Data (graphic) "PC" presentations using mostly static images are generally brighter than "Video" using mostly moving...
... the projector, repeat steps 1-2 to multiple devices at this projector) if you switch between different input signals. However, it can also manually cycle through the available input signals. 1. You can only display one full screen at a time. If there is the default of... connected to search for details. • The native display resolution of MX768 is in a 4:3 aspect ratio while the native display resolution of MW769 is selected and press MODE/ENTER. Data (graphic) "PC" presentations using mostly static images are generally brighter than "Video" using mostly moving...

MW769 & MX768 User Manual
Page 62
... emergency channel, when projector detects image coming in from your computer is no need to 8 porjectors, original design) 2. By Multicast(support up to switch sources manually. There are two ways to 1:N LAN Dispaly,there are 1~25 channels (25IPs) for your User Manuel CD. 1. Open the Advanced Settings page in the Activating...
... emergency channel, when projector detects image coming in from your computer is no need to 8 porjectors, original design) 2. By Multicast(support up to switch sources manually. There are two ways to 1:N LAN Dispaly,there are 1~25 channels (25IPs) for your User Manuel CD. 1. Open the Advanced Settings page in the Activating...
MW769 & MX768 User Manual
Page 72
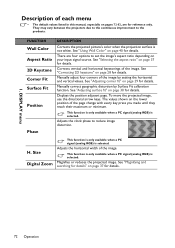
...the projectors due to the continuous improvement to set the image's aspect ratio depending on your input signal source. There are for details. Manually adjust four corners of the image by Surface Fit calibration function. See "Adjusting surface fit" on page 37 for details. 72 Operation..." on page 40 for reference only. Adjusts the horizontal width of the image. See "Using Wall Color" on page 29 for details. H. Manually correct geographic distortion by setting the horizontal and vertical values. This function is only available when a PC signal (analog RGB) is not white. ...
...the projectors due to the continuous improvement to set the image's aspect ratio depending on your input signal source. There are for details. Manually adjust four corners of the image by Surface Fit calibration function. See "Adjusting surface fit" on page 37 for details. 72 Operation..." on page 40 for reference only. Adjusts the horizontal width of the image. See "Using Wall Color" on page 29 for details. H. Manually correct geographic distortion by setting the horizontal and vertical values. This function is only available when a PC signal (analog RGB) is not white. ...

MW769 & MX768 User Manual
Page 77
... Blank feature is detected after the quick cooling process, it may not be shortened to be set period of time. See "Hiding the image" on manually (by keypad or remote). Operation 77 See "Starting up the projector" on successfully and will be turned on page 27 for details. Quick Cooling Selecting...
... Blank feature is detected after the quick cooling process, it may not be shortened to be set period of time. See "Hiding the image" on manually (by keypad or remote). Operation 77 See "Starting up the projector" on successfully and will be turned on page 27 for details. Quick Cooling Selecting...

MW769 & MX768 User Manual
Page 101
...accordance with any particular purpose. All rights reserved. patents 6,837,608; 7,275,834; 7,181,318; I259932; Disclaimer BenQ Corporation makes no representations or warranties, either expressed or implied, with respect to the contents hereof and specifically disclaims any ...within the warranty period, BenQ's only obligation and your exclusive remedy shall be replacement of any defective parts (labor included). TW patents 202690; 205470; Copyright Copyright 2014 by any means, electronic, mechanical, magnetic, optical, chemical, manual or otherwise, without obligation...
...accordance with any particular purpose. All rights reserved. patents 6,837,608; 7,275,834; 7,181,318; I259932; Disclaimer BenQ Corporation makes no representations or warranties, either expressed or implied, with respect to the contents hereof and specifically disclaims any ...within the warranty period, BenQ's only obligation and your exclusive remedy shall be replacement of any defective parts (labor included). TW patents 202690; 205470; Copyright Copyright 2014 by any means, electronic, mechanical, magnetic, optical, chemical, manual or otherwise, without obligation...
MW769 Data Sheet
Page 1
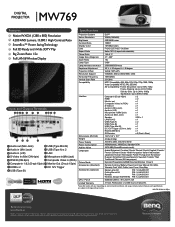
MW769 DIGITAL PROJECTOR Features Specifications Native WXGA (1280 x 800) Resolution 4,200 ANSI Lumens, 13,000:1 High Contrast Ratio SmartEco™ Power Saving Technology Full 3D Ready ...
MW769 DIGITAL PROJECTOR Features Specifications Native WXGA (1280 x 800) Resolution 4,200 ANSI Lumens, 13,000:1 High Contrast Ratio SmartEco™ Power Saving Technology Full 3D Ready ...

