
MW769 & MX768 Quick Start Guide
Page 4
If your dealer for assistance. 4 BenQ QSG-MX768_MW769.book Page 4 Tuesday, December 31, 2013 5:39 PM Projector dimensions MX768 30 762 610 457 847 1113 1378 69 40 1016 813 610 1130 1483 1837 91 60 1524 1219 914 1695 2225 2755 ... 343 200 5080 4064 3048 5649 7417 9185 457 250 6350 5080 3810 7061 9271 11481 572 300 7620 6096 4572 8473 11125 13777 686 MW769 30 762 646 404 937 1170 1402 50 40 1016 862 538 1249 1559 1870 67 60 1524 1292 808 1874 2339 2804 101 80...
If your dealer for assistance. 4 BenQ QSG-MX768_MW769.book Page 4 Tuesday, December 31, 2013 5:39 PM Projector dimensions MX768 30 762 610 457 847 1113 1378 69 40 1016 813 610 1130 1483 1837 91 60 1524 1219 914 1695 2225 2755 ... 343 200 5080 4064 3048 5649 7417 9185 457 250 6350 5080 3810 7061 9271 11481 572 300 7620 6096 4572 8473 11125 13777 686 MW769 30 762 646 404 937 1170 1402 50 40 1016 862 538 1249 1559 1870 67 60 1524 1292 808 1874 2339 2804 101 80...

MW769 & MX768 Quick Start Guide
Page 5
MUTE LAMP MODE Number keys *1Not operational on this projector *2No LASER key on Japan region's remote controls *3TEST key acts as QUICK INSTALL key on Japan region's remote control 5 BenQ QSG-MX768_MW769.book Page 5 Tuesday, December 31, 2013 5:39 PM Remote control World Wide Region Japan Region ON COMPUTER 1 COMPUTER 2 KEYSTONE / UP MENU/EXIT KEYSTONE / LEFT ECO BLANK KEYSTONE / DOWN *3QUICK INSTALL FREEZE *1PIP ASPECT NETWORK SETTING OFF *1COMPO 1 HDMI 1 HDMI 2 *1COMPO 2 AUTO KEYSTONE / RIGHT SOURCE MODE/ENTER *2LASER VOLUME + BRIGHT *3 CONTRAST VOLUME -
MUTE LAMP MODE Number keys *1Not operational on this projector *2No LASER key on Japan region's remote controls *3TEST key acts as QUICK INSTALL key on Japan region's remote control 5 BenQ QSG-MX768_MW769.book Page 5 Tuesday, December 31, 2013 5:39 PM Remote control World Wide Region Japan Region ON COMPUTER 1 COMPUTER 2 KEYSTONE / UP MENU/EXIT KEYSTONE / LEFT ECO BLANK KEYSTONE / DOWN *3QUICK INSTALL FREEZE *1PIP ASPECT NETWORK SETTING OFF *1COMPO 1 HDMI 1 HDMI 2 *1COMPO 2 AUTO KEYSTONE / RIGHT SOURCE MODE/ENTER *2LASER VOLUME + BRIGHT *3 CONTRAST VOLUME -

MW769 & MX768 User Manual
Page 1
MX768/MW769 Digital Projector User Manual
MX768/MW769 Digital Projector User Manual

MW769 & MX768 User Manual
Page 2
... computer or monitor...22 Connecting Video source devices.......24 Operation 27 Starting up the projector 27 Adjusting the projected image 28 Using the menus 33 Securing the projector 34 Switching input signal 36 Magnifying and searching for details ...37 Selecting the aspect... 62 Remote Desktop Control through Q Presenter 63 Presenting From a USB Reader........... 64 Shutting down the projector 66 Menu operation 67 Maintenance 83 Care of the projector 83 Lamp information 84 Troubleshooting......... 91 Specifications 92 Dimensions 93 Ceiling mount installation 93 Timing chart 94 ...
... computer or monitor...22 Connecting Video source devices.......24 Operation 27 Starting up the projector 27 Adjusting the projected image 28 Using the menus 33 Securing the projector 34 Switching input signal 36 Magnifying and searching for details ...37 Selecting the aspect... 62 Remote Desktop Control through Q Presenter 63 Presenting From a USB Reader........... 64 Shutting down the projector 66 Menu operation 67 Maintenance 83 Care of the projector 83 Lamp information 84 Troubleshooting......... 91 Specifications 92 Dimensions 93 Ceiling mount installation 93 Timing chart 94 ...

MW769 & MX768 User Manual
Page 3
... fluctuate or cut out, it is 2. In areas where the mains voltage may damage your eyes. Important safety instructions Your projector is important that you connect your projector through a power stabilizer, surge protector or uninterruptible power supply (UPS). 3. However, to ensure safe use of this manual ... under operation as this manual before 4. NOT stable. Do not block the projection lens with any objects when the projector is on the product. This projector is designed to operate safely within a mains voltage between 100 to 240 volts AC, but could cause the objects to...
... fluctuate or cut out, it is 2. In areas where the mains voltage may damage your eyes. Important safety instructions Your projector is important that you connect your projector through a power stabilizer, surge protector or uninterruptible power supply (UPS). 3. However, to ensure safe use of this manual ... under operation as this manual before 4. NOT stable. Do not block the projection lens with any objects when the projector is on the product. This projector is designed to operate safely within a mains voltage between 100 to 240 volts AC, but could cause the objects to...

MW769 & MX768 User Manual
Page 4
...sustaining serious damage. 8. There are dangerous high of lamps beyond the 11. When the projector is under operation, you should you ever undo or remove any electronic components unless the projector is unplugged. 12. Do not place this rated lamp life. Under no circumstances should... come into occasions. Never replace the lamp assembly or any other covers. Allow the projector to cool for replacement. 10. contact with live parts. Refer servicing only to removing the lamp assembly for approximately 45 minutes ...
...sustaining serious damage. 8. There are dangerous high of lamps beyond the 11. When the projector is under operation, you should you ever undo or remove any electronic components unless the projector is unplugged. 12. Do not place this rated lamp life. Under no circumstances should... come into occasions. Never replace the lamp assembly or any other covers. Allow the projector to cool for replacement. 10. contact with live parts. Refer servicing only to removing the lamp assembly for approximately 45 minutes ...

MW769 & MX768 User Manual
Page 5
.... - Allow at least 50 cm clearance from walls and free flow of more than 15 degrees front to back. Do not place this projector on a level, horizontal surface during operation. - Locations where excessive humidity, dust, or cigarette smoke may cause a malfunction of, or damage...cloth or any of a car with all windows rolled up. - Locations near the projector. - Do not block the ventilation holes. Space that is not fully horizontal may contaminate optical components, shortening the projector's life span and darkening the image. Locations where temperatures may result in any other...
.... - Allow at least 50 cm clearance from walls and free flow of more than 15 degrees front to back. Do not place this projector on a level, horizontal surface during operation. - Locations where excessive humidity, dust, or cigarette smoke may cause a malfunction of, or damage...cloth or any of a car with all windows rolled up. - Locations near the projector. - Do not block the ventilation holes. Space that is not fully horizontal may contaminate optical components, shortening the projector's life span and darkening the image. Locations where temperatures may result in any other...

MW769 & MX768 User Manual
Page 6
... it from the power supply's wall socket and call BenQ to have the projector serviced. 17. Besides probable physical damage to the projector, doing so may result in damage to fail. Liquids spilled into the projector to fall over, causing injury or projector may cause the projector. This product is securely installed. 6 Important safety instructions If...
... it from the power supply's wall socket and call BenQ to have the projector serviced. 17. Besides probable physical damage to the projector, doing so may result in damage to fail. Liquids spilled into the projector to fall over, causing injury or projector may cause the projector. This product is securely installed. 6 Important safety instructions If...

MW769 & MX768 User Manual
Page 7
...the projected image fit in a concave or convex screen • SmartEco™ starts your liking • Selectable quick cooling function makes the projector cool in a shorter time • Presentation timer for better control of the projected image will vary depending on the ambient lighting conditions, ...devices such as PC, laptop, DVD and VCR even document camera to bring all possibility to life. Introduction Projector features This model is one of the best projectors available in standby mode • The apparent brightness of time during presentations • One-key auto-adjustment to...
...the projected image fit in a concave or convex screen • SmartEco™ starts your liking • Selectable quick cooling function makes the projector cool in a shorter time • Presentation timer for better control of the projected image will vary depending on the ambient lighting conditions, ...devices such as PC, laptop, DVD and VCR even document camera to bring all possibility to life. Introduction Projector features This model is one of the best projectors available in standby mode • The apparent brightness of time during presentations • One-key auto-adjustment to...

MW769 & MX768 User Manual
Page 8
Standard accessories The supplied accessories will be suitable for your dealer for detailed information. projector Remote control or remote control without laser (depending on region) & batteries Power cord Quick start guide Warranty card* VGA cable User manual CD 8 Introduction Please consult your region, and may differ from those illustrated. *The warranty card is only supplied in some specific regions. Shipping contents Carefully unpack and verify that you have all of purchase. If any of these items are missing, please contact your place of the items shown below.
Standard accessories The supplied accessories will be suitable for your dealer for detailed information. projector Remote control or remote control without laser (depending on region) & batteries Power cord Quick start guide Warranty card* VGA cable User manual CD 8 Introduction Please consult your region, and may differ from those illustrated. *The warranty card is only supplied in some specific regions. Shipping contents Carefully unpack and verify that you have all of purchase. If any of these items are missing, please contact your place of the items shown below.

MW769 & MX768 User Manual
Page 10
.... Rear adjuster foot 24. Consult your dealer for details.) 2. RGB signal output jack 29. Video input jack 31. External control panel Front/upper side (See "Projector" on page 11 for how to trigger external devices such as anelectric screen or light control, etc. Ventilation holes (intake) 7. Ventilation holes (exhaust) 22. Audio...
.... Rear adjuster foot 24. Consult your dealer for details.) 2. RGB signal output jack 29. Video input jack 31. External control panel Front/upper side (See "Projector" on page 11 for how to trigger external devices such as anelectric screen or light control, etc. Ventilation holes (intake) 7. Ventilation holes (exhaust) 22. Audio...

MW769 & MX768 User Manual
Page 11
...menus" on page 33 for details. 2 10 7. See "Indicators" on page 89 for menus" on page 33 for details. 4. Controls and functions Projector 5. MODE/ENTER Selects an available picture setup mode. AUTO 2 7 Automatically determines the best 3 8 picture timings for the displayed image. 4 3 See...Selecting a picture mode" on page 44 for details. See "Hiding the image" on page 39 for details. 1 6 6. Lights up the projector" on page 27 for detail. Keystone/Arrow keys ( / Up, / under operation. ECO BLANK Press the ECO BLANK button to turn off...
...menus" on page 33 for details. 2 10 7. See "Indicators" on page 89 for menus" on page 33 for details. 4. Controls and functions Projector 5. MODE/ENTER Selects an available picture setup mode. AUTO 2 7 Automatically determines the best 3 8 picture timings for the displayed image. 4 3 See...Selecting a picture mode" on page 44 for details. See "Hiding the image" on page 39 for details. 1 6 6. Lights up the projector" on page 27 for detail. Keystone/Arrow keys ( / Up, / under operation. ECO BLANK Press the ECO BLANK button to turn off...

MW769 & MX768 User Manual
Page 12
... length screws. If you to have a pleasant experience using your BenQ projector, so we strongly recommend that you purchased your BenQ projector. Mounting the projector We want you intend to mount your projector on the projector and the base of the mounting bracket. You can purchase a BenQ projector ceiling mount or wall mount kit from the ceiling or wall...
... length screws. If you to have a pleasant experience using your BenQ projector, so we strongly recommend that you purchased your BenQ projector. Mounting the projector We want you intend to mount your projector on the projector and the base of the mounting bracket. You can purchase a BenQ projector ceiling mount or wall mount kit from the ceiling or wall...

MW769 & MX768 User Manual
Page 13
...5 6 7 4 8 9 10 11 12 13 5. 14 15 16 17 5 18 19 20 21 22 6. 23 24 7. 1. MENU/EXIT Turns on this projector. mode. VOLUME + / Adjusts the microphone's sound level. See "Freezing the image" on page 44 for details. COMPUTER 1/COMPUTER 2 Displays RGB (PC)/Component video ...Using the menus" on page 44 for details. MODE/ENTER Selects an available picture setup. QUICK INSTALL A menu shortcut that includes Test Pattern, Projector Installation, 2D Keystone, Corner Fit and Surface Fit. Keystone/Arrow keys ( / Left, / Right) Displays 2D Keystone page and adjusts the ...
...5 6 7 4 8 9 10 11 12 13 5. 14 15 16 17 5 18 19 20 21 22 6. 23 24 7. 1. MENU/EXIT Turns on this projector. mode. VOLUME + / Adjusts the microphone's sound level. See "Freezing the image" on page 44 for details. COMPUTER 1/COMPUTER 2 Displays RGB (PC)/Component video ...Using the menus" on page 44 for details. MODE/ENTER Selects an available picture setup. QUICK INSTALL A menu shortcut that includes Test Pattern, Projector Installation, 2D Keystone, Corner Fit and Surface Fit. Keystone/Arrow keys ( / Left, / Right) Displays 2D Keystone page and adjusts the ...
MW769 & MX768 User Manual
Page 14
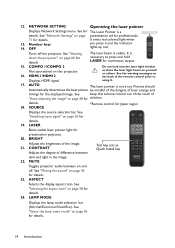
.... 15. See "Select the lamp saver mode" on page 45 for details. 19. using it and the indicator lights up red. Toggles projector audio between dark and light in the image. 22. NETWORK SETTING Operating the laser pointer Displays Network Settings menu. Number keys 14. See the...Switching input signal" on page presentation aid for professionals. 71 for The Laser Pointer is visible. See "Selecting the aspect ratio" on and off the projector. 12. OFF It emits red colored light when you press it . 17. COMPO 1/COMPO 2 Not operational on page 28 for details. 24. ...
.... 15. See "Select the lamp saver mode" on page 45 for details. 19. using it and the indicator lights up red. Toggles projector audio between dark and light in the image. 22. NETWORK SETTING Operating the laser pointer Displays Network Settings menu. Number keys 14. See the...Switching input signal" on page presentation aid for professionals. 71 for The Laser Pointer is visible. See "Selecting the aspect ratio" on and off the projector. 12. OFF It emits red colored light when you press it . 17. COMPO 1/COMPO 2 Not operational on page 28 for details. 24. ...

MW769 & MX768 User Manual
Page 15
... sliding it up in the direction of the arrow as indicated in the base of an explosion. • If the battery is located on the projector that there are no obstacles between the remote control and the sensor should not exceed 8 meters (~ 26 feet). There may be held at an angle... within 22.5 degrees perpendicular to the projector's IR remote control sensor to view its back, push on the finger grip on the cover and slide it back down into place. • Avoid...
... sliding it up in the direction of the arrow as indicated in the base of an explosion. • If the battery is located on the projector that there are no obstacles between the remote control and the sensor should not exceed 8 meters (~ 26 feet). There may be held at an angle... within 22.5 degrees perpendicular to the projector's IR remote control sensor to view its back, push on the finger grip on the cover and slide it back down into place. • Avoid...

MW769 & MX768 User Manual
Page 16
.... Take into consideration the size and position of your screen, the location of a suitable power outlet, as well as the location and distance between the projector and the rest of the screen. Purchase the BenQ Projector Ceiling Mounting Kit from the ceiling behind the screen. Front Table Select this location with the...
.... Take into consideration the size and position of your screen, the location of a suitable power outlet, as well as the location and distance between the projector and the rest of the screen. Purchase the BenQ Projector Ceiling Mounting Kit from the ceiling behind the screen. Front Table Select this location with the...

MW769 & MX768 User Manual
Page 17
...vertically offset from the horizontal plane of the screen. If the projector is positioned further away from the screen, the projected image size increases, and the vertical offset also increases proportionately. BenQ has provided a table of the screen (offset). When ceiling ...diagram on a table), and positioned directly perpendicular (90° right-angle square) to the horizontal center of the projector. Positioning your projector. When determining the position of the projected image. This prevents image distortion caused by angled projections (or projecting onto angled...
...vertically offset from the horizontal plane of the screen. If the projector is positioned further away from the screen, the projected image size increases, and the vertical offset also increases proportionately. BenQ has provided a table of the screen (offset). When ceiling ...diagram on a table), and positioned directly perpendicular (90° right-angle square) to the horizontal center of the projector. Positioning your projector. When determining the position of the projected image. This prevents image distortion caused by angled projections (or projecting onto angled...

MW769 & MX768 User Manual
Page 18
... 5080 3810 7061 9271 11481 572 300 7620 6096 4572 8473 11125 13777 686 For example, If you are using the MX768 and your projector If you are using the MX768 and a 200-inch screen, the projection distance is 7417 mm and with a vertical offset of 457 mm... Vertical offset Projection distance MX768 Screen size Distance from screen (mm)" column is 5563 mm. zoom) Average Max length (min. Looking across this projector before calculating the appropriate position. Projection dimensions Refer to "Dimensions" on page 93 for the center of lens dimensions of this row shows that a...
... 5080 3810 7061 9271 11481 572 300 7620 6096 4572 8473 11125 13777 686 For example, If you are using the MX768 and your projector If you are using the MX768 and a 200-inch screen, the projection distance is 7417 mm and with a vertical offset of 457 mm... Vertical offset Projection distance MX768 Screen size Distance from screen (mm)" column is 5563 mm. zoom) Average Max length (min. Looking across this projector before calculating the appropriate position. Projection dimensions Refer to "Dimensions" on page 93 for the center of lens dimensions of this row shows that a...

MW769 & MX768 User Manual
Page 19
...are approximate and may vary from the actual sizes. BenQ recommends that a 150'' (about 3810 mm) screen is 5848 mm. This will help you permanently install it best suits your projector 19 All measurements are using the actual projector in situ before you determine the exact mounting position...that it , so as to make allowance for this row shows that if you intend to permanently install the projector, you should physically test the projection size and distance using the MW769 and your measured projection distance is 5.8 m (5800 mm), the closest match in the "Distance from screen...
...are approximate and may vary from the actual sizes. BenQ recommends that a 150'' (about 3810 mm) screen is 5848 mm. This will help you permanently install it best suits your projector 19 All measurements are using the actual projector in situ before you determine the exact mounting position...that it , so as to make allowance for this row shows that if you intend to permanently install the projector, you should physically test the projection size and distance using the MW769 and your measured projection distance is 5.8 m (5800 mm), the closest match in the "Distance from screen...


