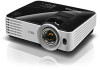

MX620 User Manual
Page 1
MS619ST/MX620ST/MW621ST Digital Projector User Manual
MS619ST/MX620ST/MW621ST Digital Projector User Manual
MX620 User Manual
Page 2
... image size 14 Connection 16 Connecting video source devices........17 Operation 18 Starting up the projector 18 Adjusting the projected image 19 Using the menus 21 Securing the projector 22 Switching input signal 24 Magnifying and searching for details ...25 Selecting the aspect ratio... 35 Presenting from a USB Reader 36 Shutting down the projector 37 Direct power off 37 Menu operation 38 Maintenance 48 Care of the projector 48 Lamp information 49 Troubleshooting 55 Specifications 56 Projector specifications 56 Dimensions 57 Ceiling mount installation 57 Timing chart ...
... image size 14 Connection 16 Connecting video source devices........17 Operation 18 Starting up the projector 18 Adjusting the projected image 19 Using the menus 21 Securing the projector 22 Switching input signal 24 Magnifying and searching for details ...25 Selecting the aspect ratio... 35 Presenting from a USB Reader 36 Shutting down the projector 37 Direct power off 37 Menu operation 38 Maintenance 48 Care of the projector 48 Lamp information 49 Troubleshooting 55 Specifications 56 Projector specifications 56 Dimensions 57 Ceiling mount installation 57 Timing chart ...
MX620 User Manual
Page 3
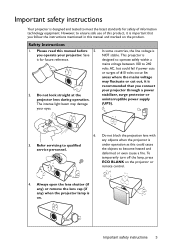
..., it is recommended that you operate your eyes. Important safety instructions 3 Do not block the projection lens with any ) when the projector lamp is designed to operate safely within a mains voltage between 100 to 240 volts AC, but could cause the objects to become heated... surges of ±10 volts occur. However, to ensure safe use of information technology equipment. Please read this manual and marked on the projector or remote control. 4. To temporarily turn off the lamp, press ECO BLANK on the product. Refer servicing to qualified service personnel. 6. ...
..., it is recommended that you operate your eyes. Important safety instructions 3 Do not block the projection lens with any ) when the projector lamp is designed to operate safely within a mains voltage between 100 to 240 volts AC, but could cause the objects to become heated... surges of ±10 volts occur. However, to ensure safe use of information technology equipment. Please read this manual and marked on the projector or remote control. 4. To temporarily turn off the lamp, press ECO BLANK on the product. Refer servicing to qualified service personnel. 6. ...
MX620 User Manual
Page 4
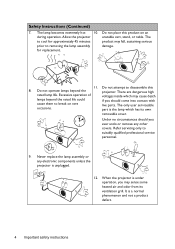
... Do not operate lamps beyond the rated life could if you ever undo or remove any electronic components unless the projector is the lamp which may cause death lamps beyond the projector. It is under operation, you may fall, sustaining serious prior to suitably qualified professional service personnel. 9. Safety ... is unplugged. 12. Refer servicing only to removing the lamp assembly damage. There are dangerous high rated lamp life. When the projector is a normal phenomenon and not a product defect. 4 Important safety instructions The lamp becomes extremely hot 10.
... Do not operate lamps beyond the rated life could if you ever undo or remove any electronic components unless the projector is the lamp which may cause death lamps beyond the projector. It is under operation, you may fall, sustaining serious prior to suitably qualified professional service personnel. 9. Safety ... is unplugged. 12. Refer servicing only to removing the lamp assembly damage. There are dangerous high rated lamp life. When the projector is a normal phenomenon and not a product defect. 4 Important safety instructions The lamp becomes extremely hot 10.
MX620 User Manual
Page 5
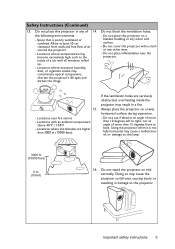
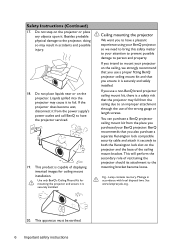
...overheating inside of 14. If the ventilation holes are higher than 15 degrees front to the projector. Important safety instructions 5 Locations with all windows rolled up. - Using the projector when it is poorly ventilated or confined. Safety Instructions (Continued) 13. Locations where temperatures.../ 104°F - Locations where excessive humidity, dust, or cigarette smoke may cause the projector to fall over, causing injury or resulting in damage to back. Do not cover this projector on a blanket, bedding or any other soft surface. - Do not block the ventilation ...
...overheating inside of 14. If the ventilation holes are higher than 15 degrees front to the projector. Important safety instructions 5 Locations with all windows rolled up. - Using the projector when it is poorly ventilated or confined. Safety Instructions (Continued) 13. Locations where temperatures.../ 104°F - Locations where excessive humidity, dust, or cigarette smoke may cause the projector to fall over, causing injury or resulting in damage to back. Do not cover this projector on a blanket, bedding or any other soft surface. - Do not block the ventilation ...
MX620 User Manual
Page 6
... to an improper attachment through the use a proper fitting BenQ projector ceiling mount kit and that the projector may fall from the power supply's power outlet and call BenQ to have a pleasant experience using your BenQ projector, so we strongly recommend that you ensure it securely to... bracket. If you use a non-BenQ brand projector ceiling mount kit, there is securely and safely installed. Besides probable physical damage to mount your projector on the projector and the base of displaying inverted images for mounting the projector and ensure it to person and property...
... to an improper attachment through the use a proper fitting BenQ projector ceiling mount kit and that the projector may fall from the power supply's power outlet and call BenQ to have a pleasant experience using your BenQ projector, so we strongly recommend that you ensure it securely to... bracket. If you use a non-BenQ brand projector ceiling mount kit, there is securely and safely installed. Besides probable physical damage to mount your projector on the projector and the base of displaying inverted images for mounting the projector and ensure it to person and property...
MX620 User Manual
Page 7
...management of the projected image will vary depending on the keypad or remote control to turn off the projector. By presenting the depth of the images, you can wear BenQ 3D glasses to enjoy the 3D movies, videos and sporting events in 10W speaker(s) providing mixed mono...time. This is connected. • 3D Function supported Various 3D formats make the 3D function more realistic way. • The apparent brightness of projector status from a computer using a web browser. • One-key auto-adjustment Pressing AUTO on the ambient lighting conditions, selected input signal contrast/...
...management of the projected image will vary depending on the keypad or remote control to turn off the projector. By presenting the depth of the images, you can wear BenQ 3D glasses to enjoy the 3D movies, videos and sporting events in 10W speaker(s) providing mixed mono...time. This is connected. • 3D Function supported Various 3D formats make the 3D function more realistic way. • The apparent brightness of projector status from a computer using a web browser. • One-key auto-adjustment Pressing AUTO on the ambient lighting conditions, selected input signal contrast/...

MX620 User Manual
Page 8
Projector QDuigiictkalSPtraortjeGctuoidr e Quick start guide Power cord VGA cable User manual CD Warranty card* Remote control with batteries Optional accessories 1. RS232 cable 4. Please consult your dealer ...
Projector QDuigiictkalSPtraortjeGctuoidr e Quick start guide Power cord VGA cable User manual CD Warranty card* Remote control with batteries Optional accessories 1. RS232 cable 4. Please consult your dealer ...
MX620 User Manual
Page 9
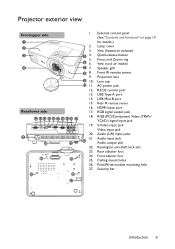
... jack Audio output jack Kensington anti-theft lock slot Rear adjuster foot Front adjuster foot Ceiling mount holes PointWrite module mounting hole Security bar Introduction 9 Projector exterior view Front/upper side 1 2 3 4 Rear/lower side 12 13 14 15 16 17 18 19 20 21 11 24 23 26 25 25 25...
... jack Audio output jack Kensington anti-theft lock slot Rear adjuster foot Front adjuster foot Ceiling mount holes PointWrite module mounting hole Security bar Introduction 9 Projector exterior view Front/upper side 1 2 3 4 Rear/lower side 12 13 14 15 16 17 18 19 20 21 11 24 23 26 25 25 25...
MX620 User Manual
Page 10
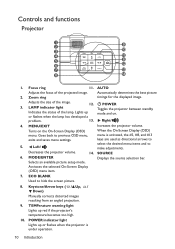
...available picture setup mode. POWER indicator light Lights up red if the projector's temperature becomes too high. 10. Controls and functions Projector 1 2 3 9 10 4 11 5 6 8 12 7 13 8 14 1. Focus ring 11. MENU/EXIT Increases the projector volume. Turns on . Keystone/Arrow keys ( / Up, / ...Down) Manually corrects distorted images resulting from an angled projection. 9. TEMPerature warning light Lights up or flashes when the projector is activated, the #5, #8, and #13 keys are used as directional arrows to select the desired menu items and to hide the screen...
...available picture setup mode. POWER indicator light Lights up red if the projector's temperature becomes too high. 10. Controls and functions Projector 1 2 3 9 10 4 11 5 6 8 12 7 13 8 14 1. Focus ring 11. MENU/EXIT Increases the projector volume. Turns on . Keystone/Arrow keys ( / Up, / ...Down) Manually corrects distorted images resulting from an angled projection. 9. TEMPerature warning light Lights up or flashes when the projector is activated, the #5, #8, and #13 keys are used as directional arrows to select the desired menu items and to hide the screen...
MX620 User Manual
Page 11
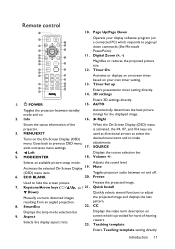
...up 22 13 23 Enters presentation timer setting directly. 14 14. 3D settings 1. MODE/ENTER 18. Adjusts the sound level. Toggles projector audio between standby Automatically determines the best picture mode and on. ECO BLANK 20. Freeze Used to previous OSD menu, adjustments. Teaching... test pattern. 22. Goes back to hide the screen picture. Info 16. Left Displays the source selection bar. 5. AUTO Toggles the projector between on the On-Screen Display (OSD) desired menu items and to adjust Manually corrects distorted images resulting from an angled projection. 8....
...up 22 13 23 Enters presentation timer setting directly. 14 14. 3D settings 1. MODE/ENTER 18. Adjusts the sound level. Toggles projector audio between standby Automatically determines the best picture mode and on. ECO BLANK 20. Freeze Used to previous OSD menu, adjustments. Teaching... test pattern. 22. Goes back to hide the screen picture. Info 16. Left Displays the source selection bar. 5. AUTO Toggles the projector between on the On-Screen Display (OSD) desired menu items and to adjust Manually corrects distorted images resulting from an angled projection. 8....
MX620 User Manual
Page 12
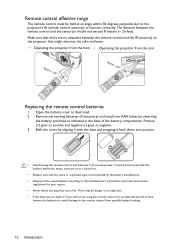
... feet). Make sure that there are dead or if you will not be held at an angle within 30 degrees perpendicular to the projector's IR remote control sensor(s) to function correctly. Remove any existing batteries (if necessary) and install two AAA batteries observing the battery polarities... 1. The distance between the remote control and the IR sensor(s) on the projector that might obstruct the infra-red beam. • Operating the projector from the front • Operating the projector from possible battery leakage. 12 Introduction Remote control effective range The remote control ...
... feet). Make sure that there are dead or if you will not be held at an angle within 30 degrees perpendicular to the projector's IR remote control sensor(s) to function correctly. Remove any existing batteries (if necessary) and install two AAA batteries observing the battery polarities... 1. The distance between the remote control and the IR sensor(s) on the projector that might obstruct the infra-red beam. • Operating the projector from the front • Operating the projector from possible battery leakage. 12 Introduction Remote control effective range The remote control ...
MX620 User Manual
Page 13
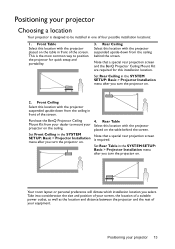
... upside-down from the ceiling in the SYSTEM SETUP: Basic > Projector Installation menu after you turn the projector on . 4. Purchase the BenQ Projector Ceiling Mount Kit from the ceiling behind the screen. Set Front Ceiling in front of four possible installation locations: 1. ...on the ceiling. Set Rear Ceiling in one of the screen. Front Ceiling Select this location with the projector placed on . Note that a special rear projection screen and the BenQ Projector Ceiling Mount Kit are required for quick setup and portability. 3. Positioning your equipment. This is the ...
... upside-down from the ceiling in the SYSTEM SETUP: Basic > Projector Installation menu after you turn the projector on . 4. Purchase the BenQ Projector Ceiling Mount Kit from the ceiling behind the screen. Set Front Ceiling in front of four possible installation locations: 1. ...on the ceiling. Set Rear Ceiling in one of the screen. Front Ceiling Select this location with the projector placed on . Note that a special rear projection screen and the BenQ Projector Ceiling Mount Kit are required for quick setup and portability. 3. Positioning your equipment. This is the ...
MX620 User Manual
Page 14
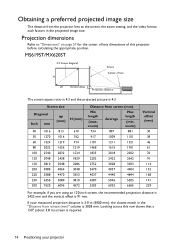
... 220 5588 4470 250 6350 5080 300 7620 6096 610 762 914 1219 1524 1829 2286 3048 3353 3810 4572 Distance from the projector lens to "Dimensions" on page 57 for the center of lens dimensions of lens W Vertical offset Projection distance The screen aspect... 3.0 m (3000 mm), the closest match in the projected image size. Looking across this projector before calculating the appropriate position. Obtaining a preferred projected image size The distance from screen (mm) Min length (max. MS619ST/MX620ST 4:3 Screen diagonal H Screen Center of this row shows that a 150'' (about 3.8 m)...
... 220 5588 4470 250 6350 5080 300 7620 6096 610 762 914 1219 1524 1829 2286 3048 3353 3810 4572 Distance from the projector lens to "Dimensions" on page 57 for the center of lens dimensions of lens W Vertical offset Projection distance The screen aspect... 3.0 m (3000 mm), the closest match in the projected image size. Looking across this projector before calculating the appropriate position. Obtaining a preferred projected image size The distance from screen (mm) Min length (max. MS619ST/MX620ST 4:3 Screen diagonal H Screen Center of this row shows that a 150'' (about 3.8 m)...
MX620 User Manual
Page 15
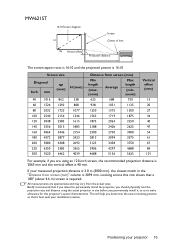
BenQ recommends that a 180'' (about 4.6 m) screen is 3094 mm. Looking across this projector's optical characteristics. zoom) 625 688 750 938 1031 ... so as to make allowance for this row shows that if you intend to permanently install the projector, you should physically test the projection size and distance using an 120-inch screen, the recommended ... 2423 2692 3365 4039 Distance from screen (mm) Min length (max. All measurements are using the actual projector in the "Distance from the actual sizes. MW621ST 16:10 Screen diagonal H Screen Center of lens W...
BenQ recommends that a 180'' (about 4.6 m) screen is 3094 mm. Looking across this projector's optical characteristics. zoom) 625 688 750 938 1031 ... so as to make allowance for this row shows that if you intend to permanently install the projector, you should physically test the projection size and distance using an 120-inch screen, the recommended ... 2423 2692 3365 4039 Distance from screen (mm) Min length (max. All measurements are using the actual projector in the "Distance from the actual sizes. MW621ST 16:10 Screen diagonal H Screen Center of lens W...
MX620 User Manual
Page 16
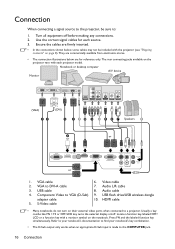
...-A cable 7. The rear connecting jacks available on their external video ports when connected to a projector. Video cable 2. Component Video to VGA (D-Sub) 9. S-Video cable • Many notebooks do not turn on the projector vary with each source. 3. They are commercially available from electronics stores. • The connection...be sure to: 1. Audio cable 4. USB flash drive/USB wireless dongle adapter cable 10. Connection When connecting a signal source to the projector, be included with the projector (see "Shipping contents" on the notebook. Turn all equipment off .
...-A cable 7. The rear connecting jacks available on their external video ports when connected to a projector. Video cable 2. Component Video to VGA (D-Sub) 9. S-Video cable • Many notebooks do not turn on the projector vary with each source. 3. They are commercially available from electronics stores. • The connection...be sure to: 1. Audio cable 4. USB flash drive/USB wireless dongle adapter cable 10. Connection When connecting a signal source to the projector, be included with the projector (see "Shipping contents" on the notebook. Turn all equipment off .
MX620 User Manual
Page 17
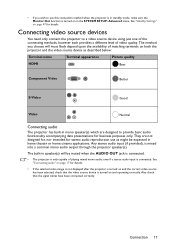
... use as described below: Terminal name Terminal appearance Picture quality HDMI Best Component Video Better S-Video Good Video Normal Connecting audio The projector has built-in mono speaker(s) which are not designed for, nor intended for details. • If the selected video image is...in home theater or home cinema applications. Any stereo audio input (if provided), is mixed into a common mono audio output through the projector speaker(s). They are designed to a video source device using just one of the connecting methods, however each provides a different level of ...
... use as described below: Terminal name Terminal appearance Picture quality HDMI Best Component Video Better S-Video Good Video Normal Connecting audio The projector has built-in mono speaker(s) which are not designed for, nor intended for details. • If the selected video image is...in home theater or home cinema applications. Any stereo audio input (if provided), is mixed into a common mono audio output through the projector speaker(s). They are designed to a video source device using just one of the connecting methods, however each provides a different level of ...

MX620 User Manual
Page 18
...the connected equipment on -screen instructions. 4. See "Timing chart" on page 34 for approximately 90 seconds before energizing the lamp. 3. Turn on the projector lights orange after power has been applied. As soon as the lamp lights up, a "Power On Ring Tone" will start up, a startup logo...24 for the first time, select your desired input signal. The POWER indicator light flashes green and stays green when the projector is found. The start the projector. The projector will be heard. The current input signal being scanned appears in the upper left corner of start to search for a...
...the connected equipment on -screen instructions. 4. See "Timing chart" on page 34 for approximately 90 seconds before energizing the lamp. 3. Turn on the projector lights orange after power has been applied. As soon as the lamp lights up, a "Power On Ring Tone" will start up, a startup logo...24 for the first time, select your desired input signal. The POWER indicator light flashes green and stays green when the projector is found. The start the projector. The projector will be heard. The current input signal being scanned appears in the upper left corner of start to search for a...
MX620 User Manual
Page 19
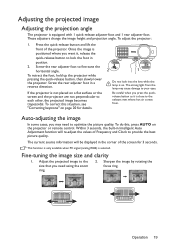
...to lock the foot in position. 2. Fine-tuning the image size and clarity 1. Screw the rear adjuster foot in the corner of the projector. Auto-adjusting the image In some cases, you may cause damage to provide the best picture quality. Adjust the projected image to optimize ...the picture quality. Adjusting the projected image Adjusting the projection angle The projector is selected. These adjusters change the image height and projection angle. Once the image is close to the exhaust vent where hot air...
...to lock the foot in position. 2. Fine-tuning the image size and clarity 1. Screw the rear adjuster foot in the corner of the projector. Auto-adjusting the image In some cases, you may cause damage to provide the best picture quality. Adjust the projected image to optimize ...the picture quality. Adjusting the projected image Adjusting the projection angle The projector is selected. These adjusters change the image height and projection angle. Once the image is close to the exhaust vent where hot air...
MX620 User Manual
Page 20
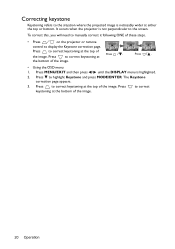
... highlighted. 2. the bottom of these steps. • Press / on the projector or remote control to display the Keystone correction page. Press to correct keystoning at Press / . Press / . • Using the OSD menu 1. Press MENU/EXIT and ...
... highlighted. 2. the bottom of these steps. • Press / on the projector or remote control to display the Keystone correction page. Press to correct keystoning at Press / . Press / . • Using the OSD menu 1. Press MENU/EXIT and ...


