
MX660P User Manual
Page 2
... instructions 3 Introduction 7 Projector features 7 Shipping contents 8 Projector exterior view 9 Controls and functions 10 Positioning your projector13 Choosing a location 13 Obtaining a preferred projected image size 14 Connection 15 Connecting video source devices........ 16 Operation 17 Starting up the projector 17 Adjusting the projected image 18 Using the menus 20 Securing the projector 21 Switching input signal 24 Magnifying and searching for details . 25 Selecting the aspect ratio 25 Optimizing the image 27 Setting the presentation timer 30 Remote paging operations...
... instructions 3 Introduction 7 Projector features 7 Shipping contents 8 Projector exterior view 9 Controls and functions 10 Positioning your projector13 Choosing a location 13 Obtaining a preferred projected image size 14 Connection 15 Connecting video source devices........ 16 Operation 17 Starting up the projector 17 Adjusting the projected image 18 Using the menus 20 Securing the projector 21 Switching input signal 24 Magnifying and searching for details . 25 Selecting the aspect ratio 25 Optimizing the image 27 Setting the presentation timer 30 Remote paging operations...

MX660P User Manual
Page 7
... input signal contrast/brightness settings, and is directly proportional to deliver high reliability and ease of use. This is connected • Component HDTV compatibility (YPbPr) • The apparent brightness of time during presentations • One-key auto-adjustment to display the best picture quality • Digital keystone correction to correct distorted images • Adjustable color balance control for data/video display • Ability to display 16.7 million colors • Multi-language On-Screen Display...
... input signal contrast/brightness settings, and is directly proportional to deliver high reliability and ease of use. This is connected • Component HDTV compatibility (YPbPr) • The apparent brightness of time during presentations • One-key auto-adjustment to display the best picture quality • Digital keystone correction to correct distorted images • Adjustable color balance control for data/video display • Ability to display 16.7 million colors • Multi-language On-Screen Display...
MX660P User Manual
Page 10
... becomes too high. POWER Toggles the projector between standby 14. LAMP indicator light Indicates the status of the image. 3. AUTO Automatically determines the best picture timings for the displayed image. Activates the selected On-Screen Display (OSD) menu item. Right/ Activates panel key lock. exits and saves menu settings. 5. BLANK Used to previous OSD menu, 13. SOURCE Displays the source selection bar. 10 Introduction Focus ring Adjusts the focus of the projected image. 2. Left/ Starts the FAQ function. 7. MENU/EXIT Turns on . 6. Controls and functions...
... becomes too high. POWER Toggles the projector between standby 14. LAMP indicator light Indicates the status of the image. 3. AUTO Automatically determines the best picture timings for the displayed image. Activates the selected On-Screen Display (OSD) menu item. Right/ Activates panel key lock. exits and saves menu settings. 5. BLANK Used to previous OSD menu, 13. SOURCE Displays the source selection bar. 10 Introduction Focus ring Adjusts the focus of the projected image. 2. Left/ Starts the FAQ function. 7. MENU/EXIT Turns on . 6. Controls and functions...

MX660P User Manual
Page 11
... the best picture timings for the displayed image. 12 11. Remote control 1 2 3 Capture 4 5 6 9. POWER Displays the source selection bar. Introduction 11 Toggles the projector between standby mode 13. Right/ 13 9 Activates panel key lock. 14 When the On-Screen Display (OSD) 7 menu is activated, the #4, #9, and #11 15 keys are used as your display software program (on the On-Screen Display (OSD) menu. Adjusts the sound level. 8. CAPTURE Selects an available picture setup mode. MENU/EXIT Turns on a connected PC) which...
... the best picture timings for the displayed image. 12 11. Remote control 1 2 3 Capture 4 5 6 9. POWER Displays the source selection bar. Introduction 11 Toggles the projector between standby mode 13. Right/ 13 9 Activates panel key lock. 14 When the On-Screen Display (OSD) 7 menu is activated, the #4, #9, and #11 15 keys are used as your display software program (on the On-Screen Display (OSD) menu. Adjusts the sound level. 8. CAPTURE Selects an available picture setup mode. MENU/EXIT Turns on a connected PC) which...

MX660P User Manual
Page 16
... video source has been selected, check that the signal cables have been connected correctly. 16 Connection Locate a function key labeled CRT/LCD or a function key with a monitor symbol on page 51 for stereo audio reproduction use as might be muted when the AUDIO OUT jack is connected. • In the unlikely event that you connect the projector to a DVD player via the projector's HDMI input and the projected picture displays wrong colors...
... video source has been selected, check that the signal cables have been connected correctly. 16 Connection Locate a function key labeled CRT/LCD or a function key with a monitor symbol on page 51 for stereo audio reproduction use as might be muted when the AUDIO OUT jack is connected. • In the unlikely event that you connect the projector to a DVD player via the projector's HDMI input and the projected picture displays wrong colors...

MX660P User Manual
Page 17
... arrow keys to enter a six-digit password. Plug the power cord into the projector and into a power outlet. Turn on . 6. power cord) only with the projector's resolution or set the input signal to adjust the image clearness. If you will continue displaying until an input signal is projected. (If necessary) Rotate the focus ring to a lower setting. See "Timing chart" on the projector or remote control to avoid possible dangers such as the lamp lights up , a startup logo is...
... arrow keys to enter a six-digit password. Plug the power cord into the projector and into a power outlet. Turn on . 6. power cord) only with the projector's resolution or set the input signal to adjust the image clearness. If you will continue displaying until an input signal is projected. (If necessary) Rotate the focus ring to a lower setting. See "Timing chart" on the projector or remote control to avoid possible dangers such as the lamp lights up , a startup logo is...

MX660P User Manual
Page 22
.... The projector RECALL PASSWORD will display a coded number on the projector or remote control for 3 seconds. Write down the recall code, and contact BenQ Customer Center. Recall Code: 0 2 1 2 center to verify that you are an MENU Exit authorized user of purchase documentation to decode the number. You can use the password recall procedure. Entering the password recall procedure 1. digit password, or if you did not record the password in a short time...
.... The projector RECALL PASSWORD will display a coded number on the projector or remote control for 3 seconds. Write down the recall code, and contact BenQ Customer Center. Recall Code: 0 2 1 2 center to verify that you are an MENU Exit authorized user of purchase documentation to decode the number. You can use the password recall procedure. Entering the password recall procedure 1. digit password, or if you did not record the password in a short time...
MX660P User Manual
Page 23
... password next time when turning on -screen. Press MODE/ENTER. The Splash Screen function in hand should you ever need to you should you need to keep the old password in the SYSTEM SETUP: Basic menu will display as asterisks on the projector. If the password is incorrect, the password error message displays lasting for three seconds, and the message "INPUT PASSWORD" displays for your retry. Enter a new password. Operation 23 Enter the current password. Open...
... password next time when turning on -screen. Press MODE/ENTER. The Splash Screen function in hand should you ever need to you should you need to keep the old password in the SYSTEM SETUP: Basic menu will display as asterisks on the projector. If the password is incorrect, the password error message displays lasting for three seconds, and the message "INPUT PASSWORD" displays for your retry. Enter a new password. Operation 23 Enter the current password. Open...

MX660P User Manual
Page 24
... the SOURCE menu is multiple equipment connected to the projector, repeat steps 1-2 to YUV. Press MENU/EXIT and then press / until your desired signal is in a 4:3 aspect ratio. Switching input signal The projector can only display one of the Source buttons on the remote control, or press SOURCE on the projector or remote control. Data (graphic) "PC" presentations using mostly static images are generally brighter than "Video" using mostly moving images (movies). Press to highlight Color...
... the SOURCE menu is multiple equipment connected to the projector, repeat steps 1-2 to YUV. Press MENU/EXIT and then press / until your desired signal is in a 4:3 aspect ratio. Switching input signal The projector can only display one of the Source buttons on the remote control, or press SOURCE on the projector or remote control. Data (graphic) "PC" presentations using mostly static images are generally brighter than "Video" using mostly moving images (movies). Press to highlight Color...
MX660P User Manual
Page 31
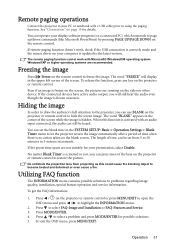
... the video or other device. Do not block the projection lens from projecting as this function is activated with an audio input connected, the audio can set from 5 to let the projector return the image automatically after a period of the screen while the image is correctly made and the mouse driver on your display software program (on the remote control. To exit the OSD menu, press MENU/EXIT. The remote paging...
... the video or other device. Do not block the projection lens from projecting as this function is activated with an audio input connected, the audio can set from 5 to let the projector return the image automatically after a period of the screen while the image is correctly made and the mouse driver on your display software program (on the remote control. To exit the OSD menu, press MENU/EXIT. The remote paging...

MX660P User Manual
Page 32
... prevent your startup screen from being changed accidentally (by pressing / on the projector locked, you can also use the High Altitude Mode if your own startup screen, project the picture you turn off the projector without disabling panel key lock, the projector will still be over -heating. The projector will operate except POWER. 1. To release panel key lock, press and hold / on the remote control are as your projector settings from either a computer or video source.
... prevent your startup screen from being changed accidentally (by pressing / on the projector locked, you can also use the High Altitude Mode if your own startup screen, project the picture you turn off the projector without disabling panel key lock, the projector will still be over -heating. The projector will operate except POWER. 1. To release panel key lock, press and hold / on the remote control are as your projector settings from either a computer or video source.

MX660P User Manual
Page 46
Standby Network On/Off SYSTEM Settings Monitor Out On/Off SETUP: Status Advanced Wireless LAN SSID IP Address Connection Mode Reset All Settings FAQ-Image and Installation FAQ-Features and Service 6. If there is no equipment connected to the projector or no signal detected, limited menu items are available when the projector detects at least one valid signal. Main menu Sub-menu Options Closed Caption Closed Caption Enable On/Off Caption Version CC1/CC2...
Standby Network On/Off SYSTEM Settings Monitor Out On/Off SETUP: Status Advanced Wireless LAN SSID IP Address Connection Mode Reset All Settings FAQ-Image and Installation FAQ-Features and Service 6. If there is no equipment connected to the projector or no signal detected, limited menu items are available when the projector detects at least one valid signal. Main menu Sub-menu Options Closed Caption Closed Caption Enable On/Off Caption Version CC1/CC2...

MX660P User Manual
Page 49
... and 12 hours. SYSTEM SETUP: Basic menu Function Quick Auto Search Description See "Switching input signal" on page 54 for the On-Screen Display (OSD) menus. Sets the language for details. Menu Display Time Sets the length of time. See "Setting Auto Power Off " on page 24 for details. Direct Power On Allows the projector to enable all the remote receivers or one or more mirrors. Operation 49 3. Color Space Conversion See "Changing Color Space...
... and 12 hours. SYSTEM SETUP: Basic menu Function Quick Auto Search Description See "Switching input signal" on page 54 for the On-Screen Display (OSD) menus. Sets the language for details. Menu Display Time Sets the length of time. See "Setting Auto Power Off " on page 24 for details. Direct Power On Allows the projector to enable all the remote receivers or one or more mirrors. Operation 49 3. Color Space Conversion See "Changing Color Space...

MX660P User Manual
Page 50
.... Audio Settings Mute Volume Power On/Off Ring Tone See "Adjusting the sound" on how the total lamp hour is calculated. Sets the background color for details. Equivalent Lamp Hour See "Getting to a new one. Selecting On enables the function and projector cooling time will display during projector start-up. SYSTEM SETUP: Basic menu 5. 4. SYSTEM SETUP: Advanced menu Function Description Panel Key Lock Background Color Disables or enables all panel key functions except POWER on the projector...
.... Audio Settings Mute Volume Power On/Off Ring Tone See "Adjusting the sound" on how the total lamp hour is calculated. Sets the background color for details. Equivalent Lamp Hour See "Getting to a new one. Selecting On enables the function and projector cooling time will display during projector start-up. SYSTEM SETUP: Basic menu 5. 4. SYSTEM SETUP: Advanced menu Function Description Panel Key Lock Background Color Disables or enables all panel key functions except POWER on the projector...

MX660P User Manual
Page 51
... function. The projector can connect the projector using a suitable RS-232 cable and update or download the projector's firmware. Enabling this function slightly increases the standby power consumption. See "Controlling the projector through a LAN environment" on -screen display of the dialogue, narration, and sound effects of TV programs and videos that you adjust the image size and focus and check that the projected image is in your screen aspect ratio to the factory preset values. Network Selecting On...
... function. The projector can connect the projector using a suitable RS-232 cable and update or download the projector's firmware. Enabling this function slightly increases the standby power consumption. See "Controlling the projector through a LAN environment" on -screen display of the dialogue, narration, and sound effects of TV programs and videos that you adjust the image size and focus and check that the projected image is in your screen aspect ratio to the factory preset values. Network Selecting On...
MX660P User Manual
Page 52
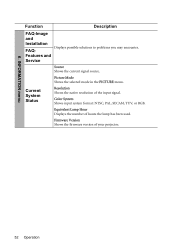
Color System Shows input system format: NTSC, PAL, SECAM, YUV, or RGB. INFORMATION menu Function Description FAQ-Image and Installation FAQ- Current System Status Resolution Shows the native resolution of your projector. 52 Operation Features and Service Source Shows the current signal source. Firmware Version Shows the firmware version of the input signal. Displays possible solutions to problems you may encounter. Picture Mode Shows the selected mode in the PICTURE menu. Equivalent Lamp Hour Displays the number of hours the lamp has been used. 6.
Color System Shows input system format: NTSC, PAL, SECAM, YUV, or RGB. INFORMATION menu Function Description FAQ-Image and Installation FAQ- Current System Status Resolution Shows the native resolution of your projector. 52 Operation Features and Service Source Shows the current signal source. Firmware Version Shows the firmware version of the input signal. Displays possible solutions to problems you may encounter. Picture Mode Shows the selected mode in the PICTURE menu. Equivalent Lamp Hour Displays the number of hours the lamp has been used. 6.

MX660P User Manual
Page 54
... no input signal is detected after a set Auto Power Off, go into the SYSTEM SETUP: Basic > Operation Settings > Auto Power Off menu and press / . To leave the menu, press MENU/EXIT. To set period of time to prevent unnecessary waste of lamp usage is automatically calculated by 20%. Lamp information Getting to know the lamp hour When the projector is in operation, the duration (in hours) of lamp life. See "Setting Lamp Mode as Economic Using Economic mode reduces...
... no input signal is detected after a set Auto Power Off, go into the SYSTEM SETUP: Basic > Operation Settings > Auto Power Off menu and press / . To leave the menu, press MENU/EXIT. To set period of time to prevent unnecessary waste of lamp usage is automatically calculated by 20%. Lamp information Getting to know the lamp hour When the projector is in operation, the duration (in hours) of lamp life. See "Setting Lamp Mode as Economic Using Economic mode reduces...

MX660P User Manual
Page 60
.... Remote control does not work Cause The battery is not correctly connected to turn on. You are not aligned properly. Open the lens cover. No picture Cause The video source is not turned on the projector, and plug the power cord into the power outlet. The lens cover is not correctly focused. Remedy Plug the power cord into the AC power jack on or connected correctly. Check the connection. Select the correct input signal with new ones. Open the lens cover. Remove...
.... Remote control does not work Cause The battery is not correctly connected to turn on. You are not aligned properly. Open the lens cover. No picture Cause The video source is not turned on the projector, and plug the power cord into the power outlet. The lens cover is not correctly focused. Remedy Plug the power cord into the AC power jack on or connected correctly. Check the connection. Select the correct input signal with new ones. Open the lens cover. Remove...

MX660P User Manual
Page 68
... user intervention. • BenQ's monitors and projectors have a variety of settings of BenQ's monitors and projectors contain unique product information that helps computer systems to identify BenQ products and activate their Plug-and-Play function when connected. • All BenQ's monitors and projectors are typically located on the front-panel. • Firmware of pre-programmed flicker-free timing to make the screen shown on every time the monitor is using...
... user intervention. • BenQ's monitors and projectors have a variety of settings of BenQ's monitors and projectors contain unique product information that helps computer systems to identify BenQ products and activate their Plug-and-Play function when connected. • All BenQ's monitors and projectors are typically located on the front-panel. • Firmware of pre-programmed flicker-free timing to make the screen shown on every time the monitor is using...

MX660P Data Sheet
Page 1
... 0 S-Video / Video xl Audio R/L xl Audio In & Out xl Kensington Lock Sirecificati.ns ER - Native Resolution XGA (1024 x 768) Brightness 3000 ANSI Lumens Contrast Ratio 5000:1 (Full on/Full off) Keystone Manual Vertical +/- 40 Degree Aspect Ratio 4:3 Native, 16:9 Selectable Color Full 1.07 Billion colors palette Lens F=2.56 - 2.8 Zoom Ratio Manual Zoom, 1.1:1 Image Size (Diagonal) 36.2" - 300" Throw Ratio 1.86 to 2.04 (53"@ 6.5 Feet) Lamp Life 210W, 3500/5000 hours...
... 0 S-Video / Video xl Audio R/L xl Audio In & Out xl Kensington Lock Sirecificati.ns ER - Native Resolution XGA (1024 x 768) Brightness 3000 ANSI Lumens Contrast Ratio 5000:1 (Full on/Full off) Keystone Manual Vertical +/- 40 Degree Aspect Ratio 4:3 Native, 16:9 Selectable Color Full 1.07 Billion colors palette Lens F=2.56 - 2.8 Zoom Ratio Manual Zoom, 1.1:1 Image Size (Diagonal) 36.2" - 300" Throw Ratio 1.86 to 2.04 (53"@ 6.5 Feet) Lamp Life 210W, 3500/5000 hours...


