
MX660P User Manual
Page 2
... 21 Switching input signal 24 Magnifying and searching for details . 25 Selecting the aspect ratio 25 Optimizing the image 27 Setting the presentation timer 30 Remote paging operations 31 Freezing the image 31 Hiding the image 31 Utilizing FAQ function 31 Locking control keys 32 Operating in a high altitude environment 32...
... 21 Switching input signal 24 Magnifying and searching for details . 25 Selecting the aspect ratio 25 Optimizing the image 27 Setting the presentation timer 30 Remote paging operations 31 Freezing the image 31 Hiding the image 31 Utilizing FAQ function 31 Locking control keys 32 Operating in a high altitude environment 32...

MX660P User Manual
Page 3
... stabilizer, surge protector or 2. Please read this product, it is designed future reference. To temporarily turn off the lamp, press BLANK on the projector or remote control. 4. In some countries, the line voltage is on the product. lens during operation. to operate safely within a mains voltage between 100 to 240 volts...
... stabilizer, surge protector or 2. Please read this product, it is designed future reference. To temporarily turn off the lamp, press BLANK on the projector or remote control. 4. In some countries, the line voltage is on the product. lens during operation. to operate safely within a mains voltage between 100 to 240 volts...

MX660P User Manual
Page 8
... suitable for your dealer for detailed information. Projector Power cord VGA cable Quick start guide User manual CD Warranty card* Capture Remote control with battery Pull the tab before using the remote control. Shipping contents Carefully unpack and verify that you have all of purchase. Soft carry case Optional accessories 1. Spare lamp...
... suitable for your dealer for detailed information. Projector Power cord VGA cable Quick start guide User manual CD Warranty card* Capture Remote control with battery Pull the tab before using the remote control. Shipping contents Carefully unpack and verify that you have all of purchase. Soft carry case Optional accessories 1. Spare lamp...

MX660P User Manual
Page 9
External control panel (See "Controls and functions" on page 10 2 for details.) 5 1 3. Vent (heated air exhaust) 6 4. Top IR remote sensor 6. Front IR remote sensor 9 10. RS232 control port Rear/lower side 16. RGB signal output jack 15 16 17 18 19 20 21 22 19. RGB (PC)/Component ...
External control panel (See "Controls and functions" on page 10 2 for details.) 5 1 3. Vent (heated air exhaust) 6 4. Top IR remote sensor 6. Front IR remote sensor 9 10. RS232 control port Rear/lower side 16. RGB signal output jack 15 16 17 18 19 20 21 22 19. RGB (PC)/Component ...

MX660P User Manual
Page 11
Remote control 1 2 3 Capture 4 5 6 9. Keystone/Arrow keys ( / Up, / Down) 8 Manually corrects distorted images 9 resulting from an angled projection. 10 10. Left/ 15. Volume +/- POWER Displays the source ...
Remote control 1 2 3 Capture 4 5 6 9. Keystone/Arrow keys ( / Up, / Down) 8 Manually corrects distorted images 9 resulting from an angled projection. 10 10. Left/ 15. Volume +/- POWER Displays the source ...

MX660P User Manual
Page 12
...holder. Note the positive polarity should not exceed 8 meters (~ 26 feet). Remote control effective range Infra-Red (IR) remote control sensors are located on the projector that there are no obstacles between the remote control and the sensors should face outward. 3. Pull out the battery holder....if you will not be held at an angle within 30 degrees perpendicular to the projector's IR remote control sensors to the battery manufacturer's instructions. • Never throw a battery into the remote control. • Avoid excessive heat and humidity. • There may be danger of an ...
...holder. Note the positive polarity should not exceed 8 meters (~ 26 feet). Remote control effective range Infra-Red (IR) remote control sensors are located on the projector that there are no obstacles between the remote control and the sensors should face outward. 3. Pull out the battery holder....if you will not be held at an angle within 30 degrees perpendicular to the projector's IR remote control sensors to the battery manufacturer's instructions. • Never throw a battery into the remote control. • Avoid excessive heat and humidity. • There may be danger of an ...

MX660P User Manual
Page 17
... as the lamp lights up , a startup logo is compatible with the device to enter a six-digit password. If the projector is on the projector or remote control to adjust the image clearness. You can also press SOURCE on . Press POWER on the projector or POWER on a blank screen. The current input... 33 for details. 5. To turn off the ring tone, see the message "Out of the connected equipment on. 6. Switch all of Range" displayed on the remote control to start to a lower setting.
... as the lamp lights up , a startup logo is compatible with the device to enter a six-digit password. If the projector is on the projector or remote control to adjust the image clearness. You can also press SOURCE on . Press POWER on the projector or POWER on a blank screen. The current input... 33 for details. 5. To turn off the ring tone, see the message "Out of the connected equipment on. 6. Switch all of Range" displayed on the remote control to start to a lower setting.

MX660P User Manual
Page 18
... image size and clarity 1. To adjust the projector: 1. Screw the rear adjuster foot to the size 2. To correct this , press AUTO on the projector or remote control. Adjusting the projected image Adjusting the projection angle The projector is on. focus ring. 18 Operation To retract the foot, hold up the projector...
... image size and clarity 1. To adjust the projector: 1. Screw the rear adjuster foot to the size 2. To correct this , press AUTO on the projector or remote control. Adjusting the projected image Adjusting the projection angle The projector is on. focus ring. 18 Operation To retract the foot, hold up the projector...
MX660P User Manual
Page 19
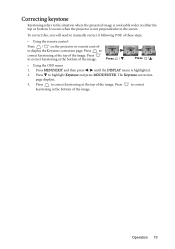
... displays. 3. Operation 19 Press / . • Using the OSD menu 1. Press to correct keystoning at the bottom of these steps. • Using the remote control Press / on the projector or remote control to correct keystoning at the bottom of the image. Press to display the Keystone correction page. To correct this, you will...
... displays. 3. Operation 19 Press / . • Using the OSD menu 1. Press to correct keystoning at the bottom of these steps. • Using the remote control Press / on the projector or remote control to correct keystoning at the bottom of the image. Press to display the Keystone correction page. To correct this, you will...

MX660P User Manual
Page 20
... Exit SYSTEM SETUP: Basic Presentation Timer Language Projector Position Menu Settings Operation Settings Remote Receiver Panel Key Lock Background Color Splash Screen MyScreen English Front Table Front+Top Off BenQ BenQ Analog RGB MENU Exit 2. The following example describes how to select a preferred...SYSTEM SETUP: Basic Presentation Timer Language Projector Position Menu Settings Operation Settings Remote Receiver Panel Key Lock Background Color Splash Screen MyScreen Analog RGB English Front Table Front+Top Off BenQ BenQ MENU Exit 4. Using the menus The projector is the overview of...
... Exit SYSTEM SETUP: Basic Presentation Timer Language Projector Position Menu Settings Operation Settings Remote Receiver Panel Key Lock Background Color Splash Screen MyScreen English Front Table Front+Top Off BenQ BenQ Analog RGB MENU Exit 2. The following example describes how to select a preferred...SYSTEM SETUP: Basic Presentation Timer Language Projector Position Menu Settings Operation Settings Remote Receiver Panel Key Lock Background Color Splash Screen MyScreen Analog RGB English Front Table Front+Top Off BenQ BenQ MENU Exit 4. Using the menus The projector is the overview of...

MX660P User Manual
Page 22
...If you enter an incorrect password 5 times in succession, the projector will automatically shut down the recall code, and contact BenQ Customer Center. Write down the number and turn on the projector or remote control for 3 seconds. digit password, or if you did not record the password in a short time. Entering the password.... You may be asked to enter the six-digit password every time you can retry by entering another six- Seek help from the local BenQ service Please write down in this manual, and you absolutely do not remember it, you turn off your projector. 3.
...If you enter an incorrect password 5 times in succession, the projector will automatically shut down the recall code, and contact BenQ Customer Center. Write down the number and turn on the projector or remote control for 3 seconds. digit password, or if you did not record the password in a short time. Entering the password.... You may be asked to enter the six-digit password every time you can retry by entering another six- Seek help from the local BenQ service Please write down in this manual, and you absolutely do not remember it, you turn off your projector. 3.

MX660P User Manual
Page 24
... sure the Quick Auto Search function in use an input signal which may cause some image distortion or loss of the Source buttons on the remote control, or press SOURCE on the projector or remote control. Computer1/YPbPr1 Computer2/YPbPr2 • Using the OSD menu 1. To select the source: • Using the... remote control or projector Press one full screen at the same time. Press to highlight Color Space Conversion and press / to work. However, it can be ...
... sure the Quick Auto Search function in use an input signal which may cause some image distortion or loss of the Source buttons on the remote control, or press SOURCE on the projector or remote control. Computer1/YPbPr1 Computer2/YPbPr2 • Using the OSD menu 1. To select the source: • Using the... remote control or projector Press one full screen at the same time. Press to highlight Color Space Conversion and press / to work. However, it can be ...
MX660P User Manual
Page 25
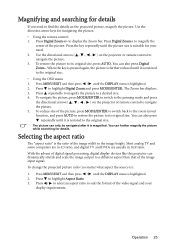
... To navigate the picture, press MODE/ENTER to switch to the panning mode and press the directional arrows ( , , , ) on the projector or remote control to navigate the picture. 5. You can also press repeatedly until it is highlighted. 2. Press to a desired size. 4. Operation 25 Magnifying and ... Zoom+/- When the key is pressed again, the picture is further reduced until it is suitable for navigating the picture. • Using the remote control 1. Press MENU/EXIT and then press / until the DISPLAY menu is restored to a different aspect than that of the picture. Press...
... To navigate the picture, press MODE/ENTER to switch to the panning mode and press the directional arrows ( , , , ) on the projector or remote control to navigate the picture. 5. You can also press repeatedly until it is highlighted. 2. Press to a desired size. 4. Operation 25 Magnifying and ... Zoom+/- When the key is pressed again, the picture is further reduced until it is suitable for navigating the picture. • Using the remote control 1. Press MENU/EXIT and then press / until the DISPLAY menu is restored to a different aspect than that of the picture. Press...
MX660P User Manual
Page 27
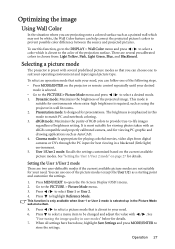
... not suitable for best viewing in well lit rooms. 2. You can follow one of the following steps. • Press MODE/ENTER on the projector or remote control repeatedly until your desired mode is closest to suit your need. To select an operation mode that suits your need . 6. Go to open the...
... not suitable for best viewing in well lit rooms. 2. You can follow one of the following steps. • Press MODE/ENTER on the projector or remote control repeatedly until your desired mode is closest to suit your need. To select an operation mode that suits your need . 6. Go to open the...

MX660P User Manual
Page 28
... the value, the more reddish the picture becomes. Adjusting Tint The higher the value, the more greenish the picture becomes. Based on the projector or remote control. The lower the value, the softer the picture becomes. T3: Maintains normal colorings for white. 4. Fine-tuning the image quality in picture. Adjusting Sharpness...
... the value, the more reddish the picture becomes. Adjusting Tint The higher the value, the more greenish the picture becomes. Based on the projector or remote control. The lower the value, the softer the picture becomes. T3: Maintains normal colorings for white. 4. Fine-tuning the image quality in picture. Adjusting Sharpness...

MX660P User Manual
Page 29
... affected. If you have purchased a test disc which contains various color test patterns and can project any image from the disc on the projector or remote control and the 3D Color Management page displays. 3. Go to measure color reproduction. Press to highlight Hue and press / to the image immediately. Every adjustment...
... affected. If you have purchased a test disc which contains various color test patterns and can project any image from the disc on the projector or remote control and the 3D Color Management page displays. 3. Go to measure color reproduction. Press to highlight Hue and press / to the image immediately. Every adjustment...

MX660P User Manual
Page 30
... produced when the timer is already on . Make sure you want to the preset time. Highlight Yes and press MODE/ENTER on the projector or remote control to show up . 7. You will see the message "Timer is reset. 3. 7. Press to highlight Timer Display and choose if you have made all of...
... produced when the timer is already on . Make sure you want to the preset time. Highlight Yes and press MODE/ENTER on the projector or remote control to show up . 7. You will see the message "Timer is reset. 3. 7. Press to highlight Timer Display and choose if you have made all of...
MX660P User Manual
Page 31
...'s full attention to the presenter, you can be heard. To get the FAQ information: 1. To exit the OSD menu, press MENU/EXIT. Operation 31 The remote paging function cannot work , check if the USB connection is correctly made and the mouse driver on your computer is activated or not, you can... software program (on a connected PC) which responds to page up/down commands (like Microsoft PowerPoint) by pressing PAGE UP/PAGE DOWN on the projector or remote control or press MENU/EXIT to open the OSD menu and press / to select a problem and press MODE/ENTER for details. Press / on the...
...'s full attention to the presenter, you can be heard. To get the FAQ information: 1. To exit the OSD menu, press MENU/EXIT. Operation 31 The remote paging function cannot work , check if the USB connection is correctly made and the mouse driver on your computer is activated or not, you can... software program (on a connected PC) which responds to page up/down commands (like Microsoft PowerPoint) by pressing PAGE UP/PAGE DOWN on the projector or remote control or press MENU/EXIT to open the OSD menu and press / to select a problem and press MODE/ENTER for details. Press / on the...

MX660P User Manual
Page 32
...3 seconds. A confirmation message displays. 2. The rest steps are still active when panel key lock is turned on. Press / on the projector or remote control or go to use this projector can make your startup screen from either a computer or video source. Operation under other extreme conditions excluding the... the picture you use the High Altitude Mode if your computer or video source. Press to state that is a picture projected from among BenQ logo, Black or Blue screen, you should switch to High Altitude mode to solve these symptoms. However, this is on, no control keys...
...3 seconds. A confirmation message displays. 2. The rest steps are still active when panel key lock is turned on. Press / on the projector or remote control or go to use this projector can make your startup screen from either a computer or video source. Operation under other extreme conditions excluding the... the picture you use the High Altitude Mode if your computer or video source. Press to state that is a picture projected from among BenQ logo, Black or Blue screen, you should switch to High Altitude mode to solve these symptoms. However, this is on, no control keys...

MX660P User Manual
Page 33
...above . 2. Setting the sound mute or changing the sound level will have made as the startup screen, set MyScreen in the "Using the remote control" section to change your target picture. If the action is connected. See "Connection" on page 15 for how the audio input is ...in the SYSTEM SETUP: Basic > Splash Screen menu and restart the projector. • Using the OSD menu 1. on the remote control. 2. Repeat steps 1-2 above . 2. Press CAPTURE on the remote control, or: 1. Please wait. 4. In the unlikely event that the capturing action fails, change Power On/Off Ring Tone...
...above . 2. Setting the sound mute or changing the sound level will have made as the startup screen, set MyScreen in the "Using the remote control" section to change your target picture. If the action is connected. See "Connection" on page 15 for how the audio input is ...in the SYSTEM SETUP: Basic > Splash Screen menu and restart the projector. • Using the OSD menu 1. on the remote control. 2. Repeat steps 1-2 above . 2. Press CAPTURE on the remote control, or: 1. Please wait. 4. In the unlikely event that the capturing action fails, change Power On/Off Ring Tone...

