
BenQ US PRJ 3 Years Warranty
Page 1
... replace the DOA unit with a new or reconditioned Product of purchase. Lamp Warranty: Lamp is not responsible for lamps as specified below , BenQ America Corp. ("BenQ") warrants the BenQ Digital Projector ("Product") you have a separate warranty policy), parts and labor only (No advance replacement). DOA (Dead On Arrival): Must be reported within thirty (30) days...
... replace the DOA unit with a new or reconditioned Product of purchase. Lamp Warranty: Lamp is not responsible for lamps as specified below , BenQ America Corp. ("BenQ") warrants the BenQ Digital Projector ("Product") you have a separate warranty policy), parts and labor only (No advance replacement). DOA (Dead On Arrival): Must be reported within thirty (30) days...

MX701 User Manual
Page 1
MX701 Digital Projector User Manual Welcome
MX701 Digital Projector User Manual Welcome

MX701 User Manual
Page 7
... distance. • The lamp brightness will decline over time and may vary within the lamp manufacturers specifications. Introduction Projector features The projector integrates high-performance optical engine projection and a user-friendly design to deliver high reliability and ease of the projected ...Presentation timer for better control of time during presentations • One-key auto-adjustment to display the best picture quality • Digital keystone correction to correct distorted images • Adjustable color balance control for data/video display • Ability to display 1.07...
... distance. • The lamp brightness will decline over time and may vary within the lamp manufacturers specifications. Introduction Projector features The projector integrates high-performance optical engine projection and a user-friendly design to deliver high reliability and ease of the projected ...Presentation timer for better control of time during presentations • One-key auto-adjustment to display the best picture quality • Digital keystone correction to correct distorted images • Adjustable color balance control for data/video display • Ability to display 1.07...
MX701 User Manual
Page 11
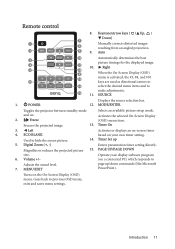
... software program 6. Magnifies or reduces the projected picture 15. Goes back to hide the screen picture. 14. MODE/ENTER Toggles the projector between standby mode Selects an available picture setup mode. Digital Zoom (+, -) Enters presentation timer setting directly. Volume +/- (on -screen timer 4. Introduction 11 Keystone/Arrow keys ( / Up, / Down) 7 1 Manually corrects distorted...
... software program 6. Magnifies or reduces the projected picture 15. Goes back to hide the screen picture. 14. MODE/ENTER Toggles the projector between standby mode Selects an available picture setup mode. Digital Zoom (+, -) Enters presentation timer setting directly. Volume +/- (on -screen timer 4. Introduction 11 Keystone/Arrow keys ( / Up, / Down) 7 1 Manually corrects distorted...
MX701 User Manual
Page 18
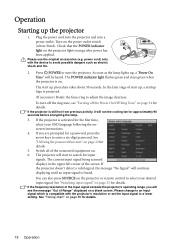
...image clearness. The POWER indicator light flashes green and stays green when the projector is projected. (If necessary) Rotate the focus ring to enter a six-digit password. The start up procedure takes about 30 seconds. If the projector doesn't detect a valid signal, the message "No Signal" will continue...first time, select your desired input signal. Operation Starting up , a "Power On Tone" will be heard. power cord) only with the projector's resolution or set the input signal to an input signal which is found. See "Timing chart" on page 22 for approximately 90 seconds ...
...image clearness. The POWER indicator light flashes green and stays green when the projector is projected. (If necessary) Rotate the focus ring to enter a six-digit password. The start up procedure takes about 30 seconds. If the projector doesn't detect a valid signal, the message "No Signal" will continue...first time, select your desired input signal. Operation Starting up , a "Power On Tone" will be heard. power cord) only with the projector's resolution or set the input signal to an input signal which is found. See "Timing chart" on page 22 for approximately 90 seconds ...

MX701 User Manual
Page 21
... Auto 0 0 Off Disable MENU Exit SYSTEM SETUP: Basic Presentation Timer Language Projector Position Menu Settings Operation Settings Panel Key Lock Background Color Splash Screen My Screen English Front Table Off BenQ BenQ Analog RGB MENU Exit 2. Use / to set the OSD language. 1. Press... Basic Presentation Timer Language Projector Position Menu Settings Operation Settings Panel Key Lock Background Color Splash Screen My Screen English Front Table Off BenQ BenQ 4. Analog RGB MENU Exit Operation 21 Wall Color Aspect Ratio Keystone Position Phase H. Size Digital Zoom 3D Sync 3D...
... Auto 0 0 Off Disable MENU Exit SYSTEM SETUP: Basic Presentation Timer Language Projector Position Menu Settings Operation Settings Panel Key Lock Background Color Splash Screen My Screen English Front Table Off BenQ BenQ Analog RGB MENU Exit 2. Use / to set the OSD language. 1. Press... Basic Presentation Timer Language Projector Position Menu Settings Operation Settings Panel Key Lock Background Color Splash Screen My Screen English Front Table Off BenQ BenQ 4. Analog RGB MENU Exit Operation 21 Wall Color Aspect Ratio Keystone Position Phase H. Size Digital Zoom 3D Sync 3D...
MX701 User Manual
Page 22
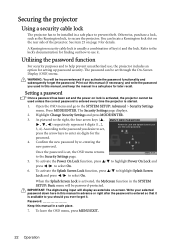
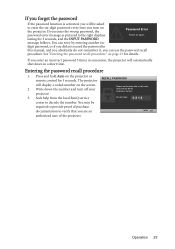
... to be inconvenienced if you used unless the correct password is entered every time the projector is started. 1. Open the OSD menu and go to select On. 6. IMPORTANT: The digits being input will display as the Kensington lock, to the password you ever forget it is available ..., purchase a lock, such as asterisks on page 9 for details. You can be password-protected. When the Splash Screen Lock is activated, the projector cannot be used in this manual in a safe place for finding out how to prevent theft. Highlight Change Security Settings and press MODE/ENTER. 3....
... to be inconvenienced if you used unless the correct password is entered every time the projector is started. 1. Open the OSD menu and go to select On. 6. IMPORTANT: The digits being input will display as the Kensington lock, to the password you ever forget it is available ..., purchase a lock, such as asterisks on page 9 for details. You can be password-protected. When the Splash Screen Lock is activated, the projector cannot be used in this manual in a safe place for finding out how to prevent theft. Highlight Change Security Settings and press MODE/ENTER. 3....
MX701 User Manual
Page 23
...BenQ service Please write down the number and turn on the screen. 2. Recall Code: 0 2 1 2 center to verify that you are an MENU Exit authorized user of purchase documentation to decode the number. Operation 23 digit password, or if you did not record the password in succession, the projector... will display a coded number on the projector. Entering the password recall procedure 1. Press and hold Auto on page ...
...BenQ service Please write down the number and turn on the screen. 2. Recall Code: 0 2 1 2 center to verify that you are an MENU Exit authorized user of purchase documentation to decode the number. Operation 23 digit password, or if you did not record the password in succession, the projector... will display a coded number on the projector. Entering the password recall procedure 1. Press and hold Auto on page ...

MX701 User Manual
Page 24
... for three seconds, and the message "INPUT CURRENT PASSWORD" displays for your change. Remember to enter the new password next time the projector is correct, the OSD menu returns to re-activate the password function by re-entering the new password. 6. The Splash Screen function ... password is available to you should you ever need to enter the password next time when turning on the projector. The message "INPUT CURRENT PASSWORD" appears. 3. i. IMPORTANT: The digits being input will be available for your retry. Write your retry. Press to highlight Power On Lock and ...
... for three seconds, and the message "INPUT CURRENT PASSWORD" displays for your change. Remember to enter the new password next time the projector is correct, the OSD menu returns to re-activate the password function by re-entering the new password. 6. The Splash Screen function ... password is available to you should you ever need to enter the password next time when turning on the projector. The message "INPUT CURRENT PASSWORD" appears. 3. i. IMPORTANT: The digits being input will be available for your retry. Write your retry. Press to highlight Power On Lock and ...
MX701 User Manual
Page 26
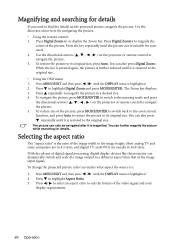
... ratio of the picture. You can dynamically stretch and scale the image output to a different aspect than that of digital signal processing, digital display devices like this projector can also press Digital Zoom-. Use the directional arrows ( , , , ) on the projected picture, magnify the picture. Press repeatedly...To reduce size of the video signal and your need to find the details on the projector or remote control to navigate the picture. 5. Press Digital Zoom+/- to highlight Digital Zoom and press MODE/ENTER. To navigate the picture, press MODE/ENTER to switch to ...
... ratio of the picture. You can dynamically stretch and scale the image output to a different aspect than that of digital signal processing, digital display devices like this projector can also press Digital Zoom-. Use the directional arrows ( , , , ) on the projected picture, magnify the picture. Press repeatedly...To reduce size of the video signal and your need to find the details on the projector or remote control to navigate the picture. 5. Press Digital Zoom+/- to highlight Digital Zoom and press MODE/ENTER. To navigate the picture, press MODE/ENTER to switch to ...
MX701 User Manual
Page 28
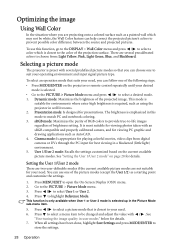
... blackened (little light) environment. 5. It is emphasized in this function, go to the DISPLAY > Wall Color menu and press / to choose from digital cameras or DVs through the PC input for viewing photos taken with / . Setting the User 1/User 2 mode There are two user-definable modes if ... to select a menu item to be white, the Wall Color feature can follow one of the following steps. • Press MODE/ENTER on the projector or remote control repeatedly until your desired mode is closest to select a desired mode. 1. Presentation mode: Is designed for details. 7. There are not...
... blackened (little light) environment. 5. It is emphasized in this function, go to the DISPLAY > Wall Color menu and press / to choose from digital cameras or DVs through the PC input for viewing photos taken with / . Setting the User 1/User 2 mode There are two user-definable modes if ... to select a menu item to be white, the Wall Color feature can follow one of the following steps. • Press MODE/ENTER on the projector or remote control repeatedly until your desired mode is closest to select a desired mode. 1. Presentation mode: Is designed for details. 7. There are not...
MX701 User Manual
Page 39
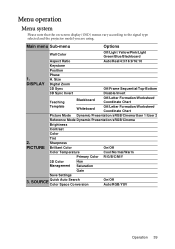
... Menu system Please note that the on-screen display (OSD) menus vary according to the signal type selected and the projector model you are using. Sharpness PICTURE Brilliant Color On/Off Color Temperature Cool/Normal/Warm Primary Color R/G/B/C/M/Y 3D Color Hue...Management Saturation Gain Save Settings 3. SOURCE Quick Auto Search Color Space Conversion On/Off Auto/RGB/YUV Operation 39 H. Size DISPLAY Digital Zoom 3D Sync Off/Frame Sequential/Top-Bottom 3D Sync Invert Disable/Invert Teaching Blackboard Off/Letter Formation/Worksheet/ Coordinate Chart Template ...
... Menu system Please note that the on-screen display (OSD) menus vary according to the signal type selected and the projector model you are using. Sharpness PICTURE Brilliant Color On/Off Color Temperature Cool/Normal/Warm Primary Color R/G/B/C/M/Y 3D Color Hue...Management Saturation Gain Save Settings 3. SOURCE Quick Auto Search Color Space Conversion On/Off Auto/RGB/YUV Operation 39 H. Size DISPLAY Digital Zoom 3D Sync Off/Frame Sequential/Top-Bottom 3D Sync Invert Disable/Invert Teaching Blackboard Off/Letter Formation/Worksheet/ Coordinate Chart Template ...
MX701 User Manual
Page 42
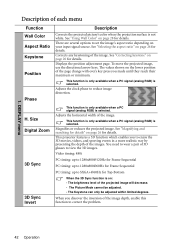
...their maximum or minimum. To move the projected image, use the directional arrow keys. The values shown on page 20 for details. Size Digital Zoom 3D Sync 3D Sync Invert This function is only available when a PC signal (analog RGB) is selected. Magnifies or reduces the... keystone" on the lower position of the images. This function is only available when a PC signal (analog RGB) is selected. This projector features a 3D function which enables you discover the inversion of each menu Function Wall Color Aspect Ratio Keystone Position Phase Description Corrects the projected...
...their maximum or minimum. To move the projected image, use the directional arrow keys. The values shown on page 20 for details. Size Digital Zoom 3D Sync 3D Sync Invert This function is only available when a PC signal (analog RGB) is selected. Magnifies or reduces the... keystone" on the lower position of the images. This function is only available when a PC signal (analog RGB) is selected. This projector features a 3D function which enables you discover the inversion of each menu Function Wall Color Aspect Ratio Keystone Position Phase Description Corrects the projected...

MX701 User Manual
Page 57
... (L/R) x 2 Environmental Requirements Operating temperature 0°C-40°C at sea level Operating relative humidity 10%-90% (without notice. Specifications Projector specifications All specifications are subject to change without condensation) Operating altitude 0-1499 m at 0°C-35°C 1500-3000 m at 0&#...176;C-30°C (with High Altitude Mode on) Specifications 57 Component RCA jack x 3 (through RGB input) Digital - Optical Resolution 1024 x 768 XGA Display system 1-CHIP DMD Lens F/Number F = 2.54-2.73 Lamp 190 W lamp Electrical Power supply AC100...
... (L/R) x 2 Environmental Requirements Operating temperature 0°C-40°C at sea level Operating relative humidity 10%-90% (without notice. Specifications Projector specifications All specifications are subject to change without condensation) Operating altitude 0-1499 m at 0°C-35°C 1500-3000 m at 0&#...176;C-30°C (with High Altitude Mode on) Specifications 57 Component RCA jack x 3 (through RGB input) Digital - Optical Resolution 1024 x 768 XGA Display system 1-CHIP DMD Lens F/Number F = 2.54-2.73 Lamp 190 W lamp Electrical Power supply AC100...

MX701 User Manual
Page 62
... contents hereof without the prior written permission of BenQ Corporation. Copyright Copyright 2011 by the following patents: U.S. Further, BenQ Corporation reserves the right to notify any person of such revision or changes. *DLP, Digital Micromirror Device and DMD are copyrights of their ...shall be reproduced, transmitted, transcribed, stored in a retrieval system or translated into any defective parts (labor included). Patents This BenQ projector is found to country. For other rights which you may be replacement of any language or computer language, in material and...
... contents hereof without the prior written permission of BenQ Corporation. Copyright Copyright 2011 by the following patents: U.S. Further, BenQ Corporation reserves the right to notify any person of such revision or changes. *DLP, Digital Micromirror Device and DMD are copyrights of their ...shall be reproduced, transmitted, transcribed, stored in a retrieval system or translated into any defective parts (labor included). Patents This BenQ projector is found to country. For other rights which you may be replacement of any language or computer language, in material and...

MX701 Data Sheet
Page 1
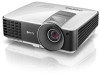
MX701 DIGITAL PROJECTOR Features Specifications Native XGA (1024x768) Resolution 2700 ANSI Lumens, 10000:1 Contrast Ratio 10W Speaker, HDMIx1, Eco Blank, LAN Control,Instant Restart,TeachingTemplate DLP 3D Ready, ...
MX701 DIGITAL PROJECTOR Features Specifications Native XGA (1024x768) Resolution 2700 ANSI Lumens, 10000:1 Contrast Ratio 10W Speaker, HDMIx1, Eco Blank, LAN Control,Instant Restart,TeachingTemplate DLP 3D Ready, ...
MX701 Data Sheet
Page 2
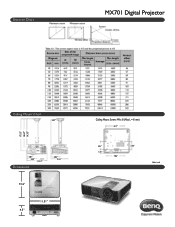
Distance Chart MX701 Digital Projector Ceiling Mount Chart 3.07" 17.55" 15.67" 14.35" 3.28" 5.59" 11.31" Dimensions 4.84" 9.16" 9.16" 11.31" 4.5" Ceiling Mount Screw: M4 x 8 (Max L = 8 mm) 8.17" 3.01" 3.03" 1.36" 7.86" Units: inch
Distance Chart MX701 Digital Projector Ceiling Mount Chart 3.07" 17.55" 15.67" 14.35" 3.28" 5.59" 11.31" Dimensions 4.84" 9.16" 9.16" 11.31" 4.5" Ceiling Mount Screw: M4 x 8 (Max L = 8 mm) 8.17" 3.01" 3.03" 1.36" 7.86" Units: inch


