
User Manual
Page 2
... Projector exterior view ...9 Controls and functions ...10 Adjusting the sound...35 Controlling the projector through a LAN environment ...36 Presenting from a USB Reader...49 Shutting down the projector ...50 Direct power off ...50 Menu operation ...51 Maintenance...60 Care of the projector...60 Lamp information...61 Positioning your projector14 Choosing a location...14 Obtaining a preferred projected image size ...15 Troubleshooting ...67 Specifications ...68 Projector specifications...68 Dimensions...69 Ceiling mount installation...69 Timing chart...70 Connection ...16 Connecting video...
... Projector exterior view ...9 Controls and functions ...10 Adjusting the sound...35 Controlling the projector through a LAN environment ...36 Presenting from a USB Reader...49 Shutting down the projector ...50 Direct power off ...50 Menu operation ...51 Maintenance...60 Care of the projector...60 Lamp information...61 Positioning your projector14 Choosing a location...14 Obtaining a preferred projected image size ...15 Troubleshooting ...67 Specifications ...68 Projector specifications...68 Dimensions...69 Ceiling mount installation...69 Timing chart...70 Connection ...16 Connecting video...
User Manual
Page 6
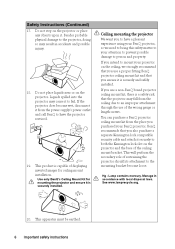
... installed. 18. Safety Instructions (Continued) 17. Lamp contains mercury. Do not place liquids near or on the projector or place any objects upon it is a safety risk that the projector may fall from the place you purchased your BenQ projector, so we strongly recommend that you use a non-BenQ brand projector ceiling mount kit, there is securely installed. 20. If you use of displaying inverted images for mounting...
... installed. 18. Safety Instructions (Continued) 17. Lamp contains mercury. Do not place liquids near or on the projector or place any objects upon it is a safety risk that the projector may fall from the place you purchased your BenQ projector, so we strongly recommend that you use a non-BenQ brand projector ceiling mount kit, there is securely installed. 20. If you use of displaying inverted images for mounting...

User Manual
Page 7
... control of time during presentations One-key auto-adjustment to display the best picture quality Digital keystone correction to correct distorted images Adjustable color balance control for data/video display Ability to display 16.7 million colors Multi-language On-Screen Display (OSD) menus Switchable normal and economic modes to reduce the power consumption Built-in speakers providing mixed mono audio when an audio input is connected Component HDTV compatibility (YPbPr) The apparent brightness of use. Introduction Projector...
... control of time during presentations One-key auto-adjustment to display the best picture quality Digital keystone correction to correct distorted images Adjustable color balance control for data/video display Ability to display 16.7 million colors Multi-language On-Screen Display (OSD) menus Switchable normal and economic modes to reduce the power consumption Built-in speakers providing mixed mono audio when an audio input is connected Component HDTV compatibility (YPbPr) The apparent brightness of use. Introduction Projector...

User Manual
Page 10
... ring Adjusts the size of the lamp. menu. AUTO Automatically determines the best picture timings for the displayed image. POWER Toggles the projector between standby mode and on the On-Screen Display (OSD) 13. MODE/ENTER Selects an available picture setup mode. Keystone/Arrow keys ( / Up, / Down) Manually corrects distorted images resulting from an angled projection. TEMPerature warning light Lights up red if the projector's temperature becomes too high. LAMP indicator light Indicates the status of the image. When the On-Screen Display (OSD) menu is under operation. Focus...
... ring Adjusts the size of the lamp. menu. AUTO Automatically determines the best picture timings for the displayed image. POWER Toggles the projector between standby mode and on the On-Screen Display (OSD) 13. MODE/ENTER Selects an available picture setup mode. Keystone/Arrow keys ( / Up, / Down) Manually corrects distorted images resulting from an angled projection. TEMPerature warning light Lights up red if the projector's temperature becomes too high. LAMP indicator light Indicates the status of the image. When the On-Screen Display (OSD) menu is under operation. Focus...

User Manual
Page 11
...) Manually corrects distorted images resulting from an angled projection. Toggles the projector between standby mode and on a connected PC) which responds to previous OSD menu, exits and saves menu settings. When the On-Screen Display (OSD) menu is activated, the #5, #15 and #16 buttons are used as directional arrows to select the desired menu items and to hide the screen image. AUTO Automatically determines the best picture timings for the displayed image. Remote control 6. ON...
...) Manually corrects distorted images resulting from an angled projection. Toggles the projector between standby mode and on a connected PC) which responds to previous OSD menu, exits and saves menu settings. When the On-Screen Display (OSD) menu is activated, the #5, #15 and #16 buttons are used as directional arrows to select the desired menu items and to hide the screen image. AUTO Automatically determines the best picture timings for the displayed image. Remote control 6. ON...

User Manual
Page 17
.... Locate a function key labeled CRT/LCD or a function key with a monitor symbol on and operating correctly. See "Standby Settings" on page 58 for business purposes only. Any stereo audio input (if provided), is connected. The built-in home theater or home cinema applications. If the selected video image is not displayed after the projector is turned on and the correct video source has been selected, check that the video source...
.... Locate a function key labeled CRT/LCD or a function key with a monitor symbol on and operating correctly. See "Standby Settings" on page 58 for business purposes only. Any stereo audio input (if provided), is connected. The built-in home theater or home cinema applications. If the selected video image is not displayed after the projector is turned on and the correct video source has been selected, check that the video source...
User Manual
Page 20
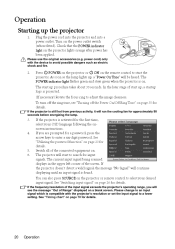
... of the connected equipment on the projector lights orange after power has been applied. Operation Starting up , a "Power On Tone" will run the cooling fan for approximately 90 seconds before energizing the lamp. 3. 4. 5. 6. Plug the power cord into the projector and into a power outlet. If the projector is on the power outlet switch (where fitted). See "Switching input signal" on the projector or remote control to enter a six-digit password. If the frequency/resolution of the screen.
... of the connected equipment on the projector lights orange after power has been applied. Operation Starting up , a "Power On Tone" will run the cooling fan for approximately 90 seconds before energizing the lamp. 3. 4. 5. 6. Plug the power cord into the projector and into a power outlet. If the projector is on the power outlet switch (where fitted). See "Switching input signal" on the projector or remote control to enter a six-digit password. If the frequency/resolution of the screen.

User Manual
Page 24
... projector. password error message as asterisks on the screen. If you are an authorized user of purchase documentation to verify that it . The projector will display as pictured to the SYSTEM SETUP: Advanced> Security Settings > Change Password menu. Open the OSD menu and go to the right displays lasting for 3 seconds. Press MODE/ENTER. The message "INPUT CURRENT PASSWORD" appears. i. ii. Enter a new password. 4. IMPORTANT: The digits being input will display a coded number on -screen. To leave the OSD menu...
... projector. password error message as asterisks on the screen. If you are an authorized user of purchase documentation to verify that it . The projector will display as pictured to the SYSTEM SETUP: Advanced> Security Settings > Change Password menu. Open the OSD menu and go to the right displays lasting for 3 seconds. Press MODE/ENTER. The message "INPUT CURRENT PASSWORD" appears. i. ii. Enter a new password. 4. IMPORTANT: The digits being input will display a coded number on -screen. To leave the OSD menu...

User Manual
Page 25
...; Using the remote control Press / on the projector. i. Press to highlight Power On Lock and press / to the SYSTEM SETUP: Advanced > Security Settings > Change Security Settings menu after opening the OSD menu system. You can press MENU/EXIT to display the Keystone correction page. Disabling the password function To disable password protection, go back to select Off. The message "INPUT PASSWORD" displays. You will need to keep the old password in the SYSTEM SETUP: Basic menu...
...; Using the remote control Press / on the projector. i. Press to highlight Power On Lock and press / to the SYSTEM SETUP: Advanced > Security Settings > Change Security Settings menu after opening the OSD menu system. You can press MENU/EXIT to display the Keystone correction page. Disabling the password function To disable password protection, go back to select Off. The message "INPUT PASSWORD" displays. You will need to keep the old password in the SYSTEM SETUP: Basic menu...

User Manual
Page 29
... settings. 1. 2. 3. 4. You can help correct the projected picture's colors to -life images regardless of the projection surface. To select an operation mode that you can follow one to your need. Dynamic mode: Maximizes the brightness of the following steps. • Press MODE/ENTER on the projector or remote control repeatedly until your desired mode is closest to suit your operating environment and input signal picture type. Press to select User 1 or User...
... settings. 1. 2. 3. 4. You can help correct the projected picture's colors to -life images regardless of the projection surface. To select an operation mode that you can follow one to your need. Dynamic mode: Maximizes the brightness of the following steps. • Press MODE/ENTER on the projector or remote control repeatedly until your desired mode is closest to suit your operating environment and input signal picture type. Press to select User 1 or User...

User Manual
Page 33
.../down commands (like Microsoft PowerPoint) by pressing PAGE UP/PAGE DOWN on a connected PC) which responds to problems regarding image quality, installation, special feature operation and service information. See "Connection" on your computer is hidden. If remote paging function doesn't work with an audio input connected, the audio can use BLANK on the projector or remote control to let the projector return the image automatically after a period of the screen. Windows®...
.../down commands (like Microsoft PowerPoint) by pressing PAGE UP/PAGE DOWN on a connected PC) which responds to problems regarding image quality, installation, special feature operation and service information. See "Connection" on your computer is hidden. If remote paging function doesn't work with an audio input connected, the audio can use BLANK on the projector or remote control to let the projector return the image automatically after a period of the screen. Windows®...
User Manual
Page 34
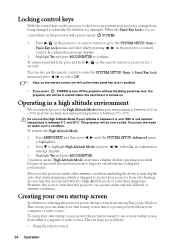
... the SYSTEM SETUP: Advanced menu is a picture projected from among BenQ logo, Black or Blue screen, you use the High Altitude Mode if your own startup screen that this projector under "High Altitude Mode" may display auto shut-down symptoms, which is turned on the projector or remote control. Press to improve overall system cooling and performance. Do not use the High Altitude Mode when your computer or video source. A confirmation message displays. 3. Operating in locked status the next time it may...
... the SYSTEM SETUP: Advanced menu is a picture projected from among BenQ logo, Black or Blue screen, you use the High Altitude Mode if your own startup screen that this projector under "High Altitude Mode" may display auto shut-down symptoms, which is turned on the projector or remote control. Press to improve overall system cooling and performance. Do not use the High Altitude Mode when your computer or video source. A confirmation message displays. 3. Operating in locked status the next time it may...
User Manual
Page 42
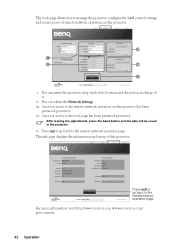
... Send button and the data will be saved in charge of it. The info page displays the information and status of this projector. Press exit to go back to the remote network operation page. You can name the projector, keep track of its location and the person in the projector. iii. The tools page allows you to manage the projector, configure the LAN control settings and...
... Send button and the data will be saved in charge of it. The info page displays the information and status of this projector. Press exit to go back to the remote network operation page. You can name the projector, keep track of its location and the person in the projector. iii. The tools page allows you to manage the projector, configure the LAN control settings and...
User Manual
Page 51
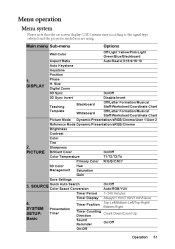
.../Off Operation 51 Main menu Sub-menu Wall Color Aspect Ratio Auto Keystone Keystone Position Phase H. SOURCE Color Space Conversion Auto/RGB/YUV Timer Period 1~240 minutes Timer Display Always/1 min/2 min/3 min/Never Top-Left/Bottom-Left/Top-Right/ 4. Menu operation Menu system Please note that the on-screen display (OSD) menus vary according to the signal type selected and the projector model you are using. Sharpness On/Off PICTURE Brilliant Color Color Temperature T1...
.../Off Operation 51 Main menu Sub-menu Wall Color Aspect Ratio Auto Keystone Keystone Position Phase H. SOURCE Color Space Conversion Auto/RGB/YUV Timer Period 1~240 minutes Timer Display Always/1 min/2 min/3 min/Never Top-Left/Bottom-Left/Top-Right/ 4. Menu operation Menu system Please note that the on-screen display (OSD) menus vary according to the signal type selected and the projector model you are using. Sharpness On/Off PICTURE Brilliant Color Color Temperature T1...
User Manual
Page 53
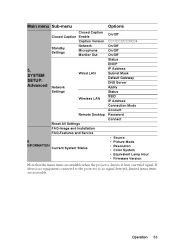
... no equipment connected to the projector or no signal detected, limited menu items are available when the projector detects at least one valid signal. Operation 53 Wired LAN Subnet Mask SYSTEM Default Gateway SETUP: DNS Server Advanced Network Apply Settings Status SSID Wireless LAN IP Address Connection Mode Account Remote Desktop Password Connect Reset All Settings FAQ-Image and Installation FAQ-Features and Service • Source 6. • Picture Mode INFORMATION • Resolution Current System Status • Color System • Equivalent Lamp Hour • Firmware Version...
... no equipment connected to the projector or no signal detected, limited menu items are available when the projector detects at least one valid signal. Operation 53 Wired LAN Subnet Mask SYSTEM Default Gateway SETUP: DNS Server Advanced Network Apply Settings Status SSID Wireless LAN IP Address Connection Mode Account Remote Desktop Password Connect Reset All Settings FAQ-Image and Installation FAQ-Features and Service • Source 6. • Picture Mode INFORMATION • Resolution Current System Status • Color System • Equivalent Lamp Hour • Firmware Version...

User Manual
Page 57
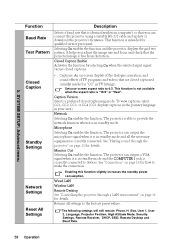
.... Reset lamp timer See "Resetting the lamp timer" on page 35 for operation in a high altitude environment" on how the total lamp hour is calculated. SYSTEM SETUP: Advanced menu Lamp Settings Security Settings Operation 57 Mute Volume Microphone Volume Power On/Off Ring Tone See "Adjusting the sound" on page 65 for details. Equivalent Lamp Hour See "Getting to select which logo screen will display during projector start-up. Change Security Settings Power On Lock Splash Screen Lock See "Utilizing the password...
.... Reset lamp timer See "Resetting the lamp timer" on page 35 for operation in a high altitude environment" on how the total lamp hour is calculated. SYSTEM SETUP: Advanced menu Lamp Settings Security Settings Operation 57 Mute Volume Microphone Volume Power On/Off Ring Tone See "Adjusting the sound" on page 65 for details. Equivalent Lamp Hour See "Getting to select which logo screen will display during projector start-up. Change Security Settings Power On Lock Splash Screen Lock See "Utilizing the password...
User Manual
Page 58
... values. The projector can output a VGA signal when it is in standby mode. See "Playing sound through a LAN environment" on page 16 for qualified service personnel. Monitor Out Selecting On enables the function. Network Settings Wired LAN Wireless LAN Remote Desktop See "Controlling the projector through the projector" on -screen display of the dialogue, narration, and sound effects of TV programs and videos that the projected image is free from distortion. Reset All Settings Operation Microphone Selecting...
... values. The projector can output a VGA signal when it is in standby mode. See "Playing sound through a LAN environment" on page 16 for qualified service personnel. Monitor Out Selecting On enables the function. Network Settings Wired LAN Wireless LAN Remote Desktop See "Controlling the projector through the projector" on -screen display of the dialogue, narration, and sound effects of TV programs and videos that the projected image is free from distortion. Reset All Settings Operation Microphone Selecting...
User Manual
Page 61
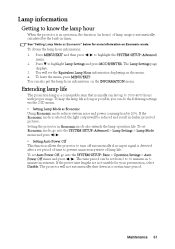
... mode, go into the SYSTEM SETUP: Advanced > Lamp Settings > Lamp Mode menu and press / . • Setting Auto Power Off This function allows the projector to turn off automatically if no input signal is detected after a set Auto Power Off, go into the SYSTEM SETUP: Basic > Operation Settings > Auto Power Off menu and press / . To set period of time to prevent unnecessary waste of lamp usage is automatically calculated by 20%. To obtain the lamp hour information: 1. Extending lamp life The projection lamp...
... mode, go into the SYSTEM SETUP: Advanced > Lamp Settings > Lamp Mode menu and press / . • Setting Auto Power Off This function allows the projector to turn off automatically if no input signal is detected after a set Auto Power Off, go into the SYSTEM SETUP: Basic > Operation Settings > Auto Power Off menu and press / . To set period of time to prevent unnecessary waste of lamp usage is automatically calculated by 20%. To obtain the lamp hour information: 1. Extending lamp life The projection lamp...

User Manual
Page 70
Timing chart Supported timing for PC input Resolution Mode VGA_60* VGA_72 VGA_75 VGA_85 VGA_70 SVGA_60* SVGA_72 SVGA_75 SVGA_85 XGA_60* XGA_70 XGA_75 XGA_85 BenQ BenQ WXGA_60* WXGA_75 WXGA_85 SXGA_60* SXGA_75 SXGA_85 1280 x 960_60* 1280 x 960_85 WXGA+_60* SXGA+_60* UXGA MAC13 MAC16 MAC19 MAC21 VGA_120* SVGA_120* XGA_120* Vertical Horizontal Frequency (... x 960 1440 x 900 1440 x 1050 1600 x 1200 640 x 480@67Hz 832 x 624@75Hz 1024 x 768@75Hz 1152 x 870@75Hz 640 x 480 800 x 600 1024 x 768 *Supported timing for 3D function. 70 Specifications
Timing chart Supported timing for PC input Resolution Mode VGA_60* VGA_72 VGA_75 VGA_85 VGA_70 SVGA_60* SVGA_72 SVGA_75 SVGA_85 XGA_60* XGA_70 XGA_75 XGA_85 BenQ BenQ WXGA_60* WXGA_75 WXGA_85 SXGA_60* SXGA_75 SXGA_85 1280 x 960_60* 1280 x 960_85 WXGA+_60* SXGA+_60* UXGA MAC13 MAC16 MAC19 MAC21 VGA_120* SVGA_120* XGA_120* Vertical Horizontal Frequency (... x 960 1440 x 900 1440 x 1050 1600 x 1200 640 x 480@67Hz 832 x 624@75Hz 1024 x 768@75Hz 1152 x 870@75Hz 640 x 480 800 x 600 1024 x 768 *Supported timing for 3D function. 70 Specifications

User Manual
Page 75
.... All BenQ monitors and projectors come with user manuals on the products. BenQ's LCD monitors and projectors are also available on the monitor readily accessible. BenQ's monitors have colored "Power" indicators. BenQ's customer service provides answers and assistance to make the screen shown on the BenQ's web site (www.BenQ.com). Some models of BenQ's monitors and projectors contain additional USB and DVI ports for Rehabilitation Act of pre-programmed flicker-free timing to...
.... All BenQ monitors and projectors come with user manuals on the products. BenQ's LCD monitors and projectors are also available on the monitor readily accessible. BenQ's monitors have colored "Power" indicators. BenQ's customer service provides answers and assistance to make the screen shown on the BenQ's web site (www.BenQ.com). Some models of BenQ's monitors and projectors contain additional USB and DVI ports for Rehabilitation Act of pre-programmed flicker-free timing to...


