
MX750 User Manual
Page 2
Table of contents Important safety instructions 3 Introduction 7 Projector features 7 Shipping contents 8 Projector exterior view 10 Controls and functions 11 Positioning your projector16 Choosing a location 16 Obtaining a preferred projected image size 17 Connection 21 Connecting a computer or monitor... 23 Connecting Video source devices....... 26 Operation 30 Starting up the projector 30 Adjusting the projected image 31 Using the menus 33 Securing the projector 34 Switching input signal 36 Magnifying and searching for details . 37 Selecting the aspect...
Table of contents Important safety instructions 3 Introduction 7 Projector features 7 Shipping contents 8 Projector exterior view 10 Controls and functions 11 Positioning your projector16 Choosing a location 16 Obtaining a preferred projected image size 17 Connection 21 Connecting a computer or monitor... 23 Connecting Video source devices....... 26 Operation 30 Starting up the projector 30 Adjusting the projected image 31 Using the menus 33 Securing the projector 34 Switching input signal 36 Magnifying and searching for details . 37 Selecting the aspect...
MX750 User Manual
Page 3
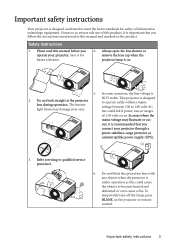
... block the projection lens with any objects when the projector is on the projector or remote control. Always open the lens shutter or remove the lens cap when the projector lamp is under operation as this product, it for safety of ±10 volts occur. Do not look straight at the projector lens during operation. However, to ensure safe use of this could fail if power cuts or...
... block the projection lens with any objects when the projector is on the projector or remote control. Always open the lens shutter or remove the lens cap when the projector lamp is under operation as this product, it for safety of ±10 volts occur. Do not look straight at the projector lens during operation. However, to ensure safe use of this could fail if power cuts or...
MX750 User Manual
Page 7
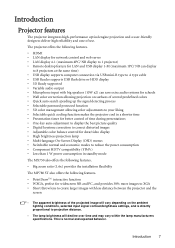
... • Selectable password protected function • 3D color management allowing color adjustments to your liking • Selectable quick cooling function makes the projector cool in a shorter time • Presentation timer for better control of time during presentations • One-key auto-adjustment to display the best picture quality • Digital keystone correction to correct distorted images • Adjustable color balance control for data/video display • High brightness projection lamp • Multi-language On-Screen Display (OSD...
... • Selectable password protected function • 3D color management allowing color adjustments to your liking • Selectable quick cooling function makes the projector cool in a shorter time • Presentation timer for better control of time during presentations • One-key auto-adjustment to display the best picture quality • Digital keystone correction to correct distorted images • Adjustable color balance control for data/video display • High brightness projection lamp • Multi-language On-Screen Display (OSD...

MX750 User Manual
Page 10
... 1. Projection lens 5. USB A type jack 6 20. RS-232 control port 18. USB mini-B type jack 24. AC power cord inlet 29. Kensington anti-theft lock slot 9 25. HDMI input jack 17. Front IR remote sensor 8 10. Lamp cover 3. Rear IR remote sensor 7 22. RGB (PC)/Component video (YPbPr/ YCbCr) signal input jack 16. External control panel (See "Projector" on page 11 for how to trigger external devices such as anelectric screen or light control...
... 1. Projection lens 5. USB A type jack 6 20. RS-232 control port 18. USB mini-B type jack 24. AC power cord inlet 29. Kensington anti-theft lock slot 9 25. HDMI input jack 17. Front IR remote sensor 8 10. Lamp cover 3. Rear IR remote sensor 7 22. RGB (PC)/Component video (YPbPr/ YCbCr) signal input jack 16. External control panel (See "Projector" on page 11 for how to trigger external devices such as anelectric screen or light control...
MX750 User Manual
Page 11
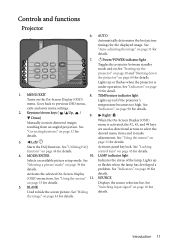
... details. Down) Manually corrects distorted images resulting from an angled projection. Selects an available picture setup mode. II Power/POWER indicator light Toggles the projector between standby mode and on.See "Starting up or flashes when the projector is activated, the #2, #3, and #9 keys are used as directional arrows to select the desired menu items and to make adjustments. MENU/EXIT 8. See "Locking control keys" on page 36 for details. See "Switching input signal" on page...
... details. Down) Manually corrects distorted images resulting from an angled projection. Selects an available picture setup mode. II Power/POWER indicator light Toggles the projector between standby mode and on.See "Starting up or flashes when the projector is activated, the #2, #3, and #9 keys are used as directional arrows to select the desired menu items and to make adjustments. MENU/EXIT 8. See "Locking control keys" on page 36 for details. See "Switching input signal" on page...

MX750 User Manual
Page 13
... for details. 16. 6. OFF Turns off the projector. NETWORK Enables the network mode. Introduction 13 ON 11. Turns on page 73 for details. Used to previous OSD menu, exits and saves menu settings. See "Hiding the image" on page 32 for details. See "Correcting keystone" on page 44 for details. Network Setting Enables Network Settings OSD menu. VIDEO Displays vidoe signal. See "Switching input signal" on page 30 for details. Remote control 7. 1 14 2 15 16...
... for details. 16. 6. OFF Turns off the projector. NETWORK Enables the network mode. Introduction 13 ON 11. Turns on page 73 for details. Used to previous OSD menu, exits and saves menu settings. See "Hiding the image" on page 32 for details. See "Correcting keystone" on page 44 for details. Network Setting Enables Network Settings OSD menu. VIDEO Displays vidoe signal. See "Switching input signal" on page 30 for details. Remote control 7. 1 14 2 15 16...

MX750 User Manual
Page 23
... the projector speaker(s) in your computer. See "Displaying image through Q Presenter" on page 73 for the first time plug-in speaker will vary according to the RJ45 port. 2. Once connected, the audio can connect to the COMPUTER 1 or COMPUTER 2 signal input jack on /off. The built-in . • If computer's screen still can use Q Presenter program to the HDMI jack of the VGA cable to...
... the projector speaker(s) in your computer. See "Displaying image through Q Presenter" on page 73 for the first time plug-in speaker will vary according to the RJ45 port. 2. Once connected, the audio can connect to the COMPUTER 1 or COMPUTER 2 signal input jack on /off. The built-in . • If computer's screen still can use Q Presenter program to the HDMI jack of the VGA cable to...
MX750 User Manual
Page 30
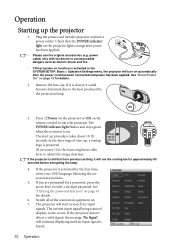
... onscreen instructions. 5. Switch all of start to the heat produced by the projection lamp. 3. Press II Power on the projector or ON on the remote control to enter a six digit password. See "Utilizing the password function" on page 34 for details. 2. If it will start up the projector 1. Check that the POWER indicator light on the projector lights orange after the power cord has been connected and power has been applied. The current input signal being scanned displays...
... onscreen instructions. 5. Switch all of start to the heat produced by the projection lamp. 3. Press II Power on the projector or ON on the remote control to enter a six digit password. See "Utilizing the password function" on page 34 for details. 2. If it will start up the projector 1. Check that the POWER indicator light on the projector lights orange after the power cord has been connected and power has been applied. The current input signal being scanned displays...
MX750 User Manual
Page 31
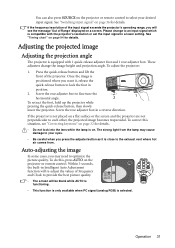
... quick-release button, then slowly lower the projector. If the frequency/resolution of Range' displayed on a screen. Operation 31 To adjust the projector: 1. Screw the rear adjuster foot in position. 2. Within 3 seconds, the built-in Intelligent Auto Adjustment function will see "Correcting keystone" on a flat surface or the screen and the projector are not perpendicular to each other, the projected image becomes trapezoidal. These adjusters change to an input signal which...
... quick-release button, then slowly lower the projector. If the frequency/resolution of Range' displayed on a screen. Operation 31 To adjust the projector: 1. Screw the rear adjuster foot in position. 2. Within 3 seconds, the built-in Intelligent Auto Adjustment function will see "Correcting keystone" on a flat surface or the screen and the projector are not perpendicular to each other, the projected image becomes trapezoidal. These adjusters change to an input signal which...
MX750 User Manual
Page 34
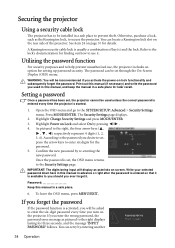
... re-entering the new password. Once the password is started. 1. If you enter the wrong password, the password error message as pictured to the SYSTEM SETUP: Advanced > Security Settings menu. You can be inconvenienced if you activate the power-on the projector. The password can locate a Kensington lock slot on page 10 for three seconds, and the message 'INPUT PASSWORD' follows. Open the OSD menu and go to the right displays lasting for...
... re-entering the new password. Once the password is started. 1. If you enter the wrong password, the password error message as pictured to the SYSTEM SETUP: Advanced > Security Settings menu. You can be inconvenienced if you activate the power-on the projector. The password can locate a Kensington lock slot on page 10 for three seconds, and the message 'INPUT PASSWORD' follows. Open the OSD menu and go to the right displays lasting for...

MX750 User Manual
Page 35
... digits being input will automatically shut down in a safe place. 5. Confirm the new password by pressing / . Disabling the password function To disable password protection, go to the SYSTEM SETUP: Advanced > Security Settings > Change Security Settings > Power on -screen. Operation 35 six-digit password, or if you did not record the password in advance or right after opening the OSD menu system. Press and hold AUTO on the projector or remote control for your projector. 3. Open...
... digits being input will automatically shut down in a safe place. 5. Confirm the new password by pressing / . Disabling the password function To disable password protection, go to the SYSTEM SETUP: Advanced > Security Settings > Change Security Settings > Power on -screen. Operation 35 six-digit password, or if you did not record the password in advance or right after opening the OSD menu system. Press and hold AUTO on the projector or remote control for your projector. 3. Open...
MX750 User Manual
Page 36
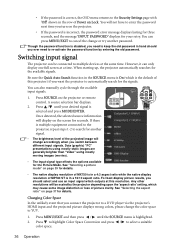
... display resolution of the projected image will display on Lock. See "Selecting a picture mode" on the projector. • If the password is incorrect, the password error message displays lasting for three seconds, and the message 'INPUT PASSWORD' displays for details. • The native display resolution of MX750 is in a 16:10 aspect ratio. Changing Color Space In the unlikely event that you want the projector to multiple devices at a time. A source selection bar displays. #-"/, 2. Data (graphic) "PC" presentations using...
... display resolution of the projected image will display on Lock. See "Selecting a picture mode" on the projector. • If the password is incorrect, the password error message displays lasting for three seconds, and the message 'INPUT PASSWORD' displays for details. • The native display resolution of MX750 is in a 16:10 aspect ratio. Changing Color Space In the unlikely event that you want the projector to multiple devices at a time. A source selection bar displays. #-"/, 2. Data (graphic) "PC" presentations using...

MX750 User Manual
Page 42
... successful, you select Red and set MyScreen in the projected RED Yellow GREEN picture will be overpowering and unrealistic. 6. For example, if you can make your own startup screen that color from either a computer or video source. 2. a setting of pure red will be affected. Saturation is processing the image. Please wait. 5. For example, if you see the message 'Captured Succeeded' on the remote control or go to...
... successful, you select Red and set MyScreen in the projected RED Yellow GREEN picture will be overpowering and unrealistic. 6. For example, if you can make your own startup screen that color from either a computer or video source. 2. a setting of pure red will be affected. Saturation is processing the image. Please wait. 5. For example, if you see the message 'Captured Succeeded' on the remote control or go to...
MX750 User Manual
Page 44
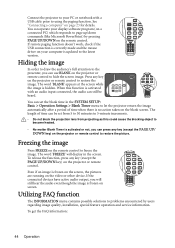
... an audio input connected, the audio can still be set from 5 to 30 minutes in the screen. You can use BLANK on your computer is updated to using the paging function. If remote paging function doesn't work, check if the USB connection is correctly made and the mouse driver on the projector or remote control to restore the picture. The word 'FREEZE' will still hear the audio even though the image...
... an audio input connected, the audio can still be set from 5 to 30 minutes in the screen. You can use BLANK on your computer is updated to using the paging function. If remote paging function doesn't work, check if the USB connection is correctly made and the mouse driver on the projector or remote control to restore the picture. The word 'FREEZE' will still hear the audio even though the image...
MX750 User Manual
Page 45
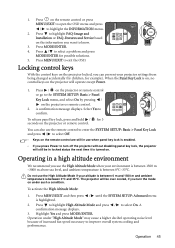
... FAQ-Image and Installation or FAQ-Features and Service based #-"/, #-"/, on the information you turn off the projector without disabling panel key lock, the projector will operate except Power. 1. Press to know. 3. You can prevent your projector settings from being changed accidentally (by pressing / on the projector or remote control. Operation under such a condition. Press / to select Off. • Keys on the remote control are still in use the High Altitude Mode...
... FAQ-Image and Installation or FAQ-Features and Service based #-"/, #-"/, on the information you turn off the projector without disabling panel key lock, the projector will operate except Power. 1. Press to know. 3. You can prevent your projector settings from being changed accidentally (by pressing / on the projector or remote control. Operation under such a condition. Press / to select Off. • Keys on the remote control are still in use the High Altitude Mode...

MX750 User Manual
Page 53
... you to manage the projector, configure the LAN control settings and secure access of it. After making the adjustments, press the Send button and the data will be saved in charge of remote network operation on this projector. You can adjust the Wired LAN settings. ii. iv. Press exit to go back to the remote network operation on this projector has been password-protected. Once set , access to the tools...
... you to manage the projector, configure the LAN control settings and secure access of it. After making the adjustments, press the Send button and the data will be saved in charge of remote network operation on this projector. You can adjust the Wired LAN settings. ii. iv. Press exit to go back to the remote network operation on this projector has been password-protected. Once set , access to the tools...
MX750 User Manual
Page 82
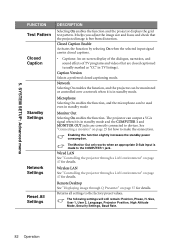
... 25 for details. Wireless LAN See "Controlling the projector through a LAN environment" on page 57 for how to the COMPUTER 1 jack. Size, User 1, User 2, Language, Projector Position, High Altitude Mode, Security Settings, Baud Rate. 82 Operation It helps you adjust the image size and focus and check that are correctly connected to the factory preset values. Closed Caption Enable Activates the function by selecting On when the selected input signal carries closed captions...
... 25 for details. Wireless LAN See "Controlling the projector through a LAN environment" on page 57 for how to the COMPUTER 1 jack. Size, User 1, User 2, Language, Projector Position, High Altitude Mode, Security Settings, Baud Rate. 82 Operation It helps you adjust the image size and focus and check that are correctly connected to the factory preset values. Closed Caption Enable Activates the function by selecting On when the selected input signal carries closed captions...
MX750 User Manual
Page 85
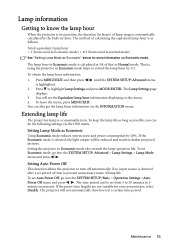
... lamp operation life. The lamp hour in Economic mode is as follows: Total (equivalent) lamp hour = 1 (hours used in Economic mode) + 4/3 (hours used in normal mode) See "Setting Lamp Mode as possible, you can be reduced and result in darker projected pictures. To obtain the lamp hour information: 1. Setting Auto Power Off This function allows the projector to turn off automatically if no input source is detected after a set Economic mode, go into the SYSTEM SETUP: Advanced > Lamp Settings > Lamp Mode menu and press / . To keep the lamp life...
... lamp operation life. The lamp hour in Economic mode is as follows: Total (equivalent) lamp hour = 1 (hours used in Economic mode) + 4/3 (hours used in normal mode) See "Setting Lamp Mode as possible, you can be reduced and result in darker projected pictures. To obtain the lamp hour information: 1. Setting Auto Power Off This function allows the projector to turn off automatically if no input source is detected after a set Economic mode, go into the SYSTEM SETUP: Advanced > Lamp Settings > Lamp Mode menu and press / . To keep the lamp life...

MX750 User Manual
Page 91
... password recall procedure" on the projector or remote control. The lens cover is still closed . Check the connection. Remedy Adjust the focus of the unit if necessary. Open the lens cover. You are not aligned properly. Troubleshooting 91 No picture Cause The video source is out of the projector. Select the correct input signal with new one. Remove the obstacle. Troubleshooting The projector does not turn the projector on . Remote control does not work Cause The battery is not turned...
... password recall procedure" on the projector or remote control. The lens cover is still closed . Check the connection. Remedy Adjust the focus of the unit if necessary. Open the lens cover. You are not aligned properly. Troubleshooting 91 No picture Cause The video source is out of the projector. Select the correct input signal with new one. Remove the obstacle. Troubleshooting The projector does not turn the projector on . Remote control does not work Cause The battery is not turned...

MX750 User Manual
Page 99
...-panel. • Firmware of BenQ's monitors and projectors contain unique product information that text and images could be easily read by including the assistive features as below: • BenQ's monitors have a variety of settings of pre-programmed flicker-free timing to make the screen shown on the monitor readily accessible. While the indicator shows green, it means that the monitor is using the full power...
...-panel. • Firmware of BenQ's monitors and projectors contain unique product information that text and images could be easily read by including the assistive features as below: • BenQ's monitors have a variety of settings of pre-programmed flicker-free timing to make the screen shown on the monitor readily accessible. While the indicator shows green, it means that the monitor is using the full power...


