
BenQ US PRJ 1 Year Warranty
Page 1
...repaired or replaced parts or products shall be reported within thirty (30) days of the original warranty period specified above. BenQ Projector Standard Limited Warranty: Subject to the exclusions set forth below and refurbished units which have purchased from defects in order to... number must be warranted only for lamps as specified below , BenQ America Corp. ("BenQ") warrants the BenQ Digital Projector ("Product") you are entitled to the following terms and conditions: END USER LIMITED WARRANTY DIGITAL PROJECTORS Subject to the terms and conditions set forth below: One (1)...
...repaired or replaced parts or products shall be reported within thirty (30) days of the original warranty period specified above. BenQ Projector Standard Limited Warranty: Subject to the exclusions set forth below and refurbished units which have purchased from defects in order to... number must be warranted only for lamps as specified below , BenQ America Corp. ("BenQ") warrants the BenQ Digital Projector ("Product") you are entitled to the following terms and conditions: END USER LIMITED WARRANTY DIGITAL PROJECTORS Subject to the terms and conditions set forth below: One (1)...

MX760 User Manual
Page 1
MX760/MX761 Digital Projector User Manual Welcome
MX760/MX761 Digital Projector User Manual Welcome

MX760 User Manual
Page 2
... Connection 17 Connecting video source devices........ 18 Playing sound through the projector . 19 Operation 21 Starting up the projector 21 Adjusting the projected image 22 Using the menus 24 Securing the projector 25 Switching input signal 28 Magnifying and searching for details . 29...38 Presenting from a USB Reader............51 Shutting down the projector 52 Direct power off 52 Menu operation 53 Maintenance 62 Care of the projector 62 Lamp information 63 Troubleshooting 69 Specifications 70 Projector specifications 70 Dimensions 71 Ceiling mount installation 71 Timing chart...
... Connection 17 Connecting video source devices........ 18 Playing sound through the projector . 19 Operation 21 Starting up the projector 21 Adjusting the projected image 22 Using the menus 24 Securing the projector 25 Switching input signal 28 Magnifying and searching for details . 29...38 Presenting from a USB Reader............51 Shutting down the projector 52 Direct power off 52 Menu operation 53 Maintenance 62 Care of the projector 62 Lamp information 63 Troubleshooting 69 Specifications 70 Projector specifications 70 Dimensions 71 Ceiling mount installation 71 Timing chart...

MX760 User Manual
Page 3
...is recommended that you 5. The intense light beam may fluctuate or cut out, it is operate your projector. Do not block the projection lens with any ) when the projector lamp is designed and tested to qualified service personnel. 6. Important safety instructions 3 However, to 240 volts... Always open the lens shutter (if any) or remove the lens cap (if any objects when the projector is designed future reference. Important safety instructions Your projector is on. Refer servicing to meet the latest standards for NOT stable. In areas where the mains voltage...
...is recommended that you 5. The intense light beam may fluctuate or cut out, it is operate your projector. Do not block the projection lens with any ) when the projector lamp is designed and tested to qualified service personnel. 6. Important safety instructions 3 However, to 240 volts... Always open the lens shutter (if any) or remove the lens cap (if any objects when the projector is designed future reference. Important safety instructions Your projector is on. Refer servicing to meet the latest standards for NOT stable. In areas where the mains voltage...

MX760 User Manual
Page 4
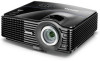
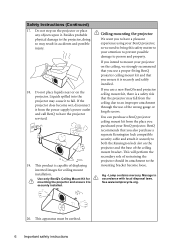
... Safety Instructions (Continued) 7. It is the lamp which may cause death lamps beyond the projector. When the projector is under operation, you should you ever undo or remove any electronic components unless the projector is unplugged. 12. The only user serviceable part is a normal phenomenon and not a ...product defect. 4 Important safety instructions Allow the projector to cool for replacement. There are dangerous high rated lamp life. Never replace the lamp assembly or any other covers....
... Safety Instructions (Continued) 7. It is the lamp which may cause death lamps beyond the projector. When the projector is under operation, you should you ever undo or remove any electronic components unless the projector is unplugged. 12. The only user serviceable part is a normal phenomenon and not a ...product defect. 4 Important safety instructions Allow the projector to cool for replacement. There are dangerous high rated lamp life. Never replace the lamp assembly or any other covers....

MX760 User Manual
Page 5
... cm clearance from walls and free flow of more than 15 degrees front to the projector. Do not use if tilted at an angle of the 14. following environments. - Do not cover this projector in a fire. Locations where the altitudes are seriously obstructed, overheating inside of , ...or damage to, the lamp. 3000 m (10000 feet) 0 m (0 feet) 16. Do not place this projector with a cloth or any other item. - Locations where excessive humidity, dust, or cigarette smoke may result in any of more than 3000 m (10000 feet). ...
... cm clearance from walls and free flow of more than 15 degrees front to the projector. Do not use if tilted at an angle of the 14. following environments. - Do not cover this projector in a fire. Locations where the altitudes are seriously obstructed, overheating inside of , ...or damage to, the lamp. 3000 m (10000 feet) 0 m (0 feet) 16. Do not place this projector with a cloth or any other item. - Locations where excessive humidity, dust, or cigarette smoke may result in any of more than 3000 m (10000 feet). ...
MX760 User Manual
Page 6
...Do not step on the ceiling, we need to bring this safety matter to fail. Liquids spilled into the projector may cause it . If you use a non-BenQ brand projector ceiling mount kit, there is capable of the ceiling mount bracket. Manage in accidents and possible injury. 18.... If you intend to mount your projector on the projector or place any objects upon it to your BenQ projector. Lamp contains mercury. This apparatus must be earthed. 6 Important safety instructions If the projector does become loose. You can purchase a BenQ projector ceiling mount kit from the place you...
...Do not step on the ceiling, we need to bring this safety matter to fail. Liquids spilled into the projector may cause it . If you use a non-BenQ brand projector ceiling mount kit, there is capable of the ceiling mount bracket. Manage in accidents and possible injury. 18.... If you intend to mount your projector on the projector or place any objects upon it to your BenQ projector. Lamp contains mercury. This apparatus must be earthed. 6 Important safety instructions If the projector does become loose. You can purchase a BenQ projector ceiling mount kit from the place you...

MX760 User Manual
Page 7
... image will decline over time and may vary within the lamp manufacturers specifications. Introduction 7 The projector offers the following features. • Network Settings allowing management of projector status from a computer using a web browser • Microphone jack to output the sound through... password protected function • 3D color management allowing color adjustments to your liking • Selectable quick cooling function making the projector cool in speakers providing mixed mono audio when an audio input is connected • Component HDTV compatibility (YPbPr) • The ...
... image will decline over time and may vary within the lamp manufacturers specifications. Introduction 7 The projector offers the following features. • Network Settings allowing management of projector status from a computer using a web browser • Microphone jack to output the sound through... password protected function • 3D color management allowing color adjustments to your liking • Selectable quick cooling function making the projector cool in speakers providing mixed mono audio when an audio input is connected • Component HDTV compatibility (YPbPr) • The ...

MX760 User Manual
Page 8
Please consult your region, and may differ from those illustrated. *The warranty card is only supplied in some specific regions. Projector Power cord VGA cable Quick start guide User manual CD Warranty card* Remote control with batteries Optional accessories 1. RS232 cable 8 Introduction Standard accessories The supplied ...
Please consult your region, and may differ from those illustrated. *The warranty card is only supplied in some specific regions. Projector Power cord VGA cable Quick start guide User manual CD Warranty card* Remote control with batteries Optional accessories 1. RS232 cable 8 Introduction Standard accessories The supplied ...

MX760 User Manual
Page 9
....) 2. HDMI-input port 18. Audio input jack 25 Audio output jack Microphone jack 25. 12V DC output terminal Used to connect these devices. 14 Introduction 9 Projector exterior view Front/upper side 1 2 3 4 5 Rear/lower side 15 16 17 18 19 LAN TYPE-A USB RS-232 20 10 11 12 12 13 1. RGB...
....) 2. HDMI-input port 18. Audio input jack 25 Audio output jack Microphone jack 25. 12V DC output terminal Used to connect these devices. 14 Introduction 9 Projector exterior view Front/upper side 1 2 3 4 5 Rear/lower side 15 16 17 18 19 LAN TYPE-A USB RS-232 20 10 11 12 12 13 1. RGB...
MX760 User Manual
Page 10
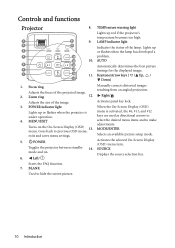
... 5. BLANK Used to previous OSD menu, 13. Right/ Activates panel key lock. Adjusts the size of the lamp. POWER Toggles the projector between standby 14. mode and on the On-Screen Display (OSD) menu. MODE/ENTER Selects an available picture setup mode. AUTO Automatically ... the #6, #11, and #12 keys are used as directional arrows to select the desired menu items and to make adjustments. Lights up red if the projector's temperature becomes too high. When the On-Screen Display (OSD) menu is under operation. 4. MENU/EXIT Turns on . 6. Keystone/Arrow keys ( ...
... 5. BLANK Used to previous OSD menu, 13. Right/ Activates panel key lock. Adjusts the size of the lamp. POWER Toggles the projector between standby 14. mode and on the On-Screen Display (OSD) menu. MODE/ENTER Selects an available picture setup mode. AUTO Automatically ... the #6, #11, and #12 keys are used as directional arrows to select the desired menu items and to make adjustments. Lights up red if the projector's temperature becomes too high. When the On-Screen Display (OSD) menu is under operation. 4. MENU/EXIT Turns on . 6. Keystone/Arrow keys ( ...
MX760 User Manual
Page 11
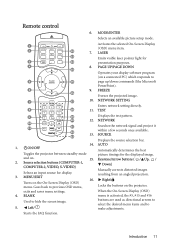
... 9. LASER 13 Emits visible laser pointer light for the displayed image. PAGE UP/PAGE DOWN 15 Operates your display software program (on the projector. TEST 9 19 Displays the test pattern. 20 12. MENU/EXIT Turns on . 15. When the On-Screen Display (OSD) 4. ...Down) Manually corrects distorted images resulting from an angled projection. 16. Starts the FAQ function. ON/OFF Automatically determines the best Toggles the projector between standby mode picture timings for 3 14 presentation purposes. 4 8. Right/ Locks the buttons on a connected PC) which responds to ...
... 9. LASER 13 Emits visible laser pointer light for the displayed image. PAGE UP/PAGE DOWN 15 Operates your display software program (on the projector. TEST 9 19 Displays the test pattern. 20 12. MENU/EXIT Turns on . 15. When the On-Screen Display (OSD) 4. ...Down) Manually corrects distorted images resulting from an angled projection. 16. Starts the FAQ function. ON/OFF Automatically determines the best Toggles the projector between standby mode picture timings for 3 14 presentation purposes. 4 8. Right/ Locks the buttons on a connected PC) which responds to ...

MX760 User Manual
Page 12
... beam is not a toy. CAPTURE Captures the projected picture and save it and the indicator lights up red. The laser pointer is visible. MUTE Toggles projector audio between on yourself or others. Numeric buttons Enters numbers in network settings. Operating the LASER pointer The Laser Pointer is necessary to enter password...
... beam is not a toy. CAPTURE Captures the projected picture and save it and the indicator lights up red. The laser pointer is visible. MUTE Toggles projector audio between on yourself or others. Numeric buttons Enters numbers in network settings. Operating the LASER pointer The Laser Pointer is necessary to enter password...

MX760 User Manual
Page 13
... between the remote control and the IR sensors on the front and the back of the arrow as indicated in the direction of the projector. Remove any existing batteries (if necessary) and install two AAA batteries observing the battery polarities as illustrated. Make sure that there are ...for an extended period of an explosion. • If the batteries are located on the projector that might obstruct the infra-red beam. • Operating the projector from the front • Operating the projector from possible battery leakage. Refit the cover by aligning it with the base and sliding it...
... between the remote control and the IR sensors on the front and the back of the arrow as indicated in the direction of the projector. Remove any existing batteries (if necessary) and install two AAA batteries observing the battery polarities as illustrated. Make sure that there are ...for an extended period of an explosion. • If the batteries are located on the projector that might obstruct the infra-red beam. • Operating the projector from the front • Operating the projector from possible battery leakage. Refit the cover by aligning it with the base and sliding it...

MX760 User Manual
Page 14
... in one of your equipment. 14 Positioning your projector Note that a special rear projection screen is required. Purchase the BenQ Projector Ceiling Mount Kit from the ceiling most common way to position the projector behind the screen. Note that a special rear projection screen and the BenQ Projector Ceiling Mount Kit are required for quick setup and...
... in one of your equipment. 14 Positioning your projector Note that a special rear projection screen is required. Purchase the BenQ Projector Ceiling Mount Kit from the ceiling most common way to position the projector behind the screen. Note that a special rear projection screen and the BenQ Projector Ceiling Mount Kit are required for quick setup and...

MX760 User Manual
Page 15
zoom) Average Max length (min. Looking across this projector's optical characteristics. BenQ recommends that a 120'' (about 3.0 m) or 150'' (about 3.8 m) screen is 91 mm - 274 mm. Positioning your measured projection distance is 5.0 m (5000 mm), the closest match in ... determine the exact mounting position so that it , so as to make allowance for this row shows that if you intend to permanently install the projector, you should physically test the projection size and distance using a 120-inch screen, the recommended projection distance is 4457 mm and the vertical offset is...
zoom) Average Max length (min. Looking across this projector's optical characteristics. BenQ recommends that a 120'' (about 3.0 m) or 150'' (about 3.8 m) screen is 91 mm - 274 mm. Positioning your measured projection distance is 5.0 m (5000 mm), the closest match in ... determine the exact mounting position so that it , so as to make allowance for this row shows that if you intend to permanently install the projector, you should physically test the projection size and distance using a 120-inch screen, the recommended projection distance is 4457 mm and the vertical offset is...

MX760 User Manual
Page 16
... is fixed 2 3 1 Center of the projected image height or width. It allows the projector to be positioned off the center of the projector to expose an access (a deep hole) to the lens shift device, rotate the screw driver slowly and gently. • Lens shift ... position. The lens shift is produced, see "Correcting keystone" on page 23 for installing your projector. Shifting the projection lens The lens shift control provides flexibility for details. 16 Positioning your projector Insert a screwdriver to shift the projection lens within the allowable range depending on the side of...
... is fixed 2 3 1 Center of the projected image height or width. It allows the projector to be positioned off the center of the projector to expose an access (a deep hole) to the lens shift device, rotate the screw driver slowly and gently. • Lens shift ... position. The lens shift is produced, see "Correcting keystone" on page 23 for installing your projector. Shifting the projection lens The lens shift control provides flexibility for details. 16 Positioning your projector Insert a screwdriver to shift the projection lens within the allowable range depending on the side of...

MX760 User Manual
Page 17
... cable 10. VGA to VGA (D-Sub) 9. USB flash drive/USB wireless dongle 5. The rear connecting jacks available on page 8). Ensure the cables are for each projector model. Connection When connecting a signal source to the projector, be included with the projector (see "Shipping contents" on the projector vary with each source. 3. VGA cable 6. Audio L/R cable 3.
... cable 10. VGA to VGA (D-Sub) 9. USB flash drive/USB wireless dongle 5. The rear connecting jacks available on page 8). Ensure the cables are for each projector model. Connection When connecting a signal source to the projector, be included with the projector (see "Shipping contents" on the projector vary with each source. 3. VGA cable 6. Audio L/R cable 3.

MX760 User Manual
Page 18
... as described below: Terminal name Terminal appearance Picture quality HDMI Best Component Video Better S-Video Good Video Normal Connecting audio The projector has two built-in home theater or home cinema applications. See "Connecting audio" on page 18 for business purposes only....depend upon the availability of video quality. Connecting video source devices You need only connect the projector to a projector. The method you connect the projector to a DVD player via the projector's HDMI input and the projected picture displays wrong colors, please change the color space to ...
... as described below: Terminal name Terminal appearance Picture quality HDMI Best Component Video Better S-Video Good Video Normal Connecting audio The projector has two built-in home theater or home cinema applications. See "Connecting audio" on page 18 for business purposes only....depend upon the availability of video quality. Connecting video source devices You need only connect the projector to a projector. The method you connect the projector to a DVD player via the projector's HDMI input and the projected picture displays wrong colors, please change the color space to ...

MX760 User Manual
Page 19
... microphone is connected. Device PC/Component Video Video/S-Video Microphone Audio input port AUDIO IN 1 AUDIO IN 2 (L/R) MIC The projector can play the sound from the projector when AUDIO OUT is not working, check the volume setting and cable connection. Audio output port AUDIO IN 1/MIC AUDIO OUT...below describes the connection methods for different devices, and where the sound is in the table below. on the remote control. (The projector volume setting will most likely want to connect the audio output of your Video source device to that your presentations, and also connect...
... microphone is connected. Device PC/Component Video Video/S-Video Microphone Audio input port AUDIO IN 1 AUDIO IN 2 (L/R) MIC The projector can play the sound from the projector when AUDIO OUT is not working, check the volume setting and cable connection. Audio output port AUDIO IN 1/MIC AUDIO OUT...below describes the connection methods for different devices, and where the sound is in the table below. on the remote control. (The projector volume setting will most likely want to connect the audio output of your Video source device to that your presentations, and also connect...


