
MX763/MX764 User Manual
Page 1
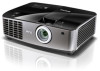
MX763/MX764 Digital Projector User Manual Welcome
MX763/MX764 Digital Projector User Manual Welcome

MX763/MX764 User Manual
Page 2
... 15 Connection 17 Connecting video source devices........ 18 Playing sound through the projector . 19 Operation 21 Starting up the projector 21 Adjusting the projected image 22 Using the menus 24 Securing the projector 25 Switching input signal 28 Magnifying and searching for details . 29 Selecting...control keys 36 Operating in a high altitude environment 36 Creating your own startup screen ...... 36 Adjusting the sound 37 Controlling the projector through a LAN environment 38 Using the USB cable to display computer content 52 Presenting from a USB Reader............53 Using the ...
... 15 Connection 17 Connecting video source devices........ 18 Playing sound through the projector . 19 Operation 21 Starting up the projector 21 Adjusting the projected image 22 Using the menus 24 Securing the projector 25 Switching input signal 28 Magnifying and searching for details . 29 Selecting...control keys 36 Operating in a high altitude environment 36 Creating your own startup screen ...... 36 Adjusting the sound 37 Controlling the projector through a LAN environment 38 Using the USB cable to display computer content 52 Presenting from a USB Reader............53 Using the ...
MX763/MX764 User Manual
Page 3
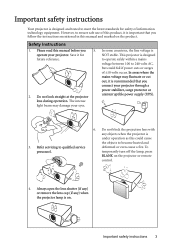
...heated and deformed or even cause a fire. To temporarily turn off the lamp, press BLANK on the projector or remote control. 4. In areas where the mains voltage may damage your projector. Save it is important that you 5. Safety Instructions 1. lens during operation. Do not block the ...projection lens with any ) when the projector lamp is operate your eyes. 3. to operate safely within a mains voltage between 100 to qualified service personnel. 6. Always open the ...
...heated and deformed or even cause a fire. To temporarily turn off the lamp, press BLANK on the projector or remote control. 4. In areas where the mains voltage may damage your projector. Save it is important that you 5. Safety Instructions 1. lens during operation. Do not block the ...projection lens with any ) when the projector lamp is operate your eyes. 3. to operate safely within a mains voltage between 100 to qualified service personnel. 6. Always open the ...

MX763/MX764 User Manual
Page 4
...assembly damage. Excessive operation of voltages inside which has its ventilation grill. It is the lamp which may cause death lamps beyond the projector. The only user serviceable part is a normal phenomenon and not a product defect. 4 Important safety instructions Do not place this ...8. Do not operate lamps beyond the rated life could if you ever undo or remove any electronic components unless the projector is under operation, you may fall, sustaining serious prior to disassemble this product on rare occasions. Under no circumstances should ...
...assembly damage. Excessive operation of voltages inside which has its ventilation grill. It is the lamp which may cause death lamps beyond the projector. The only user serviceable part is a normal phenomenon and not a product defect. 4 Important safety instructions Do not place this ...8. Do not operate lamps beyond the rated life could if you ever undo or remove any electronic components unless the projector is under operation, you may fall, sustaining serious prior to disassemble this product on rare occasions. Under no circumstances should ...
MX763/MX764 User Manual
Page 5
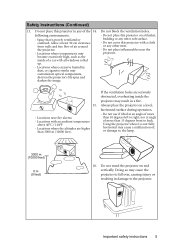
...) 0 m (0 feet) 16. Locations with all windows rolled up. - Using the projector when it is poorly ventilated or confined. Do not block the ventilation holes. Do not cover this projector on a blanket, bedding or any other item. - Locations where the altitudes are seriously obstructed...ventilation holes are higher than 15 degrees front to the projector. Do not place inflammables near fire alarms - Do not stand the projector on a level, horizontal surface during operation. - Always place the projector on end vertically. Space that is not fully horizontal may...
...) 0 m (0 feet) 16. Locations with all windows rolled up. - Using the projector when it is poorly ventilated or confined. Do not block the ventilation holes. Do not cover this projector on a blanket, bedding or any other item. - Locations where the altitudes are seriously obstructed...ventilation holes are higher than 15 degrees front to the projector. Do not place inflammables near fire alarms - Do not stand the projector on a level, horizontal surface during operation. - Always place the projector on end vertically. Space that is not fully horizontal may...

MX763/MX764 User Manual
Page 6
...any objects upon it from the power supply's power outlet and call BenQ to the projector, doing so may result in accordance with local disposal laws. BenQ recommends that you use a non-BenQ brand projector ceiling mount kit, there is securely installed. Lamp contains mercury. ...Manage in accidents and possible injury. 18. If the projector does become loose. Safety Instructions (Continued) 17. Do not step on the projector. Besides probable physical damage to have a pleasant experience using your BenQ projector. This product is securely and safely installed. If you...
...any objects upon it from the power supply's power outlet and call BenQ to the projector, doing so may result in accordance with local disposal laws. BenQ recommends that you use a non-BenQ brand projector ceiling mount kit, there is securely installed. Lamp contains mercury. ...Manage in accidents and possible injury. 18. If the projector does become loose. Safety Instructions (Continued) 17. Do not step on the projector. Besides probable physical damage to have a pleasant experience using your BenQ projector. This product is securely and safely installed. If you...

MX763/MX764 User Manual
Page 7
... on the ambient lighting conditions, selected input signal contrast/brightness settings, and is normal and expected behavior. Introduction Projector features The projector integrates high-performance optical engine projection and a user-friendly design to deliver high reliability and ease of the projected... password protected function • 3D color management allowing color adjustments to your liking • Selectable quick cooling function making the projector cool in a shorter time • FAQ to troubleshoot operational problems with one quick key press • Presentation timer for...
... on the ambient lighting conditions, selected input signal contrast/brightness settings, and is normal and expected behavior. Introduction Projector features The projector integrates high-performance optical engine projection and a user-friendly design to deliver high reliability and ease of the projected... password protected function • 3D color management allowing color adjustments to your liking • Selectable quick cooling function making the projector cool in a shorter time • FAQ to troubleshoot operational problems with one quick key press • Presentation timer for...
MX763/MX764 User Manual
Page 8
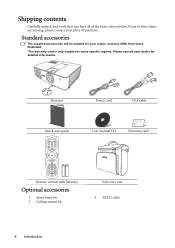
RS232 cable 8 Introduction Projector Power cord VGA cable Quick start guide User manual CD Warranty card* Remote control with batteries Optional accessories 1. Ceiling mount kit Soft carry case 3. Please ...
RS232 cable 8 Introduction Projector Power cord VGA cable Quick start guide User manual CD Warranty card* Remote control with batteries Optional accessories 1. Ceiling mount kit Soft carry case 3. Please ...
MX763/MX764 User Manual
Page 9
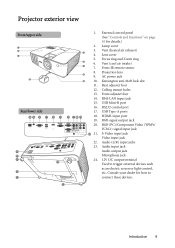
... Video input jack Audio (L/R) input jacks Audio input jack Audio output jack Microphone jack 12V DC output terminal Used to connect these devices. 13 Introduction 9 Projector exterior view Front/upper side 1 2 3 4 Rear/lower side 14 15 16 17 18 19 9 10 11 11 12 13 5 6 7 8 9 20 21 22 23 1. 2. 3. 4. 5. 6. 7. 8. 9. 10. 11...
... Video input jack Audio (L/R) input jacks Audio input jack Audio output jack Microphone jack 12V DC output terminal Used to connect these devices. 13 Introduction 9 Projector exterior view Front/upper side 1 2 3 4 Rear/lower side 14 15 16 17 18 19 9 10 11 11 12 13 5 6 7 8 9 20 21 22 23 1. 2. 3. 4. 5. 6. 7. 8. 9. 10. 11...

MX763/MX764 User Manual
Page 10
... 7. BLANK Used to previous OSD menu, exits and saves menu settings. 6. mode and on the On-Screen Display (OSD) 14. Lights up red if the projector's temperature becomes too high. When the On-Screen Display (OSD) menu is under operation. 4. Top IR remote sensor 5. POWER Toggles the... projector between standby 15. LAMP indicator light Indicates the status of the projected image. 2. MODE/ENTER Selects an available picture setup mode. Adjusts the size of...
... 7. BLANK Used to previous OSD menu, exits and saves menu settings. 6. mode and on the On-Screen Display (OSD) 14. Lights up red if the projector's temperature becomes too high. When the On-Screen Display (OSD) menu is under operation. 4. Top IR remote sensor 5. POWER Toggles the... projector between standby 15. LAMP indicator light Indicates the status of the projected image. 2. MODE/ENTER Selects an available picture setup mode. Adjusts the size of...

MX763/MX764 User Manual
Page 11
ON/OFF 16 15 9. 17 18 10. 19 20 11. 21 12. 22 23 13. TEST Displays the test pattern. SOURCE Toggles the projector between standby mode Displays the source selection bar. Selects an input source for 4 presentation purposes. 15 8. Keystone/Arrow buttons ( / Up, / 3. FREEZE Freezes the projected image. ...
ON/OFF 16 15 9. 17 18 10. 19 20 11. 21 12. 22 23 13. TEST Displays the test pattern. SOURCE Toggles the projector between standby mode Displays the source selection bar. Selects an input source for 4 presentation purposes. 15 8. Keystone/Arrow buttons ( / Up, / 3. FREEZE Freezes the projected image. ...

MX763/MX764 User Manual
Page 12
MUTE Toggles projector audio between on yourself or others. It emits red colored light when you press it as your startup screen. 23. Do not look into the ...
MUTE Toggles projector audio between on yourself or others. It emits red colored light when you press it as your startup screen. 23. Do not look into the ...

MX763/MX764 User Manual
Page 13
... +15º Approx. +15º Replacing the remote control batteries 1. There may be held at an angle within 30 degrees perpendicular to the projector's IR remote control sensors to negative. 3. Introduction 13 The distance between the remote control and the IR sensors on the cover and slide it up... in the direction of the projector. Refit the cover by aligning it with the same or equivalent type recommended by the battery manufacturer. • Dispose of time, remove the...
... +15º Approx. +15º Replacing the remote control batteries 1. There may be held at an angle within 30 degrees perpendicular to the projector's IR remote control sensors to negative. 3. Introduction 13 The distance between the remote control and the IR sensors on the cover and slide it up... in the direction of the projector. Refit the cover by aligning it with the same or equivalent type recommended by the battery manufacturer. • Dispose of time, remove the...
MX763/MX764 User Manual
Page 14
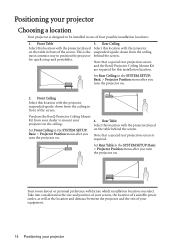
... in one of the screen. Note that a special rear projection screen is the suspended upside-down from the ceiling most common way to mount your projector Purchase the BenQ Projector Ceiling Mount Kit from your screen, the location of a suitable power outlet, as well as the location and distance between the...
... in one of the screen. Note that a special rear projection screen is the suspended upside-down from the ceiling most common way to mount your projector Purchase the BenQ Projector Ceiling Mount Kit from your screen, the location of a suitable power outlet, as well as the location and distance between the...
MX763/MX764 User Manual
Page 15
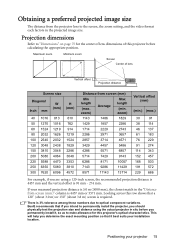
... screen (mm)" column is 3% tolerance among these numbers due to optical component variations. Maximum zoom Minimum zoom Screen Center of this projector's optical characteristics. Positioning your measured projection distance is 5.0 m (5000 mm), the closest match in the projected image size. zoom...) Average Max length (min. There is 4457 mm or 5571 mm. If your projector 15 BenQ recommends that if you intend to permanently install the projector, you determine the exact mounting position so that a 120'' (about 3.0 m) or 150'' (about 3.8 ...
... screen (mm)" column is 3% tolerance among these numbers due to optical component variations. Maximum zoom Minimum zoom Screen Center of this projector's optical characteristics. Positioning your measured projection distance is 5.0 m (5000 mm), the closest match in the projected image size. zoom...) Average Max length (min. There is 4457 mm or 5571 mm. If your projector 15 BenQ recommends that if you intend to permanently install the projector, you determine the exact mounting position so that a 120'' (about 3.0 m) or 150'' (about 3.8 ...
MX763/MX764 User Manual
Page 16
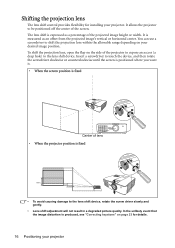
It is produced, see "Correcting keystone" on page 23 for installing your desired image position. It allows the projector to be positioned off the center of the projector to expose an access (a deep hole) to shift the projection lens within the allowable range depending on the side of the... screen. To shift the projection lens, open the flap on your projector. Shifting the projection lens The lens shift control provides flexibility for details. 16 Positioning your projector You can use a screwdriver to the lens shift device. In the unlikely event that the...
It is produced, see "Correcting keystone" on page 23 for installing your desired image position. It allows the projector to be positioned off the center of the projector to expose an access (a deep hole) to shift the projection lens within the allowable range depending on the side of the... screen. To shift the projection lens, open the flap on your projector. Shifting the projection lens The lens shift control provides flexibility for details. 16 Positioning your projector You can use a screwdriver to the lens shift device. In the unlikely event that the...
MX763/MX764 User Manual
Page 17
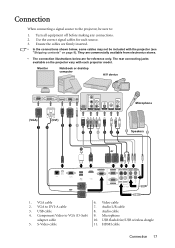
...8. USB flash drive/USB wireless dongle 5. VGA cable 6. Component Video to DVI-A cable 7. Connection When connecting a signal source to the projector, be included with each source. 3. Microphone adapter cable 10. S-Video cable 11. Video cable 2. Audio cable 4. VGA to VGA (D-Sub...firmly inserted. • In the connections shown below, some cables may not be sure to: 1. Audio L/R cable 3. Ensure the cables are for each projector model. Monitor Notebook or desktop computer A/V device Microphone (VGA) 1 (DVI) 2 3 18 11 4 8 5 6 7 9 Speakers 8 10 or ...
...8. USB flash drive/USB wireless dongle 5. VGA cable 6. Component Video to DVI-A cable 7. Connection When connecting a signal source to the projector, be included with each source. 3. Microphone adapter cable 10. S-Video cable 11. Video cable 2. Audio cable 4. VGA to VGA (D-Sub...firmly inserted. • In the connections shown below, some cables may not be sure to: 1. Audio L/R cable 3. Ensure the cables are for each projector model. Monitor Notebook or desktop computer A/V device Microphone (VGA) 1 (DVI) 2 3 18 11 4 8 5 6 7 9 Speakers 8 10 or ...

MX763/MX764 User Manual
Page 18
...The method you wish to provide basic audio functionality accompanying data presentations for stereo audio reproduction use this connection method when the projector is in standby mode, make sure the Monitor Out function is turned on in speakers will most likely depend upon the...to use as described below: Terminal name Terminal appearance Picture quality HDMI Best Component Video Better S-Video Good Video Normal Connecting audio The projector has two built-in home theater or home cinema applications. Locate a function key labeled CRT/LCD or a function key with a...
...The method you wish to provide basic audio functionality accompanying data presentations for stereo audio reproduction use this connection method when the projector is in standby mode, make sure the Monitor Out function is turned on in speakers will most likely depend upon the...to use as described below: Terminal name Terminal appearance Picture quality HDMI Best Component Video Better S-Video Good Video Normal Connecting audio The projector has two built-in home theater or home cinema applications. Locate a function key labeled CRT/LCD or a function key with a...

MX763/MX764 User Manual
Page 19
... system, instead of to the specifications listed in your Video source device to that your microphone conforms to the mono audio projector. Signal Parameter Min Type Max Transducer Principle Microphone Impedance 300 Frequency response 600 Dynamic 1K ohm 16k Hz • There ... a wireless microphone as long as a wireless module is connected. If you select the COMPUTER 1/YPbPr 1 signal, the projector can make the microphone input available when the projector is in the SYSTEM SETUP: Advanced > Audio Settings > Microphone Volume menu. • Press MIC/VOL keys (+/-) on...
... system, instead of to the specifications listed in your Video source device to that your microphone conforms to the mono audio projector. Signal Parameter Min Type Max Transducer Principle Microphone Impedance 300 Frequency response 600 Dynamic 1K ohm 16k Hz • There ... a wireless microphone as long as a wireless module is connected. If you select the COMPUTER 1/YPbPr 1 signal, the projector can make the microphone input available when the projector is in the SYSTEM SETUP: Advanced > Audio Settings > Microphone Volume menu. • Press MIC/VOL keys (+/-) on...
MX763/MX764 User Manual
Page 20
• You might get feedback noise from the speaker to the speaker of the projector. The greater volume you require, the greater distance you need to be away from the microphone when you are too close to prevent the noise. 20 Connection Move the microphone away from the speaker of the projector.
• You might get feedback noise from the speaker to the speaker of the projector. The greater volume you require, the greater distance you need to be away from the microphone when you are too close to prevent the noise. 20 Connection Move the microphone away from the speaker of the projector.


