
BenQ US PRJ 3 Years Warranty
Page 1
... set forth below: Three (3) year from the purchase date by the original retail purchaser (the "Customer") (except for lamps as specified below , BenQ America Corp. ("BenQ") warrants the BenQ Digital Projector ("Product") you are entitled to depot repair service during the warranty period subject to the Customer during the warranty period in materials or...
... set forth below: Three (3) year from the purchase date by the original retail purchaser (the "Customer") (except for lamps as specified below , BenQ America Corp. ("BenQ") warrants the BenQ Digital Projector ("Product") you are entitled to depot repair service during the warranty period subject to the Customer during the warranty period in materials or...

MW769 & MX768 Quick Start Guide
Page 4
... numbers are listed. Only the recommended screen sizes are approximate and may be slightly different from the actual measurements. BenQ QSG-MX768_MW769.book Page 4 Tuesday, December 31, 2013 5:39 PM Projector dimensions MX768 30 762 610 457 847 1113 1378 69 40 1016 813 610 1130 1483 1837 91 60 1524 1219 914...
... numbers are listed. Only the recommended screen sizes are approximate and may be slightly different from the actual measurements. BenQ QSG-MX768_MW769.book Page 4 Tuesday, December 31, 2013 5:39 PM Projector dimensions MX768 30 762 610 457 847 1113 1378 69 40 1016 813 610 1130 1483 1837 91 60 1524 1219 914...

MW769 & MX768 Quick Start Guide
Page 5
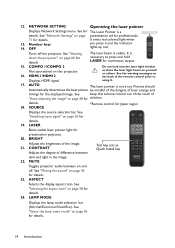
BenQ QSG-MX768_MW769.book Page 5 Tuesday, December 31, 2013 5:39 PM Remote control World Wide Region Japan Region ON COMPUTER 1 COMPUTER 2 KEYSTONE / UP MENU/EXIT KEYSTONE / LEFT ECO BLANK KEYSTONE / DOWN *3QUICK INSTALL FREEZE *1PIP ASPECT NETWORK SETTING OFF *1COMPO 1 HDMI 1 HDMI 2 *1COMPO 2 AUTO KEYSTONE / RIGHT SOURCE MODE/ENTER *2LASER VOLUME + BRIGHT *3 CONTRAST VOLUME - MUTE LAMP MODE Number keys *1Not operational on this projector *2No LASER key on Japan region's remote controls *3TEST key acts as QUICK INSTALL key on Japan region's remote control 5
BenQ QSG-MX768_MW769.book Page 5 Tuesday, December 31, 2013 5:39 PM Remote control World Wide Region Japan Region ON COMPUTER 1 COMPUTER 2 KEYSTONE / UP MENU/EXIT KEYSTONE / LEFT ECO BLANK KEYSTONE / DOWN *3QUICK INSTALL FREEZE *1PIP ASPECT NETWORK SETTING OFF *1COMPO 1 HDMI 1 HDMI 2 *1COMPO 2 AUTO KEYSTONE / RIGHT SOURCE MODE/ENTER *2LASER VOLUME + BRIGHT *3 CONTRAST VOLUME - MUTE LAMP MODE Number keys *1Not operational on this projector *2No LASER key on Japan region's remote controls *3TEST key acts as QUICK INSTALL key on Japan region's remote control 5

MW769 & MX768 User Manual
Page 1
MX768/MW769 Digital Projector User Manual
MX768/MW769 Digital Projector User Manual

MW769 & MX768 User Manual
Page 2
... computer or monitor...22 Connecting Video source devices.......24 Operation 27 Starting up the projector 27 Adjusting the projected image 28 Using the menus 33 Securing the projector 34 Switching input signal 36 Magnifying and searching for details ...37 Selecting the aspect... 62 Remote Desktop Control through Q Presenter 63 Presenting From a USB Reader........... 64 Shutting down the projector 66 Menu operation 67 Maintenance 83 Care of the projector 83 Lamp information 84 Troubleshooting......... 91 Specifications 92 Dimensions 93 Ceiling mount installation 93 Timing chart 94 ...
... computer or monitor...22 Connecting Video source devices.......24 Operation 27 Starting up the projector 27 Adjusting the projected image 28 Using the menus 33 Securing the projector 34 Switching input signal 36 Magnifying and searching for details ...37 Selecting the aspect... 62 Remote Desktop Control through Q Presenter 63 Presenting From a USB Reader........... 64 Shutting down the projector 66 Menu operation 67 Maintenance 83 Care of the projector 83 Lamp information 84 Troubleshooting......... 91 Specifications 92 Dimensions 93 Ceiling mount installation 93 Timing chart 94 ...

MW769 & MX768 User Manual
Page 3
..., to ensure safe use of this product, it for safety of ±10 volts occur. In areas where the mains voltage may damage your projector through a power stabilizer, surge protector or uninterruptible power supply (UPS). 3. you follow the instructions mentioned in this manual before 4. In some countries..., the line voltage is on the product. This projector is designed to operate safely within a mains voltage between 100 to 240 volts AC, but could cause the objects to become heated and ...
..., to ensure safe use of this product, it for safety of ±10 volts occur. In areas where the mains voltage may damage your projector through a power stabilizer, surge protector or uninterruptible power supply (UPS). 3. you follow the instructions mentioned in this manual before 4. In some countries..., the line voltage is on the product. This projector is designed to operate safely within a mains voltage between 100 to 240 volts AC, but could cause the objects to become heated and ...

MW769 & MX768 User Manual
Page 4
...the lamp which may cause cause them to disassemble this product on rare death if you ever undo or remove any electronic components unless the projector is a normal phenomenon and not a product defect. 4 Important safety instructions The only user serviceable part is under operation, you may fall... professional service personnel. 9. Do not operate lamps beyond the rated life could voltages inside which has its ventilation grill. Allow the projector to cool for replacement. 10. The product may sense some heated air and odor from its own removable cover. Do not place...
...the lamp which may cause cause them to disassemble this product on rare death if you ever undo or remove any electronic components unless the projector is a normal phenomenon and not a product defect. 4 Important safety instructions The only user serviceable part is under operation, you may fall... professional service personnel. 9. Do not operate lamps beyond the rated life could voltages inside which has its ventilation grill. Allow the projector to cool for replacement. 10. The product may sense some heated air and odor from its own removable cover. Do not place...

MW769 & MX768 User Manual
Page 5
... confined. Locations where the altitudes are seriously obstructed, overheating inside of a car with all windows rolled up. - Do not place this projector on a level, horizontal surface during operation. - the following environments. - Space that is not fully horizontal may result in any other item... an angle of more than 3000 m (10000 feet). 3000 m (10000 feet) 0 m (0 feet) Important safety instructions 5 Do not place this projector in a fire. 15. Safety Instructions (Continued) 13. Do not block the ventilation holes. Allow at angle of , or damage to back. If the...
... confined. Locations where the altitudes are seriously obstructed, overheating inside of a car with all windows rolled up. - Do not place this projector on a level, horizontal surface during operation. - the following environments. - Space that is not fully horizontal may result in any other item... an angle of more than 3000 m (10000 feet). 3000 m (10000 feet) 0 m (0 feet) Important safety instructions 5 Do not place this projector in a fire. 15. Safety Instructions (Continued) 13. Do not block the ventilation holes. Allow at angle of , or damage to back. If the...

MW769 & MX768 User Manual
Page 6
... on end 18. Do not stand the projector on the vertically. Liquids spilled into the projector to fall over, causing injury or projector may cause it from the power supply's wall socket and call BenQ to the projector, doing so may cause the projector. Do not step on the projector or place any objects upon it is...
... on end 18. Do not stand the projector on the vertically. Liquids spilled into the projector to fall over, causing injury or projector may cause it from the power supply's wall socket and call BenQ to the projector, doing so may cause the projector. Do not step on the projector or place any objects upon it is...

MW769 & MX768 User Manual
Page 7
... the signal detecting process • 3D color management allowing color adjusents to your liking • Selectable quick cooling function makes the projector cool in a shorter time • Presentation timer for better control of time during presentations • One-key auto-adjustment to...• Component HDTV compatibility (YPbPr) • Less than 0.5 W power consumption in standby mode • The apparent brightness of the best projectors available in a concave or convex screen • SmartEco™ starts your dynamic power saving • LAN display for network control and web ...
... the signal detecting process • 3D color management allowing color adjusents to your liking • Selectable quick cooling function makes the projector cool in a shorter time • Presentation timer for better control of time during presentations • One-key auto-adjustment to...• Component HDTV compatibility (YPbPr) • Less than 0.5 W power consumption in standby mode • The apparent brightness of the best projectors available in a concave or convex screen • SmartEco™ starts your dynamic power saving • LAN display for network control and web ...

MW769 & MX768 User Manual
Page 8
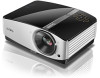
Please consult your place of purchase. If any of the items shown below. Standard accessories The supplied accessories will be suitable for detailed information. projector Remote control or remote control without laser (depending on region) & batteries Power cord Quick start guide Warranty card* VGA cable User manual CD 8 Introduction Shipping contents Carefully unpack and verify that you have all of these items are missing, please contact your dealer for your region, and may differ from those illustrated. *The warranty card is only supplied in some specific regions.
Please consult your place of purchase. If any of the items shown below. Standard accessories The supplied accessories will be suitable for detailed information. projector Remote control or remote control without laser (depending on region) & batteries Power cord Quick start guide Warranty card* VGA cable User manual CD 8 Introduction Shipping contents Carefully unpack and verify that you have all of these items are missing, please contact your dealer for your region, and may differ from those illustrated. *The warranty card is only supplied in some specific regions.

MW769 & MX768 User Manual
Page 10
.... Lamp cover 3. Zoom slide lever 8. Microphone input jack 10 Introduction Quick-release button 3 4 7 10. Audio output jack 11. External control panel Front/upper side (See "Projector" on page 11 for how to trigger external devices such as anelectric screen or light control, etc. AC power cord inlet 30. HDMI input jack...
.... Lamp cover 3. Zoom slide lever 8. Microphone input jack 10 Introduction Quick-release button 3 4 7 10. Audio output jack 11. External control panel Front/upper side (See "Projector" on page 11 for how to trigger external devices such as anelectric screen or light control, etc. AC power cord inlet 30. HDMI input jack...

MW769 & MX768 User Manual
Page 11
... to select the desired "Switching input signal" on page 27 for details. Keystone/Arrow keys ( / Up, / under operation. Lights up the projector" on page 36 for details. See as directional arrows to make adjusents. AUTO 2 7 Automatically determines the best 3 8 picture timings for the ...displayed image. 4 3 See "Auto-adjusting the image" on . Lights up red if the projector's vertical keystone values. See "Using the problem. ECO BLANK Press the ECO BLANK button to previous OSD menu, mode and on page 5 9 ...
... to select the desired "Switching input signal" on page 27 for details. Keystone/Arrow keys ( / Up, / under operation. Lights up the projector" on page 36 for details. See as directional arrows to make adjusents. AUTO 2 7 Automatically determines the best 3 8 picture timings for the ...displayed image. 4 3 See "Auto-adjusting the image" on . Lights up red if the projector's vertical keystone values. See "Using the problem. ECO BLANK Press the ECO BLANK button to previous OSD menu, mode and on page 5 9 ...

MW769 & MX768 User Manual
Page 12
... also purchase a separate Kensington lock compatible security cable and attach it is a safety risk that the projector may fall from the place you purchased your BenQ projector. You can purchase a BenQ projector ceiling mount or wall mount kit from the ceiling or wall due to an improper attachment through the ...use of the mounting bracket. Mounting the projector We want you to have a pleasant experience using your BenQ projector, so we need to bring this safety matter to your attention to prevent possible damage to both the...
... also purchase a separate Kensington lock compatible security cable and attach it is a safety risk that the projector may fall from the place you purchased your BenQ projector. You can purchase a BenQ projector ceiling mount or wall mount kit from the ceiling or wall due to an improper attachment through the ...use of the mounting bracket. Mounting the projector We want you to have a pleasant experience using your BenQ projector, so we need to bring this safety matter to your attention to prevent possible damage to both the...

MW769 & MX768 User Manual
Page 13
... (OSD) menu. Remote control 1 2 3 4 5 6 7 4 8 9 10 11 12 13 5. 14 15 16 17 5 18 19 20 21 22 6. 23 24 7. 1. MENU/EXIT Turns on this projector. Activates the selected On-Screen Display (OSD) menu item. See "Adjusting the sound level" on page 27 for details. See "Starting up the... projector" on page 45 for details. 4. Goes back to restore the image. Keystone/Arrow keys ( / Up, / Down) 10. Displays 2D Keystone page and adjusts the ...
... (OSD) menu. Remote control 1 2 3 4 5 6 7 4 8 9 10 11 12 13 5. 14 15 16 17 5 18 19 20 21 22 6. 23 24 7. 1. MENU/EXIT Turns on this projector. Activates the selected On-Screen Display (OSD) menu item. See "Adjusting the sound level" on page 27 for details. See "Starting up the... projector" on page 45 for details. 4. Goes back to restore the image. Keystone/Arrow keys ( / Up, / Down) 10. Displays 2D Keystone page and adjusts the ...
MW769 & MX768 User Manual
Page 14
...the displayed image. CONTRAST Adjusts the degree of "Auto-adjusting the image" on page 36 for details. See "Shutting down the projector" on and off the projector. COMPO 1/COMPO 2 Not operational on this remote control out of the reach of difference between on page 66 for details. 19.... light when you press it . 17. See "Network Settings" on page 38 for details. 14 Introduction It is a details. See keep this projector. 16. Number keys 14. See "Muting the sound" on yourself or others. ASPECT Selects the display aspect ratio. SOURCE *Remote control for The...
...the displayed image. CONTRAST Adjusts the degree of "Auto-adjusting the image" on page 36 for details. See "Shutting down the projector" on and off the projector. COMPO 1/COMPO 2 Not operational on this remote control out of the reach of difference between on page 66 for details. 19.... light when you press it . 17. See "Network Settings" on page 38 for details. 14 Introduction It is a details. See keep this projector. 16. Number keys 14. See "Muting the sound" on yourself or others. ASPECT Selects the display aspect ratio. SOURCE *Remote control for The...

MW769 & MX768 User Manual
Page 15
...IR sensor on the cover and slide it with the same or equivalent type recommended by the battery manufacturer. • Dispose of the projector. There may be battery damage if the battery is located on the front of the used battery according to the battery manufacturer's instructions.... • Never throw a battery into position. The cover will not be held at an angle within 22.5 degrees perpendicular to the projector's IR remote control sensor to the remote control from the rear Approx. 22.5° Approx. 22.5° Replacing the remote control battery 1. Make...
...IR sensor on the cover and slide it with the same or equivalent type recommended by the battery manufacturer. • Dispose of the projector. There may be battery damage if the battery is located on the front of the used battery according to the battery manufacturer's instructions.... • Never throw a battery into position. The cover will not be held at an angle within 22.5 degrees perpendicular to the projector's IR remote control sensor to the remote control from the rear Approx. 22.5° Approx. 22.5° Replacing the remote control battery 1. Make...

MW769 & MX768 User Manual
Page 16
... one of the screen. Front Ceiling Select this location with the projector suspended upsidedown from your dealer to be installed in front of four possible installation locations: 1. Purchase the BenQ Projector Ceiling Mounting Kit from the ceiling behind the screen. Set Front Ceiling... on the remote control to position the projector for this location with the projector placed near the floor in the SYSTEM SETUP: Basic > Projector Installation menu after you select. Note that a special rear projection screen and the BenQ Projector Ceiling Mounting Kit are required for quick ...
... one of the screen. Front Ceiling Select this location with the projector suspended upsidedown from your dealer to be installed in front of four possible installation locations: 1. Purchase the BenQ Projector Ceiling Mounting Kit from the ceiling behind the screen. Set Front Ceiling... on the remote control to position the projector for this location with the projector placed near the floor in the SYSTEM SETUP: Basic > Projector Installation menu after you select. Note that a special rear projection screen and the BenQ Projector Ceiling Mounting Kit are required for quick ...

MW769 & MX768 User Manual
Page 17
... a ceiling, it must be mounted upside-down so that this refers to account for your projector 17 If the projector is mounted on page 18, that it projects at a slightly downward angle. BenQ has provided a table of screen sizes to assist you will need to the top edge of...) to consider, the perpendicular horizontal distance from the center of the screen (projection distance), and the vertical offset height of the projector from the screen, the projected image size increases, and the vertical offset also increases proportionately. When determining the position of the screen and...
... a ceiling, it must be mounted upside-down so that this refers to account for your projector 17 If the projector is mounted on page 18, that it projects at a slightly downward angle. BenQ has provided a table of screen sizes to assist you will need to the top edge of...) to consider, the perpendicular horizontal distance from the center of the screen (projection distance), and the vertical offset height of the projector from the screen, the projected image size increases, and the vertical offset also increases proportionately. When determining the position of the screen and...

MW769 & MX768 User Manual
Page 18
... Center of 457 mm. If you are using the MX768 and a 200-inch screen, the projection distance is 5.5 m (5500 mm), the closest match in the "Distance from screen (mm) Vertical offset Diagonal Inch mm W (mm) H (mm) Min length (max. Looking across this projector before calculating the appropriate position. Projection dimensions Refer to... 9185 457 250 6350 5080 3810 7061 9271 11481 572 300 7620 6096 4572 8473 11125 13777 686 For example, If you are using the MX768 and your projector zoom) Average Max length (min.
... Center of 457 mm. If you are using the MX768 and a 200-inch screen, the projection distance is 5.5 m (5500 mm), the closest match in the "Distance from screen (mm) Vertical offset Diagonal Inch mm W (mm) H (mm) Min length (max. Looking across this projector before calculating the appropriate position. Projection dimensions Refer to... 9185 457 250 6350 5080 3810 7061 9271 11481 572 300 7620 6096 4572 8473 11125 13777 686 For example, If you are using the MX768 and your projector zoom) Average Max length (min.


