

User Manual
Page 4
... light beam may fluctuate or cut out, it is recommended that you follow the instructions mentioned in this manual before you connect your projector through a power stabilizer, surge protector or uninterruptible power supply (UPS). 3. Do not look straight at the projector lens during operation. Important safety instructions Your projector is on. 5. Refer servicing to break on rare occasions. 4 Important safety instructions To temporarily turn off the lamp, use...
... light beam may fluctuate or cut out, it is recommended that you follow the instructions mentioned in this manual before you connect your projector through a power stabilizer, surge protector or uninterruptible power supply (UPS). 3. Do not look straight at the projector lens during operation. Important safety instructions Your projector is on. 5. Refer servicing to break on rare occasions. 4 Important safety instructions To temporarily turn off the lamp, use...
User Manual
Page 10
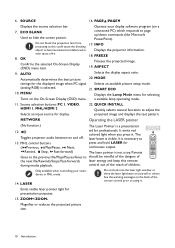
.... a suitable lamp operating mode. 11. Source selection buttons: PC 1, VIDEO, HDMI 1, MHL/HDMI 2 Selects an input source for ( Previous, Play/Pause, Next, continuous output. MHL control buttons press and hold LASER for display. 22. Only available when controlling your display software program (on yourself or others. See the warning messages on the back of the remote control prior to become heated and deformed or Displays the projector information. FREEZE Freezes the projected image. 19...
.... a suitable lamp operating mode. 11. Source selection buttons: PC 1, VIDEO, HDMI 1, MHL/HDMI 2 Selects an input source for ( Previous, Play/Pause, Next, continuous output. MHL control buttons press and hold LASER for display. 22. Only available when controlling your display software program (on yourself or others. See the warning messages on the back of the remote control prior to become heated and deformed or Displays the projector information. FREEZE Freezes the projected image. 19...
User Manual
Page 12
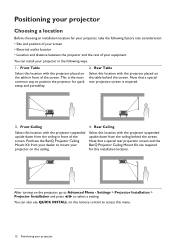
... dealer to mount your projector on the remote control to Advanced Menu - Settings > Projector Installation > Projector Installation and press / to position the projector for quick setup and portability. 2. After turning on the table behind the screen. Rear Ceiling Select this location with the projector suspended upside-down from the ceiling in the following factors into consideration: • Size and position of your screen • Electrical outlet location • Location and distance between the projector and...
... dealer to mount your projector on the remote control to Advanced Menu - Settings > Projector Installation > Projector Installation and press / to position the projector for quick setup and portability. 2. After turning on the table behind the screen. Rear Ceiling Select this location with the projector suspended upside-down from the ceiling in the following factors into consideration: • Size and position of your screen • Electrical outlet location • Location and distance between the projector and...
User Manual
Page 15
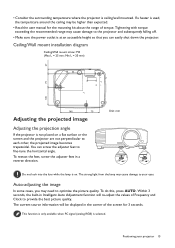
... angle. Auto-adjusting the image In some cases, you can screw the adjuster feet to optimize the picture quality. If a heater is on a flat surface or the screen and the projector are not perpendicular to your projector 15 The strong light from the lamp may be displayed in a reverse direction. This function is only available when PC signal (analog RGB) is ceiling/wall mounted. Unit...
... angle. Auto-adjusting the image In some cases, you can screw the adjuster feet to optimize the picture quality. If a heater is on a flat surface or the screen and the projector are not perpendicular to your projector 15 The strong light from the lamp may be displayed in a reverse direction. This function is only available when PC signal (analog RGB) is ceiling/wall mounted. Unit...
User Manual
Page 20
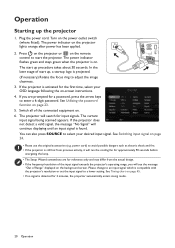
.... • If the frequency/resolution of the connected equipment on the power outlet switch (where fitted). Plug the power cord. See Utilizing the password function on page 24. • Please use the original accessories (e.g. See Switching input signal on page 23. 5. Operation Starting up , a startup logo is projected. (If necessary) Rotate the focus ring to adjust the image clearness. 3. Switch all of the input signal exceeds the projector's operating range, you are for...
.... • If the frequency/resolution of the connected equipment on the power outlet switch (where fitted). Plug the power cord. See Utilizing the password function on page 24. • Please use the original accessories (e.g. See Switching input signal on page 23. 5. Operation Starting up , a startup logo is projected. (If necessary) Rotate the focus ring to adjust the image clearness. 3. Switch all of the input signal exceeds the projector's operating range, you are for...
User Manual
Page 23
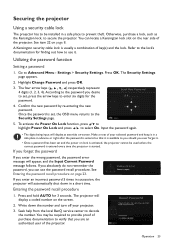
... decode the number. Password Error Please try again. Press and hold AUTO for the password. The projector will display as the Kensington lock, to the Security Settings page. Write down the recall code, and contact BenQ Customer Center. 3. Seek help from the local BenQ service center to select On. Refer to the lock's documentation for finding out how to use the password recall procedure. Highlight Change Password and press...
... decode the number. Password Error Please try again. Press and hold AUTO for the password. The projector will display as the Kensington lock, to the Security Settings page. Write down the recall code, and contact BenQ Customer Center. 3. Seek help from the local BenQ service center to select On. Refer to the lock's documentation for finding out how to use the password recall procedure. Highlight Change Password and press...
User Manual
Page 24
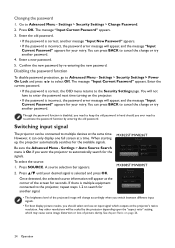
... the new password. MX825ST/MW826ST MX808ST/MW809ST • The brightness level of the projected image will be connected to enter the password next time turning on page 26. 24 Operation Any other resolutions will change or try another password. You will appear at the same time. When starting up, the projector automatically searches for seconds. Settings > Security Settings > Power On Lock and press / to Advanced Menu - Once detected, the selected source information...
... the new password. MX825ST/MW826ST MX808ST/MW809ST • The brightness level of the projected image will be connected to enter the password next time turning on page 26. 24 Operation Any other resolutions will change or try another password. You will appear at the same time. When starting up, the projector automatically searches for seconds. Settings > Security Settings > Power On Lock and press / to Advanced Menu - Once detected, the selected source information...
User Manual
Page 26
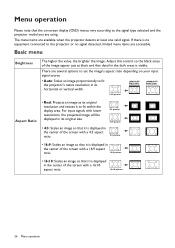
Adjust this control so the black areas of the image appear just as its original resolution and resizes it is no equipment connected to the projector or no signal detected, limited menu items are several options to set the image's aspect ratio depending on -screen display (OSD) menus vary according to fit within the display area. For input signals with lower resolutions, the projected image will be displayed in its...
Adjust this control so the black areas of the image appear just as its original resolution and resizes it is no equipment connected to the projector or no signal detected, limited menu items are several options to set the image's aspect ratio depending on -screen display (OSD) menus vary according to fit within the display area. For input signals with lower resolutions, the projected image will be displayed in its...
User Manual
Page 27
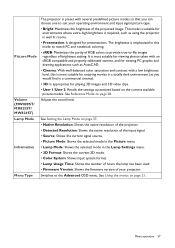
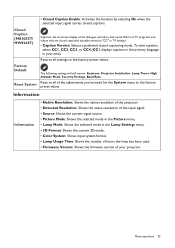
... environment (as using the projector in the Lamp Settings menu. • 3D Format: Shows the current 3D mode. • Color System: Shows input system format. • Lamp Usage Time: Shows the number of hours the lamp has been used. • Firmware Version: Shows the firmware version of your operating environment and input signal picture type. • Bright: Maximizes the brightness of brightness setting. Picture Mode Volume (MW809ST/ MX825ST/ MW826ST) Lamp Mode Information Menu Type The projector is preset...
... environment (as using the projector in the Lamp Settings menu. • 3D Format: Shows the current 3D mode. • Color System: Shows input system format. • Lamp Usage Time: Shows the number of hours the lamp has been used. • Firmware Version: Shows the firmware version of your operating environment and input signal picture type. • Bright: Maximizes the brightness of brightness setting. Picture Mode Volume (MW809ST/ MX825ST/ MW826ST) Lamp Mode Information Menu Type The projector is preset...
User Manual
Page 32
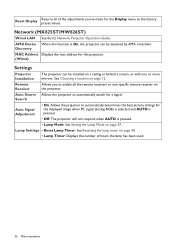
... of hours the lamp has been used. 32 Menu operation Search Auto Signal Adjustment • On: Allows the projector to the factory preset values. See Choosing a location on page 40. • Lamp Timer: Displays the number of the adjustments you to automatically search for this function is pressed. • Lamp Mode: See Setting the Lamp Mode on page 37. Lamp Settings • Reset Lamp Timer: See Resetting the lamp timer on page 12. Discovery MAC Address Displays the mac address for a signal. Reset Display Returns all the remote...
... of hours the lamp has been used. 32 Menu operation Search Auto Signal Adjustment • On: Allows the projector to the factory preset values. See Choosing a location on page 40. • Lamp Timer: Displays the number of the adjustments you to automatically search for this function is pressed. • Lamp Mode: See Setting the Lamp Mode on page 37. Lamp Settings • Reset Lamp Timer: See Resetting the lamp timer on page 12. Discovery MAC Address Displays the mac address for a signal. Reset Display Returns all the remote...

User Manual
Page 33
.... If you use the High Altitude Mode if your need, select Disable. Blank Timer Sets the image blank time when there is activated or not, you to restart the projector immediately within 90 seconds after a set period of lamp life. • Power Off Timer: Sets the auto-shutdown timer. The projector will return to prevent unnecessary waste of time to the screen. No matter Blank Timer is no input signal is not...
.... If you use the High Altitude Mode if your need, select Disable. Blank Timer Sets the image blank time when there is activated or not, you to restart the projector immediately within 90 seconds after a set period of lamp life. • Power Off Timer: Sets the auto-shutdown timer. The projector will return to prevent unnecessary waste of time to the screen. No matter Blank Timer is no input signal is not...
User Manual
Page 35
... Lamp Settings menu. • 3D Format: Shows the current 3D mode. • Color System: Shows input system format. • Lamp Usage Time: Shows the number of hours the lamp has been used. • Firmware Version: Shows the firmware version of TV programs and videos that are closed captioned (usually marked as "CC" in your projector. Closed Caption (MX825ST/ MW826ST) Captions: An on-screen display of the dialogue, narration, and sound...
... Lamp Settings menu. • 3D Format: Shows the current 3D mode. • Color System: Shows input system format. • Lamp Usage Time: Shows the number of hours the lamp has been used. • Firmware Version: Shows the firmware version of TV programs and videos that are closed captioned (usually marked as "CC" in your projector. Closed Caption (MX825ST/ MW826ST) Captions: An on-screen display of the dialogue, narration, and sound...
User Manual
Page 37
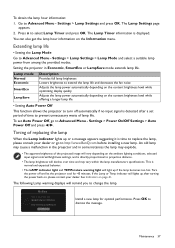
... while offering a longer lamp life • Setting Auto Power Off This function allows the projector to http://www.BenQ.com before installing a new lamp. Press OK to Advanced Menu - Maintenance 37 To obtain the lamp hour information: 1. Go to dismiss the message. Press to Advanced Menu - The Lamp Timer information is normal and expected behavior. • The LAMP indicator light and TEMPerature warning light will light up after a set Auto Power Off, go to turn off and let...
... while offering a longer lamp life • Setting Auto Power Off This function allows the projector to http://www.BenQ.com before installing a new lamp. Press OK to Advanced Menu - Maintenance 37 To obtain the lamp hour information: 1. Go to dismiss the message. Press to Advanced Menu - The Lamp Timer information is normal and expected behavior. • The LAMP indicator light and TEMPerature warning light will light up after a set Auto Power Off, go to turn off and let...

User Manual
Page 38
... to fingers and/or compromising image quality by fractured lamp. • Ensure good ventilation when handling broken lamps. Notice Replace lamp soon Equivalent lamp hour >XXXX hours Order a new lamp at www.BenQ.com Notice Replace lamp now Equivalent lamp hour > XXXX Hours Order a new lamp at www.BenQ.com Notice Out of lamp usage time Replace lamp (refer to user manual) then reset the lamp timer Order a new lamp at this lamp in the above messages are numbers that the brightness level...
... to fingers and/or compromising image quality by fractured lamp. • Ensure good ventilation when handling broken lamps. Notice Replace lamp soon Equivalent lamp hour >XXXX hours Order a new lamp at www.BenQ.com Notice Replace lamp now Equivalent lamp hour > XXXX Hours Order a new lamp at www.BenQ.com Notice Out of lamp usage time Replace lamp (refer to user manual) then reset the lamp timer Order a new lamp at this lamp in the above messages are numbers that the brightness level...

User Manual
Page 42
... picture Cause The video source is no power from the projector. The projector and the screen are out of power. The lens cover is switched on. Open the lens cover. Remove the obstacle. If the power outlet has a switch, make sure that the signal cable is still closed . The lens cover is connected correctly. Remedy Turn the video source on and check that it is still closed . Blurred image Cause The projection lens is an obstacle between the remote control and...
... picture Cause The video source is no power from the projector. The projector and the screen are out of power. The lens cover is switched on. Open the lens cover. Remove the obstacle. If the power outlet has a switch, make sure that the signal cable is still closed . The lens cover is connected correctly. Remedy Turn the video source on and check that it is still closed . Blurred image Cause The projection lens is an obstacle between the remote control and...

DMS Local User Manual
Page 5
...'s is set to 1054x640 or higher with a standard size/ratio to remotely monitor, control, and configure projectors individually or as groups. Introduction 5 Introduction DMS Local is a software tool for full functionality in DMS Local. CPU Free memory Hard disk space Connectivity Display Resolution Intel i7 2.6GHz 8 GB 2GB • Wi-Fi capability • RJ-45 Ethernet port 1054x640 or higher Operating system...
...'s is set to 1054x640 or higher with a standard size/ratio to remotely monitor, control, and configure projectors individually or as groups. Introduction 5 Introduction DMS Local is a software tool for full functionality in DMS Local. CPU Free memory Hard disk space Connectivity Display Resolution Intel i7 2.6GHz 8 GB 2GB • Wi-Fi capability • RJ-45 Ethernet port 1054x640 or higher Operating system...

DMS Local User Manual
Page 20
... standby mode. This status usually indicates a problem with the network itself , in such instances it is in the projector panel. The projector is powered on. The following table defines the various power statuses available in the projector panel to the network or with the projector's connection to view detailed information regarding the operating error. • The projector does not support the transmission of error messages over the network. • The projector is suggested that you check the projector's connection...
... standby mode. This status usually indicates a problem with the network itself , in such instances it is in the projector panel. The projector is powered on. The following table defines the various power statuses available in the projector panel to the network or with the projector's connection to view detailed information regarding the operating error. • The projector does not support the transmission of error messages over the network. • The projector is suggested that you check the projector's connection...

DMS Local User Manual
Page 21
... color wheel has failed to start. • The scaler has shutdown abnormally. • The filter life has changed. • The scaler has failed to read the status information of the fans in the Status column of the projector panel, the Error column may show Offline). Error Icon/ Message Description Indicates a system error based on one of operating error the projector may have failed. • Lamp 1 / light source is currently no operating issues (the Status...
... color wheel has failed to start. • The scaler has shutdown abnormally. • The filter life has changed. • The scaler has failed to read the status information of the fans in the Status column of the projector panel, the Error column may show Offline). Error Icon/ Message Description Indicates a system error based on one of operating error the projector may have failed. • Lamp 1 / light source is currently no operating issues (the Status...

DMS Local User Manual
Page 29
... features the following buttons and menus which help you control your projector. Volume* Adjusts the audio volume. Button Description Input Source Sets the input source for the projector on the fields in the quick settings section will be empty. • When the projector is in standby mode all projectors will feature an asterisk (*). Blank Toggles a blank screen for the projector. Picture Mode* Sets the picture mode for the projector. Lamp Mode Select the lamp mode settings for the projector. Mute Mutes or...
... features the following buttons and menus which help you control your projector. Volume* Adjusts the audio volume. Button Description Input Source Sets the input source for the projector on the fields in the quick settings section will be empty. • When the projector is in standby mode all projectors will feature an asterisk (*). Blank Toggles a blank screen for the projector. Picture Mode* Sets the picture mode for the projector. Lamp Mode Select the lamp mode settings for the projector. Mute Mutes or...

DMS Local User Manual
Page 40
... pop-up window. • Error reports will only list the errors that do not support sending error messages via the network do not support generating error reports. 1. If you want to export the error report to further help you manage your projectors: • Generate error report • Update your projector's firmware over the network • Backup DMS Local's projector listings Generating an Error Report To generate an error report in...
... pop-up window. • Error reports will only list the errors that do not support sending error messages via the network do not support generating error reports. 1. If you want to export the error report to further help you manage your projectors: • Generate error report • Update your projector's firmware over the network • Backup DMS Local's projector listings Generating an Error Report To generate an error report in...


