User Manual
Page 3
... view 7 Controls and functions 9 Positioning your projector 13 Choosing a location 13 Obtaining a preferred projected image size 14 Connection 16 Wireless connection 16 Cable connections 16 Operation 19 Start up 19 Preparing for a wireless presentation 20 Switching input signals 20 Adjusting the image 21 Optimizing the image 23 Laser pointer operation 24 Using the remote mouse functions 24 PIP (Picture In Picture) operation 25 Freezing the image 26 Adjusting the volume 26 Hiding the image 26 Shutdown 27 Menu operation 28 Maintenance 36 Lamp...
... view 7 Controls and functions 9 Positioning your projector 13 Choosing a location 13 Obtaining a preferred projected image size 14 Connection 16 Wireless connection 16 Cable connections 16 Operation 19 Start up 19 Preparing for a wireless presentation 20 Switching input signals 20 Adjusting the image 21 Optimizing the image 23 Laser pointer operation 24 Using the remote mouse functions 24 PIP (Picture In Picture) operation 25 Freezing the image 26 Adjusting the volume 26 Hiding the image 26 Shutdown 27 Menu operation 28 Maintenance 36 Lamp...

User Manual
Page 5
... use of this product, it is recommended that you operate your eyes. Caution • To prevent shock, do not open the lens shutter or • Please read this remove the lens cap when the projector lamp is on the product. Refer servicing to operate safely within a mains light beam may fluctuate or cut out, it is important that you connect your projector through a power...
... use of this product, it is recommended that you operate your eyes. Caution • To prevent shock, do not open the lens shutter or • Please read this remove the lens cap when the projector lamp is on the product. Refer servicing to operate safely within a mains light beam may fluctuate or cut out, it is important that you connect your projector through a power...

User Manual
Page 9
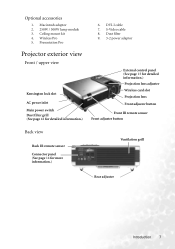
... • Replaceable dust filters The brightness of use. The projector offers the following features: • Making wireless connection with your laptop • Full-function remote control with laser pointer/ remote mouse function • High quality manual zoom lens • One-key auto-adjustment to display the best picture quality • Digital keystone correction to correct distorted images • Adjustable color balance control for data/video display • Ultra-high brightness • Ability to display 16.7 million colors • On-screen menus...
... • Replaceable dust filters The brightness of use. The projector offers the following features: • Making wireless connection with your laptop • Full-function remote control with laser pointer/ remote mouse function • High quality manual zoom lens • One-key auto-adjustment to display the best picture quality • Digital keystone correction to correct distorted images • Adjustable color balance control for data/video display • Ultra-high brightness • Ability to display 16.7 million colors • On-screen menus...
User Manual
Page 10
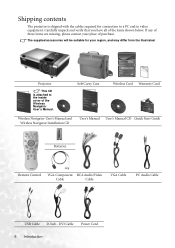
... User's Manual. DVI Cable Power Cord 6 Introduction Carefully unpack and verify that you have all of purchase. Projector This CD is shipped with the cables required for your place of the items shown below. Soft Carry Case PB8250 DiUnissgetiart'laslalMtPioraonujneScaetlroiers .001 1 .001 Wireless Card Warranty Card P/N:53.J940 Wireless Navigator User's Manual and Wireless Navigator Installation CD User's Manual User's Manual CD Quick Start Guide Batteries Remote Control VGA-Component RCA Audio/Video Cable Cable VGA Cable PC Audio Cable USB Cable...
... User's Manual. DVI Cable Power Cord 6 Introduction Carefully unpack and verify that you have all of purchase. Projector This CD is shipped with the cables required for your place of the items shown below. Soft Carry Case PB8250 DiUnissgetiart'laslalMtPioraonujneScaetlroiers .001 1 .001 Wireless Card Warranty Card P/N:53.J940 Wireless Navigator User's Manual and Wireless Navigator Installation CD User's Manual User's Manual CD Quick Start Guide Batteries Remote Control VGA-Component RCA Audio/Video Cable Cable VGA Cable PC Audio Cable USB Cable...
User Manual
Page 11
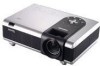
Presentation Pro Projector exterior view Front / upper view Kensington lock slot AC power inlet Main power switch Dust filter grill (See page 42 for more information.) Ventilation grill Rear adjuster Introduction 7 Ceiling mount kit 4. Wireless Pro 5. Dust filter 9. 3-2 power adaptor External control panel (See page 15 for detailed information.) Projection lens adjuster Wireless card slot Projection lens Front adjuster button Front IR remote sensor Front adjuster button Back view Back IR remote sensor Connector panel (See page 14 for detailed information.) 6. DVI-I cable 7. ...
Presentation Pro Projector exterior view Front / upper view Kensington lock slot AC power inlet Main power switch Dust filter grill (See page 42 for more information.) Ventilation grill Rear adjuster Introduction 7 Ceiling mount kit 4. Wireless Pro 5. Dust filter 9. 3-2 power adaptor External control panel (See page 15 for detailed information.) Projection lens adjuster Wireless card slot Projection lens Front adjuster button Front IR remote sensor Front adjuster button Back view Back IR remote sensor Connector panel (See page 14 for detailed information.) 6. DVI-I cable 7. ...
User Manual
Page 13
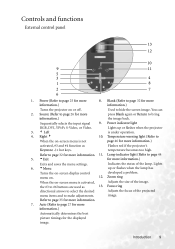
Controls and functions External control panel 13 12 10 9 11 5 3 4 1 8 2 7 6 1. Used to #6 buttons are used as Flashes red if the projector's Keystone -/+ hot keys. Source (Refer to make adjustments. Power indicator light RGB, DVI, YPbPr, S-Video, or Video. 3. 3 Left 4. Zoom ring When the on-screen menu is activated, Adjusts the size of the projected menu items and to page 26 for more information.) Automatically determines the best picture timings for more information. 7. Auto (Refer to page 27 for...
Controls and functions External control panel 13 12 10 9 11 5 3 4 1 8 2 7 6 1. Used to #6 buttons are used as Flashes red if the projector's Keystone -/+ hot keys. Source (Refer to make adjustments. Power indicator light RGB, DVI, YPbPr, S-Video, or Video. 3. 3 Left 4. Zoom ring When the on-screen menu is activated, Adjusts the size of the projected menu items and to page 26 for more information.) Automatically determines the best picture timings for more information. 7. Auto (Refer to page 27 for...

User Manual
Page 17
... projection screen is required. With the use of four possible installation locations: 1. This is the most common way to be installed in front of the screen. III. Positioning your projector 13 Floor at rear of screen; Positioning your projector Choosing a location Your projector is designed to position the projector for this installation location. Floor in the Source > Mirror menu after you turn the projector on the ceiling. Ceiling at rear of screen. Set...
... projection screen is required. With the use of four possible installation locations: 1. This is the most common way to be installed in front of the screen. III. Positioning your projector 13 Floor at rear of screen; Positioning your projector Choosing a location Your projector is designed to position the projector for this installation location. Floor in the Source > Mirror menu after you turn the projector on the ceiling. Ceiling at rear of screen. Set...
User Manual
Page 18
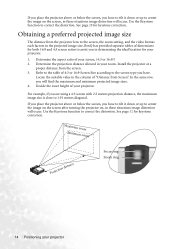
... projection distance allowed in your projector For example, if you in the projected image size. Install the projector at a proper distance from the projector lens to the screen, the zoom setting, and the video format each factors in determining the ideal location for both 16:9 and 4:3 screen ratios to assist you are using a 4:3 screen with 2.5 meters projection distance, the maximum image size is close to center the image on the screen after turning the projector on the screen...
... projection distance allowed in your projector For example, if you in the projected image size. Install the projector at a proper distance from the projector lens to the screen, the zoom setting, and the video format each factors in determining the ideal location for both 16:9 and 4:3 screen ratios to assist you are using a 4:3 screen with 2.5 meters projection distance, the maximum image size is close to center the image on the screen after turning the projector on the screen...

User Manual
Page 20
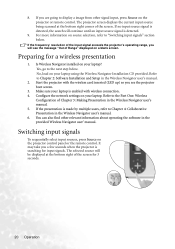
... not service the card yourself like revising the software inside. Turn all equipment off before making any connections. 2. Use the correct signal cables for installing the software and the subsequent operations on the front side of the projector. 2. To use the projector without cables: 1. We do not guarantee it works correctly with the designed slot on your laptop to enable you to the Wireless Navigator User's Manual for each source...
... not service the card yourself like revising the software inside. Turn all equipment off before making any connections. 2. Use the correct signal cables for installing the software and the subsequent operations on the front side of the projector. 2. To use the projector without cables: 1. We do not guarantee it works correctly with the designed slot on your laptop to enable you to the Wireless Navigator User's Manual for each source...

User Manual
Page 23
... switched). 3. If the supplied BenQ wireless card is on the remote control or projector to heat. 5. The Power indicator lights orange. 4. Turn the main power switch on . 2. In the later stage of the connected equipment on . Switch all of start up your computer Projector boot screen Operation 19 If it could become deformed due to start up 1. The start the unit. Plug the power cord into the projector and into a wall socket. Remove the lens cap. Operation Start up...
... switched). 3. If the supplied BenQ wireless card is on the remote control or projector to heat. 5. The Power indicator lights orange. 4. Turn the main power switch on . 2. In the later stage of the connected equipment on . Switch all of start up your computer Projector boot screen Operation 19 If it could become deformed due to start up 1. The start the unit. Plug the power cord into the projector and into a wall socket. Remove the lens cap. Operation Start up...
User Manual
Page 24
... projector screen displays the current input source being scanned at the bottom right of the screen. Preparing for input signals. Start the projector with wireless connection. 4. If the presentation is detected. 9. Switching input signals To sequentially select input sources, press Source on your laptop is enabled with the wireless card inserted (LED up) so you will continue until an input source signal is made by multiple users, refer to Chapter 2: Software Installation and Setup in the provided Wireless Navigator user' manual...
... projector screen displays the current input source being scanned at the bottom right of the screen. Preparing for input signals. Start the projector with wireless connection. 4. If the presentation is detected. 9. Switching input signals To sequentially select input sources, press Source on your laptop is enabled with the wireless card inserted (LED up) so you will continue until an input source signal is made by multiple users, refer to Chapter 2: Software Installation and Setup in the provided Wireless Navigator user' manual...

User Manual
Page 27
... DVI-D image using the Display menu or with the remote control. You can adjust Brightness and Contrast settings for presentations. Zoom In + / Zoom Out - The brightness is also extended with lower light output. Some picture adjustments are available only when certain input ports are 4 modes available for each signal type. You can adjust the Brightness, Contrast, Color, and Tint settings whilst viewing a Component Video, Composite Video, or S-Video input. Unavailable adjustments are well-balanced. • Video Mode: Is...
... DVI-D image using the Display menu or with the remote control. You can adjust Brightness and Contrast settings for presentations. Zoom In + / Zoom Out - The brightness is also extended with lower light output. Some picture adjustments are available only when certain input ports are 4 modes available for each signal type. You can adjust the Brightness, Contrast, Color, and Tint settings whilst viewing a Component Video, Composite Video, or S-Video input. Unavailable adjustments are well-balanced. • Video Mode: Is...

User Manual
Page 31
... approximately 90 seconds to start the projector after the fans stop. Note: • Do not unplug the power cord before the projector shutdown sequence is not properly shut down, to protect the lamp, when you attempt to cool down. Operation 27 Shutdown 1. The Power indicator light flashes orange and the lamp shuts down the projector lamp. Turn the main power switch off , press Power again. 2. To turn the projector off . Press Power and a confirmation prompt message displays.
... approximately 90 seconds to start the projector after the fans stop. Note: • Do not unplug the power cord before the projector shutdown sequence is not properly shut down, to protect the lamp, when you attempt to cool down. Operation 27 Shutdown 1. The Power indicator light flashes orange and the lamp shuts down the projector lamp. Turn the main power switch off , press Power again. 2. To turn the projector off . Press Power and a confirmation prompt message displays.
User Manual
Page 34
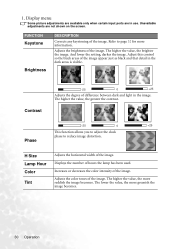
... more information. Adjusts the color tones of the image. The higher the value, the brighter the image. H Size Lamp Hour Color Tint Adjusts the horizontal width of the image. Increases or decreases the color intensity of the image. The lower the value, the more reddish the image becomes. 1. Display menu Some picture adjustments are available only when certain input ports are not shown on the screen. FUNCTION Keystone Brightness DESCRIPTION Corrects...
... more information. Adjusts the color tones of the image. The higher the value, the brighter the image. H Size Lamp Hour Color Tint Adjusts the horizontal width of the image. Increases or decreases the color intensity of the image. The lower the value, the more reddish the image becomes. 1. Display menu Some picture adjustments are available only when certain input ports are not shown on the screen. FUNCTION Keystone Brightness DESCRIPTION Corrects...

User Manual
Page 40
... prevent proper ventilation. Turn the project off and unplug the power cord. Never remove any cables. 3. Contact your dealer if other chemical detergents. Maintenance Your projector needs little maintenance. These can cause overheating and a malfunction of the projector. Open one dust filter cover from any parts of compressed air to prevent overheating. If the filters are to keep the lens clean and to clean the dust filters to remove dust. From the...
... prevent proper ventilation. Turn the project off and unplug the power cord. Never remove any cables. 3. Contact your dealer if other chemical detergents. Maintenance Your projector needs little maintenance. These can cause overheating and a malfunction of the projector. Open one dust filter cover from any parts of compressed air to prevent overheating. If the filters are to keep the lens clean and to clean the dust filters to remove dust. From the...
User Manual
Page 41
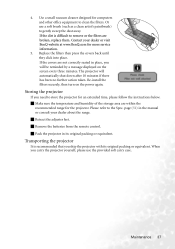
... filters securely, then turn on the screen every three minutes. Storing the projector If you carry the projector yourself, please use a soft brush (such as a clean artist's paintbrush) to store the projector for computers and other office equipment to the Spec. Please refer to clean the filters. Remove the batteries from the remote control. Use a small vacuum cleaner designed for an extended time, please follow the instructions...
... filters securely, then turn on the screen every three minutes. Storing the projector If you carry the projector yourself, please use a soft brush (such as a clean artist's paintbrush) to store the projector for computers and other office equipment to the Spec. Please refer to clean the filters. Remove the batteries from the remote control. Use a small vacuum cleaner designed for an extended time, please follow the instructions...
User Manual
Page 42
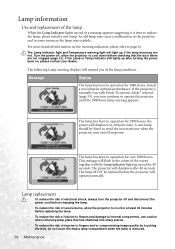
... compromising image quality by touching the lens, do not touch the empty lamp compartment when the lamp is normally run with the Lamp indicator lighting up if the lamp becomes too hot. If the projector is removed. 38 Maintenance This message will operate normally. The Lamp indicator light and Temperature warning light will shutdown in operation for 2980 hours, the power will light up red for optimal performance. Install a new lamp for 40 seconds. Lamp information Use and replacement...
... compromising image quality by touching the lens, do not touch the empty lamp compartment when the lamp is normally run with the Lamp indicator lighting up if the lamp becomes too hot. If the projector is removed. 38 Maintenance This message will operate normally. The Lamp indicator light and Temperature warning light will shutdown in operation for 2980 hours, the power will light up red for optimal performance. Install a new lamp for 40 seconds. Lamp information Use and replacement...
User Manual
Page 43
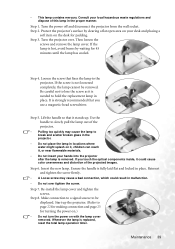
... in locations where water might splash on your hands into the projector after the lamp is fully laid flat and locked in the proper manner. If you use a magnetic-head screwdriver. Start up . Step 7. Whenever the lamp is strongly recommended that fixes the lamp to be removed. Turn the power off and disconnect the projector from the wall socket. It is replaced, reset the total lamp operation timer...
... in locations where water might splash on your hands into the projector after the lamp is fully laid flat and locked in the proper manner. If you use a magnetic-head screwdriver. Start up . Step 7. Whenever the lamp is strongly recommended that fixes the lamp to be removed. Turn the power off and disconnect the projector from the wall socket. It is replaced, reset the total lamp operation timer...
User Manual
Page 44
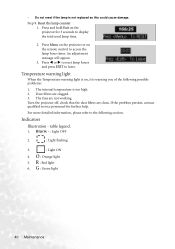
... projector for further help. The internal temperature is not replaced as this could cause damage. If the problem persists, contact qualified service personnel for 3 seconds to the following possible problems: 1. For more detailed information, please refer to display the total used lamp time. 2. Reset the lamp counter 1. Press W or X to reset lamp hours and press EXIT to access the lamp hour timer. Dust filters are clogged. 3. O : Orange light 5. An adjustment message will appear. 3. Indicators Illustration - Blank - : Light...
... projector for further help. The internal temperature is not replaced as this could cause damage. If the problem persists, contact qualified service personnel for 3 seconds to the following possible problems: 1. For more detailed information, please refer to display the total used lamp time. 2. Reset the lamp counter 1. Press W or X to reset lamp hours and press EXIT to access the lamp hour timer. Dust filters are clogged. 3. O : Orange light 5. An adjustment message will appear. 3. Indicators Illustration - Blank - : Light...

User Manual
Page 48
... well as the height of the projector. 44 Troubleshooting Troubleshooting Common problems & solutions THE PROJECTOR DOES NOT TURN ON. The projector and the screen are not aligned properly. Attempting to the input source device. Wait until the cooling down process has completed. The projector is no power from the projector. Check the connection. Remove the lens cap. BLURRED IMAGE Cause The projection lens is not correctly focused. Remove the lens cap. Remove the obstacle.
... well as the height of the projector. 44 Troubleshooting Troubleshooting Common problems & solutions THE PROJECTOR DOES NOT TURN ON. The projector and the screen are not aligned properly. Attempting to the input source device. Wait until the cooling down process has completed. The projector is no power from the projector. Check the connection. Remove the lens cap. BLURRED IMAGE Cause The projection lens is not correctly focused. Remove the lens cap. Remove the obstacle.


