
User Manual
Page 1
PB8260 Digital Projector Installation Series User's Manual Welcome
PB8260 Digital Projector Installation Series User's Manual Welcome

User Manual
Page 5
... • Do not look straight at the projector NOT stable. user's manual for safety of 100 to meet the latest standards for future reference. • In some countries, the line voltage is designed lens during operation. Important safety instructions Your BenQ projector is important that you connect your projector through a power stabilizer, surge protector or...
... • Do not look straight at the projector NOT stable. user's manual for safety of 100 to meet the latest standards for future reference. • In some countries, the line voltage is designed lens during operation. Important safety instructions Your BenQ projector is important that you connect your projector through a power stabilizer, surge protector or...

User Manual
Page 9
...compatibility (YPbPr) • Two PC input terminals and one PC output terminal • Replaceable dust filters The brightness of use. The projector offers the following features: • Making wireless connection with your laptop • Full-function remote control with laser pointer/ remote mouse... function • High quality manual zoom lens • One-key auto-adjustment to display the best picture quality • Digital keystone correction to correct distorted images...
...compatibility (YPbPr) • Two PC input terminals and one PC output terminal • Replaceable dust filters The brightness of use. The projector offers the following features: • Making wireless connection with your laptop • Full-function remote control with laser pointer/ remote mouse... function • High quality manual zoom lens • One-key auto-adjustment to display the best picture quality • Digital keystone correction to correct distorted images...
User Manual
Page 10
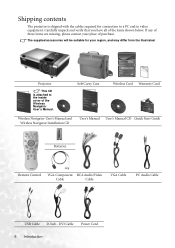
...connection to a PC and to the inside WUsierre'lsesMs aNnauvaigl ator cover of the Wireless Navigator P/N:53.J9401 User's Manual. Projector This CD is shipped with the cables required for your place of purchase. Carefully unpack and verify that you have all... Case PB8250 DiUnissgetiart'laslalMtPioraonujneScaetlroiers .001 1 .001 Wireless Card Warranty Card P/N:53.J940 Wireless Navigator User's Manual and Wireless Navigator Installation CD User's Manual User's Manual CD Quick Start Guide Batteries Remote Control VGA-Component RCA Audio/Video Cable Cable VGA Cable PC Audio ...
...connection to a PC and to the inside WUsierre'lsesMs aNnauvaigl ator cover of the Wireless Navigator P/N:53.J9401 User's Manual. Projector This CD is shipped with the cables required for your place of purchase. Carefully unpack and verify that you have all... Case PB8250 DiUnissgetiart'laslalMtPioraonujneScaetlroiers .001 1 .001 Wireless Card Warranty Card P/N:53.J940 Wireless Navigator User's Manual and Wireless Navigator Installation CD User's Manual User's Manual CD Quick Start Guide Batteries Remote Control VGA-Component RCA Audio/Video Cable Cable VGA Cable PC Audio ...

User Manual
Page 20
...; Do not service the card yourself like revising the software inside. Align the wireless card with BenQ PB8260 projector. Install Wireless Navigator with other devices. • The effective range of using this projector. Notes about the wireless card: • The warless card is securely in place. 3. Refer... is fully inserted. You will need to insert the wireless card to your projector and install the necessary software onto your laptop. Insert the wireless card to the Wireless Navigator User's Manual for each source. 3. The eject button pops out once the card is only...
...; Do not service the card yourself like revising the software inside. Align the wireless card with BenQ PB8260 projector. Install Wireless Navigator with other devices. • The effective range of using this projector. Notes about the wireless card: • The warless card is securely in place. 3. Refer... is fully inserted. You will need to insert the wireless card to your projector and install the necessary software onto your laptop. Insert the wireless card to the Wireless Navigator User's Manual for each source. 3. The eject button pops out once the card is only...
User Manual
Page 24
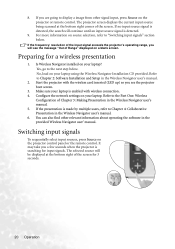
...Yes, go to display a image from other relevant information about operating the software in the Wireless Navigator user's manual. 2. Start the projector with wireless connection. 4. Make sure your laptop? You can also find other signal input, press Source on ... Setup in the provided Wireless Navigator user' manual. Preparing for input signals. Refer to Chapter 4: Collaborative Presentation in the Wireless Navigator user's manual. 5. Configure the network settings on your laptop is detected, the search will see the projector boot screen. 3. Is Wireless Navigator installed ...
...Yes, go to display a image from other relevant information about operating the software in the Wireless Navigator user's manual. 2. Start the projector with wireless connection. 4. Make sure your laptop? You can also find other signal input, press Source on ... Setup in the provided Wireless Navigator user' manual. Preparing for input signals. Refer to Chapter 4: Collaborative Presentation in the Wireless Navigator user's manual. 5. Configure the network settings on your laptop is detected, the search will see the projector boot screen. 3. Is Wireless Navigator installed ...
User Manual
Page 26
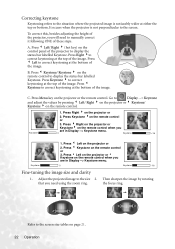
...projected image to the situation where the projected image is not perpendicular to manually correct it following ONE of the projector, you need to the screen. Then sharpen the image by pressing 3 Left/ Right 4 on the projector or 3 Keystone/ Keystone 4 on page 21. 22 Operation Refer to ...when you are in Display --> Keystone menu. Press 3 Left to correct keystoning at the top of the image. Press 4 Right on the projector or Keystone4 on the remote control when you are in Display --> Keystone menu. Press Keystone 4 to display the status bar labelled Keystone. Press...
...projected image to the situation where the projected image is not perpendicular to manually correct it following ONE of the projector, you need to the screen. Then sharpen the image by pressing 3 Left/ Right 4 on the projector or 3 Keystone/ Keystone 4 on page 21. 22 Operation Refer to ...when you are in Display --> Keystone menu. Press 3 Left to correct keystoning at the top of the image. Press 4 Right on the projector or Keystone4 on the remote control when you are in Display --> Keystone menu. Press Keystone 4 to display the status bar labelled Keystone. Press...
User Manual
Page 41
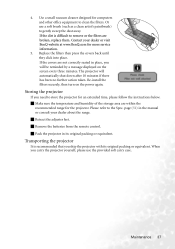
... storage area are broken, replace them. Retract the adjuster feet. 4. If the dirt is recommended that you need to store the projector for the projector. Re-install the filters securely, then turn on the screen every three minutes. Remove the batteries from the remote control. Pack the...filters are within the recommended range for an extended time, please follow the instructions below. page (51) in the manual or consult your dealer or visit BenQ website at www.BenQ.com for computers and other office equipment to gently sweep the dust away. Contact your dealer about the range. Use...
... storage area are broken, replace them. Retract the adjuster feet. 4. If the dirt is recommended that you need to store the projector for the projector. Re-install the filters securely, then turn on the screen every three minutes. Remove the batteries from the remote control. Pack the...filters are within the recommended range for an extended time, please follow the instructions below. page (51) in the manual or consult your dealer or visit BenQ website at www.BenQ.com for computers and other office equipment to gently sweep the dust away. Contact your dealer about the range. Use...


