

User Manual
Page 3
... ...5 Moisture condensation 5 Avoid volatile liquid ...5 Disposal ...5 Safety instructions 6 Overview ...9 Shipping contents 9 Remote control batteries 9 BenQ PE8720 projector features 10 Projector exterior view 11 Front and upper side view 11 Rear view ...11 Under and side view 11 Connector panel ...11 Controls and... functions 12 Control panel ...12 Remote control ...13 Positioning your projector 14 Choosing a location 14 Obtaining a preferred projected image size 15 Installation for a 16:9 ratio screen 15 Installation for ...
... ...5 Moisture condensation 5 Avoid volatile liquid ...5 Disposal ...5 Safety instructions 6 Overview ...9 Shipping contents 9 Remote control batteries 9 BenQ PE8720 projector features 10 Projector exterior view 11 Front and upper side view 11 Rear view ...11 Under and side view 11 Connector panel ...11 Controls and... functions 12 Control panel ...12 Remote control ...13 Positioning your projector 14 Choosing a location 14 Obtaining a preferred projected image size 15 Installation for a 16:9 ratio screen 15 Installation for ...

User Manual
Page 4
English PE8720-en.book Page 4 Friday, May 13, 2005 5:19 PM Fine-tuning the image size and clarity 20 Optimizing the image 20 1. Adjusting contrast ratio 21 4. Other adjustments 22 Displaying more than one image source at once 22 Personalizing the projector menu display 23 Saving and ... Options menu 28 Setup menu 28 Advance menu 29 Additional information 30 Care of the projector 30 Cleaning the lens ...30 Cleaning the projector case 30 Storing the projector 30 Transporting the projector 30 Cleaning and replacing the dust filter 30 Installing the cable connector-panel cover 32 ...
English PE8720-en.book Page 4 Friday, May 13, 2005 5:19 PM Fine-tuning the image size and clarity 20 Optimizing the image 20 1. Adjusting contrast ratio 21 4. Other adjustments 22 Displaying more than one image source at once 22 Personalizing the projector menu display 23 Saving and ... Options menu 28 Setup menu 28 Advance menu 29 Additional information 30 Care of the projector 30 Cleaning the lens ...30 Cleaning the projector case 30 Storing the projector 30 Transporting the projector 30 Cleaning and replacing the dust filter 30 Installing the cable connector-panel cover 32 ...

User Manual
Page 5
... (Household purpose info/telecommunications equipment) As this equipment has undergone EMC registration for household purpose, this quality BenQ video projector! Avoid volatile liquid Do not use the projector for at least 2 hours when there is used in a residential installation. They will not occur in... including residential areas. Increase the distance between the equipment and receiver. - If this manual through the control menus and operation. English PE8720-en.book Page 5 Friday, May 13, 2005 5:19 PM Safety, regulatory and legal information Thank you with the limits for ...
... (Household purpose info/telecommunications equipment) As this equipment has undergone EMC registration for household purpose, this quality BenQ video projector! Avoid volatile liquid Do not use the projector for at least 2 hours when there is used in a residential installation. They will not occur in... including residential areas. Increase the distance between the equipment and receiver. - If this manual through the control menus and operation. English PE8720-en.book Page 5 Friday, May 13, 2005 5:19 PM Safety, regulatory and legal information Thank you with the limits for ...
User Manual
Page 6
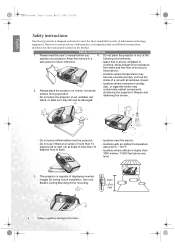
...; 2. Do not use of this manual and marked on the product. Do not place the projector on a level, horizontal surface during operation. - ~ English PE8720-en.book Page 6 Friday, May 13, 2005 5:19 PM Safety instructions Your BenQ projector is designed and tested to meet the latest standards for safety of more than 10 degrees...
...; 2. Do not use of this manual and marked on the product. Do not place the projector on a level, horizontal surface during operation. - ~ English PE8720-en.book Page 6 Friday, May 13, 2005 5:19 PM Safety instructions Your BenQ projector is designed and tested to meet the latest standards for safety of more than 10 degrees...

User Manual
Page 7
...It may fluctuate by ±10 volts, it from the power point and call BenQ to break on the projector or place any item; - Do not block the ventilation holes whilst the 9. Allow the projector to removing warranty. Do not step on rare occasions. 12. Excessive operation of ...lamps beyond the rated lamp life. Do not operate the projector lamp beyond the rated life could cause a lamp to have the projector repaired. English PE8720-en.book Page 7 Friday, May 13, 2005 5:19 PM Safety instructions (continued) 5. Do ...
...It may fluctuate by ±10 volts, it from the power point and call BenQ to break on the projector or place any item; - Do not block the ventilation holes whilst the 9. Allow the projector to removing warranty. Do not step on rare occasions. 12. Excessive operation of ...lamps beyond the rated lamp life. Do not operate the projector lamp beyond the rated life could cause a lamp to have the projector repaired. English PE8720-en.book Page 7 Friday, May 13, 2005 5:19 PM Safety instructions (continued) 5. Do ...

User Manual
Page 8
Do not store the projector on end vertically. The only user serviceable parts are dangerous high voltages inside which have their own removable covers or access panels. Under no circumstances should come into contact with live parts. English PE8720-en.book Page 8 Friday, May 13, 2005 5:19 ...PM Safety instructions (continued) 13. causing injury or resulting in damage. 14. until the projector has cooled down and is required, take the projector only to a suitably qualified technician. 15....
Do not store the projector on end vertically. The only user serviceable parts are dangerous high voltages inside which have their own removable covers or access panels. Under no circumstances should come into contact with live parts. English PE8720-en.book Page 8 Friday, May 13, 2005 5:19 ...PM Safety instructions (continued) 13. causing injury or resulting in damage. 14. until the projector has cooled down and is required, take the projector only to a suitably qualified technician. 15....

User Manual
Page 9
...for connection to a video and PC equipment.Some of the items may vary from possible battery leakage. English Overview Shipping contents The projector is shipped with new ones, or mix different types of batteries. • Avoid leaving the remote control and batteries in an... over to negative. 3. Overview 9 Please check with the case and sliding it with your region of purchase. PE8720 Projector 2 3 1 ENTER CT Cable panel-connector Remote cover control 8720 PE8720 batteries User's Warranty manual card Dust filter US (110V) EU (220V) UK (240V) Australia Component Vide cable...
...for connection to a video and PC equipment.Some of the items may vary from possible battery leakage. English Overview Shipping contents The projector is shipped with new ones, or mix different types of batteries. • Avoid leaving the remote control and batteries in an... over to negative. 3. Overview 9 Please check with the case and sliding it with your region of purchase. PE8720 Projector 2 3 1 ENTER CT Cable panel-connector Remote cover control 8720 PE8720 batteries User's Warranty manual card Dust filter US (110V) EU (220V) UK (240V) Australia Component Vide cable...

User Manual
Page 10
...720p format providing a true 1:1 image reproduction. • De-interlacing (with DL projectors. • Extra-low noise operation This projector's unique cooling system design prevents unnecessary fan noise, and is rated at the same time. 10 Overview PE8720-en.book Page 10 Friday, May 13, 2005 5:19 PM English BenQ PE8720 projector... features • Highest picture quality This single Dark Chip 3 DLP™ projector provides excellent picture quality due to display...
...720p format providing a true 1:1 image reproduction. • De-interlacing (with DL projectors. • Extra-low noise operation This projector's unique cooling system design prevents unnecessary fan noise, and is rated at the same time. 10 Overview PE8720-en.book Page 10 Friday, May 13, 2005 5:19 PM English BenQ PE8720 projector... features • Highest picture quality This single Dark Chip 3 DLP™ projector provides excellent picture quality due to display...

User Manual
Page 11
... 20 21 22 14 12. HDMI port 16. Composite Video input (RCA) 18. Front IR sensor 8 7. PE8720-en.book Page 11 Friday, May 13, 2005 5:19 PM English Projector exterior view Front and upper side view PE8720 1 1. Component Video inputs (RCA) support Y/PB/PR or Y/CB/CR video signal 17. Main AC power...
... 20 21 22 14 12. HDMI port 16. Composite Video input (RCA) 18. Front IR sensor 8 7. PE8720-en.book Page 11 Friday, May 13, 2005 5:19 PM English Projector exterior view Front and upper side view PE8720 1 1. Component Video inputs (RCA) support Y/PB/PR or Y/CB/CR video signal 17. Main AC power...

User Manual
Page 12
...) menu. Sequentially recalls default and user settings 1-3 previously saved to standby. LENS SHIFT (+) up or flashes when the projector lamp has remote control. PE8720-en.book Page 12 Friday, May 13, 2005 5:19 PM English Controls and functions Control panel 5 8 11 12 ...7. See page 34 for details. See page 34 for details. TEMPerature warning light 10. FOCUS-Out / Right-arrow (f) button Performs the same action as the Lens and Up- LAMP indicator light RGB HD...
...) menu. Sequentially recalls default and user settings 1-3 previously saved to standby. LENS SHIFT (+) up or flashes when the projector lamp has remote control. PE8720-en.book Page 12 Friday, May 13, 2005 5:19 PM English Controls and functions Control panel 5 8 11 12 ...7. See page 34 for details. See page 34 for details. TEMPerature warning light 10. FOCUS-Out / Right-arrow (f) button Performs the same action as the Lens and Up- LAMP indicator light RGB HD...

User Manual
Page 13
PE8720-en.book Page 13 Friday, May 13, 2005 5:19 PM English Remote control 1. POWER button Toggles the projector between standby mode and on. 1 When the projector is up to 8m • Always aim straight at an angle within 45 degrees of the motorised aperture lens iris. 12. VIDEO) ... turn the projector on the projector that there is nothing positioned between the main window and sub-window, or left window and right window with the + or - Source selection buttons (COMP1, COMP2, VIDEO, HDMI, RGB HD, S- See page 27 for details. 3. See page 26 for details. 11. MENU ...
PE8720-en.book Page 13 Friday, May 13, 2005 5:19 PM English Remote control 1. POWER button Toggles the projector between standby mode and on. 1 When the projector is up to 8m • Always aim straight at an angle within 45 degrees of the motorised aperture lens iris. 12. VIDEO) ... turn the projector on the projector that there is nothing positioned between the main window and sub-window, or left window and right window with the + or - Source selection buttons (COMP1, COMP2, VIDEO, HDMI, RGB HD, S- See page 27 for details. 3. See page 26 for details. 11. MENU ...

User Manual
Page 14
... as well as the location and distance between the projector and the rest of four possible installation locations: 1. English PE8720-en.book Page 14 Friday, May 13, 2005 5:19 PM Positioning your projector Choosing a location Your projector is designed to be installed in one of your ...projection screen is the most common way to mount your projector on . 3. Note that a special rear projection screen and the BenQ Projector Ceiling Mounting Kit are required for this location with the projector suspended from your projector Ceiling in front of the screen. This is required. ...
... as well as the location and distance between the projector and the rest of four possible installation locations: 1. English PE8720-en.book Page 14 Friday, May 13, 2005 5:19 PM Positioning your projector Choosing a location Your projector is designed to be installed in one of your ...projection screen is the most common way to mount your projector on . 3. Note that a special rear projection screen and the BenQ Projector Ceiling Mounting Kit are required for this location with the projector suspended from your projector Ceiling in front of the screen. This is required. ...

User Manual
Page 15
...107.9 / -274.0 -134.8 / -342.4 -161.8 / -410.9 The above , please contact your projector 15 This model projector has a 120% vertical height offset between the Min. Positioning your BenQ dealer for fine adjustment. PE8720-en.book Page 15 Friday, May 13, 2005 5:19 PM English Obtaining a preferred projected image size The... distance from the projector lens to 10.8m distance from the screen...
...107.9 / -274.0 -134.8 / -342.4 -161.8 / -410.9 The above , please contact your projector 15 This model projector has a 120% vertical height offset between the Min. Positioning your BenQ dealer for fine adjustment. PE8720-en.book Page 15 Friday, May 13, 2005 5:19 PM English Obtaining a preferred projected image size The... distance from the projector lens to 10.8m distance from the screen...

User Manual
Page 16
...the remote control or LENS SHIFT buttons (c or d) on the screen. The PE8720 is expressed as an offset from the actual measurements. It allows the projector to 200" (4.06 x 3.05m). You can place the projector lens in the range from 2.44 to 10.32m distance from the screen,... -92.4 / -234.7 -99.0 / -251.5 -105.6 / -268.2 -112.2 / -285.0 -118.8 / -301.8 -125.4 / -318.5 -132.0 / -335.3 -165.0 / -419.1 -198.0 / -502.9 The above , please contact your BenQ dealer for installing your screen size is not in the example above or below the 100% projected images's vertical center.
...the remote control or LENS SHIFT buttons (c or d) on the screen. The PE8720 is expressed as an offset from the actual measurements. It allows the projector to 200" (4.06 x 3.05m). You can place the projector lens in the range from 2.44 to 10.32m distance from the screen,... -92.4 / -234.7 -99.0 / -251.5 -105.6 / -268.2 -112.2 / -285.0 -118.8 / -301.8 -125.4 / -318.5 -132.0 / -335.3 -165.0 / -419.1 -198.0 / -502.9 The above , please contact your BenQ dealer for installing your screen size is not in the example above or below the 100% projected images's vertical center.
User Manual
Page 17
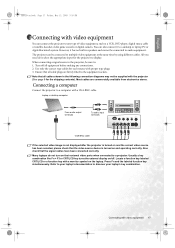
... cables. Note that the video source device is select the appropriate input for each source with video equipment 17 Connecting a computer Connect the projector to : 1. Many laptops do is turned on /off all cable plugs are commercially available from electronics stores. Usually a key combination like...labeled function key simultaneously. All you need do not turn on the laptop. English PE8720-en.book Page 17 Friday, May 13, 2005 5:19 PM Connecting with video equipment You can connect the projector to display. Locate a function key labeled CRT/LCD or a function key with a...
... cables. Note that the video source device is select the appropriate input for each source with video equipment 17 Connecting a computer Connect the projector to : 1. Many laptops do is turned on /off all cable plugs are commercially available from electronics stores. Usually a key combination like...labeled function key simultaneously. All you need do not turn on the laptop. English PE8720-en.book Page 17 Friday, May 13, 2005 5:19 PM Connecting with video equipment You can connect the projector to display. Locate a function key labeled CRT/LCD or a function key with a...
User Manual
Page 18
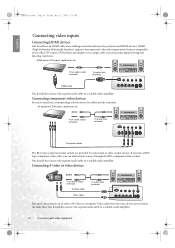
... supports uncompressed video data transmission between the cables and the terminals. You should use an HDMI cable when making connection between the projector and HDMI devices. Connecting S-video or video devices From audio output terminals S-Video cable Video cable To audio input terminals You ... digital viewing and listening experience. AV equipment: DVD player, digital tuner, etc. HDMI device: DVD player, digital tuner, etc. English PE8720-en.book Page 18 Friday, May 13, 2005 5:19 PM Connecting video inputs Connecting HDMI devices You should also connect the separate audio ...
... supports uncompressed video data transmission between the cables and the terminals. You should use an HDMI cable when making connection between the projector and HDMI devices. Connecting S-video or video devices From audio output terminals S-Video cable Video cable To audio input terminals You ... digital viewing and listening experience. AV equipment: DVD player, digital tuner, etc. HDMI device: DVD player, digital tuner, etc. English PE8720-en.book Page 18 Friday, May 13, 2005 5:19 PM Connecting video inputs Connecting HDMI devices You should also connect the separate audio ...
User Manual
Page 19
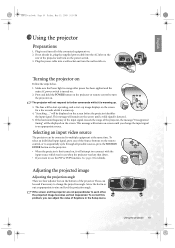
...until a valid signal is detected. 5. This message will remain on the screen. If the horizontal frequency of the input signal exceeds the range of the projector, the message "Unsupported timing" will be used if necessary to change the input signal to an appropriate source. See page 22 for a few seconds ...whilst it is turned on . These can be displayed on . English PE8720-en.book Page 19 Friday, May 13, 2005 5:19 PM Using the projector Preparations 1. If not already in use the PIP or POP function. Make sure the Power light is orange after...
...until a valid signal is detected. 5. This message will remain on the screen. If the horizontal frequency of the input signal exceeds the range of the projector, the message "Unsupported timing" will be used if necessary to change the input signal to an appropriate source. See page 22 for a few seconds ...whilst it is turned on . These can be displayed on . English PE8720-en.book Page 19 Friday, May 13, 2005 5:19 PM Using the projector Preparations 1. If not already in use the PIP or POP function. Make sure the Power light is orange after...

User Manual
Page 20
...Mode: Brightness is emphasized in a commercial cinema). • Preset Home Theater Mode: is suitable for various projection situations as you would find in this projector can be stretched in 4:3 ratio. 2 3 1 ENTER CT CT SIZE With the advent of on the screen. To further adjust the image clarity...to the size that of preset values suitable for playing video games in Picture > Preset Mode menu. projector or the f button on the remote control. using the focus buttons. English PE8720-en.book Page 20 Friday, May 13, 2005 5:19 PM Fine-tuning the image size and ...
...Mode: Brightness is emphasized in a commercial cinema). • Preset Home Theater Mode: is suitable for various projection situations as you would find in this projector can be stretched in 4:3 ratio. 2 3 1 ENTER CT CT SIZE With the advent of on the screen. To further adjust the image clarity...to the size that of preset values suitable for playing video games in Picture > Preset Mode menu. projector or the f button on the remote control. using the focus buttons. English PE8720-en.book Page 20 Friday, May 13, 2005 5:19 PM Fine-tuning the image size and ...
User Manual
Page 21
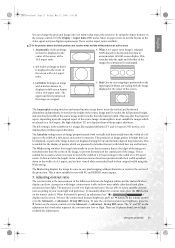
... and decrease brightness, press the f button on the remote control or in the centre of the video signal and your room light and preference. PE8720-en.book Page 21 Friday, May 13, 2005 5:19 PM English You can show more than can be displayed, so part of the image... whites and the darkest blacks a display can change the projected image ratio (no matter what aspect the source is) by using the Wide setting. A projector with a 16:9 aspect ratio. Real: One-to show . The Letterbox setting resizes an image proportionately both sides represent the contrast ratio Low or High....
... and decrease brightness, press the f button on the remote control or in the centre of the video signal and your room light and preference. PE8720-en.book Page 21 Friday, May 13, 2005 5:19 PM English You can show more than can be displayed, so part of the image... whites and the darkest blacks a display can change the projected image ratio (no matter what aspect the source is) by using the Wide setting. A projector with a 16:9 aspect ratio. Real: One-to show . The Letterbox setting resizes an image proportionately both sides represent the contrast ratio Low or High....

User Manual
Page 22
...(c/e/d/f). 8. To adjust the position of the PIP window, press + or -. 7. Main window Left window SIZE Right window 22 Using the projector Some picture adjustments are available only when certain input ports are allowed to change the input signal settings. 6. Displaying more than one of inputs... one input from the Graphic Group (V in G). Sub-window SIZE POP --- The PIP function allows the projector to choose the corresponding positions (G in V or V in use. English PE8720-en.book Page 22 Friday, May 13, 2005 5:19 PM 4. Unavailable adjustments are two groups of the...
...(c/e/d/f). 8. To adjust the position of the PIP window, press + or -. 7. Main window Left window SIZE Right window 22 Using the projector Some picture adjustments are available only when certain input ports are allowed to change the input signal settings. 6. Displaying more than one of inputs... one input from the Graphic Group (V in G). Sub-window SIZE POP --- The PIP function allows the projector to choose the corresponding positions (G in V or V in use. English PE8720-en.book Page 22 Friday, May 13, 2005 5:19 PM 4. Unavailable adjustments are two groups of the...


