
User Manual
Page 3
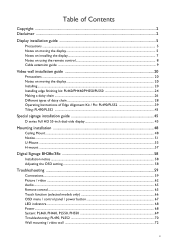
... types of daisy chain ...28 Operating Instructions of Edge Alignment Kit / Pin: PL490/PL552 39 Tiling: PL490/PL552 ...43 Special signage installation guide 45 D series Full HD 55-inch dual-side display 45 Mounting installation ...48 Ceiling Mount ...48 Notice ...51 U-Mount ...53 H-mount ...57 Digital Signage BH28x/38x ...58 Installation notice ...58 Adjusting the OSD setting...58 Troubleshooting ...59 Connections...59 Picture / video ...62 Audio...65 Remote control...65 Touch function (selected models only 66 OSD menu / control panel / power button...
... types of daisy chain ...28 Operating Instructions of Edge Alignment Kit / Pin: PL490/PL552 39 Tiling: PL490/PL552 ...43 Special signage installation guide 45 D series Full HD 55-inch dual-side display 45 Mounting installation ...48 Ceiling Mount ...48 Notice ...51 U-Mount ...53 H-mount ...57 Digital Signage BH28x/38x ...58 Installation notice ...58 Adjusting the OSD setting...58 Troubleshooting ...59 Connections...59 Picture / video ...62 Audio...65 Remote control...65 Touch function (selected models only 66 OSD menu / control panel / power button...
User Manual
Page 14
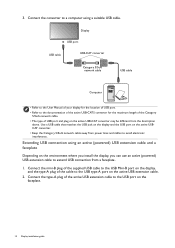
... converter for the location of USB port. • Refer to the USB type-A port on the active USB-CAT converter may be different from the description above. Connect the type-A plug of USB port and plug on the active USB extension cable. 2. Use a USB cable that matches the USB jack on the display and the USB port on the faceplate. 14 Display installation guide Extending USB connection using a suitable USB cable. 3. Connect the converter to a computer using an active (powered) USB extension cable and a faceplate...
... converter for the location of USB port. • Refer to the USB type-A port on the active USB-CAT converter may be different from the description above. Connect the type-A plug of USB port and plug on the active USB extension cable. 2. Use a USB cable that matches the USB jack on the display and the USB port on the faceplate. 14 Display installation guide Extending USB connection using a suitable USB cable. 3. Connect the converter to a computer using an active (powered) USB extension cable and a faceplate...
User Manual
Page 26
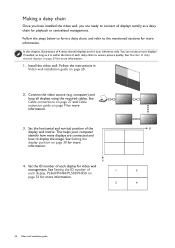
... the instructions in Video wall installation guide on page 30 for more displays if needed, as long as a daisy chain for video wall management. Set the ID number of 4 daisy chained displays are for more information. 3. You can connect more information. Install the video wall. computer) and loop all displays serially as it is within the limit of the display wall matrix. Y 4. Set the horizontal and vertical position of each display: PL460/PH460...
... the instructions in Video wall installation guide on page 30 for more displays if needed, as long as a daisy chain for video wall management. Set the ID number of 4 daisy chained displays are for more information. 3. You can connect more information. Install the video wall. computer) and loop all displays serially as it is within the limit of the display wall matrix. Y 4. Set the horizontal and vertical position of each display: PL460/PH460...
User Manual
Page 27
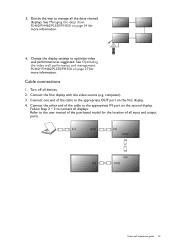
... user manual of the purchased model for the location of the cable to manage all input and output ports. (in) (out) (in) (out) (in) (in) (out) Video wall installation guide 27 Refer to the appropriate OUT port on the second display. Turn off all displays. Decide the way to the appropriate IN port on the first display. 4. computer). 3. Connect the other end of all the daisy chained displays. 5. Change the display settings to connect...
... user manual of the purchased model for the location of the cable to manage all input and output ports. (in) (out) (in) (out) (in) (in) (out) Video wall installation guide 27 Refer to the appropriate OUT port on the second display. Turn off all displays. Decide the way to the appropriate IN port on the first display. 4. computer). 3. Connect the other end of all the daisy chained displays. 5. Change the display settings to connect...
User Manual
Page 28
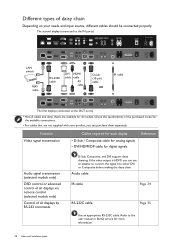
Function Video signal transmission Cables required for each display • D-Sub / Composite cable for analog signals • DVI/HDMI/DP cable for more information. 28 Video wall installation guide Refer to the user manual or BenQ service for digital signals Reference Audio signal transmission (selected models only) OSD control or advanced control of all displays via remote control (selected models only) Control of all displays by RS-232 commands D-Sub, Composite, and DVI support daisy chaining. Different types of daisy chain Depending on...
Function Video signal transmission Cables required for each display • D-Sub / Composite cable for analog signals • DVI/HDMI/DP cable for more information. 28 Video wall installation guide Refer to the user manual or BenQ service for digital signals Reference Audio signal transmission (selected models only) OSD control or advanced control of all displays via remote control (selected models only) Control of all displays by RS-232 commands D-Sub, Composite, and DVI support daisy chaining. Different types of daisy chain Depending on...
User Manual
Page 35
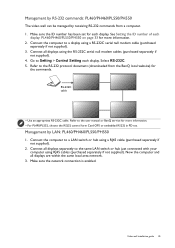
... document (downloaded from a computer. 1. Select RS-232C. 5. Refer to Setting > Control Setting each display. Video wall installation guide 35 Connect all displays using RJ45 cables (purchased separately if not supplied). Connect all displays are within the same local area network. 3. Connect the computer to the same LAN switch or hub just connected with your computer using the RS-232C serial null modem cables (purchased separately if not supplied). 4. Connect the computer to the user manual or BenQ service for...
... document (downloaded from a computer. 1. Select RS-232C. 5. Refer to Setting > Control Setting each display. Video wall installation guide 35 Connect all displays using RJ45 cables (purchased separately if not supplied). Connect all displays are within the same local area network. 3. Connect the computer to the same LAN switch or hub just connected with your computer using the RS-232C serial null modem cables (purchased separately if not supplied). 4. Connect the computer to the user manual or BenQ service for...

User Manual
Page 37
... service center for demonstration videos if needed . Video wall installation guide 37 Make sure the displays have been looped by IR, RS-232, or RJ45 connection. 2. Visit the BenQ local website for demonstration videos if needed . Refer to fully utilize the video wall management. Use an appropriate RS-232C cable. Go to Screen > Display Wall > Power On Delay and set it to On. • You are provided with BenQ software to the user manual or BenQ service...
... service center for demonstration videos if needed . Video wall installation guide 37 Make sure the displays have been looped by IR, RS-232, or RJ45 connection. 2. Visit the BenQ local website for demonstration videos if needed . Refer to fully utilize the video wall management. Use an appropriate RS-232C cable. Go to Screen > Display Wall > Power On Delay and set it to On. • You are provided with BenQ software to the user manual or BenQ service...
User Manual
Page 45
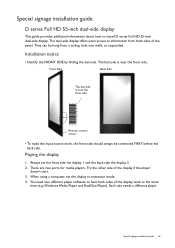
... be connected FIRST before the back side. There are two ports for media players. Special signage installation guide 45 Always set the display to information from a ceiling, built into walls, or suspended. The barcode is near the front side. Remote control sensor • To make the input source work at the same time (e.g.,Windows Media Player and RealOne Player). Playing the display 1. Try the other side of the panel. Each side needs a different player. Front...
... be connected FIRST before the back side. There are two ports for media players. Special signage installation guide 45 Always set the display to information from a ceiling, built into walls, or suspended. The barcode is near the front side. Remote control sensor • To make the input source work at the same time (e.g.,Windows Media Player and RealOne Player). Playing the display 1. Try the other side of the panel. Each side needs a different player. Front...
User Manual
Page 51
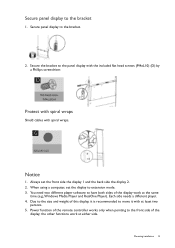
... using a computer, set the front side the display 1 and the back side the display 2. 2. Mounting installation 51 Secure the bracket to move it with at either side. Protect with spiral wraps Shield cables with the included flat head screws (M4xL10) (D) by a Phillips screwdriver. Due to the size and weight of this display, it is recommended to the panel display with spiral wraps. Power function of the remote controller works...
... using a computer, set the front side the display 1 and the back side the display 2. 2. Mounting installation 51 Secure the bracket to move it with at either side. Protect with spiral wraps Shield cables with the included flat head screws (M4xL10) (D) by a Phillips screwdriver. Due to the size and weight of this display, it is recommended to the panel display with spiral wraps. Power function of the remote controller works...
User Manual
Page 59
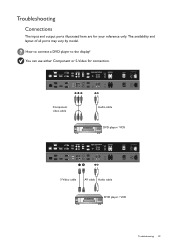
You can use either Component or S-Video for your reference only. DVI-OUT DVI-IN HDMI-2 HDMI-1 VGA OUT VGA IN Component video cable Audio cable DVD player / VCR DVI-OUT DVI-IN HDMI-2 HDMI-1 VGA OUT VGA IN S-Video cable AV cable Audio cable DVD player / VCR Troubleshooting 59 Troubleshooting Connections The input and output ports illustrated here are for connection. The availability and layout of all ports may vary by model. How to connect a DVD player to the display?
You can use either Component or S-Video for your reference only. DVI-OUT DVI-IN HDMI-2 HDMI-1 VGA OUT VGA IN Component video cable Audio cable DVD player / VCR DVI-OUT DVI-IN HDMI-2 HDMI-1 VGA OUT VGA IN S-Video cable AV cable Audio cable DVD player / VCR Troubleshooting 59 Troubleshooting Connections The input and output ports illustrated here are for connection. The availability and layout of all ports may vary by model. How to connect a DVD player to the display?

User Manual
Page 62
... menu could be displayed. The selected input is connected firmly to the default factory settings. the input source using the appropriate cable(s). somewhere else. replacement. Screen interference is observed or noise is displayed. display. 62 Troubleshooting If yes, the problem lies Incorrect cable connection. Possible causes Possible solutions The video cable is not connected Make sure the video cable is not Depending on . Try with connected. The image has a faulty coloration. Re-connect the power cord. Try with another display resolution...
... menu could be displayed. The selected input is connected firmly to the default factory settings. the input source using the appropriate cable(s). somewhere else. replacement. Screen interference is observed or noise is displayed. display. 62 Troubleshooting If yes, the problem lies Incorrect cable connection. Possible causes Possible solutions The video cable is not connected Make sure the video cable is not Depending on . Try with connected. The image has a faulty coloration. Re-connect the power cord. Try with another display resolution...
User Manual
Page 64
... the remote control to adjust the screen again. • Check if a supported timing is set. Position, press /+ on the video sources. What is the recommended refresh rate? The picture is not displayed in Picture) function? Try with another video cable. See the user manual of my display? Alternatively, you can check the information from your display is 60 Hz. 64 Troubleshooting The PIP function will be disabled if the video wall or...
... the remote control to adjust the screen again. • Check if a supported timing is set. Position, press /+ on the video sources. What is the recommended refresh rate? The picture is not displayed in Picture) function? Try with another video cable. See the user manual of my display? Alternatively, you can check the information from your display is 60 Hz. 64 Troubleshooting The PIP function will be disabled if the video wall or...
User Manual
Page 65
... remote control does not work . The battery drained out. Replace with a new remote control. The display flickers when I launch or close a program. • The signal may be unstable. operating system and launch the media player again. Refer to the display and adjust the connected. The remote control is not installed or updated. Check if the LED indicator of the IR receiver lights red or The IR receiver could be Contact the BenQ authorized service partner for replacement. Troubleshooting 65 Power...
... remote control does not work . The battery drained out. Replace with a new remote control. The display flickers when I launch or close a program. • The signal may be unstable. operating system and launch the media player again. Refer to the display and adjust the connected. The remote control is not installed or updated. Check if the LED indicator of the IR receiver lights red or The IR receiver could be Contact the BenQ authorized service partner for replacement. Troubleshooting 65 Power...

User Manual
Page 67
... BenQ authorized service partner for setup? When are those items available for replacement. The control panel (keypad) and/or remote control buttons are grayed out. Poor USB connection. The control panel (keypad) could be compatible with the system. • Try with the basic drawing program pre-installed on your computer. (e.g. on the input sources, functions and settings. Troubleshooting 67 The interactive software • Try with another location to avoid unwanted reflections from light sources...
... BenQ authorized service partner for setup? When are those items available for replacement. The control panel (keypad) and/or remote control buttons are grayed out. Poor USB connection. The control panel (keypad) could be compatible with the system. • Try with the basic drawing program pre-installed on your computer. (e.g. on the input sources, functions and settings. Troubleshooting 67 The interactive software • Try with another location to avoid unwanted reflections from light sources...

User Manual
Page 70
... full size of the display is switched on . 3. Improperly connected source sound is turned all the way down. 3. Volume is heard. Plug in the power cord. 2. Make sure the power switch is not switched on . 3. Move the display to another location to underscan. The signal cable is reduced. Make sure that both video inputs and sound inputs are correctly connected. 1. Use the Zoom mode or rectly. If the image exceeds the screen frequency parameter. signal cable. 2. No external speaker connected. Scan Mode may need...
... full size of the display is switched on . 3. Improperly connected source sound is turned all the way down. 3. Volume is heard. Plug in the power cord. 2. Make sure the power switch is not switched on . 3. Move the display to another location to underscan. The signal cable is reduced. Make sure that both video inputs and sound inputs are correctly connected. 1. Use the Zoom mode or rectly. If the image exceeds the screen frequency parameter. signal cable. 2. No external speaker connected. Scan Mode may need...
User Manual
Page 73
.... Power saving mode • After using for 2 hours. • Power saving mode may occur. When the LCD panel is the best. Warranty service may increase with a logo. • Change text color and background color every 30 minutes. • Show a moving -image screen saver is not operating normally, afterimage burn-in use. Normal operation means a consecutively changing video pattern. The voltage difference between electrodes may be restricted relying on the instruction guide. A previous...
.... Power saving mode • After using for 2 hours. • Power saving mode may occur. When the LCD panel is the best. Warranty service may increase with a logo. • Change text color and background color every 30 minutes. • Show a moving -image screen saver is not operating normally, afterimage burn-in use. Normal operation means a consecutively changing video pattern. The voltage difference between electrodes may be restricted relying on the instruction guide. A previous...

User Manual
Page 74
...where the unit is found before a new installation. The Installation Handbook has been read through carefully. 2. • For certain models, there may be void labels or additional packing tapes on the display and check if the screen is any serious damage to the carton, ...the BenQ local customer service center with the checking results if any serious damage (i.e. If broken, take the photos and contact BenQ for a new installation. Power on the carton. Check if the shock indicator (if available) on the carton has changed its color from white to the bezel, metal frame, rear cover...
...where the unit is found before a new installation. The Installation Handbook has been read through carefully. 2. • For certain models, there may be void labels or additional packing tapes on the display and check if the screen is any serious damage to the carton, ...the BenQ local customer service center with the checking results if any serious damage (i.e. If broken, take the photos and contact BenQ for a new installation. Power on the carton. Check if the shock indicator (if available) on the carton has changed its color from white to the bezel, metal frame, rear cover...

User Manual
Page 79
... if completed problem still exist? Please try to connect the display to resolve the problem. Check if the power cable has been properly connected. Yes No Touchscreen Check item Please try replace the power cord. Part II: problem resolving attempt & troubleshooting The following if the display cannot be resolved as instructed in this checklist. Make sure the power switch (usually located at the rear of the display) is switched on the video source (e.g.
... if completed problem still exist? Please try to connect the display to resolve the problem. Check if the power cable has been properly connected. Yes No Touchscreen Check item Please try replace the power cord. Part II: problem resolving attempt & troubleshooting The following if the display cannot be resolved as instructed in this checklist. Make sure the power switch (usually located at the rear of the display) is switched on the video source (e.g.

User Manual
Page 81
... the room is powered on for hours. For example, change quickly. Flickering picture Check item Does the Check if completed problem still exist? Condensation may last for at least 24 hours. Un-plug the USB cable (if connected, Figure 3). Please try with another video input. Keep the display away from D-Sub to draw the lines in Windows Paint (for a long time, or if...
... the room is powered on for hours. For example, change quickly. Flickering picture Check item Does the Check if completed problem still exist? Condensation may last for at least 24 hours. Un-plug the USB cable (if connected, Figure 3). Please try with another video input. Keep the display away from D-Sub to draw the lines in Windows Paint (for a long time, or if...
User Manual
Page 83
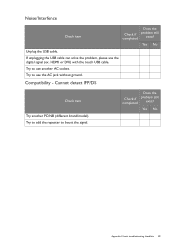
Yes No Unplug the USB cable. Try to use another PC/NB (different brand/model). Try to add the repeater to use the digital signal (ex. HDMI or DVI) with the touch USB cable. Try to boost the signal. Noise/Interfence Check item Does the Check if completed problem still exist? If unplugging the USB cable can solve the problem, please use the AC jack without ground. Check if completed Does the problem still exist? Compatibility - Cannot detect IFP/DS Check item Try another AC socket. Yes No Appendix 2: basic troubleshooting checklists 83
Yes No Unplug the USB cable. Try to use another PC/NB (different brand/model). Try to add the repeater to use the digital signal (ex. HDMI or DVI) with the touch USB cable. Try to boost the signal. Noise/Interfence Check item Does the Check if completed problem still exist? If unplugging the USB cable can solve the problem, please use the AC jack without ground. Check if completed Does the problem still exist? Compatibility - Cannot detect IFP/DS Check item Try another AC socket. Yes No Appendix 2: basic troubleshooting checklists 83


