

Digital Signage Warranty
Page 1
.... Interactive Flat Panel Standard Limited Warranty: Subject to process the replacement. Depot warranty service is not responsible for the shipping damages reported after such period. Repaired or Replaced Parts and Products: All repaired or replaced parts or products shall be warranted only for the remainder of the same or functionally equivalent model. BenQ Large Display - BenQ will , at its option, repair or replace the Product. BenQ is available...
.... Interactive Flat Panel Standard Limited Warranty: Subject to process the replacement. Depot warranty service is not responsible for the shipping damages reported after such period. Repaired or Replaced Parts and Products: All repaired or replaced parts or products shall be warranted only for the remainder of the same or functionally equivalent model. BenQ Large Display - BenQ will , at its option, repair or replace the Product. BenQ is available...

Digital Signage Warranty
Page 3
... REPAIR OR REPLACEMENT, AS APPLICABLE, UNDER THE WARRANTY SERVICES DESCRIBED HEREIN IS YOUR SOLE AND EXCLUSIVE REMEDY WITH RESPECT TO ANY BREACH OF THE BenQ LIMITED WARRANTY SET FORTH HEREIN. This limited warranty gives you . Please call Technical Support Center to BenQ or BenQ Authorized Service Provider without notice. You are subject to you specific legal rights. You may not apply to change without BenQ...
... REPAIR OR REPLACEMENT, AS APPLICABLE, UNDER THE WARRANTY SERVICES DESCRIBED HEREIN IS YOUR SOLE AND EXCLUSIVE REMEDY WITH RESPECT TO ANY BREACH OF THE BenQ LIMITED WARRANTY SET FORTH HEREIN. This limited warranty gives you . Please call Technical Support Center to BenQ or BenQ Authorized Service Provider without notice. You are subject to you specific legal rights. You may not apply to change without BenQ...
RP User Manual
Page 3
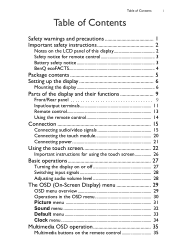
...6 Mounting the display 6 Parts of the display and their functions 9 Front/Rear panel 9 Input/output terminals 11 Remote control 13 Using the remote control 14 Connection 15 Connecting audio/video signals 15 Connecting the touch module 20 Connecting power 21 Using the touch screen 22 Important instructions for using the touch screen 26 Basic operations 27 Turning the display on or off 27 Switching input signals 28 Adjusting audio volume level 28 The OSD (On-Screen Display) menu 29 OSD menu overview 29 Operations in the OSD menu 30 Picture menu 31 Sound menu 32 Default menu...
...6 Mounting the display 6 Parts of the display and their functions 9 Front/Rear panel 9 Input/output terminals 11 Remote control 13 Using the remote control 14 Connection 15 Connecting audio/video signals 15 Connecting the touch module 20 Connecting power 21 Using the touch screen 22 Important instructions for using the touch screen 26 Basic operations 27 Turning the display on or off 27 Switching input signals 28 Adjusting audio volume level 28 The OSD (On-Screen Display) menu 29 OSD menu overview 29 Operations in the OSD menu 30 Picture menu 31 Sound menu 32 Default menu...
RP User Manual
Page 4
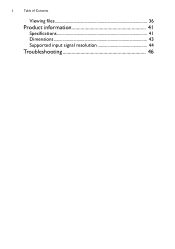
ii Table of Contents Viewing files 36 Product information 41 Specifications 41 Dimensions 43 Supported input signal resolution 44 Troubleshooting 46
ii Table of Contents Viewing files 36 Product information 41 Specifications 41 Dimensions 43 Supported input signal resolution 44 Troubleshooting 46
RP User Manual
Page 5
... the presence of important operating and maintenance (servicing) instructions in the literature accompanying the appliance. Check the installation regularly and maintain the display periodically to ensure the best working condition. • Use only the accessories approved or recommended by a qualified technician. No user serviceable parts inside . To completely disconnect this equipment from the AC mains, disconnect the power cord plug from the AC receptacle...
... the presence of important operating and maintenance (servicing) instructions in the literature accompanying the appliance. Check the installation regularly and maintain the display periodically to ensure the best working condition. • Use only the accessories approved or recommended by a qualified technician. No user serviceable parts inside . To completely disconnect this equipment from the AC mains, disconnect the power cord plug from the AC receptacle...

RP User Manual
Page 6
... is manufactured according to qualified service personnel. Refer all warnings. 4. Please handle with care. • The response time and brightness of the LCD panel may damage the panel and the external casing of the display, and the bright light will shine onto the LCD panel, as power-supply cord or plug is also liable to rain or moisture, does not operate normally, or has been...
... is manufactured according to qualified service personnel. Refer all warnings. 4. Please handle with care. • The response time and brightness of the LCD panel may damage the panel and the external casing of the display, and the bright light will shine onto the LCD panel, as power-supply cord or plug is also liable to rain or moisture, does not operate normally, or has been...
RP User Manual
Page 10
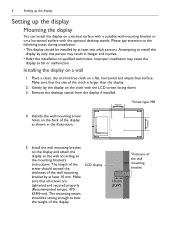
... the wall mounting screw holes on a flat, horizontal and object-free surface. Please pay attention to qualified technicians. Improper installation may result in the illustration. 400mm 5. Remove the desktop stands from the display if installed. 400mm *Screw type: M8 4. Make sure that all screws are tightened and secured properly. (Recommended torque: 470 635N•cm). The mounting means should exceed the thickness of the wall mounting bracket...
... the wall mounting screw holes on a flat, horizontal and object-free surface. Please pay attention to qualified technicians. Improper installation may result in the illustration. 400mm 5. Remove the desktop stands from the display if installed. 400mm *Screw type: M8 4. Make sure that all screws are tightened and secured properly. (Recommended torque: 470 635N•cm). The mounting means should exceed the thickness of the wall mounting bracket...

RP User Manual
Page 13
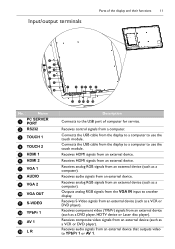
... Connects to the extended USB port of the display and their functions Front/Rear panel No. Parts of the display and their functions 9 Parts of computer from the display to a computer to a microphone. Connects the USB cable from PC USB at back. Receives composite video signals from an external device. Receives HDMI signals from an external device. Receives analog RGB signals from an external device. Opens or closes the OSD menu. • Freezes/vacates the screen. • Scrolls through settings...
... Connects to the extended USB port of the display and their functions Front/Rear panel No. Parts of the display and their functions 9 Parts of computer from the display to a computer to a microphone. Connects the USB cable from PC USB at back. Receives composite video signals from an external device. Receives HDMI signals from an external device. Receives analog RGB signals from an external device. Opens or closes the OSD menu. • Freezes/vacates the screen. • Scrolls through settings...
RP User Manual
Page 15
... another display. Receives HDMI signals from an external device. Outputs analog RGB signals from an external device (such as a computer). Receives composite video signals from an external device (such as a VCR or DVD player). Receives S-Video signals from an external device (such as a VCR or DVD player). Input/output terminals Parts of computer for service. Receives analog RGB signals from the VGA IN input to use the touch module. Connects the USB cable from an external device that outputs video to use the touch module. Receives control signals from an external...
... another display. Receives HDMI signals from an external device. Outputs analog RGB signals from an external device (such as a computer). Receives composite video signals from an external device (such as a VCR or DVD player). Receives S-Video signals from an external device (such as a VCR or DVD player). Input/output terminals Parts of computer for service. Receives analog RGB signals from the VGA IN input to use the touch module. Connects the USB cable from an external device that outputs video to use the touch module. Receives control signals from an external...

RP User Manual
Page 16
... 19 Sound Box L R 20 M USB 21 Power 22 PC USB Receives component video (YPbPr) signals from the AV IN input to another display with HDMI 2 or VGA 2. • Either front or back PC USB has to be used with a 3-in-1 3.5mm RCA cable. Connects to external stereo speakers. Connects to a headphone or an earphone. Accesses multimedia files on USB drives directly. Outputs composite video signals from an external device via 3.5mm RGB component video cable. Outputs digital audio signals via the supplied power cord. 12 Parts...
... 19 Sound Box L R 20 M USB 21 Power 22 PC USB Receives component video (YPbPr) signals from the AV IN input to another display with HDMI 2 or VGA 2. • Either front or back PC USB has to be used with a 3-in-1 3.5mm RCA cable. Connects to external stereo speakers. Connects to a headphone or an earphone. Accesses multimedia files on USB drives directly. Outputs composite video signals from an external device via 3.5mm RGB component video cable. Outputs digital audio signals via the supplied power cord. 12 Parts...
RP User Manual
Page 17
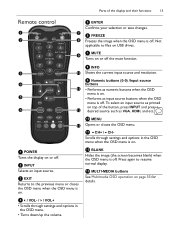
... on. 5 • Performs as VGA, HDMI, and etc. 10 MENU 133 Opens or closes the OSD menu. 11 CH+ /CHScrolls through settings and options in the OSD menu when the OSD menu is on. 1 POWER Turns the display on or off. 2 INPUT Selects an input source. 3 EXIT Returns to resume normal display. 13 MULTI-MEDIA buttons See Multimedia OSD operation on page 35 for details...
... on. 5 • Performs as VGA, HDMI, and etc. 10 MENU 133 Opens or closes the OSD menu. 11 CH+ /CHScrolls through settings and options in the OSD menu when the OSD menu is on. 1 POWER Turns the display on or off. 2 INPUT Selects an input source. 3 EXIT Returns to resume normal display. 13 MULTI-MEDIA buttons See Multimedia OSD operation on page 35 for details...
RP User Manual
Page 19
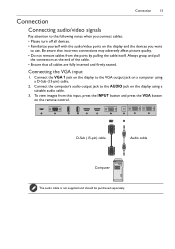
... output jack on the display to use. Connect the computer's audio output jack to the AUDIO jack on the remote control. D-Sub (15-pin) cable Audio cable Computer The audio cable is not supplied and should be purchased separately. Always grasp and pull the connectors at the end of the cable. • Ensure that incorrect connections may adversely affect picture quality. • Do not remove cables from this input, press the INPUT button...
... output jack on the display to use. Connect the computer's audio output jack to the AUDIO jack on the remote control. D-Sub (15-pin) cable Audio cable Computer The audio cable is not supplied and should be purchased separately. Always grasp and pull the connectors at the end of the cable. • Ensure that incorrect connections may adversely affect picture quality. • Do not remove cables from this input, press the INPUT button...
RP User Manual
Page 20
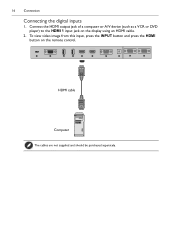
HDMI cable Computer The cables are not supplied and should be purchased separately. Connect the HDMI output jack of a computer or A/V device (such as a VCR or DVD player) to the HDMI 1 input jack on the remote control. 16 Connection Connecting the digital inputs 1. To view video image from this input, press the INPUT button and press the HDMI button on the display using an HDMI cable. 2.
HDMI cable Computer The cables are not supplied and should be purchased separately. Connect the HDMI output jack of a computer or A/V device (such as a VCR or DVD player) to the HDMI 1 input jack on the remote control. 16 Connection Connecting the digital inputs 1. To view video image from this input, press the INPUT button and press the HDMI button on the display using an HDMI cable. 2.
RP User Manual
Page 22
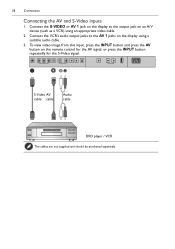
... display using an appropriate video cable. 2. To view video image from this input, press the INPUT button and press the AV button on an A/V device (such as a VCR) using a suitable audio cable. 3. S-Video AV cable cable Audio cable DVD player / VCR The cables are not supplied and should be purchased separately. Connect the VCR's audio output jacks to the output jack on the remote control for the AV signal, or press the INPUT button repeatedly for the S-Video signal. 18 Connection Connecting the AV and S-Video inputs...
... display using an appropriate video cable. 2. To view video image from this input, press the INPUT button and press the AV button on an A/V device (such as a VCR) using a suitable audio cable. 3. S-Video AV cable cable Audio cable DVD player / VCR The cables are not supplied and should be purchased separately. Connect the VCR's audio output jacks to the output jack on the remote control for the AV signal, or press the INPUT button repeatedly for the S-Video signal. 18 Connection Connecting the AV and S-Video inputs...
RP User Manual
Page 23
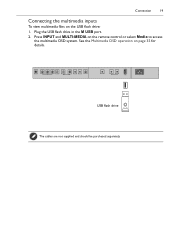
Press INPUT and MULTI-MEDIA on page 35 for details. Plug the USB flash drive in the M USB port. 2. See the Multimedia OSD operation on the remote control or select Media to access the multimedia OSD system. Connection 19 Connecting the multimedia inputs To view multimedia files on the USB flash drive: 1. USB flash drive The cables are not supplied and should be purchased separately.
Press INPUT and MULTI-MEDIA on page 35 for details. Plug the USB flash drive in the M USB port. 2. See the Multimedia OSD operation on the remote control or select Media to access the multimedia OSD system. Connection 19 Connecting the multimedia inputs To view multimedia files on the USB flash drive: 1. USB flash drive The cables are not supplied and should be purchased separately.
RP User Manual
Page 31
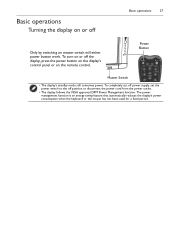
... used for a fixed period. Power Button Master Switch • The display's standby mode still consumes power. Basic operations Turning the display on or off position or disconnect the power cord from the power outlet. • The display follows the VESA approved DPM Power Management function. To completely cut off power supply, set the power switch to the off Basic operations 27 Only by switching on the remote control. To turn on or off the display, press the power button on the display's control panel...
... used for a fixed period. Power Button Master Switch • The display's standby mode still consumes power. Basic operations Turning the display on or off position or disconnect the power cord from the power outlet. • The display follows the VESA approved DPM Power Management function. To completely cut off power supply, set the power switch to the off Basic operations 27 Only by switching on the remote control. To turn on or off the display, press the power button on the display's control panel...

RP User Manual
Page 35
... User. Adjusts the backlight intensity for the screen. Properties such as Red, Green, and Blue can be adjusted further if color temperature is set to User. Available color temperatures are Auto, 4:3, 16:9, Zoom1, Zoom2, Overscan, Panorama, PointToPoint. Adjusts the color temperature. Properties such as Contrast, Brightness, Color, Sharpness, and Tint can be adjusted if the mode is set to User Sets the picture's aspect ratio. Aspect rations supported by each input: • HDMI: Auto...
... User. Adjusts the backlight intensity for the screen. Properties such as Red, Green, and Blue can be adjusted further if color temperature is set to User. Available color temperatures are Auto, 4:3, 16:9, Zoom1, Zoom2, Overscan, Panorama, PointToPoint. Adjusts the color temperature. Properties such as Contrast, Brightness, Color, Sharpness, and Tint can be adjusted if the mode is set to User Sets the picture's aspect ratio. Aspect rations supported by each input: • HDMI: Auto...
RP User Manual
Page 39
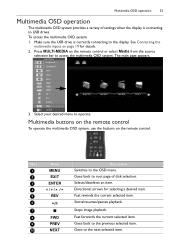
... OSD operation The multimedia OSD system provides a variety of disk selection. 3 ENTER Selects/deselects an item. 4 Directional arrows for details. 2. No Name Description 1 MENU Switches to the OSD menu. 2 EXIT Goes back to root page of settings when the display is correctly connecting to access the multimedia OSD system. See Connecting the multimedia inputs on the remote control or select Media from the source...
... OSD operation The multimedia OSD system provides a variety of disk selection. 3 ENTER Selects/deselects an item. 4 Directional arrows for details. 2. No Name Description 1 MENU Switches to the OSD menu. 2 EXIT Goes back to root page of settings when the display is correctly connecting to access the multimedia OSD system. See Connecting the multimedia inputs on the remote control or select Media from the source...

RP User Manual
Page 50
... to Supported input signal resolution on ? Have you locked the control panel buttons? Refer to Supported input signal resolution on page 44 to select a supported resolution and try again. • Are there any loose cable connections? 46 Troubleshooting Troubleshooting Problem No picture No sound The computer input image looks strange The control panel buttons do not work Solution Check the following : • Have you turned on the mute function on ? Turn on page 31) to let the display automatically...
... to Supported input signal resolution on ? Have you locked the control panel buttons? Refer to Supported input signal resolution on page 44 to select a supported resolution and try again. • Are there any loose cable connections? 46 Troubleshooting Troubleshooting Problem No picture No sound The computer input image looks strange The control panel buttons do not work Solution Check the following : • Have you turned on the mute function on ? Turn on page 31) to let the display automatically...

RP700+ Data Sheet
Page 1
...) Capacity Accuracy Touch Output Operation Temp (dC) Weight (without notice. Specifications subject to change without packing / with packing) Dimension (WxHxD) Bezel Width (T/B/L/R) Display Orientation Audio W (Amp) Audio Input Audio Output (L/R, RCA) Internal Spk/ External Spk Out (L/R) Line out (3.5mm) / Line in (3.5mm) MIC (3.5mm) Power (AC) Input / Output Power Switch VGA Input / Output HDMI Input / Output Composite video In Composite video Out Component In (YPbPr, RCA) S-Video In USB Player (Photo, Video) USB port (PC) RS232 Input FW Update OS supported (plug and play feature is...
...) Capacity Accuracy Touch Output Operation Temp (dC) Weight (without notice. Specifications subject to change without packing / with packing) Dimension (WxHxD) Bezel Width (T/B/L/R) Display Orientation Audio W (Amp) Audio Input Audio Output (L/R, RCA) Internal Spk/ External Spk Out (L/R) Line out (3.5mm) / Line in (3.5mm) MIC (3.5mm) Power (AC) Input / Output Power Switch VGA Input / Output HDMI Input / Output Composite video In Composite video Out Component In (YPbPr, RCA) S-Video In USB Player (Photo, Video) USB port (PC) RS232 Input FW Update OS supported (plug and play feature is...


