

Digital Signage Warranty
Page 1
... continental United States, Hawaii, and Alaska, you purchased a BenQ product in materials or workmanship under normal consumer use new or reconditioned components or parts to the exclusions set forth below, BenQ America Corp. ("BenQ") warrants the BenQ Large Display - Interactive Flat Panel Standard Limited Warranty: Subject to repair the Product, or replace the Product with a brand new replacement. BenQ will , at its option, repair or replace the Product.
... continental United States, Hawaii, and Alaska, you purchased a BenQ product in materials or workmanship under normal consumer use new or reconditioned components or parts to the exclusions set forth below, BenQ America Corp. ("BenQ") warrants the BenQ Large Display - Interactive Flat Panel Standard Limited Warranty: Subject to repair the Product, or replace the Product with a brand new replacement. BenQ will , at its option, repair or replace the Product.

Digital Signage Warranty
Page 3
... damages for saving (backing up) any programs, data or removable storage media. YOU AGREE THAT REPAIR OR REPLACEMENT, AS APPLICABLE, UNDER THE WARRANTY SERVICES DESCRIBED HEREIN IS YOUR SOLE AND EXCLUSIVE REMEDY WITH RESPECT TO ANY BREACH OF THE BenQ LIMITED WARRANTY SET FORTH HEREIN. This limited warranty gives you . You may not apply to change without BenQ's authorization. Hours: M-F 8:30am - 5:30pm PST...
... damages for saving (backing up) any programs, data or removable storage media. YOU AGREE THAT REPAIR OR REPLACEMENT, AS APPLICABLE, UNDER THE WARRANTY SERVICES DESCRIBED HEREIN IS YOUR SOLE AND EXCLUSIVE REMEDY WITH RESPECT TO ANY BREACH OF THE BenQ LIMITED WARRANTY SET FORTH HEREIN. This limited warranty gives you . You may not apply to change without BenQ's authorization. Hours: M-F 8:30am - 5:30pm PST...

RP840G User Manual
Page 3
... control 3 Battery safety notice 3 BenQ ecoFACTS 4 Package contents 5 Setting up the display 6 Mounting the display 6 Parts of the display and their functions 8 Front panel 8 Input/output terminals 9 Remote control 10 Using the remote control 12 Connection 14 Connecting power 20 Using the touch screen 21 Important instructions for using the touch screen 25 Menu operations 26 One touch menu operation 26 Setting menu 26 More settings 28 Android system interface 36 Product information 44 Specifications 44 Dimensions 46 Supported input signal resolution 47 Troubleshooting...
... control 3 Battery safety notice 3 BenQ ecoFACTS 4 Package contents 5 Setting up the display 6 Mounting the display 6 Parts of the display and their functions 8 Front panel 8 Input/output terminals 9 Remote control 10 Using the remote control 12 Connection 14 Connecting power 20 Using the touch screen 21 Important instructions for using the touch screen 25 Menu operations 26 One touch menu operation 26 Setting menu 26 More settings 28 Android system interface 36 Product information 44 Specifications 44 Dimensions 46 Supported input signal resolution 47 Troubleshooting...

RP840G User Manual
Page 4
... prevent personal injuries, mounting the display or installing desktop stands is effectively grounded through normal household wiring. For your safety, if you are a major cause of electric shock, do not remove covers. Make sure that the surface and fixing points are strong enough to the presence of important operating and maintenance (servicing) instructions in a position which is required before use.
... prevent personal injuries, mounting the display or installing desktop stands is effectively grounded through normal household wiring. For your safety, if you are a major cause of electric shock, do not remove covers. Make sure that the surface and fixing points are strong enough to the presence of important operating and maintenance (servicing) instructions in a position which is required before use.

RP840G User Manual
Page 5
... display weights more than the other apparatus (including amplifiers) that produce heat. 9. Do not block any way, such as power-supply cord or plug is used, use caution when moving the cart/apparatus combination to rain or moisture, does not operate normally, or has been dropped. Protect the power cord from being walked on the LCD panel of this display • The Liquid Crystal Display (LCD) panel...
... display weights more than the other apparatus (including amplifiers) that produce heat. 9. Do not block any way, such as power-supply cord or plug is used, use caution when moving the cart/apparatus combination to rain or moisture, does not operate normally, or has been dropped. Protect the power cord from being walked on the LCD panel of this display • The Liquid Crystal Display (LCD) panel...

RP840G User Manual
Page 6
... from time to the design specifications. Consult your product may be shortened. Failure to water or moisture. This condensation will not affect the operation of the batteries, wipe it 's a natural phenomenon and will usually disappear after initial use of the wrong type of the LCD technology and is no object between the remote control and the remote sensor of time, otherwise...
... from time to the design specifications. Consult your product may be shortened. Failure to water or moisture. This condensation will not affect the operation of the batteries, wipe it 's a natural phenomenon and will usually disappear after initial use of the wrong type of the LCD technology and is no object between the remote control and the remote sensor of time, otherwise...

RP840G User Manual
Page 9
... to bear the weight of the display. LCD display 10 mm (0.39") Thickness of the display as shown in danger and injuries. • Refer the installation to install this display by at least 10 mm. Identify the wall mounting screw holes on the back of the wall mounting bracket Remove the desktop stands from the display if installed. *Screw type: M8 4. Make sure that the size of the wall mounting bracket by at least...
... to bear the weight of the display. LCD display 10 mm (0.39") Thickness of the display as shown in danger and injuries. • Refer the installation to install this display by at least 10 mm. Identify the wall mounting screw holes on the back of the wall mounting bracket Remove the desktop stands from the display if installed. *Screw type: M8 4. Make sure that the size of the wall mounting bracket by at least...

RP840G User Manual
Page 12
... 13 POWER SWITCH Description Connects USB devices such as USB keyboards, USB mice, and USB flash drives. External computer audio input. External computer image input. 9 Parts of the display and their functions Input/output terminals HDMI4(4K2K) HDMI4(4K2K) No. Default touch function is available under internal computer, when connecting external computer, besides connecting external computer VGA and audio signals, external computer's USB port needs to open and shut down AC power supply. Connected to display devices with an HDMI output, a set-top-box, or other video...
... 13 POWER SWITCH Description Connects USB devices such as USB keyboards, USB mice, and USB flash drives. External computer audio input. External computer image input. 9 Parts of the display and their functions Input/output terminals HDMI4(4K2K) HDMI4(4K2K) No. Default touch function is available under internal computer, when connecting external computer, besides connecting external computer VGA and audio signals, external computer's USB port needs to open and shut down AC power supply. Connected to display devices with an HDMI output, a set-top-box, or other video...

RP840G User Manual
Page 13
... computer program window close button. 7 Numeric buttons Performs as numeric buttons. 8 Display Shows the current input source and information. 9 TV channel return key. 10 INPUT Selects the input source. 11 HOME Andriod system main screen button. 12 MENU Opens or closes the OSD menu. 13 Red button TV channel function button. 15 Green button TV channel function button. 15 Yellow button TV channel function button. 16 Blue button TV channel function button. Remote control 1 Turns the display on or off the mute function. Parts of the display...
... computer program window close button. 7 Numeric buttons Performs as numeric buttons. 8 Display Shows the current input source and information. 9 TV channel return key. 10 INPUT Selects the input source. 11 HOME Andriod system main screen button. 12 MENU Opens or closes the OSD menu. 13 Red button TV channel function button. 15 Green button TV channel function button. 15 Yellow button TV channel function button. 16 Blue button TV channel function button. Remote control 1 Turns the display on or off the mute function. Parts of the display...

RP840G User Manual
Page 17
... USB port of the display supports easy Plug-and-Play operation. Avoid connecting the display to a face plate device which may cause failures in touch operations. • If any ghost image occurs, please try to respective input source. To view images from this input, press the INPUT button on the computer. The touch module of a computer using a D-Sub (15-pin) cable. 2. Connect the computer's audio output jack to install additional drivers on the remote control...
... USB port of the display supports easy Plug-and-Play operation. Avoid connecting the display to a face plate device which may cause failures in touch operations. • If any ghost image occurs, please try to respective input source. To view images from this input, press the INPUT button on the computer. The touch module of a computer using a D-Sub (15-pin) cable. 2. Connect the computer's audio output jack to install additional drivers on the remote control...

RP840G User Manual
Page 18
Connect the HDMI output jack of a computer or A/V device (such as a VCR or DVD player) to respective input source. 15 Connection Connecting the digital inputs 1. HDMI4(4K2K) (MHL) HDMI cable DVD player The applicable cable is not supplied and should be purchased separately. To view images from this input, press the INPUT button on the remote control to switch to the HDMI input jack on the display using an HDMI cable. 2.
Connect the HDMI output jack of a computer or A/V device (such as a VCR or DVD player) to respective input source. 15 Connection Connecting the digital inputs 1. HDMI4(4K2K) (MHL) HDMI cable DVD player The applicable cable is not supplied and should be purchased separately. To view images from this input, press the INPUT button on the remote control to switch to the HDMI input jack on the display using an HDMI cable. 2.

RP840G User Manual
Page 19
AV cable Video Game Console DVD player Camcorder Set Top Box VCR Satellite Receiver The applicable cable is not supplied and should be purchased separately. Connect the VCR's audio output jacks to respective input source. Connection 16 Connecting the AV inputs 1. To view images from this input, press the INPUT button on the remote control to switch to the AV IN jacks on an A/V device (such as a VCR) using a suitable audio cable. 3. Connect the AV IN jack on the display to the output jack on the display using an appropriate video cable. 2.
AV cable Video Game Console DVD player Camcorder Set Top Box VCR Satellite Receiver The applicable cable is not supplied and should be purchased separately. Connect the VCR's audio output jacks to respective input source. Connection 16 Connecting the AV inputs 1. To view images from this input, press the INPUT button on the remote control to switch to the AV IN jacks on an A/V device (such as a VCR) using a suitable audio cable. 3. Connect the AV IN jack on the display to the output jack on the display using an appropriate video cable. 2.

RP840G User Manual
Page 21
Press INPUT to switch to the respective jacks of the devices. 2. Use D-Sub cable and audio cable to connect from VGA OUT and EARPHONE to PC port. Set internal computer as VGA output or multi-screen display. Press on the remote control to turn on . 3. Connection 18 Connecting the video output For computer: 1. Audio cable D-Sub (15-pin) cable Plug in power cord, and switch power on the display.
Press INPUT to switch to the respective jacks of the devices. 2. Use D-Sub cable and audio cable to connect from VGA OUT and EARPHONE to PC port. Set internal computer as VGA output or multi-screen display. Press on the remote control to turn on . 3. Connection 18 Connecting the video output For computer: 1. Audio cable D-Sub (15-pin) cable Plug in power cord, and switch power on the display.
RP840G User Manual
Page 22
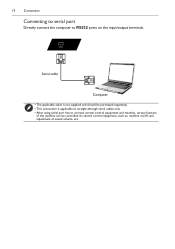
19 Connection Connecting to serial port Directly connect the computer to connect central control equipment and machine, certain function of sound volume, etc. Serial cable Computer • The applicable cable is not supplied and should be purchased separately. • This connection is applicable to straight-through serial cables only. • After using serial port line to RS232 ports on /off, and adjustment of the machine can be controlled via central control equipment, such as: machine on the input/output terminals.
19 Connection Connecting to serial port Directly connect the computer to connect central control equipment and machine, certain function of sound volume, etc. Serial cable Computer • The applicable cable is not supplied and should be purchased separately. • This connection is applicable to straight-through serial cables only. • After using serial port line to RS232 ports on /off, and adjustment of the machine can be controlled via central control equipment, such as: machine on the input/output terminals.

RP840G User Manual
Page 23
... use a power cord which appears damaged or frayed, or change the plug type on the power cord. • Be aware of the power loading when you intend to move the display. Connection 20 Connecting power Plug one end of the power cord into the Power jack on the display and the other end into an appropriate power outlet (if the outlet is switched, turn on the switch). • The supplied power cord is suitable for use...
... use a power cord which appears damaged or frayed, or change the plug type on the power cord. • Be aware of the power loading when you intend to move the display. Connection 20 Connecting power Plug one end of the power cord into the Power jack on the display and the other end into an appropriate power outlet (if the outlet is switched, turn on the switch). • The supplied power cord is suitable for use...

RP840G User Manual
Page 31
...&input Backup&reset Date&time About device Description To view current network status and network preferences of sound output can be adjusted here. To view system information in Android. Android settings When the input source is set visual preferences on the remote control or click blank area outside menu with the touch pen to enter more settings. To set date, time, and their formats in Android. To view memory consumption of the screen...
...&input Backup&reset Date&time About device Description To view current network status and network preferences of sound output can be adjusted here. To view system information in Android. Android settings When the input source is set visual preferences on the remote control or click blank area outside menu with the touch pen to enter more settings. To set date, time, and their formats in Android. To view memory consumption of the screen...

RP840G User Manual
Page 52
... the power indicator of the Auto Adjust function is not satisfactory, use the Phase, Horizontal Pos. Make sure that all cables are connected firmly. • Have you turned on the mute function on ? Refer to Supported input signal resolution on the computer? Make sure that all cables are connected firmly. • Have you locked the control panel buttons? functions to select a supported resolution and try again. 49 Troubleshooting Troubleshooting Problem No picture No sound...
... the power indicator of the Auto Adjust function is not satisfactory, use the Phase, Horizontal Pos. Make sure that all cables are connected firmly. • Have you turned on the mute function on ? Refer to Supported input signal resolution on the computer? Make sure that all cables are connected firmly. • Have you locked the control panel buttons? functions to select a supported resolution and try again. 49 Troubleshooting Troubleshooting Problem No picture No sound...

RP840G User Manual
Page 53
... menu. 1. Check whether driver is set sleep or not. 2. Adjust clock and phase position in menu. 2. Turn off the infrared function of article touched is no signal automatic shutdown. 1. Select automatic correction in menu. 1. Troubleshooting 50 The remote control does not work Remote control failure Machine automatically shutdown Signal out of range Background has vertical lines or streaks Image lack of color, color is incorrect Display format that is sudden power...
... menu. 1. Check whether driver is set sleep or not. 2. Adjust clock and phase position in menu. 2. Turn off the infrared function of article touched is no signal automatic shutdown. 1. Select automatic correction in menu. 1. Troubleshooting 50 The remote control does not work Remote control failure Machine automatically shutdown Signal out of range Background has vertical lines or streaks Image lack of color, color is incorrect Display format that is sudden power...
RP840G User Manual
Page 54
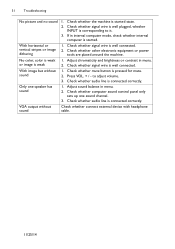
Check whether other electronic equipment or power tools are placed around the machine. 1. Check whether signal wire is connected correctly. to it. 3. Check whether computer sound control panel only sets up one speaker has sound VGA output without sound 1. Check whether audio line is well connected. 1. Adjust sound balance in menu. 2. Adjust chromaticity and brightness or contrast in menu. 2. 51 Troubleshooting No picture and no sound With horizontal or vertical stripes or...
Check whether other electronic equipment or power tools are placed around the machine. 1. Check whether signal wire is connected correctly. to it. 3. Check whether computer sound control panel only sets up one speaker has sound VGA output without sound 1. Check whether audio line is well connected. 1. Adjust sound balance in menu. 2. Adjust chromaticity and brightness or contrast in menu. 2. 51 Troubleshooting No picture and no sound With horizontal or vertical stripes or...

Specsheet
Page 1
.... Specifications Screen Diagonal Backlight Resolution Aspect Ratio Brightness Contrast Ratio Viewing Angle Color gamut (x% NTSC) Frame Rate Response Time Panel bit Light life Orientation Touch Technology Number of touches Touch interface Thickness Hardness AG coating Speaker Built-in speaker Input Output Input/Output Terminals 1 USB 2 HDMI IN 3 VGA OUT 4 AUDIO IN 5 VGA IN 6 TOUCH 7 AV IN 8 COAX OUT 9 RS232 10 EARPHONE 11 WAN 12 AC IN 13 POWER SWITCH OS Supported Dimensions(W x H x D) Weight Power supply Power consumption...
.... Specifications Screen Diagonal Backlight Resolution Aspect Ratio Brightness Contrast Ratio Viewing Angle Color gamut (x% NTSC) Frame Rate Response Time Panel bit Light life Orientation Touch Technology Number of touches Touch interface Thickness Hardness AG coating Speaker Built-in speaker Input Output Input/Output Terminals 1 USB 2 HDMI IN 3 VGA OUT 4 AUDIO IN 5 VGA IN 6 TOUCH 7 AV IN 8 COAX OUT 9 RS232 10 EARPHONE 11 WAN 12 AC IN 13 POWER SWITCH OS Supported Dimensions(W x H x D) Weight Power supply Power consumption...


